Friday, the 14th January was an eventful day for us Bangalore Bloggers. USA Pears company called out for a bloggers and media meet at Caperberry to celebrate and promote USA Pears festival. This event came into light when Madhuri of Cook-Curry-Nook contacted me asking if I would like to be a part of this bloggers event. I lost out on similar events in the past and didn't surely want to skip this chance. Least, to meet the bloggers whom I have associated with virtually till now. I was looking forward to this.

I quickly nodded a yes to Madhuri, but still unsure on the back of my mind if I would be able to make it to the event. Considering that Friday is a working day for me I pondered if I would actually get a day off from work, since it was festival time and many at my workplace would have planned leaves in advance to get a nice stretched weekend. However, I was fortunate to get a day off and consider lucky enough to attend this event which was scheduled at noon 12.30 pm - 2.30 pm.


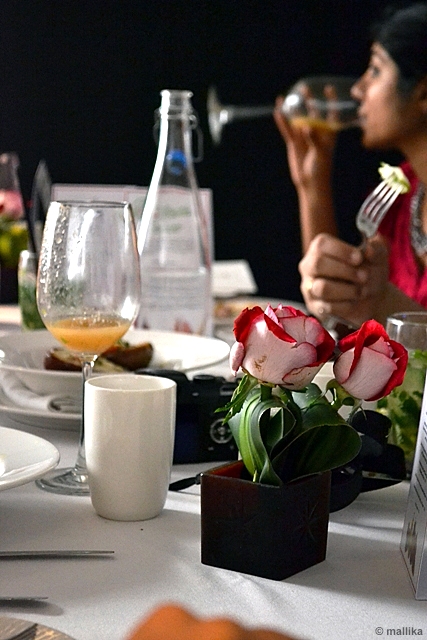
It was a quiet food testing and tasting event attended by few bloggers and media personnel. Caperberry on Dickenson Road, a neat and an aesthetically designed art studio cum restaurant was a perfect host to this event.


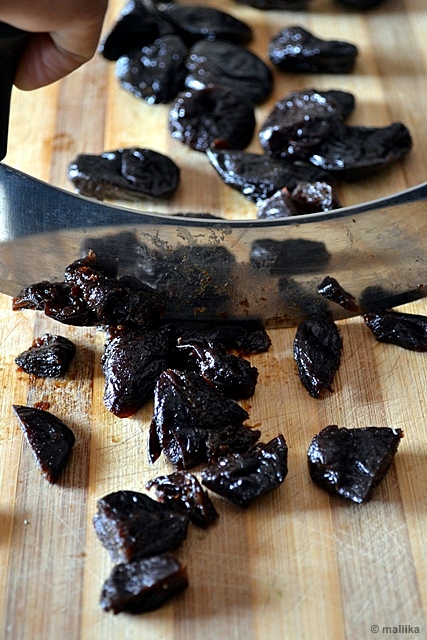
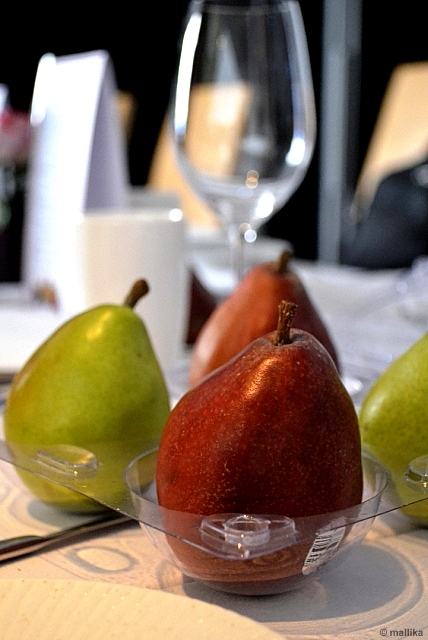
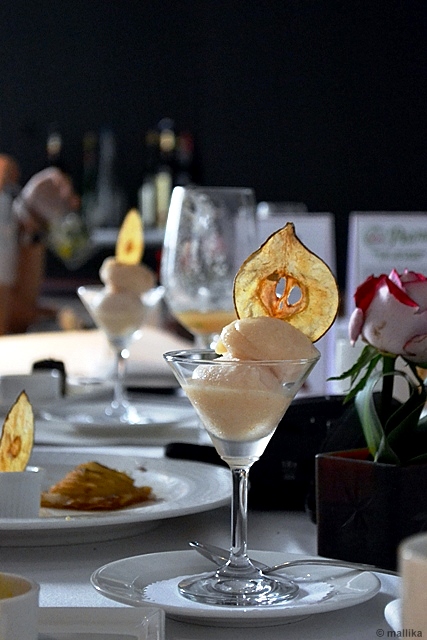
The imported Pears offered by USA Pears for tasting were sweet with a buttery texture, unlike the Chinese counterparts which have grainy texture similar to apples. Though I have tasted California Prunes and Apples from the same company and also and used them in my recipes earlier, these imported Pears were the first time for my taste buds. To begin with we had an introduction to US Pears from their representative, Rachana who explained well their distinction from the Chinese counterparts. This sweetness and texture make them fantastic ingredient in cocktails, drinks and desserts.


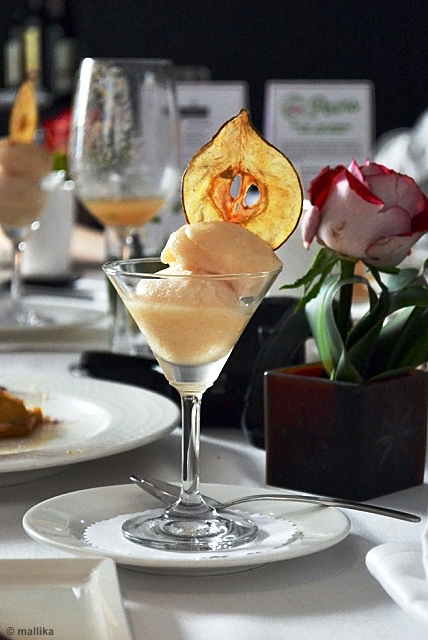
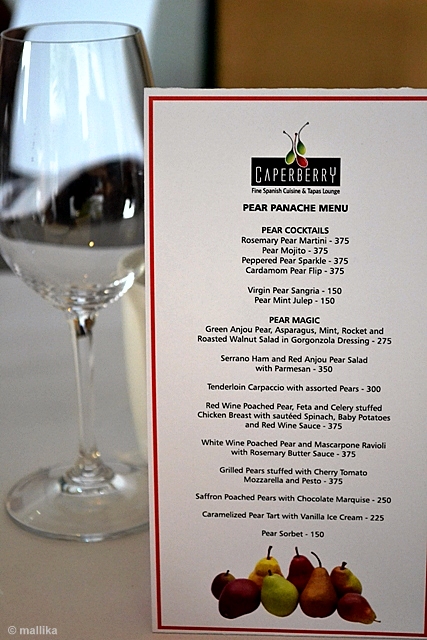
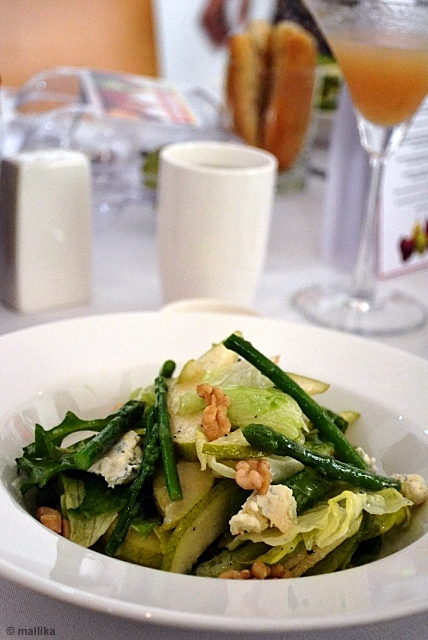
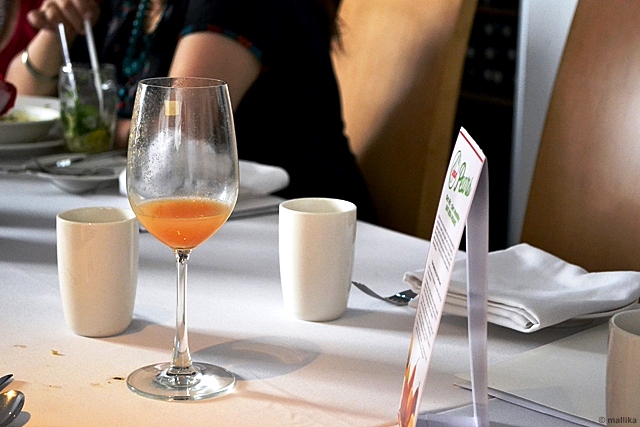
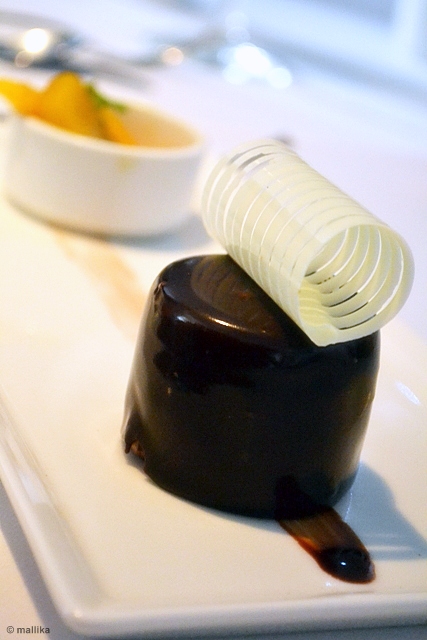
Most of us bloggers being vegetarians did not have any difficulty in choices. Menu was limited and had veg and non veg options to choose from. The cocktails offered had a good variety to chose from and they weren't disappointing at all. Pear dominated the main course too. For the main course, I chose White Wine Poached Pears and Mascarpone Ravioli with Rosemary Butter Sauce. Bland as Raviolis tend to be, I consider the Grilled Pears Stuffed with Cherry Tomato Mozzarella and Pesto better in body and flavor. It's a must try if you plan to visit this place. It was Pears on every course, on every plate!


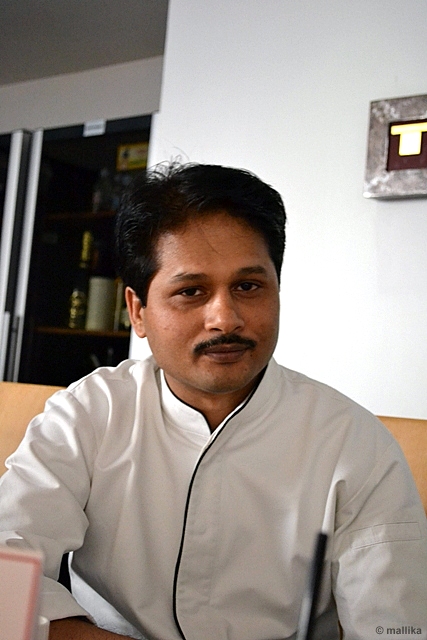
We hoped there would be a live demo of cooking with Pears, but unfortunately as a testing and tasting event, there was no live cooking demonstrated. Chef, Abhijit Saha took some time out to answer queries we had on cooking with Pears and was kind enough to answer them all.

We are prone to think that fruits always pair well in desserts or drinks, rather than being a core ingredient in a main course dish or a savory. This festival helped break all the traditional norms and school of thoughts. It showed us how well one could use a fruit and pair it with complimenting ingredients to create an exotic dish.


The festival offered us a good chance to taste some great imported US Pear and I hope to use more of these in my forthcoming cooking.It also gave me an opportunity to meet some of the food bloggers whom I have connected only through the web space till now.


Wishing all my readers a Happy Lodhi / Makara Sankranthi / Pongal. Lodhi, Pongal, Sankranthi, all signify a festival of harvest in different names in the vast and diverse culture of our nation. It also marks the end of winter season. This festival is celebrated in innumerable ways across the country depending on the climate, location, agricultural environment and cultural background of the people.

Though we don't really celebrate this festival with much grandeur at home, over years we've made sure that atleast a traditional sweet dish accompanies our regular lunch course, in a way saying that we did celebrate the festival in a small way :) From the time I have taken over my kitchen, what I love cooking during Sankranthi is two versions of Pongal, the sweet and the spicy one. While I have a huge inclination for the spicy version, which I like to make often apart from the festival itself, the sweeter version is more popular with my husband. It renders him some sweet memories of his childhood.

Ideally on this day, what you would probably expect from me is a post on traditional recipe here. Unfortunately, it's been a hectic day for me and I have been unable to take pictures of what was cooking in my kitchen today :( To begin the day with, it was Kharabath for our breakfast, followed by Gajar ka halwa and Sweet Pongal. I've had a busy day apart from just being in the kitchen, but I promise that I will definitely post my recipes for this in the future posts... though I know they wouldn't be as apt for the day today. But for the day, I have an Eggless Mango Cheesecake to offer you which I made a week ago.


Eggless Mango Cheesecake

INGREDIENTS

For the Base:

100 gm digestive biscuits (I used Fruit and Nut Biscuits here)
50 gm melted butter

Cheesecake Filling:

100 ml 25% fat cream
150 ml mango flavored thick yogurt (I used Amul's Aam Srikhand)
50 gm cottage cheese
4 tbsp castor sugar (or to taste)
1 tbsp agar agar / gelatin
1 tsp vanilla essence

Strawberry slices for garnish


DIRECTIONS

Line the sides of a cake tin with a cling film such that extra portions of it hang out. In case you are using a spring form pan, this step may not be required.

For the biscuit base: Put the biscuits into a ziplock bag & crush them to fine powder with the help of a rolling pin. You may also powder the biscuits in a mixie or food processor. I used Fruit and Nut biscuits for a better crunch. Remove and add in the melted butter and mix them well. Press this mixture into the base of a spring form pan or a lined cake tin. Chill this base for 30 minutes.


Pulse the cottage cheese to a fine puree along with 75 ml of the milk cream and vanilla. Whip enough to give it volume. Add in thick mango flavored yogurt. I made a cheat version by using Amul's Aam Srikhand which saves a lot of time and has a considerable thickness too. Add castor sugar to taste.

Dissolve a tablespoon of agar agar in the remaining 25 ml of cream and bring it to a boil. When the flakes dissolve, add this to the above cheesecake mix and give a final vigorous pulse so that all the ingredients are well combined. Transfer this mixture to the prepared biscuit base. Pat the tin gently to remove any air bubble that may have formed. Refrigerate the cheesecake to set for atleast 4-6 hours. Leave it in the refrigerator overnight or for atleast 6 hrs. Before serving, allow it to sit on the counter for 5 minutes. Garnish with fresh mango slices. I garnished mine with strawberry slices as mango is not in season.


Note: If you don't get Amul Srikhand at hand, pulse thick yogurt like Greek yogurt with thick mango puree till it's homogeneous. Add in desired amount to sugar if using Greek yogurt since Srikhand has sugar added in it .

You can make thick yogurt at home by hanging the homemade curd in a clean muslin/thin cotton cloth and leaving it hung overnight in the refrigerator over a large empty bowl which can accommodate the running liquid out of the curd.

I have a spring form tin at hand now, but despite this I preferred to use my smaller round cake tin for this purpose. With just 2 of us, a 9" inch pan would mean a large amount of cake and we surely didn't want any overdose! The yogurt rendered a nice tart which we loved. Mango flavor is light. The cheesecake set beautifully and turned out creamy and delicious. I would love to make this cheesecake again in future when fresh mangoes rock the summers.


I do hope you guys had a gala year end giving a warm, fabulous welcome to the New Year. Hope you had a lot of partying and feasting in the past couple of days. We had guests over our place and with a crowd around, there is always plenty of fun, frolic, laughter and noise. Pairing it if there's good food and wine, it gets all the more better.

An onset with Christmas saw me baking the Christmas Chocolate fruit cake, followed by the New year partying and a few birthday treats, which had us dining out steadily in the past few days, to an extent that we've resolved that we've had enough of it! I had shelved my cooking on and off during the New year stretch, throbbing the luxury of cooking full fledged meals in my kitchen. It was indeed a well deserved break. However, the commencement of the new year saw us dining out on the 1st, 2nd and 3rd of this month with guests and birthday treats, I sincerely hope this trend does not continue through the year long!


Festivities indeed bring a lot of glamor and color to our lives. During Christmas, we had a Secret Santa game organized at our workplace. It's interesting to get sneaky, wondering what each one of us would gift the other person to be a secret Santa and what we would get in return from our secret Santa, transporting our excitement back to becoming and behaving like kids. On the D-day, the puzzling game of exchanging gifts, then the hush-hush of unwrapping them, the excitement it brought was boundless and visibly noticed on all of us in an animated fashion reflecting the cloak-and-dagger mystery.


My secret Santa gifted me a very pretty coffee mug from Cafe Coffee Day. While I find it too massive for it's intended purpose and the fact that I am not a coffee lover, that does not stop me from using this mug. The coffee mug definitely makes an interesting prop for my photo-shoot and I love it. It also adorns well on my crockery cabinet along side our photo frames. Just fits the theme so perfectly there!

Over the weekend as the guests left, I had time all by myself to bake something for the evening supper and make time for photographing them. Weather was conducive too. Ample time for proofing was done overnight for the yeast to rise and the next afternoon it was ready to go into the oven. Interestingly, I did not follow any recipe per se and just went by my instincts and approximations.


Chilli Garlic Bread

INGREDIENTS

25 g active dry yeast
50 ml warm water
1 tsp sugar
200 g plain flour
50 ml warm water, approximately
Salt to taste
1/2 tbsp oil

Topping:

1/2 tbsp butter
1 tsp finely chopped garlic
1/2 tsp chilli flakes


DIRECTIONS

Dissolve dry yeast in warm water with sugar. Leave for 5-10 mins to dissolve and become frothy. Mix the flour and salt to taste. Add in the yeast mixture and warm water little by little till a soft pliable dough is formed. Cover with a warm towel or cling film and leave it to rest overnight in a warm place like a pre-heated oven.

Next morning, the dough should have risen and doubled in size. Punch it down gently. Knead the dough gently with some flour and oil till it springs back up when pressed. Grease and dust the baking tray with some oil and dust flour. Shape the dough to your desired style and transfer the dough gently to the baking dish. Allow to rest there for about an hour or two for the dough to rise again.

Meanwhile, prepare the chilli garlic topping. Melt the butter in a saucepan. Turn off the flame when the butter is hot, but not smoking. Add the finely chopped garlic and chilli flakes to this and mix well so that the butter absorbs all the flavors well. Brush the top of the bread with this seasoning. Leave the bread in a warm place to rise again. Once risen, bake in a pre-heated oven at 220 deg C for 1 hour or till done. Remove from oven, allow to cool on a cooling rack and slice as desired.


I brushed the garlic chilli seasoning on the bread to bake. However once baked the chilli and garlic fell apart. I suggest you press the garlic and chilli into the bread before baking instead of brushing them on top. Or just brush the warm oil to render the flavors. The bread baked warm and beautifully risen. It had an amber glow on it like that of a sun peeking out on a foggy dawn. Prominent flavor was ofcourse garlic with a hint of spice from chili flakes. I also toasted a few slices of bread under grill and these spicy golden brown sticks were fantastic with our tea.

While it will take some time to come out of the holiday lethargy, juggle back to business and get going into the mold of mundane routine, this break has helped rejuvenate our spirits and spring us back alive in action. At the moment however, we are resting in the cozy comfort of warm spiced tea with some of these homemade chili garlic toasts.

I am sending these to Blog Anniversary Event hosted by Suma Rowjee of Cakes and More.


When the city turned to shades of bright greens and pompous reds everywhere, the charm of Christmas played tunes over us too. The baubles, tinkles, Santa, Christmas tree and the twinkle lights hanging over our balcony sill still continue to charm and glow our house. My Chocolate Fruit Cake has seen it's end as my share of baked goodies have been distributed among family and friends and all are still relishing in the solace of home baked goodies. I am not done with the hangover yet and it feels nice to be soaked in the comfort of holiday opulence.

It's amazing to see people all around, all soaked in festive mood, mostly partying, shopping, exchanging greetings and sweet treats. I am having my share of gala time and as usual, I too can't stop myself from feeling excited about all this pomp and year end festivity. That's the real charm December month end is all about. And how I wish I could hold time in my fist and never let it go!

The year 2010 has been pretty good for us, in all aspects. It was fulfilling, bringing us joy and a year filled with contentment. Leaving behind year 2010 does bring a gloom on me for having to part with it, however heading towards the New Year 2011 brings more hope and joy as I look forward to a better year filled with excitement, new ventures, fulfilled dreams and ambitions, good luck and fortune. And to end this remarkable year and begin yet another adventurous year afresh, what can be better than to have a simple, yet delightful fruity dessert as my last post for this year.


I was lucky to have a batch of fresh Blueberries at hand my husband brought from US recently. These berries are fragile and tend to catch fungus easily. A good amount of these Blueberries and Blackberries went into our daily cereal breakfast and we loved them. Before the last few could be wiped off completely, I decided I should reserve the last few to bake a batch of Blueberry Cupcakes, least to satiate my baking desire before the year ends. The cupcakes turned out fabulous and went to make good treats for our evening snack.

Blueberry Cupcakes

(Adapted from The Big Book of Baking)

INGREDIENTS

225 g plain flour
1 tsp baking soda
A pinch of salt
115 g caster sugar
80 g fresh blueberries
150 ml thick yogurt
2 eggs
3 tbsp low fat butter or margarine
1/2 tsp vanilla extract


DIRECTIONS

Pre-heat the oven to 375 deg F. Line 12 paper muffin cases in the muffin pan.

Sift the flour, bicarbonate of soda and salt into a large mixing bowl.

In a separate bowl, beat the eggs with sugar, butter and vanilla extract. Then stir in the yogurt and blueberries until thoroughly mixed. Add this fruit mixture to the dry ingredients and then stir them all together gently.

Divide the mixture equally between the paper cases about two third full. Bake in the pre-heated oven for 20-25 mins, or until risen and golden brown. Remove from oven and allow to cool. Frost them with choice of your topping as desired.


I tweaked the recipe a bit to suit us. The Big book of baking says 3 large eggs while I used just 2 small ones. I somehow felt that with 3 eggs, the egg-y flavors would get prominent and I am glad I stuck to 2. To compensate, I increased the quantity of baking soda by a bit. The taste was perfect with absolutely no compromise on it's texture.

An attempt to frost these cupcakes turned disastrous. I used whip cream powder and the whip cream just couldn't hold it's shape. Addition of more cream powder made it taste shoddy. Despite all possible workarounds, I had to give up on it. Anyways, I am not a big fan of cupcakes with heavy frostings, unless it was a pastry. The cake itself was so soft and spongy that I didn't see the need to frost it. The fruitiness from the berries complimented it well. I love the speckles of dotted blues in between the cake. Pretty, simple, yet cute!


I am sending these to Bakeomania hosted by Suma Rowjee of Cakes and More.

Yet another day to go and the year has come to an end. A New year is here to welcome. Bring out your dancing shoes, put on your best attire and head out for a wicked night out to have the best moments with your family and friends. Here's wishing everyone a Happy and a Prosperous New Year!


Christmas is in air and there is no escape from the charms of reds and greens that have taken over everywhere. Most malls and shops have massive Christmas trees laden with tantalizing gifts, trinket and baubles and the eye-catching year end sales is definitely gripping most of us. My shopping is done. Though the weather is chill and crisp outside, our Christmas tree glow has warmed up our living space.


My baking pans are out. Oven has been heating up and the warmth from the oven has kept my kitchen space cozy and comfortable. Though baking had taken a relative backseat in the past few weeks, with the summon of Christmas and New Year season, I am all set to don my baking cap in bid to bake the traditional Christmas cake at home.


Every year, Christmas season brings back fond memories from Mangalore when we as teens would eagerly look forward to those cakes and baked goodies sent by our neighbors. I can well remember the plates filled with baked goodies, neatly wrapped in a kitchen paper and beneath it unveiled beautifully adorned rose cookies, plum cakes, candies, biscuits, cashew macaroons and many other stuffs, names of which I can't even recall. Though there wasn't much festivity at our home per se, mom surely made it a point to get freshly baked fruit cakes (commonly called as Plum cakes in Mangalore and most parts of Southern India) which most bakeries in Mangalore excel in during this season. It was her way in calling for a celebration. One can't help but soak up in Yuletide feel as Mangalore gears up to transform to a tantalizing carnival city.


Christmas baking is not an essential ritual at home, but somehow the entire spirit of Christmas takes over me and I feel enthusiastic to celebrate this way. While my husband was away in US recently, I put aside thoughts of baking a cake this year. But as DH returned home, I was curiously questioned by him on what I would be baking this Christmas. Looks like he had absorbed the Christmas spirits well abroad. A little push again and I asked him what he would love to have for this Christmas and I instantly got a reply from him without any forethought saying "Fruit Cake please!". Last year I baked this Christmas Fruit cake which has been our favorites. This year however, I had no fruits soaking and hence sought for an instant solution. A bottle of coffee liquor perched on my kitchen shelf has been looking for my due attention since long and this time again it was Nigella for my rescue.


Chocolate Fruit Cake

(Adapted from Nigella’s book Feast: Food to Celebrate Life)

INGREDIENTS

350 grams dried soft prunes, chopped
250 grams raisins
125 grams currants
175 grams unsalted butter, softened
175 grams dark muscovado sugar
175 ml honey
125 ml coffee liqueur
2 oranges, zested and juiced
1 tsp homemade spice mix
2 tbsp good quality cocoa
2 eggs, beaten
150 grams plain flour
75 grams coarsely ground almonds
1 tsp baking powder
1 tsp baking soda


DIRECTIONS

Preheat the oven to 300 degrees F (150 degrees C).

Line the sides and bottom of a 9 inch spring-form pan with a layer of baking parchment paper. Cut the parchment material into strips that are twice as high as the tin itself. The height of the strips will protect the cake from catching on the outside of the cake tin and prevent over baking of the cake edges.

Place the fruit, butter, sugar, honey, coffee liqueur, orange zest and juice, mixed spice and cocoa into a large wide saucepan. Heat the mixture until it reaches a gentle boil, stirring the mixture gently as the butter melts. Simmer the mixture for 10 minutes. Remove the saucepan from the heat and leave to cool for 30 minutes.


After the mixture has cooled, add the beaten eggs, flour, ground almonds, baking powder and baking soda. Mix well with a wooden spoon until the ingredients have combined.

Carefully pour the fruitcake mixture into the lined cake tin. Transfer the cake tin to the oven and bake for 1 1/2 to 2 hours or until the top of the cake is firm, yet with a shiny and sticky look. At this point, insert a sharp knife into the middle of the cake and test for done. Remove and place the cake on a cooling rack. Once the cake has cooled, remove it from the tin. Top the cake with a glaze of your choice or candied fruits or simply place a few chocolate coated berries in the center and sprinkle some icing sugar on top of the cake.


I am inspired by Nigella’s book Feast: Food to Celebrate Life. You just can't go wrong with this recipe. I love the way Nigella decorates her cakes. Simple and homely, yet tastefully elegant. Using prunes in baking is fairly new to me. So I stuck to the recipe by words and the only change I made was to use 2 eggs instead of the 3 mentioned. To compensate, I increased the quantity of baking powder and soda from 1/2 tsp to 1 tsp. My mixed spice was homemade and freshly ground with cinnamon, cloves, cardamom and nutmeg going into it. This recipe fetches approximately a kilo of the cake.

The cake is rich, dark, moist and absolutely delicious... laden with goodness from fruits with strong notes from prunes, fruity richness from raisins, nuttiness from almonds, subtly spiced with earthy flavors from honey and muscovado sugar. If you love fruits in your cakes, you bet this will hit you with the right tones. Heavenly!


The festive spirit of Christmas embraces one and all as it spreads joy and happiness everywhere. Here's wishing everyone a Merry Christmas and a Happy New Year!

I am sending these to Bakeomania hosted by Suma Rowjee of Cakes and More. Also sending them to the Chocolate Extravaganza - Monthly Mingle hosted by Ria. Sarah of Maison Cupcake is hosting a new blogging challenge 'Forever Nigella' and here goes my entry for the same.


Time flies real fast and it’s hard to believe that an entire year has gone by and is steadily coming to an end. December is here and though I don't see much festivity beckoning the air at the moment, I am sure the latter part of month will be filled with lot more sight to behold as it comes alive with tinsel world lighting, fireworks and merriment. And I am eagerly looking forward to it.

Desserts haven't been ruling my kitchen off late for sometime now. DH has been away for a while and I am currently enveloped in the wings of mom's cooking, enjoying my stay at parent's place. I am not surprised if I end up with ounces of added extra weight, despite the slash in the desserts made and consumed. All courtesy, home cooked food by mummy! While I am thoroughly missing my kitchen, cooking, cutlery, gadgets, photography, along with the freedom of doing what my mind presides over, I am currently enjoying the bounty treats churned by mom lovingly on a daily basis.


It amazing how good cooks our moms turn out to be. I mean, it seems perfect when my mom throws in the spices judged by experience to create that aromatic dish with well balanced flavors, hitting the right flavors. It may be a simple dish, whether it's salt or spice, sweet or tang, there's a right balance. It's then I realize that I have a long long way to go. While my mother used to make exotic western desserts and bakes long while ago, these days she prefers to stick by traditional Indian meals. At times, it's a fusion food. But by and large, it's the Indian food that dominates her kitchen. I am taking the privilege of learning some traditional recipes which I hope to re-create in my kitchen soon and post here as well. But for the moment, I am posting this Blueberry Crumble that I made for DH before his departure.


Blueberry Crumble

INGREDIENTS

1/2 cup Blueberry Pie Filling
50 gm unsalted butter
100 gm plain flour
50 gm cup confectioner's sugar

DIRECTIONS

Pre-heat the oven first. Into a pie dish / tart mould or ramekins, spoon the blueberry pie filling and level the base. Fetching fresh blueberries was not an option for me, so I settled to use Mother Maid's Blueberry Pie Filling. Fresh Blueberries would probably give out more flavors. In case you are using Keep it aside till we prepare the crumbs.

Combine the confectioner's sugar and flour in a wide mouth bowl. Quickly cut in the butter into this mixture using your fingers till the entire mixture resembles like coarse bread crumbs. Transfer these crumbs to top the blueberry filling till it's completely covered. Bake in a pre-heated oven to 180 deg C for approximately 20-30 minutes till the top is baked golden brown. Remove and allow to cool for 10 mins. Serve warm with a dollop of vanilla ice cream.


If you love the biscuit base, you can spread a handful of the crumble mixture on the tart base, then follow it with fruit on this, ending with the crumble for the topping. This Blueberry Crumble is totally effortless and can be put in matter of few mins.

I have about 3 tartlet moulds which are almost 30 years old. They were owned by my mother earlier and then handed down to me. I made one batch in these cute small tartlet mould and next in a medium sized pie dish. Fabulous for single helpings. The gooey, fruity tart blueberry base offsets well with the biscuit crumble topping. Served warm with a generous dollop of ice cream, they are absolutely heavenly!


I am without my camera from past few days and I feel totally handicapped. With it becoming a part of my routine life, just like any other day to day activity like cooking, serving and then photographing the cooked :). Just being left alone without it pushes me to be impulsive and is driving me crazy. It's one of those essentials without which I am not at ease. For the moment, I am left with my Sony Ericsson C510 which I hardly use and most definitely not when it comes to food photography!

I feel almost guilty posting this here. This one comes from my drafts that's been sitting idle for long. With the day being fairly warm and sunny, what followed was a very simple South Indian lunch. And to end it's simplicity, we treated ourselves with this gorgeous Indian beverage dessert, Falooda. I am not sure if I would call this a beverage or a dessert! Either ways, they are great for sure!

Falooda, a popular chilled beverage dessert is served in tall glasses, filled to the brim and topped with dollops of ice cream is made primarily by mixing delicately flavored rose milk with vermicelli and tapioca seeds. What a perfect way to cool off the summer heat! With the addition of vermicelli, tapioca seeds and rose milk, this can get quite filling. So make sure you have your hunger pangs on, else this can get too stodgy.


This is one such treats that brings reminiscence of my childhood. Those evening hangouts on Mumbai streets or Pabbas Ice cream parlors in Mangalore, where shopping craze were endless and when hunger pangs meddled us through those moments, a dash into these ice cream parlors with family and friends meant time spent over good food, chit chat talks and stress unwound.

Falooda

INGREDIENTS

1/2 cup falooda sev (fine roasted vermicelli)
1 cup chilled milk
Sugar, to taste
Few almonds and pistachios, chopped
2 tbsps sabza, (basil seeds, tukmaria)
1/4 tsp rose essence
2 scoops ice cream of your choice


DIRECTIONS

Into the chilled milk, add the sugar and rose essence to taste and mix well. Add one scoop of vanilla ice cream to this and churn well. This gives it a nice thick texture. Chill this in refrigerator till it's needed.

Next, boil the vermicelli in water till cooked al dente. Strain the cooked vermicelli and keep them aside to cool. Discard the water. Chill this as well in refrigerator till needed.

In a bowl, submerge the sabza seeds (also known as Basis seeds) in sufficient water for about 20-30 mins. These seeds swell up beautifully and will look transparent with an eye at the center. Strain and discard the excess water. Reserve the puffed up subza for assembling the falooda.

Assemble the Falooda:

I chose shot glasses to assemble the Falooda. Traditionally, this is done in tall glasses. So make your choice. In each glass, place the vermicelli till it reaches 1/5th the glass height. Top this with a tablespoon or more of soaked sabza seeds.

Pour in the chilled rose milk till just below the rim. Add the chopped nuts and top it a scoop of ice cream of your choice. Garnish with candied cherries. Serve chilled.


Most ice cream parlors add jelly cubes to this. I opted to leave it as I am not very fond of them. You may add them as per your preference. Also care for how much of rose essence you use. The one I used was pretty strong, just a few drops were sufficient to bring deep flavors and colors. You may opt for rose syrup too. But judge how much of it you would need.

Instead of serving these in tall glasses, I chose for smaller treats in shot glasses since it was our post lunch dessert. We loved this thought. They were neither too filling nor heavy, just right. This pot of falooda gorgeously topped with ice cream went on a melting spree and it played a spoilt sport for my photography that sunny day. Rose is one of my favorite flavors and least exploited one too, so that gives me another excuse to make these more often. Nevertheless, this is something I will make more often, not just for us, but for future get-together parties too.