You have to pardon me for my inconsistency in blogging these days. Please.

Being without my laptop since a couple of days makes me totally incompetent to maintain my blog at the desired pace I intend to and I feel totally at lag. I generally prefer posting at least one recipe each week, but haven’t been able to linger on to that. My camera flash card is flooded with pictures of food, food and more food, but seriously, haven’t got enough time to download them and edit. Couple of drafts have been sitting incomplete, soon to be posted. Worse, I received several wishes on my birthday last month from my friends and blogger pals, but I haven’t been able to respond to mails or thank any. My sincere apologies guys… !!!


I hate this procrastination. Ever since I have been without my system, I’ve been nudging my husband to lend his lappy on weekends, only to keep this space burning and alive, with a positive hope that I shall soon be united with my beloved lappy. To say that I am technologically dependent is an understatement, now that living without a system hasn’t given me any peace of mind, but driving me nuts. On the contrary I have some positive news for you all. :)


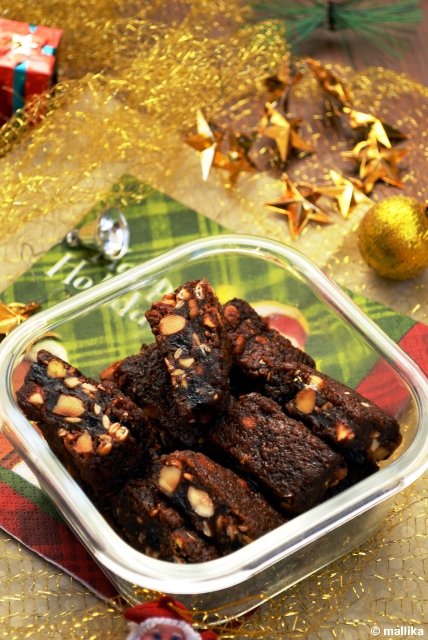
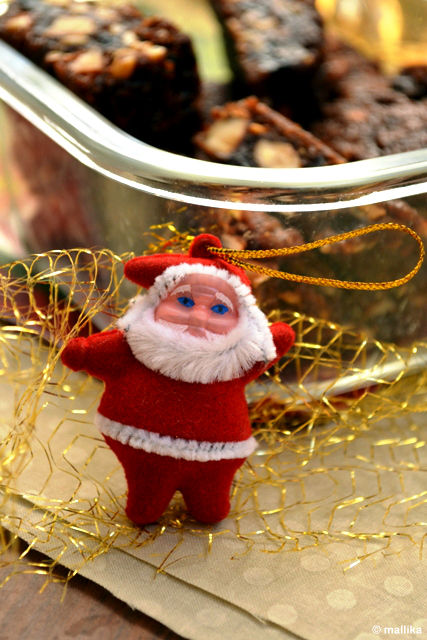
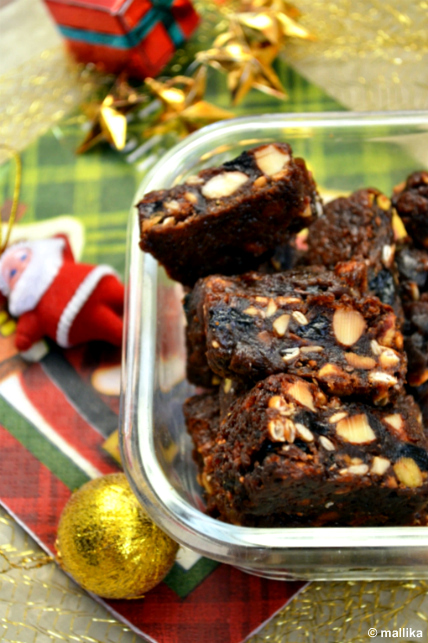
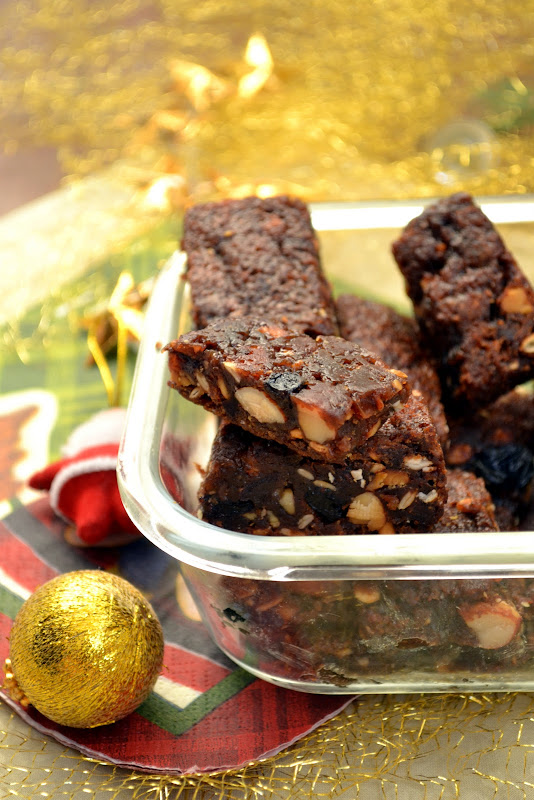
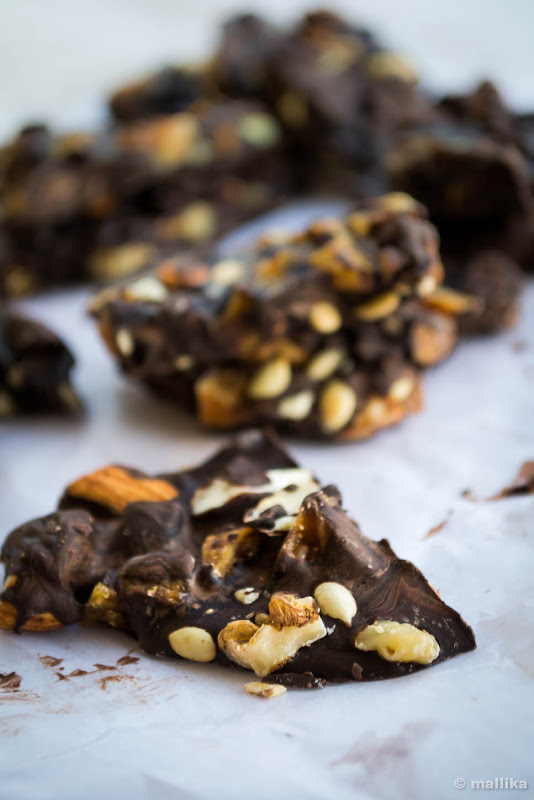
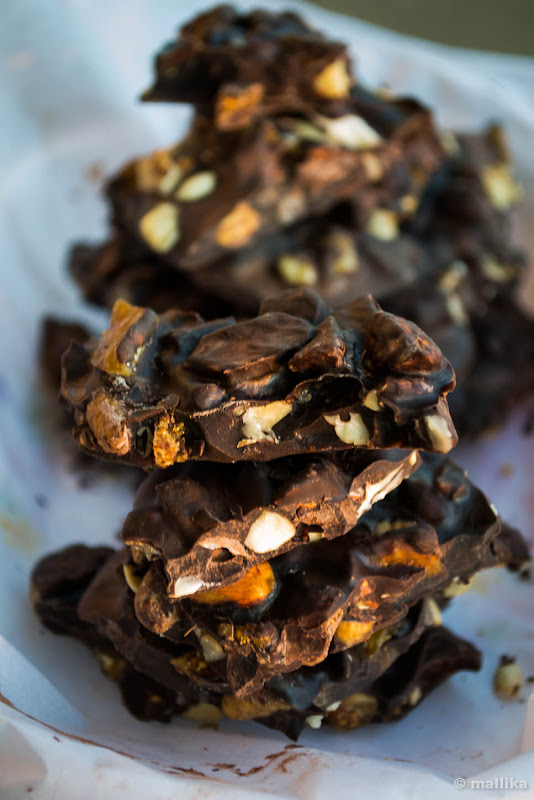
Coming to the point, after a lot of thought and wait, I finally decided to purchase my own domain. Yes, after 3 years of blogging I still feel passionate about it. I love doing this every bit, so I took a plunge to move from http://www.vegbowl.blogspot.com/ to http://www.vegbowl.in/. Now doesn't that call for some celebration??? Now here's some Fruit and Nut Chocolate Bark to raise the toast!


Fruit and Nut Chocolate Bark

INGREDIENTS

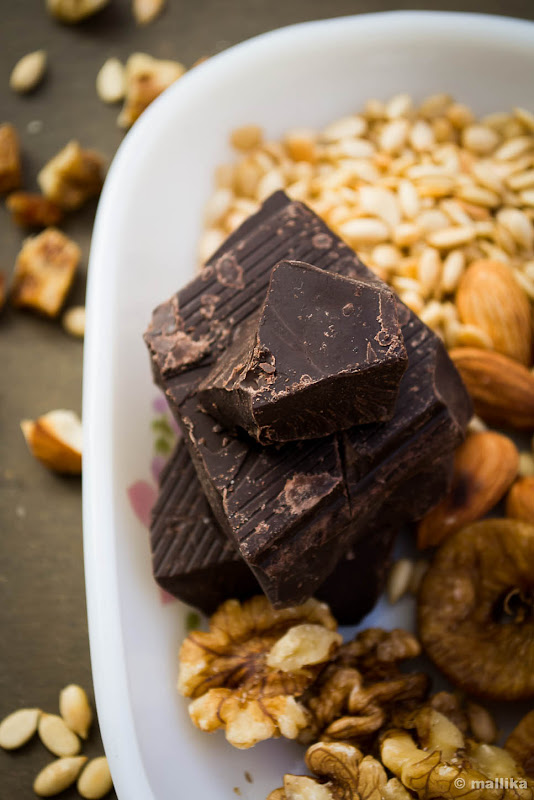
2 cups chopped Dark Chocolate
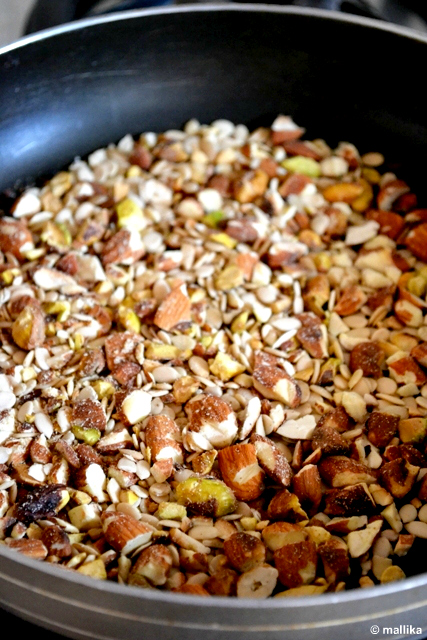
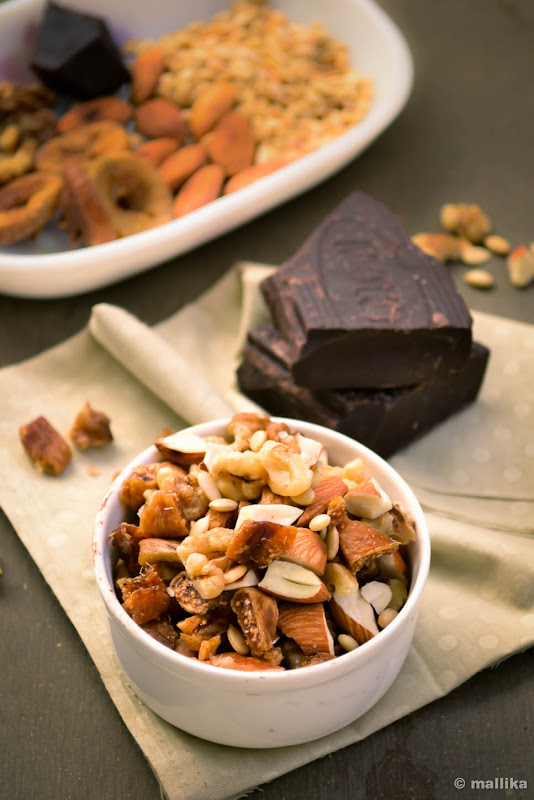
2/3 cup mixed roasted nuts (such as roasted walnuts, pistachios, almonds and melon seeds)
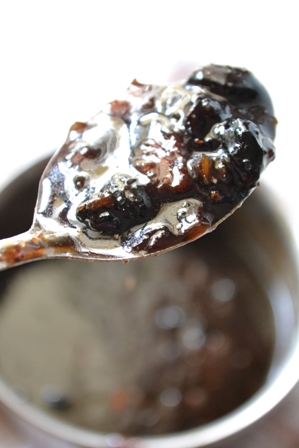
2/3 cup mixed dried fruit (such as raisins, quartered figs and apricots)

DIRECTIONS

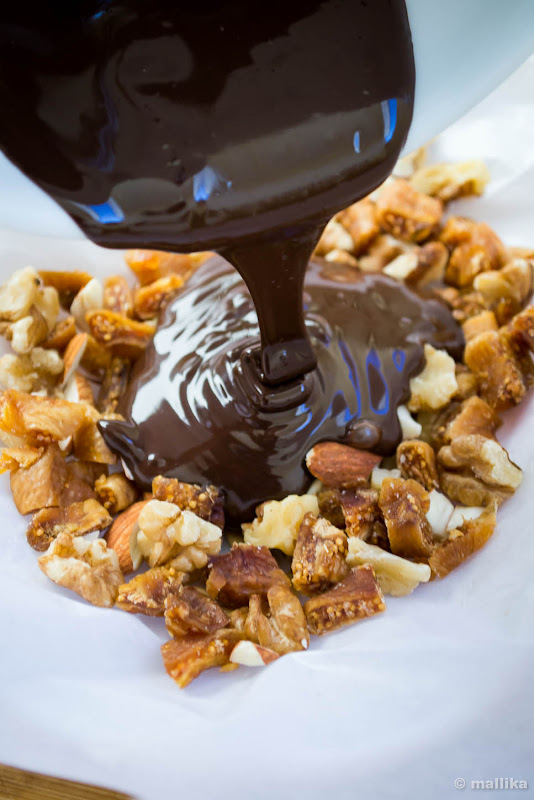
Line a tray with foil or parchment paper. Microwave the chocolate in medium bowl for 2 minutes on high power. Give a stir, the chocolate should be melted and smooth. If not microwave for another minute. Alternatively melt the chocolate in a double boiler over saucepan of simmering water, stirring until melted and smooth.

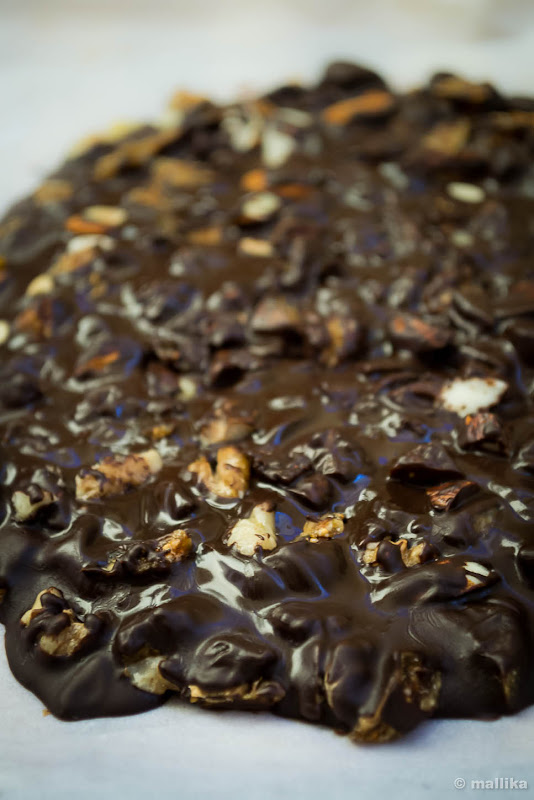
Scatter nuts and dried fruit evenly over the paper/foil. Pour melted chocolate onto the fruit nut mix, spreading gently using a spatula. Chill until chocolate is firm, about 30 minutes. Peel off the paper. Cut chocolate into irregular pieces. Serve the bark.


This chocolate bark is packed with goodness from fruits and nuts. I am a huge fan of dark chocolates, I always have them to munch on. My love for dry fruits and nuts is profound, I can add them to anything sweet and savory too. And am a bigger fan of roasted nuts, given the immense flavor and crunch they give to anything added. The bittersweet incense from the chocolate stark out beautifully when paired with the roasted earthiness from nuts and mellowed sweetness from dry fruits.


I am totally pepped up with this thought of celebrating a day symbolizing love with your Valentine. Isn’t that so cute? Unfortunately, it falls on a Tuesday this year, that means we’ll be at work and the day will be spent like any other week day. Shades of red have always been my favorite color, so there is no reason why I shouldn’t be soaked in colors of Valentine. And be it a festival or an occasion, you know I just need an excuse to make a dessert!

Initial thoughts of making chocolate cake for my Valentine took a backseat when I saw the bright oranges brought in from the Sunday shopping peeping out from shopping bag. They screamed to be used, probably not for the cake, but to be eaten fresh. As I packed a few off to be refrigerated for later use, the whipped cream on the refrigerator counter sat gleaming at me. Fresh cream cake wasn’t on my mind honestly. Experiments with fresh cream haven't had many success with me, so I didn't dare to this time. Buttercream was a safer route. After a real long time (I can say almost close to a year and half), I got eggs for the fat-less sponge base. Can’t get a better cake than a cake with Orange buttercream icing, yeah? Absolutely!


Oranges are in season. Seeing them flood the market in shades of bright yellow orange hues makes me go crazy for them. I cannot simply resist oranges, so reminiscent of a fruit which we often depend on to quench our thirst, especially during train and bus journeys. I completely adore fresh fruits, but wonder why I’ve rarely played around with them in my dessert. We relish fruits on a daily basis with stocks of banana, watermelon and muskmelon being quite a regular at home. Guess while I’m chopping fruits for a dessert a lot of it goes directly to my mouth rather than the dessert itself!

I have been toying around this idea of using oranges again to make a Gateaux since my previous bake with Baked Orange Cheesecake. Oh yeah, people loved it! It was hit at home. I’ve discovered a new found love in the zesty refreshing flavors of orange, prior to which the peels were meant to be discarded. I love that citrus zester and have been using more often since. I went on a serious hunting spree for that one tool! Totally worth the effort!

Keeping in mind the Valentine day, I baked this Orange Fresh Cream Gateaux over the weekend. This did not come as a surprise to my hubby as he very well knew that a cake was on the way for him. The eggs fluffed well to make the fatless sponge base devoid of any fat using the recipe inspired by Tarla Dalal. Drizzled juice directly from fresh oranges on to the cake. Now how good is that for you? A quick round of whip given to the cream and a good amount of orange rind and juice went into it, speckled bright and yellow. Spread the stuff and assembled it in less than an hour. It was a breeze.


Orange Buttercream Cake

INGREDIENTS

Fatless Sponge:

2 large sized eggs
50 gms (2 oz.) plain flour (maida)
50 to 80 gms fine tea sugar or powdered sugar

Buttercream Icing:

200 gm. softened butter
2 tbsp. powdered sugar
1 tsp. orange rind
A few slices of orange segments
2-3 tbsp. orange juice (for moistening the cake and icing)


DIRECTIONS

Sieve the flour. Grease and dust a baking tin. Beat the eggs and sugar very well until thick and double in quantity. Fold in the sieved flour carefully and mix gently with a metal spoon. Pour the mixture into the prepared baking tin. Bake in a hot oven at 200 degree C (400 degree F) for 15 minutes. The cake is ready when it leaves the sides of the tin and is springy to touch. Take out from the oven and leave to cool for a minute. Loosen the sides with a knife, invert the tin over a rack and tap sharply to remove. Cool the cake.


Slice the cake to two. Moist them well with fresh/canned orange juice. I used fresh juice here. Whip the butter and sugar to soft peaks. Add in fresh/canned orange juice along with fresh orange zest and whip further till stiff peaks form. Slather a dollop of cream and spread well on the center. Scatter a few orange segments and top it with the second slice. Slather and coat the cake with the remaining cream and top with candied zest and orange segments and chill for at least 3-4 hours. Serve.


I am not a huge fan of buttercream cakes, simply because they leave that buttery creaminess on the roof of mouth. Saying that this cake was not only loved by my Valentine, but also my mom and sis with whom it was shared. The cake got over even before I could carry it over for the 14th Feb! The orange rind is refreshing and makes the cake totally sinful. I was not totally satisfied the way I frosted this cake. I should have chopped off the cake hood flat before frosting. I could definitely have done a much better job. Frosting a cake is a real test of patience. You need to treat that cake like your baby, gentle and with care.

Are you geared up to celebrate this Valentine day with your special one? Do you plan to create a special dessert for your Valentine this year? What's your flavor? Would you go for Vanilla or Chocolate or is that a fruity one like mine? Share your thoughts with me.


It’s been long since I baked some cookies and this seemed the perfect occasion when I should be baking more of them. My little tot is in her teething phase and loves putting almost everything into her mouth. Door-mats seem to entice her more than anything else and we have a tough time hiding them from her. We’ve been playing a lot of peek-a-boo games with her and my little brat is full of untiring energy, life and zest. She’s been gaining strength and weight to crawl and pull herself well now, but should have some more time to go before she can be independent on her feet. While she loves pulling objects and putting them to her teeth, we have a terrible time objecting her from doing so! This seemed the perfect reason for me to bake some cookies so that she can hold them and bite into her itching teeth.

With 2 bunny teeth on lower and 1 on upper gums and the fourth breaking its way out, she hasn’t yet got over her itch to bite into almost anything close to solid. While she’s pretty fussy with her choices when it comes to food, digestive biscuits seem to be her favorites. And no, not the milk dipped softened ones done specifically for her, but a solid bite into the biscuit is what she demands. I played around with these Chocolate & Coffee Whole Wheat Cookies, adapted from the cookbook, Chocolate: The Food and the Music to make cookies which were healthy so she can bite into. I’ve made 2-3 batches of varying ingredients, all on similar lines of the base recipe. For my little one, I skipped chocolate and coffee. I omitted egg completely, instead used thin flax-meal paste. For the adults, I like to use same amount of coffee liquor as much the volume of an egg. They turn out good each time promising to be good companions for your cup of tea. And my little toddler surely seems to be enjoying them.


Chocolate & Coffee Whole Wheat Cookies

Adapted from Chocolate: The Food and the Music

INGREDIENTS

3/4 cup unsalted butter, plus extra for greasing
1 cup brown sugar
1 egg (replace with 1 tbsp. gooey flax-meal paste or 1 tbsp. of coffee liquor if making for adults)
1/2 cup all-purpose flour
1 tsp. baking soda
A pinch of salt
1/2 cup whole wheat flour
1 tbsp. bran (I used whole wheat bran)
1 1/3 cups semisweet chocolate chips
2 cup rolled oats
1 tbsp. strong coffee (Add more for stronger flavor)
2/3 cup walnuts, toasted and coarsely chopped


DIRECTIONS

Preheat oven to 375 degrees F. Grease 2 large cookies sheets. Cream the butter and sugar together in a bowl. Add the egg (replace with 1 tbsp. gooey flax-meal paste or 1 tbsp. of coffee liquor, if making for adults) and beat well, using an electric mixer.

In a separate bowl, sift together the all-purpose flour, baking soda, and salt, then add in the whole wheat flour and bran. Mix in the egg / flax mixture, then stir in the chocolate chips, oats, coffee and nuts. If it's for the baby, skip the chocolates and coffee. Mix well.

Drop tablespoonful of the mixture onto the prepared cookie sheets, dabbing each lightly using the back of a spoon (if you prefer thin, crisp cookies), leaving room for the cookies to spread during cooking. Transfer the cookie sheets to preheated oven and bake for 16-18 minutes, or until the cookies are golden brown.

Remove from the oven, the transfer to a cooling rack and let cool before serving.


I like thin, crisp cookies which have a crunch with every bite. That my prefect bake. On the other hand, my husband prefers more chewy cookies over the crunch. If you want your cookies crisp, you bake 2 minutes longer. For chewy ones, remove the cookies as they begin to brown on edges.

We use flax quite a lot in Indian cooking, specially South. While my mom’s roasted flaxseed chutney powder is my favorite, I personally dislike the flavor of flax in my baked goods. So I was cautious with my use of flax-meal powder this time and made a pretty thin paste instead of a thick gooey one. I like to think these are good for you. They have bran, rolled oats, whole wheat flour, flax-meal, walnuts and chocolate chips in them. Now, isn’t that goodness of everything in one?


Almost at the end of January and I am surprised how fast the month of January passed by. Wasn't it hardly a few days ago that we spent a gala holiday time partying for the New year? And boy, we've already crossed a month! Personally for me, this month has been packed with lots of surprises and challenges. On professional front, I am excited as my career graph moves a step ahead and am looking forward to the new learning and challenges it poses. Fortunately, the strong support from my family ties keep me enthusiastic and passionate about my work.

A lending hand does come from my parents, especially my mom. And with their relentless support I have been able to manage home smoothly. At times, when I am back home exhausted from a long day at work, mom resues me with her ready to cook batters, instant powders and spice mixes. Even her freshly chopped vegetables or picked and cleaned greens give me a helping hand that make our life much simpler. Preparing the batter or chopping vegetables may look less of an effort, but honestly it's one of those kitchen jobs I always detest to do. Like this simple Ragi dosa that doesn't require much of an effort, but a good amount of time for soaking and grinding. Looks extremely simple and hardly an effort, yet not so! While I generally get Ragi dosa batter from my mom, this weekend I pursued to make them myself so that my litte one could relish them too. This also happens to be my husband's favorites and he prefers this over the plain urad dosa.


Ragi Dosa

INGREDIENTS

1 and 1/2 cup ragi flour
1 cup urad dal
1 cup raw rice
1-2 tsp methi seeds
Salt to taste

DIRECTIONS

Wash and soak urad dal, rice and methi seeds in ample amount of water for atleast 3-4 hours. Discard the soaked water. Grind them together to a smooth paste using less than half a cup of water. Finally add in the ragi flour and stir the batter very well. The batter should be thick, not runny. Transfer this batter to a large vessel which can accommodate double the volume. Place in a warm dry place, like that of a pre-heated oven. Allow the batter to ferment overnight or atleast 8 hours. By then the batter will rise due to fermentation. Beat the batter well before preparing the dosa.

Oil an iron griddle and heat it. If using a non stick pan, oiling is not required, but I suggest you use an iron griddle for best thin and crisp dosas. Take a laddle full of batter and spread them on the griddle gently using the back of the laddle. If you find the batter too thick and not spreadable, then add little extra water, beat well and make dosas. Serve hot with fresh chutney.


Ragi or finger millet is extremely healthy, gluten-free and rich in iron and vitamins. You can make thin or thick dosas depending on your taste. We prefer thin and crisp dosas, sometimes paper-thin too and they go very well with ghee and chutney. On occasions when I am short of time to make chutneys, I serve these with a dollop of ghee-honey mix. As kids we've loved that combination and I can eat almost anything that way... breads, rotis, dosas, idlis... I guess almost anything. It's one of those traditional tricks my grandma used to lure kids to enjoy our breakfast. Simply mix equal quantites of ghee and honey and serve a dollop of this with the dosa. They taste yum!


We celebrated Makar Sankranthi on the 15th Jan at home in a small way. Nothing much really, except when it comes to food I wouldn't want to miss any kind of celebration. Since it's my daughter's first Sankranthi, keeping in mind the festive mood, I made two versions of Pongal, the sweet and the spicy version. Gud Pongal or Sihi Pongal, (sihi meaning sweet) is made of jaggery and is one of the easy and healthiest desserts that I have ever learnt to make. Though I don't often make this, Sankranthi gives me the best occasion to make and share this simple and easy recipe.


It also happens to be one of my husband's favorites... he often tells me that during Pongal festival, their neighbors would often send them both sweet and spicy pongal and as kids they would go raring over it and relish it unendingly. I rarely find him asking me to make something specific, but when these reminiscences of childhood bring back fond memories and he insisted I make some of this for him I couldn't refuse. This happens to be a common dish in most Tamilian homes during this festival.


Sihi Pongal

INGREDIENTS

3/4th cup moong dal
1 cup rice
1 cup milk
2 1/2 cups jaggery
1 tsp freshly pound cardamom powder
Handful of raisins and cashewnuts
3 tbsp of clarified butter / ghee
1/2 cup freshly grated coconut


DIRECTIONS

Wash, clean and pressure cook the dal and rice with 4 cups of water for 3-5 whistles. Alternatively cook them in a vessel till they are well done and mushy. Once cooked, add a cup of milk and jaggery and bring it to a gentle boil. Gently mash them using a spatula.

In a separate pan, heat 3 tbsp of ghee. Fry the cashewnuts and raisins and add to the pongal. Add the powdered cardamoms finally in the end. Mix well and serve hot.


Be sure to serve this with a massive dollop of ghee. Every morsel of this sweet pongal is heavenly and that dollop of ghee only elevates this experience. Rice and dal have starch which make this sticky on tongue if no fat is added. Adding ghee will balance the starch and enhance the flavors. Our fussy daughter is too choosy about food and variety. While she shuns the regular dal-chaawal combo, she happily enjoyed this Pongal and that gave me immense satisfaction.


I have been meaning to do this post since long. Somehow I have been procrastinating and what was meant to be posted two months ago is coming up now. This is meant to be a baby food, but in due course I have taken keen liking to this and have made it my meal too.

For almost 5 months, we did not introduce any external food to my daughter and she was fed on milk alone. However, since her 5th month, we introduced light foods like juice and mashed bananas. I had to get back to work, which meant feeding her in my absence was a challenge. We put her on external semi solids in her 6th month, with our baby growing from an infant to a toddler, only milk would not suffice for her growth.

My mom often teases me that I had strong affinity toward food since my birth. While most babies easily fuss about food and expect variety in terms of colors and flavors, I would happily take what ever was fed to me.

One of the most common baby foods made with utmost care and regard is this Ragi Manni which simply translates to Finger Millet Pudding. Finger Millet, called as Ragi in Kannada is very nutritious as it's gluten-free and high in proteins, minerals, calcium and fibre. Ragi Manni is one of the best food you can begin to feed your baby with. It has a semi solid consistency and a texture similar to pudding.


It took me deal of an effort to make this brown slush look presentable. I mean how good can a porridge look otherwise? Left undisturbed for a few minutes, you know there's an ugly layer that forms on top making it totally unpresentable.

Ragi Manni

INGREDIENTS

Ragi - 1/2 kg
Handful of Almonds

DIRECTIONS

Wash and soak ragi millet for 8-10 hours or overnight. Drain the water out completely. Tie the soaked ragi in a thin cotton cloth like that of muslin and hang them in a cool, dry place to germinate. Within next day or two you should see the millet sprout. Once sprouted, spread them on a clean plate and allow to dry in shade.

Soak almonds for a couple of hours. Drain the water and skin them. Allow the almonds to dry along with the millet.

Heat up an iron pan to medium low flame and gently roast the sprouted millet and almonds till it pops. Since this is a baby food, be careful not to let them burn. It may take some time, but be patient. Once roasted, allow them to cool down completely. Using a heavy duty grinder, grind it into fine powder. Store this powder in a clean, dry, airtight container.


Prepare the baby food:

There are two ways we make this. Sweet and Salt version. My daughter has less of sweet tooth and enjoys the salt version better.

Dissolve 1 teaspoon of ragi powder in milk ensuring there are no lumps. Heat this on a low flame till ragi is cooked and it thickens. Heat through well stirring constantly. Once completely cooked, add in sugar or jaggery to taste. I use sugar since the jaggery often has dust and many impurities. Allow to cool and serve to your baby.

For salty version, dissolve 1 teaspoon of ragi powder in 1/2 cup of water. Bring this to a boil, stirring on a low flame. Once thickened and completely cooked add salt to taste. Allow to come to room temperature. Add in yogurt to this prepared ragi, whisk well and serve to your baby.


Celebrations generally continue at our place with birthdays falling in the first week of January. The Capri girl that I am, I am usually flooded with greetings not only for the New Year, but following my birthday too. I am extremely poor at remembering birth dates and I feel overwhelmed when people take effort to remember my birthday and wish me, including my close friends whose birthdays I've always missed to wish. It happens often that I end up remembering them a week or even a month later, then repenting not having wished them, once again.

The trip to Mangalore earlier during the Christmas was fun. Being at home town is always comforting and that too in a city where I grew up and spent most of my teen life. Yes, I do have a sense of belonging attached here. We relaxed and the trip took us away from all the hustle bustle of city life. We rested through our stay, while the calm, serene and peaceful city indeed did the best to our souls and we felt extremely rejuvenated post the trip.


And even as we were bouncing back to our routine life, we had another trip planned in advance to Mumbai. Hubby hadn't seen Mumbai for more than a decade and badly wanted to pay a visit. With all that travel and bag packing done, there wasn't much scope for baking for my birthday. Fortunately, we were home on the New year eve. With our baby around, her sleep and food patterns would hamper her schedule and put us to trouble, so we stuck to staying indoors and partying at home. Same evening when I had a little time at hand, I put a few ingredients together and worked briskly to bake this simple yet delicious cheesecake which we not just enjoyed over the New Year Eve, but was carried over to my birthday as well.


Baked Cheesecake with Orange Glaze

INGREDIENTS

For the Crust

75 gms digestive biscuit (I used McVities)
1 tbsp sugar
4 tbsp melted butter

For the Filling

1 cup grated homemade fresh paneer (cottage cheese)
1 cup medium fat cream
1/2 cup thick hung yogurt/Amul Srikhand
1 cup sugar
1 tsp vanilla extract
1 tbsp corn starch

For Orange Glaze

1/2 tsp agar-agar powder
1/4 cup orange juice, fresh or canned
1 tbsp sugar or more, depending on your taste
1 tsp orange rind
Flesh from 1 orange


DIRECTION

For the crust: Mix the finely crushed biscuits, sugar and butter and press the mixture evenly into a 6" diameter loose bottom tin or a spring-form pan. Chill in a freezer.

For the filling: Blend the paneer till it's liquid and pour-able. Add the hung yogurt and sugar to blend with paneer further. Ensure it's blended well uniformly. Whip in the medium fat cream and add it to the above mixture along with corn starch and vanilla. Whiz once more.

To assemble: Pour the filling over the set crust. Bake in a hot oven at 200 degree c (400 degree f) for 15-20 minutes or till the sides are set and the center is still a little jiggly. Remove and allow to cool in th refrigerator.

To prepare the glaze: Dissolve the agar in cold water and bring it to boil. Add in the orange juice, rind, sugar and orange flesh. Bring to a boil and pour on prepared cheesecake. Allow to set. Decorate with orange rind if desired.

The key to a good cheesecake is to allow it to set overnight or at least for 6 hours in refrigerator. That's when the flavors develop and mingle well, also letting the cake set firmly. The cheesecake was fabulous and made up for not just the New year, but my birthday too. On the flip side, I found the crust uneven and thicker on edges and I need to work on getting them right. I also felt the filling could have increased in quantity for the crust made, which would in turn give the cake the desired height, making it more presentable. But nevertheless the cheesecake had all the flavors right. The orange flavors burst out with every bite. The orange rind is extremely refreshing and adds that zing factor to this cheesecake, so I suggest you do not miss on that. They not only add flavor, but the glamuor element to the cake. Cottage cheese cannot be tasted and blends well with the cream, thus making this cake soft, moist, cheesy, citric and rich. A totally decadent treat.


Hope you guys are having fun time with your family and friends. A little late though, but I am happy I managed to post this for the holiday season. Travel to Mangalore with my family kept us busy. Packing bags and cleaning up the refrigerator took a deal of my time. Packing bags was never this challenging as it was offlate with the baby. The baby bag almost took the entire world in it, all in minature sizes! The chill Bangalore weather just added more winter clothing to the travel bag making it heavier. Phew!


With all this, I had least expected I would bake. Hubby was back from his adventure trip and demanded a fruit cake. I rebeled initially, given the amount of work I had at hand, but later couldn't resist the thought of baking for Christmas, to bake and pack something that we could carry for our trip too so that our family could enjoy.

Spices, fruits and nuts make such a quintessential part of Christmas baking, that without them the holiday's celebration does not sound complete. This is the coldest time of the year and the spices and liqour soaked fruits and nuts give all that warmth to make the winter holiday season eventful.


Baking a cake didn't figure out in my list this year, that's probably because a spiced fruit cake uses exotic ingredients like the best of fruits and nuts, soaked in liquor, tossed in homemade spice mix and baked to lend warm, heart rendering flavors to the cake. When there's so much of pre-planning and process involved, I ensure I make it with utmost care and caution. And that calls for time and attention. Instead on the lines of similar flavors, I had in mind these spiced bars that I baked the morning we left outstation, so that we could enjoy them through our journey with ease.

I apologize for these snaps. They aren't the best and do not justify the burst of flavors these bars have. I photographed them in a hurry and packed them off to be relished later.

Spiced Fruit and Nut Christmas Bars

Inspired by Panforte Di Siena from Big Book of Baking

INGREDIENTS

1 1/4th cup all purpose flour
3/4th cup brown sugar
3/4th cup butter
1 tbsp mixed peels
1 tbsp honey
1 cup Kahlua/Tia Maria/Coffee liquor
1 cup mixed fruits and citrus peels (raisins, sultanas and dates)
1 cup mixed roasted nuts (almonds, pistachios, melon seeds, walnuts, etc.)
All spices homemade mix


DIRECTIONS

Pre-heat the oven to 180 deg C. Grease and line a square cake tin. If you prefer wedges, use a round baking tin.

Chop the dates finely. In a saucepan, add in kahlua, honey, brown sugar and butter along with raisins, sultanas and chopped dates and bring it to a rolling boil. Boil for about 6-8 mins. By this time the raisins and sultanas will swell. Add in the citrus peels and all spice mix. Turn off the stove and allow to cool a little. As the mixture cools down, add in the all purpose flour and stir well. Finally add in the chopped roasted nuts to this mixture and toss them together. The batter is bound to be stiffer than the regular cake batter. Transfer it to the prepared cake tin and bake for 35-40 minutes. Once baked, remove from oven and allow to cool a little. Slice them to bars or wedges as desired.


These bars were inspired by Panforte Di Siena from Big Book of Baking, but with a difference. They are a cross between cake and cookies, sort of like fudges. These bars are rich and buttery, so you may reduce the butter to half a cup as well. I used Kahlua to flavor them. The hint of coffee liquor comes out subtly against the warm coziness from spices in an earthy backdrop from brown sugar. A touch of Christmas with a mélange of vivid flavors.

With just 3 days to go, New Year 2012 will be here. The advent of new year comes new hopes and new possibilities. I hope this year brings good luck, joy and happiness to all and brightens up every life. Here's wishing all my readers a Happy New Year 2012.


You know Christmas is here when your eyes tune to seeing shades of reds and whites everywhere. I am eyeing at the holiday season which is all set to beckon us with some travel, which means loads of fun and excitement with family and friends, which I am eagerly looking forward to. To all my fellow readers, I extend my warm and hearty wishes for Merry Christmas and Happy New year.

Seriously, I can't imagine Christmas without a fruit cake of any kind. Christmas is already here and my fruits aren't soaked yet. I would probably settle for a store bought one. Sweet cravings of plum cakes and rose cookies flood my memories as I think of them. The deep amber cakes dotted with dry fruits and nuts lining the stretch of glass shelves in bakeries and cake shops tempt me further and the aromas linger, hanging on so strong and etched.


Last week my hubby and dad set out on a biking expedition to greener pastures to enjoy the serene country side. The nature lovers that they are put the two of us, mom and me into trouble! With their trip came additional responsibility of bag packing and baby sitting my daughter. And you know that with a nine month old baby at arm all the time, who craves for the best of our attention, it can't get any easy for us. With more in my hand than I can ask for this year, I doubted if I could really extend myself to bake for the Christmas course.


Right before the day they set out on their trip, I scuffled through my pantry to pull out packets of roasted pistachios fervently, all of which I have been zealous to put to use for long. I put together pistachios and chopped chocolate chunks to make half a dozen ultimate pistachio chocolate chunk muffins for the ultimate adventure biking trip! These muffins were not only eggless to boast for, but also rich and luxuriously decadent that with every bite their energy levels boosted to the zenith!


Pistachio Chocolate Chunk Muffins

INGREDIENTS

1 cup all purpose flour
1/2 cup whole wheat flour (or use 1/2 cups all purpose flour instead)
1 tbsp corn flour
1/4 cup milk
3/4 cup melted butter
1 cup minus a tbsp of sugar
1 tsp baking powder
1 tsp baking soda
1 tbsp chopped pistachios
Fistful of chocolate chunks

DIRECTION

Pre-heat the oven to 180 degrees C. Line muffin liners on muffin pans. Sieve together all purpose flour, wheat flour, baking powder and baking soda. Keep aside. Beat the butter and sugar till it's light and frothy. To this add vanilla extract. Add the wet ingredients into the dry ingredients and toss gently till they are just combined. Finally add the chopped pistachios and chocolate chunks and give a final stir. Transfer the batter to the prepared muffin cups. Bake for 30-35 mins or till top looks golden brown done.


I draw inspiration from dozens of recipes I see flooding across the net, all hosted in style and glamor for the holiday season. Every click takes me to a new recipe and it tempts me further. As I bake a fruit cake of some sort every year, this year too plans weren't any different. I would have probably exhausted myself pondering hard what best I could do to revamp the traditional fruitcake I have been making since couple of years.

When I came up with these muffins, I was so glad the way they turned out, moist and crumbly, yet not utterly sweet and the buttery richness lent it a decadence which both the men enjoyed through their journey. Again, dad being particular about eggless cakes, these eggless muffins were enjoyed by him too without complaining. With pistachios and chocolate chunks you know they can't go wrong. Pack off to be given to your family and friends this holiday season!

Merry Christmas & a Happy New Year!!!