Showing posts with label Karnataka. Show all posts


So what do you think is life like for a toddler mom food blogger? Fun, thrilling, stressful, exciting, uncertain, adventurous, tough, entertaining, or may be all of these??? Interesting! Let me give you a glimpse of me as a food blogger.

Just about 2 days ago I decided Sankranthi, the festival for harvest is here and I need to have a post signifying it for the 14th. I rustle up my calculations and cross upon Huggi, a traditional Havyaka household dish, and an apt one that can make it right for the day and the festival. Perfect, I think.

So to be able to post it a day in advance that will benefit my readers, I decide I will cook the recipe a day before, photograph them and publish here. I almost put things together, when I simply get a feeling that I am cheating. Would that justify me celebrating the festival? It made more sense to cook them the first thing in the morning of the festival while my family is around, finish the pooja, offer God and relish them fresh. So I push the entire thought of cooking Huggi for the day of Sankranthi, in a hope I will be able to quickly grab some clicks and post them here, hopefully the same morning. Hopelessly, that rarely happens!


The morning of Sankranthi dawns and the baths are over. I head over to the kitchen to make both versions of Huggi, the sweet and the spicy one, both equally delicious and my favourites too. My cooking is done on time, pooja is over, little one is to be fed and I am to decide if the oggarne/tadka needs to be added then or saved for the photographs. A tic-tac-toe and I add a part of the oggarne/tadka, saving some of it for the grace. I almost finish feeding my hungry toddler, put her to play in my kitchen and keep a keen check on her from the corner of my eye. Often she hangs around me for my attention, so a huge effort goes into distracting her with piles of kitchen utensils and cutleries to amuse her. By now my kitchen is in a huge mess with utensils, dolls and toys lying on the floor and on counters too. Adding to this, hazaar utensils lay around to be cleared and washed. I clear a part of these to make some space for the props to be fitted into the existing clutter, as obvious to make my dish look a little appealing. By now my little toddler begins to get anxious, seeking my consideration to play with her, so she's up on the kitchen counter, least I can keep her busy with my constant talks and her plays. I begin to place up my props, lay the dishes, top the garnishes, neat my background, foot the tripod and almost begin to shoot when a tiny hand hovers over to dish, pulling the props, the background and at times the camera lens too! Again, in an attempt to distract, I hand over unforeseen kitchen items for her to play. Her hands go deep into the jar of my precious ghee, the onion and garlics are off their peels, things helter-skelter and a glass or two ends up cracking on the floor. Though by now she is bored and there comes the shrill cry, more mess and my woe! Then there are agony moments when my garnish ends up in a mess, spoons are thrown into the dish, splattering on to the table cloth and I throw up my hands in anguish! Did I say life of a blogger mom was stressful? Phew!


I come back to square one of laying things on the dining table instead, let her on her foot to play, hand over a spoon and bag of chickpeas for her to fiddle with, foot the tripod and almost begin to shoot a photograph or two when my little one spills over all the chickpeas, gives up on them instantly and hovers over to tripod, attempts a climb, almost tumbling over it. I tip toe over the scattered chickpeas, just managing to balance the falling camera on a single foot and my toddler on another! Again, I give up, shove aside the tripod and shoot by hand with a few shaky shots and some good angles. Did I say life of a blogger mom was adventurous? True!

Okay, so by now I somehow manage a few shots here and there and then sit down to processing the files, generally when my baby is off to her sleep. And today she decides not to sleep. I sit her till the noon, simply hoping I can make through this post today! She's off to sleep and I sit to blog about it, my thoughts are totally empty. Heck! Where do I start? Every blogger's foe, that blogger's block! I try to start, then just let it go. Instead I manage to do my processing and editing. Of the hazaar photos I click randomly I short-list to the chosen few. By then my little one is awake. Here I go off again, almost being sure this will have to wait another day, may be next year too...??? Yeah, I did say life of a blogger mom was uncertain.

With all that said and done, I finally have my post here, though not exactly on time as I would have preferred it earlier in the day. I sat at a stretch, almost 3 hours and managed to crack a good long write up too! And as it gets published, its fun and exciting. As the comments pour in, it gets entertaining too :) That's life being a food blogger and toddler's mom too!
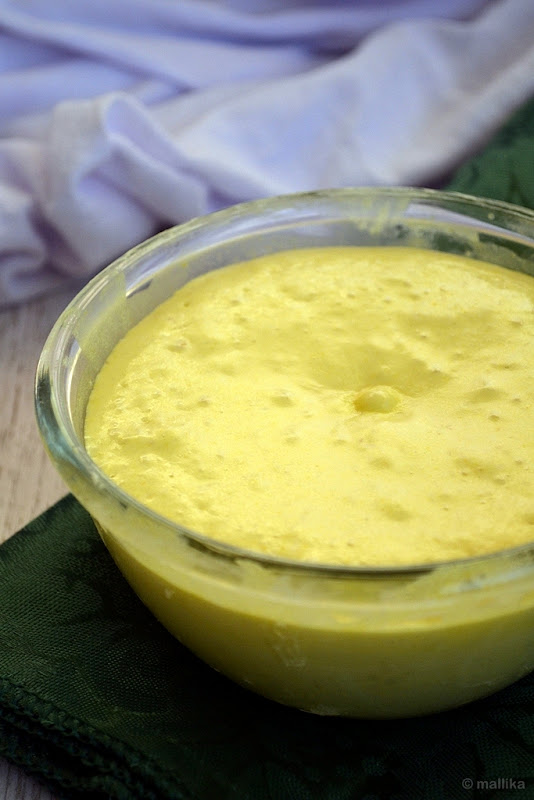

Sihi Huggi

INGREDIENTS

1/2 cup moong daal
1 cup rice
3 cups milk
1 cup water
2 tbsp. clarified butter / ghee
1 1/2 - 2 cups sugar or jaggery (adjust as per taste)
1-2 cardamom pods, crushed
A handful cashew nuts & raisins
A pinch of saffron

DIRECTIONS

Wash and clean the moong daal and rice and keep it aside for about 10 minutes. In a pressure cooker, add the moong daal, the washed rice. Cook them in 2 cups of milk and 1 cup of water to 3 whistles. If you do not have a pressure cooker at hand, use a regular cooking pan and cook the daal and rice till they turn soft and mushy. Once cooled, lightly mash them using the back of the ladle once cooked. Add the sugar to taste and adjust the thickness of the huggi by adding remaining milk, if necessary. Add in the saffron and stir well. Heat it till it comes to a boil. I've used sugar here since I ran out of jaggery, but I suggest you try the jaggery version as it tastes great too!

Next, heat three tbsp. of ghee in a wide mouthed pan. Add cashews and fry till they turn golden brown. Switch of the flame and quickly toss in the raisins and cardamoms. Allow them to plump in the heat. Garnish the prepared sihi huggi with the fried cashews and raisins and serve hot.


Khara Huggi

INGREDIENTS

1/2 cup moong daal
1 cup rice
2 tbsp. clarified butter / ghee
1 tsp. turmeric powder
1 tsp. cumin seeds
1 tsp. chopped ginger
2 chopped green chillies
1 tsp. whole & broken peppercorns
A sprig of curry leaves
Salt to taste
A handful cashew nuts

DIRECTIONS

Wash and clean the moong daal and rice and keep it aside for about 10 minutes. In a pressure cooker, add the moong daal, the washed rice along with chopped ginger and green chillies. Cook them in sufficient water (about twice to three times the quantity of rice and dal) to 3 whistles. If you do not have a pressure cooker at hand, use a regular cooking pan and cook the daal and rice till they turn soft and mushy. Once cooled, lightly mash them using the back of the ladle once cooked. Add turmeric and salt to taste. Adjust water to your desired thickness as necessary.

Next, for the oggarne, heat three tbsp. of ghee in a kadai. Add the cumin seeds. When the cumin seeds turn fragrant, add torn curry leaves, the whole and broken pepper and cashew in the ghee till the cashews turn golden brown. Garnish the prepared huggi with this oggarne and top with more roasted cashews before serving.

Wishing you all a Happy Sankranthi this season!


Hope you had a fabulous Diwali! We did and continue to do so over a couple of days. We came together, lit up the evening, met up family and friends, shared wishes, had fun the eco-friendly way, celebrated minus the crackers, snacked well (of course should I even mention that???) and had a great evening in all. Food becomes an integral part of our celebrations and is rooted to our traditions, so this Diwali wasn't any different for us in terms of feasting.

You do remember I spoke about making sweets and savouries like, Kala Jamuns and Boondi on my previous post for this Diwali? Oh I forgot to mention using boondi in Chiwda and frying up some delicious crisp, thin Jalebis to make our evening warm and memorable.


Making Jalebis have always been on my mind. I had my inhibitions, probably the process of making sugar syrup and frying them made me nervous. However, with my little one around and in an attempt to satisfy her food cravings, I am tempted these days to experiment with dishes that I hesitated in the past. My tiny tot is an average eater, but she enjoys a good deal of variety on her plate. She takes me to surprise with her food habits and likings, her uniqueness with tastes, which can get quite unpredictable!

I pulled my sleeves up well with the art of making jalebis which aren't as difficult as they sound or seem like. The video by Manjula's kitchen did boost my confidence quite a bit and I set out to fry a small batch (measured half the quantity of tea cups), yet they seemed like a lot. Easily made up close to 20 odd jalebis. I chose an instant recipe using yeast, trust me it works beautifully. My grandma is an expert in making these the traditional way by soaking flours in curd and leaving them to ferment overnight. Every Diwali, way back in her kitchen, she would slave for hours, to carefully break open the eye of an empty coconut shell to pipe out perfectly round jalebi batter over a large wok filled with oil, fry them gently and dunk them into delicately flavoured sugar syrup, an appealing dessert that could easily serve a huge crowd and satisfy many taste buds. She was quite surprised knowing the fact that I hardly slaved over these. I replaced the besan to equal amount of rice flour as per my grandma's suggestion and the resulting jalebis were very crisp and sinful.

To be honest, I wasn't sure if the photographs here were good enough to post. So I apologize since the eve was hectic and with all that I had at hand I shot them in a hurry. But then its Diwali season and jalebis should be here hence.


Crisp Jalebis

INGREDIENTS

Batter:

1/2 cup All Purpose flour
1 teaspoon rice flour
1/2 teaspoon yeast
1/2 teaspoon oil
1/2 teaspoon sugar
A pinch of turmeric for color (optional)
About 1/3 cup of lukewarm water (as needed)

Oil to fry

Syrup:

1 cup sugar
1/2 cup water
Pinch of cardamom powder
Few strands of saffron
1 teaspoon of lemon juice

DIRECTIONS

Dissolve the yeast in warm water and allow it to sit for about five minutes. Mix the flour, rice flour, turmeric, oil and sugar together. Add the yeast solution and mix well, making sure that there are no lumps and the batter is smooth. Set the batter aside and let it sit in a warm place for one hour. Make sure the batter is fermented. After fermenting batter will rise high and look frothy like the above picture.

Boil the sugar and water together. Add the lemon juice and saffron and close the heat.

Heat the oil in a kadhai or a frying pan. Check if the oil is ready by dropping dots of batter in the oil. If batter sizzles and comes up without changing color its ready. Fill the Jalebi batter into a piping bag with a plain round nozzle. Squeeze the Jalebi batter out in the hot oil in a pretzel shapes and fry them until golden-brown on both sides. Transfer into the warm syrup. Let jalebi soak in the hot syrup for a few seconds and take out. Serve hot.

Note: Having the oil at right temperature is the key to good jalebis. Fry jalebis on a low flame till they are golden in colour. I got a hang of this after my first 2 jalebis turned brown. Switch off the flame if the oil is too hot and the jalebi burn.

Last week I almost felt like the awesomeness of December winter was in the air. That’s when the bizarre North East cyclonic storms gave us an iconic threat with gusts of wind blowing hard and our toes went curling numb. It had been long time since Bangalore saw such rains, winds and chillness, a much desired respite from battling water problems in our city. Rain Gods heard our prayers, loud and clear. Misty Bangalore sky cried all day long and so through the night, bringing along with it biting cold, good drizzle and much shower we needed earnestly. We rushed home from work drenched in rain to stay indoors, sipped on piping hot adrakwali chai, snacked on spicy corn nuggets, enjoyed the melody of raindrops dripping onto our balcony shades, relished simple warm dinner and enveloped ourselves in the coziness of duvets pouncing on us, doing all that pleases one’s senses to stay cosy on a lovely rainy day like this one.


The splendid weather reminded me how much I love rains and winters. Though these rains really irk the hell out of me and have never done much good to my health or my sinuses, inhaling the aroma of the wet soil and indulging in some sizzling, spicy food can ignite happy mood and evoke nice feelings. It’s a perfect time you sit on the porch observing dark gloomy skies, while relishing some fresh hot pakodas, or sip hot, spicy masala chai and enjoy the showers outside in disposition to elevate the blissful moments.

But then to break the traditional monotony of snacking on pakodas and bajjis, to keep it healthy in lure of my health and to deem it ideal for my little toddler too, I whipped up these quick guLiappams, flavoured them with grated sweet corn, freshly chopped mint and seasoned them with green chillies. GuLiappams are traditionally South Indian breakfast dish made using fermented lentil batter, often spiced mildly, authentically made in cast iron appam mould (a slotted pan where the batter is filled) and cooked on a gas top. The ones I made are quick, instant and spicy too, making them ideal for breakfast. I paired them with some spicy peanut chutney powder I made in the day and they made up for an excellent evening snack we craved for the rainy day.


Corn and Mint Appams

INGREDIENTS

1/2 cup semolina (sooji rava)
1/2 cup rice flour
1 sweet corn, grated
Couple of mint leaves, chopped
1/2 cup regular yogurt or more (not the Greek/thick yogurt kinds)
1-2 green chillies, chopped to fine pieces
1 tsp. baking soda
Salt to taste

DIRECTIONS

Grate the sweet corn and mix in semolina and rice flour to it. Add in regular yogurt little by little till it comes to thick batter consistency. Sweet corn as some water content in it, so judge the amount of yogurt required to make a batter as thick as cake batter or dropping consistency. Add the chopped mint leaves and green chillies and adjust salt to taste. Whisk well. Finally add in the baking soda, give the entire batter a quick, good whisk.

Oil the appam pan well and bring it to heat. Using a spoon, scoop out the batter and drop into each appam mould. Fill all the moulds with the batter and allow to cook on medium low heat. Carefully flip the appams upside down and allow them to crisp well on both the sides. Serve hot with some fresh coconut chutney or chutney powder like I did.


Pick up one, take a bite, its savoury, spicy and bold. The Peanut chutney powder I made earlier in the day added further to the spice, making it delightfully right for that evening. I shall share the recipe for Peanut chutney powder in my forthcoming posts. Till then, make merry, enjoy life and celebrate Diwali in full fun and masti!

How to make Kashaya, Kashaya recipe
Yesterday marked the beginning of Navratri, a festival celebrated over nine nights and ten days, each day signifying the form of Devi or Shakti, followed by Vijayadashami or "Dussehra" celebrated on the 10th day. For many it may mean fasting, for others like me, it calls for feasting. Almost every year I look forward to this festival, for the delicacies my mom makes in bounty at home. Devi happens to be our moola mane devaru (ancestral home Goddess), so our ancestral Goddess is also offered with Pooja, flowers and variety of delicacies over all 10 days. Guests flood home, glass bangles offered to young girls and traditional food in varieties is home cooked by ladies and offered to the Goddess during the Pooja and then served on leaf to all the guests for lunch.


Despite settling in a metro city like Mumbai, the rituals were followed religiously at my paternal ancestral home, and they still continue to do so. While my mother's side were put up in a more rustic village home, where the village temple offered live tableau, cultural activities, traditional Poojas during Navratri time. During the time when the village went out of power, the light from mashaals and aarati brightened up the streets and the bhajans sung by devotees rang music to our ears. It was a common sight to watch tattiraayas (humans dressed in 7ft. puppets) and huLivesha (men dressed in tiger costumes) dance to the rhythms of dhols that brought life to the otherwise silent streets. When the lights from the aarati lit up the far end of the streets and faint hearing of dhols and bhajans pecked our ears we would run out on streets to be a part of that ceremony and dance along till it reached our home. By then the elders and ladies wait outside their house, holding a thali, often decorated with flowers, coconut, kumkum and diya for the Pooja. The poojari would patiently collect each thali, offer to the Goddess, break the coconuts and return them back to the ladies. Everyone on street flocked around the returned thali to take their quota of blessings. We never felt the need for any other form of entertainment as the vibrant culture and the simple pomp of village life kept us occupied.

Both the sides of my family were different in many ways. Never the less, the joy of celebrating the festival was the same in both my maternal and paternal ancestral homes and I surely miss them now.


One thing that almost seemed similar on both the sides of my family was this Kashaya, a herbal drink usually served instead of tea or coffee. Kashaya is a very popular drink in the South and considered a coolant in summer heat. I remember clearly the only time we had Kashaya was when we visited our relatives in villages or grandparent's home. Because it was healthy, soothing and loved by all. It had characteristic sweet and spicy flavors from jaggery and pepper. At times when we had bouts of cold or cough, my ammamma would spice it up with loads of ginger that could soothe the scratching throat. Not that kids liked it much, but yet we gulped it down with less choice as elders relished it. When we visited our relatives or they flocked home, Kashaya made it's warm presence felt. In between talks and summer heat, minus the fans or electricity, Kashaya gave a warm soothing relief which most elders enjoyed.

I do hope you will try the recipe I share and enjoy at home. Bring back your old memories and live them.


Kashaaya: Indian Herbal Brew

INGREDIENTS

For the powder:

2 cups coriander seeds
1 cup cumin seeds
1/2 cup fennel seeds
2 tbsp. black pepper

For kashaya:

1/2 cup water
1/2 cup milk
1 tbsp. jaggery
1 tsp. fresh grated ginger or ginger powder (optional)
1 tsp kashaya powder

DIRECTIONS

Dry roast all the ingredients in low flame till mildly fragrant. Allow it to cool completely. Grind it into a fine powder. Store in an airtight container.

To prepare Kashaya, heat water along with the Kashaya powder, jaggery and ginger (optional) till it comes to a rolling boil. Allow it to boil for 2 minutes. Turn off the flame and add hot milk. Stir well. Strain through a muslin cloth and serve hot.


If you thought why there were no updates here or if I went missing, let me tell you I was in my hometown recently. A nice long weekend spilling over Monday ensured another trip down to Mangalore. Long weekend spent in Mangalore during the Independence day followed by Eid gave us a well deserved break and good respite from daily chores of work and home. Adding to it, the fantastic coastal weather in Monsoons added a feather in the cap. If you've been down South visiting the coastal parts of Kerala and Karnataka during the monsoon you'll be smitten by the beauty of nature and vast greenery the rains bring in.

While in Mangalore, we often binge on dishes made with coconuts. Coconuts form an integral part of coastal cuisine since they grow in plenty in this region. With no doubts you can be assured that the juiciest and sweetest coconuts can be fetched from these coastal regions of our country. I have often shared my love and immense fondness for Tamblis in the past on my blog. I don't think I need to even stress saying that this particular soup / Tambli does list as one of my favorites. Pair it with a generous helping of rice, a papad or pickle to go with and you have the most humble meal for a warm afternoon.


Tambli: Fire Roasted Tomato and Fenugreek South Indian Soup

INGREDIENTS

1 large tomato
1 tsp fenugreek seeds
1 tsp cumin seeds
1 tsp oil
1 tbsp fresh/frozen coconut
1 cup yogurt
3 red chillies
Salt to taste

For Tempering:

1 tsp. Oil
1 tsp. mustard seeds
1-2 whole red chillies
1 sprig of curry leaves

DIRECTIONS

Lightly oil the tomato and fire roast it on an open flame till the skin turns brown. Allow it to cool down. The skin will wilt as it cools, hence you should be able to peel them easily. Lightly roast the fenugreek seeds, cumin seeds and red chillies till you get the roasted aroma from them. Don't let them brown a lot as they will turn bitter and lose the taste. It takes about a min or two. Cool and grind them along with the roasted tomatoes and coconut. Lightly beat the yogurt and this paste to it. Tamblis are usually thin and a little runny in consistency. So adjust by adding extra water if required to bring it to thinner consistency. Add salt to taste.

Temper the Tambli by seasoning it well. Heat a tsp of oil in a kadai. Add mustard seeds. As they begin to pop, add in the red chillies and curry leaves. Let the curry leaves fry for half a minute or less. Pour this seasoning over the Tambli. Serve it cold over steaming hot rice.


Almost at the end of January and I am surprised how fast the month of January passed by. Wasn't it hardly a few days ago that we spent a gala holiday time partying for the New year? And boy, we've already crossed a month! Personally for me, this month has been packed with lots of surprises and challenges. On professional front, I am excited as my career graph moves a step ahead and am looking forward to the new learning and challenges it poses. Fortunately, the strong support from my family ties keep me enthusiastic and passionate about my work.

A lending hand does come from my parents, especially my mom. And with their relentless support I have been able to manage home smoothly. At times, when I am back home exhausted from a long day at work, mom resues me with her ready to cook batters, instant powders and spice mixes. Even her freshly chopped vegetables or picked and cleaned greens give me a helping hand that make our life much simpler. Preparing the batter or chopping vegetables may look less of an effort, but honestly it's one of those kitchen jobs I always detest to do. Like this simple Ragi dosa that doesn't require much of an effort, but a good amount of time for soaking and grinding. Looks extremely simple and hardly an effort, yet not so! While I generally get Ragi dosa batter from my mom, this weekend I pursued to make them myself so that my litte one could relish them too. This also happens to be my husband's favorites and he prefers this over the plain urad dosa.


Ragi Dosa

INGREDIENTS

1 and 1/2 cup ragi flour
1 cup urad dal
1 cup raw rice
1-2 tsp methi seeds
Salt to taste

DIRECTIONS

Wash and soak urad dal, rice and methi seeds in ample amount of water for atleast 3-4 hours. Discard the soaked water. Grind them together to a smooth paste using less than half a cup of water. Finally add in the ragi flour and stir the batter very well. The batter should be thick, not runny. Transfer this batter to a large vessel which can accommodate double the volume. Place in a warm dry place, like that of a pre-heated oven. Allow the batter to ferment overnight or atleast 8 hours. By then the batter will rise due to fermentation. Beat the batter well before preparing the dosa.

Oil an iron griddle and heat it. If using a non stick pan, oiling is not required, but I suggest you use an iron griddle for best thin and crisp dosas. Take a laddle full of batter and spread them on the griddle gently using the back of the laddle. If you find the batter too thick and not spreadable, then add little extra water, beat well and make dosas. Serve hot with fresh chutney.


Ragi or finger millet is extremely healthy, gluten-free and rich in iron and vitamins. You can make thin or thick dosas depending on your taste. We prefer thin and crisp dosas, sometimes paper-thin too and they go very well with ghee and chutney. On occasions when I am short of time to make chutneys, I serve these with a dollop of ghee-honey mix. As kids we've loved that combination and I can eat almost anything that way... breads, rotis, dosas, idlis... I guess almost anything. It's one of those traditional tricks my grandma used to lure kids to enjoy our breakfast. Simply mix equal quantites of ghee and honey and serve a dollop of this with the dosa. They taste yum!