Like every year, this year too I was in my hometown during the Christmas Eve. There is something mystical about being in Mangalore during this time of the year. With the Churches lit magnificently, carols sung, chimes ringing and the cribs bedecking, it takes me back to my fond memories of just being there, making merry and enjoying every moment.

Though Christmas was never celebrated at home, it always held a special space in my heart. After all it roots me back to my Catholic school where every year this season would be celebrated in utmost fiesta fashion. Infact, our parents encouraged us to celebrate in the ways we could. Bringing home plum cakes or wishing neighbors was never ruled out.

I love the spirit that Christmas brings. It fills the air with a lot of fun and merry everywhere. We love the walk into malls and shops where the Christmas trees are adorned with tiny tinsels, bells and stars. The glitter that these bring to the shops and malls makes the entire place look like we have walked into a fairy land from a fairy tale book. During this time of the year, there is laughter and fun and all are in holiday spirits. Uncork the champagne.... It's another year end. Amazing how a Christmas can infuse so much life into people.

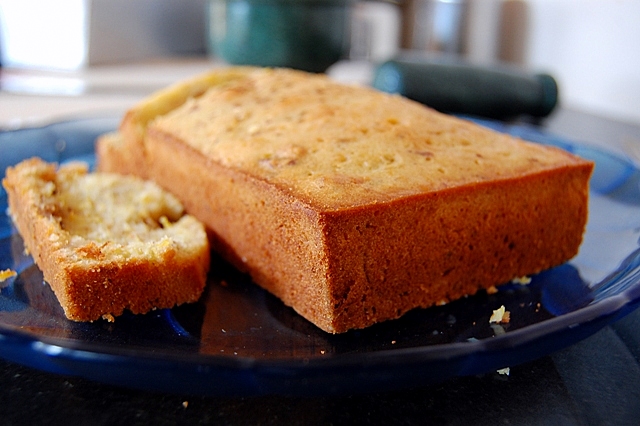
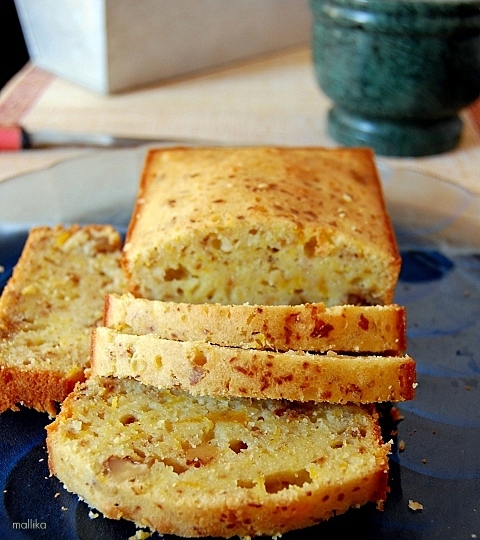
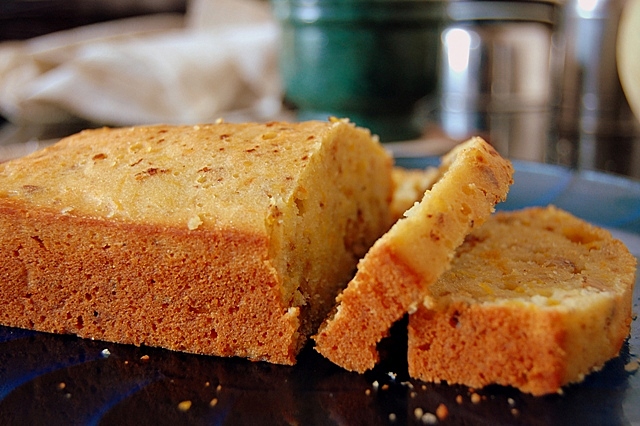
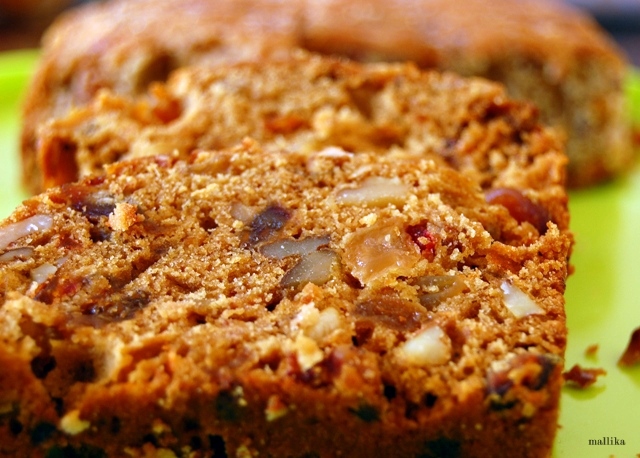
On this occasion, I made the traditional Christmas cake. It's commonly called as Plum cake, though it doesn't contain any plums in it. It has fruits soaked in rum for close to a month. Loads of raisins, sultanas, apricots, tuti-fruities, fruit peels, dates, cashews, pistachios, almonds, etc. with the warm earthy spices infusing this cake with rich aromatic fruit and rum flavors.


Christmas Fruit Cake

INGREDIENTS

50 gms raisins
50 gms sultanas
50 gms apricots
50 gms cashews
50 gms almonds
25 gms dates
25 gms pistachios
1 tsp fruit peels (lemon & orange)
2 tbsp rum
1 tbsp orange juice
1 egg
100 gms butter
250 gms all purpose flour
50 gms granulated white sugar
50 gms brown sugar
A tbsp of water
1/4 tsp baking powder
1/2 tsp baking soda
1/2 tsp cinnamon powder
1/2 tsp cardamom powder
1/2 tsp clove powder
1/2 tsp salt


DIRECTIONS

Making the Fruit cake would require some preparations ahead of time. So plan in advance. Soak the raisins, sultanas, apricots and fruit peels in rum a few days ahead. Allow it to absorb all of it. Let it rest. Probably refrigerate it. That's how I left my fruits to soak. On the day of bake, bring them out to room temperature. Add the rest of the fruits, dried fruits and tuti-fruties (colored papaya bits) to it. Dust these with a little all purpose flour so as to prevent sinking in the cake batter.

In a pan, add the granulated white sugar with a tbsp of water. Bring it to a boil gently. Allow to bubble through till the sugar syrup turns golden brown. It burns very quickly if unattended. So take care that the sugar is deep golden brown in colour, but not burnt, else it will taste bitter. Add the butter and brown sugar to this and combine well for a minute. Turn off the flame and set this aside to cool a little. This is how the cake gets its golden brown colour. Next add a tbsp of orange juice.

In another bowl, beat an egg. Add this to the above mixture and combine well.

In a mixing bowl, mix all the dry ingredients like the all purpose flour, baking powder, baking soda, salt and the spices. Make a well in the centre of this, add the prepared wet mixture into this. Add in the dry fruits and nuts and fold gently till it's combined.


Spread the batter on a greased baking dish and bake it gently on 180 degrees for about 45 mins till a toothpick inserted comes out clean. Allow it to cool on cooling rack.

This may look like a lot of work, but this is what makes the fruit cake so different and special from the others. Fruit cake is allowed to mature a day or two before consuming. This allows the fruit flavors to infuse well into the cake, making it moist and richer with time. You may also wet a kitchen towel with rum and cover the cake in the rum soaked towel as I did. This makes it better and helps it last longer. This cake is lavish with fruits and nuts with every bite making you feel rich and heavenly!


When I first purchased the tart molds, my imaginations limited to making sweet tartlets out of these. I had several recipes at hand. However, on the Christmas eve I brought these out, I was not in a mood for making any dessert. I had already been through my baking of sweet treats for the festival. Instead, I craved for some savory to satisfy my hunger pangs.

Even as I dug into my refrigerator with the thought of savory treats, I found all the ingredients stocked that perfected the recipe I had on my mind. Spinach, cream and cheese and that's all I needed to flavor this recipe...

In French cuisine, a quiche is a baked dish that is based on a custard made from eggs and milk or cream in a pastry crust. Usually, the pastry shell is blind baked before the other ingredients are added for a secondary baking period. Other ingredients such as cooked chopped meat, vegetables, or cheese are often added to the egg mixture before the quiche is baked. Quiche is generally an open pie (i.e. does not contain a pastry covering), but may include an arrangement of tomato slices or pastry off-cuts for a decorative finish. Quiche can be eaten warm but is more commonly eaten cold, making it a suitable component of the food served in a typical summer picnic. (Source: Wikipedia)


The best part of this recipe is the base tart which was made crisp and spicy. The spinach filling itself was mildly flavored, with hints of cinnamon and nutmeg. It could probably have gone with more cheese for the filling which I realized after it came out of the oven. Never the less, it was still great. Although I used cheddar cheese which has a sharp cheesy taste, the spinach fillings can be paired well with cottage cheese as well. The cheese would taste milder then. They might seem intimidating, but they’re easier than you think!

Spinach n' Cheese Mini Quiche

Prepare the tart base:

100 gm all purpose flour
50 gm cold butter, cut to pieces
1/2 tsp red chilly powder
Salt to taste
Ice cold water to bind

Begin with mixing the flour, red chilly powder and cold butter in a mixing bowl using finger tips, till the mixture resembles coarse breadcrumbs with no large lumps of butter remaining. Work quickly so that the butter does not melt resulting the mixture to become greasy. Next, make a well in the middle and pour in the ice cold water. Using a fork, stir and bind into a smooth dough. Wrap the dough with a cling film and put it into the freezer for 10 minutes. Place the dough between 2 sheets of cling films and roll from the center to the edges till it is about 1/8 inch thick.

Cut out circles larger than the tartlet molds. Gently fit them in the molds and press them to the edges. Blind bake (without any filling) them for about 10 minutes.


Prepare the tart fillings:

2 bunches spinach leaves, washed and chopped
4-5 chopped garlic pods
1 tsp melted butter
2 tbsp fresh cream
1/4 tsp cinnamon
1/4 tsp nutmeg powder
Salt & Pepper to taste
A dash of lime
Grated cheddar cheese

Finely chop the washed spinach leaves. On a pan, melt butter and add chopped garlic and fry for a minute. Add the chopped spinach leaves and let it to cook for few minutes. Add the fresh cream and the spices. Stir well. Remove from the stove and add and dash of lime juice if you prefer tang. Season with salt and pepper to taste. Top each tart with grated cheddar cheese. Fill the spinach filling into the tarlets and bake them again on 180 degrees C for about 15 minutes or till the cheese melts. Tastes best when served warm.


Wishing everyone a Merry Christmas and a Happy New Year!


As we are heading closer to Christmas, we are gearing up in full spirits to celebrate it. Kitchen stocks are being replenished and the bakewares are out for use. We are making preparations in a big way. Yes, I have also been making grand preparations for the big bake to happen at our home. Recipes have been bookmarked. Fruit soaking in rum will be brought out for the cake. Gingerbread and cookies will emerge from the oven.

On this eve, new purchases have been made. Muffin trays, paper cups, pie dish, tart molds were my recent acquisitions. Ask myself, I know how what a great deal of effort has gone into this chase and hunt for the bakewares that I recently got. Getting the muffin trays, the pie dishes and the tart molds weren't easy at all. They posed a true challenge to buy them in India.

My hunt began with the search for muffin trays. I needed them badly. I had gone through every possible online shopping site, none catered to my needs. I must have gone shop to shop, mall to mall, bakeries to bakeries, almost being thrown around in the ping-pong style. Some promised, but never got back, while other turned to a bemused gaze. To an extent that I did not even spare the local kirana stores or even the cosmetic outlets. Contacted my friends abroad to check if they could help. Also crossed the thought that I may probably have to fly down to a different country to get them! That was the tale of my hunt.


As I was about to give up my search, I came across an outlet, Jamaal's which was recently inaugurated in a mall close to our place. These guys hit my bet right. As I walked into their outlet, I was mystified to see the wide range of baking stuffs, kitchen items, cooking gears, crockery sets, etc., all that would satisfy the wants of modern kitchen homes. I managed to grab a few stuffs like the muffin tray and pie dish from them, all costing me a bomb as they were mostly imported. Well, did I have any alternate choice? I managed to get tart molds and mini pie dish from a different store and they were great too. I have been chasing them on a spring form pan which I have not been able get my hands on. So that's going to be a long wait. On a lighter note, I was glad that I could collect these just before the Christmas season.

We are now sailing in the Yuletide spirits and gearing for the year end. At this time of the year, there is a great sense of excitement. An year has passed by and it will be a new beginning, a new start, new hopes and new promises. What can be a better way than starting it on a sweet note?

To get into the Christmas temper, I made these decadent chocolate cupcakes over the weekend.


Chocolate Walnut Cupcakes

INGREDIENTS

1/2 cup butter, room temp (50 gm)
1/4 cup sugar (25 gm)
1 large egg, room temp
1 cup sweetened condensed milk (100 gms)
3/4 cup flour (75 gms)
1/2 teaspoon baking powder
1/4 teaspoon baking soda
1/4 teaspoon salt
1/2 cup unsweetened cocoa powder (50 gms)
1/2 cup milk
1 teaspoons vanilla extract

DIRECTIONS

Preheat oven to 375 degrees. Beat butter with sugar until they are light and fluffy. Beat an egg. Pour in the condensed milk, vanilla and milk. Add this to the butter-sugar mixture. Mix well. Add the flour, baking powder, baking soda, salt, and cocoa powder into another bowl and whisk to combine. Add the wet to dry ingredients. Scoop batter into cupcake cups about 2/3’s full. Bake these cupcakes for about 25 minutes or until the fork comes out clean.


I drizzled these with a tsp of warm chocolate sauce before serving to add chocolate deepness to it. I do not have a photo captured to show how moist and good the cake was when bitten into it. This is because these were all waiting to be gone by the time I took these photos.

The cake turned up beautifully. These sinful chocolate walnut cupcakes were moist and gooey and every bite into this is a pure pleasure for chocolate lovers. The walnuts added a good deal of crunch to complement the moist sweetness of the cake. This surely makes a good start for Christmas bakes to come ahead!


I love my cookery shows and I am quite hooked to them. I enjoy watching them on the idiot box more than browsing for recipes over the net. I was recently watching one of these cookery shows called Rachel Bake! By Rachel Allen. Ms. Allen shows some incredible stuffs with baking. Her baking is not just limited to desserts but a wide range of savories, tarts, pies and breads. One of her recipes included Swiss rolls with strawberry jam and cream stuffed between sheets of sponge cake. She shared the recipe from scratch which included making the sponge cake. During the course of teaching this recipe to her cooking school students, she says this is a guilt free version with no butter in it. Now, I had to give this one a try, indeed a no butter would mean truly guilt free!

Instead of making the Strawberry Swiss rolls, I tweaked the recipe to make cup cakes instead. The basic recipe pretty much remained the same with minor changes. Instead of 4 eggs I used only 2 and in turn used a quarter tsp baking powder which was not called for in her recipe. Honestly, I don't like the eggy flavors coming through the cakes. So I prefer using them in lesser quantities than what is generally mentioned in a recipe. Cake turned out good, but not fantastic as I had expected. They really lacked the much needed fat in them. They came out spongy, yet dry in flavors. These did have eminent eggy flavors coming through. Having made sponge cakes in the past, I could clearly perceive the difference. These cakes definitely require a great amount of filling to camouflage and compensate the shortcomings due to missing butter/fat. Luckily, as per Rachel I used strawberry compote as fillings and this supplemented the flavors. You may use any other fillings of you choice. Rachel also recommends raspberry fillings with cream.


Strawberry Muffins

INGREDIENTS

125g plain flour, plus extra for dusting
2 Eggs
125g caster sugar
2 tbsp warm water
1 tsp vanilla extract
1/4 tsp baking powder
Melted Butter, for greasing

For the filling:

6 tsp strawberry jam

DIRECTIONS

Grease the muffin tray with melted butter. Whisk the eggs and caster sugar together in a large mixing bowl until it's light and fluffy. Then add the water and vanilla extract. Add the baking powder and the flour, about one-third at a time, and fold it into the mixture gently. Pour the mixture gently into the prepared muffin tray till it is half way high. Drop a tsp full of strawberry compote in the middle of each batter to form the filling. Cover with the remaining batter about three fourths up and leave room for the cake and bake in the oven for 20 minutes, or until the cake has shrunk away a little from the sides of the tin.


Break open the cake and there you'll notice the strawberry fillings. These strawberry fillings can sink in to the bottom, so be sure that you have filled the batter half way up and then drop the compote and cover them. Bake them immediately. Rachel suggests to place a clean damp tea towel over the cake and leave to cool for 30 minutes. I sprinkled a good amount of fruit juice to keep these cakes moist.

These are great as tea time accompaniments. We enjoyed them over a good cup of masala chai. I ran out of cream, so these went without any frosting. Top them with a good frosting of your choice and you can take double pleasure indulging in these. Of course, you can't call them guilt-free then, yeah! The next time I make these, they will surely be accompanied by a cream topping.


We are not fussy when it comes to eating and this blog is repertoire of that. There are hardly any vegetables or fruits we dislike. With an exception of capsicum which my husband is not particularly fond of, he will eat anything and everything if tastefully made. He doesn't despise eating peppers, but prefers them mixed with other veggies. I make a stuffed version that he truly adores and insists on making it every time we get capsicum home. That's a very Indian stuff with potatoes, onions, nuts and masalas.

I often make stuffed vegetables of different kinds. Sometime baked and sometimes roasted. I make the stuffed and baked vegetables on our weekends when freedom of time is at hand. We thoroughly enjoy them.

Mushrooms were not as common earlier as they are these days. We hardly used to get them home and even if we did it meant a day to treat for us. In fact, whenever we went out to dine in a restaurant, we would ensure that we ordered at least one dish that included mushrooms. Be it Chinese or Indian or Italian or any other cuisine, a must have's on our menu order was either mushrooms or baby corns. That meant delicacy for us, to get away from the routine, something different from the usual food.

It used to be so uncommon then that my friend and I would often joke that we would run a mushroom cultivation business some day and it would turn a big hit in Indian markets. Well! That only remained a joke! Fetching these now is not an issue as we get them in almost every super market.


Recently on a week day, I was back home pretty much tired and strained from work. I had a fresh pack of mushrooms in the fridge and I intended to make usual subzi out of them. However, since I didn't want to strain myself much, I decided to go an easier way. Instead of the Indian stuffing, I opted to use Italian herbs. These stuffed mushrooms were an instant hit and I bet a single bite will not satisfy you.

Quick and easy... these were indulgent and awesome. Served with cheese n' garlic breads, they made a brilliant combo quick meal. They will leave you craving for more.

Stuffed Mushroom Caps

INGREDIENTS

200 gms button mushrooms
1 onion, finely chopped
2-3 pods of fresh garlic, finely chopped
1/2 capsicum, finely chopped
1 tbsp tomato sauce
A pinch of salt
A pinch of pepper
1 tsp olive oil
1 tsp Cheddar cheese
Italian seasoning


DIRECTIONS

Button mushrooms work the best as they can hold a good amount of stuffing. Wash the mushrooms and dry them on a towel. Divide the mushroom caps from stems and keep these caps aside.

Prepare the filling:

Chop onions, garlic, capsicum and the mushroom steps finely. Add a tbsp of tomato sauce and Italian seasoning along with a dash of salt and pepper to taste. Fill them in the mushroom cap till the top. Top them with grated cheese. Arrange these stuffed caps on a baking dish. Drizzle some olive oil and bake for 15 minutes on 350 degrees till the cheese begins to melt. The mushroom may leave water while baking, but that's okay. Do not over bake them as mushrooms cook quickly and may tend to get soggy to baked long. Serve hot.

Serving Suggestion: Top with dried Italian herbs and serve with any bread and soup.


My sweet tooth never lets me live in peace. It let's me down way too often. I hate to admit that I love anything and everything that is sweet and has sugar. I know the fact that it is not so nice on the body. Despite all possible attempts at keeping me at bay from sweet meats by my near and dear ones, I sneak way too often with no resistance to my temptation to grab few on almost daily basis. Honestly, I go through a guilt feel. But my weakness wins over most of the times. All my attempts at trying to stay away from them have gone in vain. I have been trying real hard, cautiously, but no go.

Every time, I enter the kitchen with a thought to make a dessert, I have a mind that strongly disagrees to it, but a heart that never approves. This is how the conversation goes...

Heart: Shall I... ?
Mind: No, that's not for you...
Heart: Please!!!
Mind: You know it's not good for you...
Heart: I know... hmm... but it's not for me... it's for him (my hubby)...
Mind: It's always for him... but you eat them most...
Heart: I know, that was last time... not this time I swear!
Mind: Hmm... ok, go ahead
Heart: Yippie!!!

And the heart wins always...


I was recently in the same situation. My hubby was out on a trip and I had some free time at hand. I had Chiroti on my mind for long. In fact, I wanted to make these for Diwali, but somehow couldn't make them then. I made these recently in his absence. They were really good. I probably would require more mastery in making these, but for the first attempt they came out really well.


Chiroti

INGREDIENTS

2 tbsp semolina/chiroti rava
2 cups all purpose flour/maida
1 cup water
1/4 tsp salt
1 tsp cardamom powder/elaichi

1 tbsp all purpose flour/maida
Ghee for greasing

Oil/Ghee for frying
1 cup finely powdered sugar


DIRECTIONS

Make a dough by mixing semolina, flour, cardamom powder, salt and water. Add more flour if it's too soft. Make it pliable. Leave it to rest for 10 minutes.

Meanwhile keep the icing sugar (finely powdered sugar) ready.

Roll out the dough flat using a rolling pin, similar to a nice long roti. Grease this with ghee/butter all over evenly. Next spread all purpose flour on this. Now, starting from one end, gently roll this (like cinnamon rolls) till the other ends meet. Using a knife, cut into 1/2 inch rolls. Dust some flour and roll these to small disks. These will help us in forming a nice multi-layered dough almost similar to a pastry dough.

Now, heat ghee/oil in a frying pan. Let it heat up well. Drop each chiroti to the oil at a time. Fry them on low flame gently till they turn golden brown. When done, remove from oil on to a kitchen towel. Then lay them on a plate and gently spread a generous dose of icing sugar so that they coat them well.

Another option is to drop these fried chirotis to thick sugar syrup. However, they need to be consumed soon and may not last as long as the one coated with powdered sugar. They also taste equally heavenly. These treats are often seen as desserts in our marriages and we relish them a lot. Bite into one of these and you will notice multi-layered thin crispies which you are sure to relish with each bite. Bet you, you can't stop at one!


I am not an ardent lover of pumpkins, but I do enjoy them once in a while. I have mostly relished them only in form of Indian curries. Coming to think of pumpkins in bread or desserts was beyond my imagination. This is primarily because of me thinking of pumpkins only as another vegetable.

As I peeped into my fridge yesterday, I saw half a pumpkin lying pale and dreary, as if it was almost nearing it's end of life. I sympathized with them. So I had to be quick to decide how I could use them effectively. I knew that these would make no justice if I were to use them in a curry. Probably a soup, but no, I was not in a mood.

My mum has often suggested me to try Banana Walnut bread/cake, but honestly I couldn't get a chance. So when I brought out this pumpkin from the fridge, the first thing that crossed my mind was to make a bread or cake out of it. The recipe for Pumpkin Walnut bread was not any different. Just that the eggs were added in for the texture and rise. This also has mild spices which mellow well with the gently sweetness of the pumpkins while the walnuts add the required nuttiness to the cake.

As the bread was baking, it filled the entire house with the aroma. We could see our neighbors' poke their noses out just to smell the fresh bake... just kidding ;) ! As my parents visited us that day, the moment they stepped in, they were too tempted to have this even while it was baking. That's the power of baking!

When the warm bread came out of the oven, I handed a slice of it to my hubby for taste. His expressions spoke a thousand words. "Wow! wow! wow! is what he had to say! Soon the other pieces were also grabbed and these disappeared real soon. They were really good indeed.


Pumpkin Walnut Bread

Dry Ingredients:

1 cup grated pumpkin
2 cups all purpose flour
1/2 tsp salt
1/2 tsp cinnamon
1/4 nutmeg
1/4 tsp ginger powder
1/4 tsp baking powder
1/2 cup brown sugar
1/2 cup sugar

Wet Ingredients:

1/2 cup buttermilk
1 teaspoon vanilla extract
2 eggs
1/4 cup vegetable oil/butter


Preheat the oven to 350 degrees. Lightly coat a loaf pan with melted butter. In a large mixing bowl, whisk together the flour, salt, cinnamon, ginger, nutmeg powders and baking soda. Keep this dry mixture aside.

In another bowl, whisk together the eggs and sugars till they turn pale yellow. Add the buttermilk and then the grated pumpkin. Next, add the vegetable oil and vanilla extract. Blend these well.

Add the wet ingredients to the dry ingredients. Blend them gently. Stir in the walnuts. Transfer the prepared batter into a greased loaf pan and even the top. Bake for about 55 to 60 mins till a knife inserted into the center comes out clean. Remove and set it on the rack to cool. Slice the bread as required.


Mine tasted great, it was perfect. The sweet and spice complimented each other very well. The ginger hinted an earthy flavor, not overpowering at all. The vanilla was at it's best as it blended well with all the spices and gave out really well. I would definitely go back to making this one again and again in future. This one turned a bit moist. But the next time, I would probably increase the quantity of flour a little to make this a little denser. I want to be sure it's slightly dry and crumbly in texture than moist.

Good for breakfast, amazing as desserts and fabulous as tea time snack too. This is sure to be a crowd pleaser!


Sometimes, some of the best things in life are just to relax and pamper the self at home. Plunge into the couch, grab a cushion, read a book with a soothing good music playing in the background... they can give so much happiness than anything else. It can transform a low spirit to a happy heart. And along with this, a good partner to chit chat with and enjoy a nice lemonade or a slush or even a hot cup of tea! Wow! Why can't I do this everyday? I wish I could! Our hectic lifestyle leaves us with little time to spend moments like these, but this is something which I thoroughly enjoy and would love to do whenever possible.

This is exactly what I did this weekend. Relax and revive! Adding to this, it was fun as I got back to my artistic skills of painting after a long time. My skills had almost scraped away and got rusted as I hadn't got to sketching or painting for a very long time. Now after a year or more, and after constant push by my hubby, I thought I had to revive my passion again and that's exactly what I did.


On the food side, I made a Smoothie from Cantaloupe or what we commonly call as Musk Melon in India. This round melon with a netted, often ridged rind and aromatic orange flesh is an excellent coolant and will surpass any other smoothie drink on a bright sunny day. Strangely, I am not really fond of this as a fruit by itself. But I thoroughly enjoy it in fruit salads, milkshakes, as an ice cream, or simply mashed with a little honey or sugar. The brilliant flavors of cardamom add to the distinctive taste.


Cantaloupe/Musk Melon Smoothie

INGREDIENTS

1 Cantaloupe/Musk Melon, cut to pieces
A little ice cold milk/cream
1 tbsp sugar or to taste
1 pod cardamom, freshly ground

DIRECTIONS

Wash and remove the skin of the melon fruit. Scoop the seeds out and cut into pieces. Blend the cut melon pieces with little chilled milk/cream and sugar till it's well pureed. Musk Melon has a mild and melt in mouth taste. When blended it becomes smooth.

Add a little freshly ground cardamom powder and serve in glasses. Add a little more cardamom powder for garnishing. Enjoy this refreshing drink.


For the summer fast approaching, the days getting hotter. With the onset of summer here, I am sending this coolant drink to Madhuri of Cook-Curry Nook who is hosting an event, Summer Soothers I: ‘Juices, Shakes, Smoothies' for this month.


I have been fairly successful in my attempts at making bread. They taste equally as good as the bakery bought ones, so I am happy. I also don't find a too tedious task making them at home. However, baking them for as long as 50 mins to an hour is a real test to my patience.

It has been fun baking bread at home, but honestly, I don't often make them. I find Indian breads more quicker as they need no fermentation time. However, when I do find time, I enjoy making them. I wish I could make them more often. I had a small batch of homemade dried herbs which I had prepared a few weeks ago. I use them often in Italian seasoning and salads. They go very well on toasted garlic bread. So I decided to use them on my bread. These were primarily dried Rosemary. I made these over the weekend and they were really good. These tasted fresh and heavenly when warm. The next day, we toasted leftovers with garlic butter and relished it with strawberry compote. They were good enough to make my day!


Sesame Rosemary Bread

To prepare the bread:

5-10 gm dry yeast
1 tsp of Sugar
1 cup warm water
1 cup wheat flour
1 cup all purpose flour
1 tbsp Olive oil
Salt to taste

Dissolve dry yeast in warm water with sugar. Leave for 5-10 mins to dissolve and become frothy. Next mix the wheat flour and all purpose flour with salt to taste. Add in the yeast, water and oil till a soft pliable dough is formed. Cover with a warm towel or cling film and leave it to rest overnight in a warm place.

Prepare the dressing:

1 tsp Olive oil
1 tsp dried herbs or Rosemary leaves finely chopped
1 tsp Sesame seeds

Heat some olive oil in a pan. As it gets hot, add in the rosemary leaves and sesame seeds and take it off the flame immediately. Allow to rest overnight so that the flavors infuse well.


Next morning, the dough would have risen and doubled in size. Grease and dust the bread tin. Transfer the dough gently to the baking dish. Gently dimple the bread with Sesame Rosemary oil and allow to rest there for about an hour.

Pre-heat the oven to 180 degrees C. Bake the bread for 50 mins to an hour till the top looks crusty and brown. Remove from the oven and allow to cool on the rack for sometime. Slice them as preferred. This compliments well with steaming hot soup and can go great on a rainy or cold day.


I dislike my fridge being loaded with tit-bits of this and that and when I do often find them mortifying in some corner of the fridge it brings agony to my face. You see, I cook food sufficient to be consumed and finished in maximum of two meals. I dislike eating the same the third time. This leaves me with more work, more of chopping, cooking and cleaning, but at the end the meal is more satisfying. Atleast, I know I enjoy every bit and bite of it :) Considering that I do often have leftovers of many raw vegetables in my fridge often. My best way to use common vegetables like carrot, beans, capsicum, peas, etc is by pairing them with sweet corn cobs. They couple very well with these veggies and add subtle sweetness to this dish. And to go a bit off track with the regular garnish of coriander leaves, I opted for dill leaves which doubly enhanced the flavors.


Mixed Vegetable Curry

INGREDIENTS

1 medium carrot
10 beans
1 medium capsicum
150 gm sweet corn kernels
1 onion
1 potato
1 tsp grated ginger
1 tomato
1 tsp oil
1 tsp cumin
1 tsp red chilli powder
Salt to taste


DIRECTIONS

Wash and chop all the vegetables to medium to small bite sized pieces. Heat oil in a pan. Let the cumin splutter. Add onion and grated ginger. Fry till the onions are translucent. Add potatoes and fry next. Once they are partially cooked, add tomatoes and stir for sometime. Next add carrots and beans. Allow to cook for 2-3 mins on medium heat. Then the capsicum and sweet corn kernels. Add the salt and chilli powder and cover with lid and allow to cook for a few mins. Check for the vegetables to be just cooked. Once done add in finely chopped dill leaves and remove from the stove. Transfer to the serving dish and garnish with dill leaves. Serve hot with phulkas or rice.

Wasn't that simple and an easy!