A note of thanks to Madhuri of Cook-Curry Nook for conferring upon me this award. Madhuri from Cook-Curry Nook is a fellow blogger from Bangalore and has an amazing variety of dishes churning from her blog almost everyday.

Veg Bowl! is getting close to completing a year and getting a status of this sort from fellow bloggers is remarkable. Thanks for all your support, feedback and appreciations guys, without which it can never succeed.


Today's post is going to be simple, short and sweet ;) On a Monday, as I am gearing up for the week, I am going through Monday blues with piles of work load and stress at work. Honestly, I am not in a mood to post much here, except for a good recipe to keep your week going good. Hopefully, healthy too with these Whole Wheat Sugar cookies.

I baked a batch of these earlier today and they turned out really good. With a cup of my morning milk, I munched on these to satisfy my sweet cravings. These are effortlessly made simple vanilla flavored cookies. I am not sure if I should say these are cookies or biscuits? Since I like them very crisp, just like what a biscuit would be, I should rather call them biscuits!

I made 2 batches of these. One with plain white granulated sugar and another with brown sugar. Also, using of whole wheat flour instead of all purpose flour was to make it more healthier. Just being experimental at it. The plain white sugar came out the best. The brown sugar wasn't bad too and had a slightly lower tones of sweetness. Give it a try.


Whole Wheat Sugar Cookies

INGREDIENTS

1 cup whole wheat flour
1/2 tsp baking soda
A pinch of salt
1/4 cup veg oil
1/2 cup granulated sugar
1 tsp cold water
1 teaspoon vanilla extract


DIRECTIONS

Sift together whole wheat flour, baking soda and salt in a bowl and keep it aside. Cream together the oil and sugar. It will not turn as light and fluffy as butter. Introduce the vanilla extract to it.

Add the flour mixture gradually until the flour is fully incorporated and the dough is smooth and uniform. Wrap up dough and refrigerate for 2 hours if you are using butter instead of oil (can be skipped as no butter is involved). Remove when you are ready to bake the cookies.

Preheat oven to 180°C. Grease the cookie tray. Place dough on a lightly floured surface and dust with more flour. Gently roll out the dough using a dusted rolling pin to 1/8" thickness.


Using a cookie cutter, cut out cookies and place on sheets about an inch apart. Bake for 10 minutes, rotating sheets halfway through, until edges are golden brown. Transfer cookies to racks to cool completely. Once cookies are cooled, you may dust them with icing sugar or serve as is.

Sometime simple flavors can really give out the best, just like these cookies. I love that mild flavor emitting from vanilla. You may opt to leave them and keep them even simpler. Try lemon zest instead, would work great with citrus flavors.

I like the flecks of granulated sugar on these cookies. They look really nice, like that on Bourbon biscuits. These are light on sweetness and the hints of vanilla flavor is the binge take-away on these. If you need a company with a cup of tea or coffee or simple plain milk, then these can be your best bet.


Since my previous posts on cookies and success with egg-less ones, I have been splurging with more and more of them in my little kitchen. A lots more awaits in future to come. After having tried the healthy Granola bars for breakfast, I hadn't experimented much with the good old oats for long now. So it was time for these Oatmeal & Raisin Cookies.

Rolled oats have been very popular with people on diet, given that oatmeal is well known to lower the cholesterol levels, thus control cardiovascular diseases to an extent. It has high content of carbohydrates, is a good source of protein and fiber which encourages slow digestion and stabilizes blood-glucose levels. Considering so many health benefits, it's a good idea to consume a cup of it a day. Raisins too have a good nutritional properties. They have antioxidant properties and being high in calories, but not fats, raisins are very good source of energy. I have seen my mom, aunts and grandma soak few raisins in water overnight and consume them the following morning. It is said to boost blood generation process.

Oatmeal & Raisin Cookies has been traditional and quite popular in America. I have used Quaker oats, which are the regular rolled oats used for porridge or breakfast muesli. If you find difficulty in fetching brown sugar, use jaggery or honey instead. The flavor would change a little, but it's still fine that way.


Oatmeal & Raisin Cookies

INGREDIENTS

2 cups Quaker Oats (uncooked)
1 cup all-purpose flour
1/2 cup raisins
3/4 cup butter/margarine, softened
1/2 cup firmly packed brown sugar
1/4 cup granulated sugar
1 tsp flax-meal
3 tsp water
1/2 teaspoon vanilla
1/2 tsp baking soda
1/2 tsp ground cinnamon
1/4 tsp salt (optional)

DIRECTIONS

Mix flax-meal with water and allow it to stand for about 30 mins to an hour. It will result in an egg-like gooey mix.

Whisk the butter/margarine and both the sugars in a bowl till they are frothy and creamy. Add in flax-meal water and vanilla and beat them well.


In another bowl, mix the flour, oats, baking soda, cinnamon and salt. Add this to the above wet mixture. Next add the raisins and fold all together till they come together to a rough dough. Drop the dough by teaspoonfuls onto baking tray and bake at 180 deg C for 15 mins or till they brown. Bake them longer if you prefer crispy cookies.

I love oats in this form. They are my best bet! Not being too sweet, they suit my taste way too well. I relished about 4-5 cookies in one go! They were damn good. A big batch of these freshly baked goodies disappeared in no time.

A few crispy edges, a few chewy middles, this bake filled with the goodness of healthy oats and raisins made up a good pair for my breakfast tea and the sunny noon snack. Truly a vegan treat!


I have always wondered why there is battle of minds when it comes to bread-making. Is it really such an anxious or a tedious art? Till I started taking baking seriously, I never thought of baking breads at home really. I had always visualized breads were meant to be made in bakeries with massive oven chambers, not something commonly known to be baked at home, till recently, when I saw a couple of good television cookery shows which showed how simple bread making can be. Not something that one should detest giving a try. Worth an attempt.

Even in the recent past, I have had good results making Foccacia or be it the Deep pan pizza, both using bread base. From these, I learn that the art of bread making is far simpler than baking cakes, cookies or muffins! Puzzled? Baked goods require exact measurements, restricting much scope to play around with ingredients and measurements of your choice. However, recipes involving making dough can be flippant with not so exact measurements required. They can be altered and ingredients adjusted to taste. Just a little time consuming, but with practically most commonly feasible ingredients in any kitchen home, one can bring out a healthy meal, which does always pose a temptation.

Apart from Indian breads, like Roti, Naan, Kulchas, which are fairly simple and faster, Western breads need ample time for proofing, a process where the yeast needs to rise to form ample air pockets in the bread. The dough is made in advance, which has active yeast added that assist in the process of rising. So plan ahead. Warmth is another essential factor for good proofing. It's similar to making yogurt from milk where the yeast plays a dominant role.

So for someone who is used to making Indian breads like rotis or parathas, making yeast breads at home will be a breeze. I have attempted this bread solely with Whole wheat flour instead of the all purpose flour along with honey and sesame combination.


Honey Sesame Whole Wheat Breakfast Buns

INGREDIENTS

25 g active dry yeast
50 ml warm milk/ water
1 tsp sugar
200 g whole wheat flour
50 ml warm water
1/2 tsp salt
1/2 tbsp oil

Topping:

1/2 tbsp honey
1/2 tsp sesame seeds

DIRECTIONS

Dissolve dry yeast in warm water with sugar. Leave for 5-10 mins to dissolve and become frothy.

Next mix the wheat flour with salt to taste. Add in the yeast, water and oil till a soft pliable dough is formed. Cover with a warm towel or cling film and leave it to rest for 4-5 hours or overnight in a warm place.

Next morning, the dough should have risen and doubled in size after about 5 hours of proofing. Punch it down. Roughly divide into round fist-sized dough. Grease and dust the bread tin or a roasting tray with some oil and flour. Transfer the dough gently to the baking dish. Allow to rest there for about an hour for the dough to rise again. I push the tray into a warm oven (not hot, else they will not rise, but bake!) After an hour, they will rise again. Brush the tops of the dough buns with honey and sprinkle some sesame seeds.


Pre-heat the oven to 180 degrees C. Bake the bread for 50 mins to an hour till the top looks crusty and brown. Remove from the oven and allow to cool on the rack for sometime. Slice them as preferred. I sliced them horizontally in the center and spread a good amount of Nutella. They were great to go with the morning tea.

The rolls are good as is as they have a mild sweetness from honey. You can substitute the honey with sugar if you don't like the honey taste. Sesame seeds can be avoided if you prefer. The bread itself is not sweet, so it's the honey topped wheat crust that imparts a sweet and mild flavor to it. End result is a mild honey flavored, nutty sesame, healthy wheat breakfast buns. Way to go for a healthy start!

I am sending these healthy breakfast buns to Rachel of Tangerine's Kitchen as she is hosting an event titled 'Bread Baking Day'.

BreadBakingDay #28 - last day of submission April 1, 2010


A nice big bar of bitter-sweet dark chocolate has been catching my dire attention for a while to be used. Never takes me too long for me to decide on how to use when it comes to chocolates ;) Often, it's consumed as is. Biting into a bar of bittersweet chocolate is quite therapeutic for me. Or do I call it an addiction???

I am so immorally self-indulgent in chocolate mesmerism that my husband recently got a nice catchy magnetic sticker that read, "Chocolates can make your clothes shrink!". It was meant for me to cut down on my on-going affair with chocolates and desserts. Poor guy deals with it all the time. Probably he's fed so liberally with my sweet tit-bits that he's now fed up being the experimental guinea pig!

The magnetic sticker is now stuck on the door of our refrigerator for my undue attention. So every time I walk towards or even pass by the fridge, I am supposed to take a conscious effort to understand it's implications on my waist-line. But that least catches my eye! That's me I say! It probably did for a day or two when I would hear voice from my back telling me it's time I should resist. Now it barely gets a glance, forget the second look!


These truffles are not just for chocolate addicts, they have a subtle hint of coffee flavors emitting from coffee liquor. We both don't consume liquor. Surprised! Strangely, I don't hesitate to buy them if it requires for any recipe! These were purchased to recreate my Tiramisu again. Instead, they have been rapidly poured and pampered on several desserts which I have been stirring up unendingly in my kitchen these days. I have lot more recipes to come forward which use coffee liquor. I am hoping they stay for least a helping of Tiramisu!

Chocolate and coffee combo flavors blend and compliment each other well. These are simple treats which can be whipped in minutes. They require no-bake and are great as take-aways for picnics, parties or even pot-lucks. It requires preparing the chocolate ganache, then chilling, rolling and the final coating.

Chocolate Truffles (With Coffee Liquor)

INGREDIENTS

125g bittersweet dark chocolate
30 ml single cream
10 ml coffee liquor

Coat:

About 40g unsweetened cocoa powder


DIRECTIONS

Chop the dark chocolates into small pieces. Melt it in a pan on a double boiler with hot water. Allow the chocolate to melt gracefully. Avoid overheating the chocolate as it loses it luster. Let it come to a stage where it just begins to melt. Now add coffee liquor to the chocolate.

Meanwhile, heat the cream over medium heat until the cream just comes to a boil. Add the molten chocolate to the cream and stir well till well combined. Now transfer this mixture to the refrigerator to chill for few hours. The mass should solidify on chilling.

Sometimes, the ganache may be soft and semi-solid in state. Mine did, probably because I used single fat cream instead of double fat one. In that case, rolling into balls may become quite a challenging task. You may add a little ground digestive biscuits for crunch and denser texture which will help in easy rolling. Adding almond or pistachio powder would also ease binding and add to nutty flavors.

Decorating is optional, but if done will surely give a wow factor to your creations. Roll these truffles well in unsweetened cocoa powder. Coat them completely. Serve.


You can play a around a lot with ingredients. While the ganache remains the base of this recipe, add in complimenting flavors to enhance it's rich base. Mocha, orange, mint, rum, apple vodka flavors or even chopped nuts can do justice to these. Even the coats can be of your choice. Glaze them with molten dark chocolate or get whacky with white chocolate coats for these tots.

I'll be coming out with more chocolate recipes, so keep watching this space for more to come.


I had a can of Amul condensed milk which had been lying in the fridge for few days. It was an open can which just needed to be finished. I was wondering how I could experiment with the little left over sweetened condensed milk. I knew I had many options of using it in halwa or probably ice-cream or may be a kheer. But I had other intentions for these.

I have been eying at some Dulce de Leche recipes for some time now. I like David Lebovitz's website where he not only masters the art of cooking, but brilliant photography. The photos are so good and tempting that I would lick them off from my monitor screen!!!

David, in his recipe says that the first time he had Dulce de Leche he began spooning it directly from the jar into his mouth and before he knew it, he had made it almost all the way through the jar. I too am in the same state whenever I open a can of sweetened condensed milk. I see myself indulging way too much directly from the can. This sweet temptation is just not too resisting. So I can imagine what Dulce de Leches can do to someone when offered!


I made these a few days ago. Before making them, I did a little research on how to go about achieving good results. Most common method was to set the can in a tub of water and bake in oven for 2-3 hrs. Well, that was too much of an effort for me. Not my types, as I have the least patience to carry out such tedious cooking tasks. Another great option was to use a pressure cooker with some water at the bottom of the cooker. Then place the tin in water and cook on pressure. This seemed easier. Since I had a little left over condensed milk, I went ahead with the third option, that's directly heating it on a thick bottomed pan. They were sticky and perfectly toffee like.

However, I find them way too sweet for my little dentures. So I added some crushed milk biscuits into these, shaped them to bite sized biscuits and chilled them for a while. Believe me, they were great. Fantastic!

There is a striking similarity between these with our very own Indian sweets. After all, a lot of our Indian milk sweets and burfis are made from boiling and reducing the milk which forms Khova and is later used in burfis, gulab jamuns, etc. Western countries use Dulce de leches in preparations like cakes, cookies, ice cream, creme caramel, banofee pies, etc. It is also a popular spread on bread toast.


Dulce de Leche

INGREDIENTS

100 g of sweetened condensed milk
1 thick bottomed pan
A wooden spoon to stir

DIRECTIONS

Pour the sweetened condensed milk into a thick bottomed pan. Heat up the pan with the condensed milk till the mixture begins to bubble through. Do this process on a medium low flame with continuous stirring as it's easily susceptible to burning, if left unattended. It took about 10-12 minutes for the milk to turn into toffee.

Once the Dulce de Leche is lightly browned and looks caramelized, turn off the flame and allow to cool. Dulce de Leche will thicken further when allowed to cool. Store in the refrigerator if you are not ready to use immediately. Warm if required before serving.


I would be making these again in future, but probably using the pressure cooker method. The next time, it would be the entire can. Is a Banofee pie waiting? Possible!

Since my purpose of making Dulce de Leche was just experimental, I headed towards experimenting a little more. I made and savored these little bites with my evening cup of tea. These are real quick No Bake Bites which we enjoyed.

No Bake Bites

INGREDIENTS

A packet of milk biscuits
A spoon-full of Dulce de Leche
A few chopped nuts

DIRECTIONS

In a freezer bag, throw a few milk biscuits and nuts. Beat them with a rolling pin. Transfer to a bowl and add the Dulce de Leche to it. The toffee texture is good for it to bind. Bring them all together and shape them as desired. The sole reason I used Dulce de Leche was because I found them way too sweet. This way, the intensity of sweetness was far reduced. Perfect for my taste.

I had a neighbor aunt drop into my home the same evening and she too savored these wholeheartedly. She said it was so good that she would love to re-create the same for her grand-daughter. Now, wasn't that sweet? And of course, she did come back to me for the recipe.


Yippie! Veg Bowl has been awarded! I am extremely delighted to have received this award from Suma of Cakes and More!!! Thanks a ton Suma! This is also my first award for this blog, so there is sheer happiness receiving it!

Suma from Cakes and More!!! churns out amazing cakes and bakes and that intrudes me to go back to her blog again and again for more to come. With her blog being a little more than a month old, she has whipped a number of cakes (as much has 20 odd in a month!), a cake for a day I say! With a sweet tooth myself and love for cakes and it's likes, her blog is quite an inspiration. Do take time out to peek into her blog.

As I receive this award, I would also like to share this award with Asha of FoodiesHope. Asha has a great collection of traditional Konkani & Mangalorean cuisines, contemporary food and several other delicacies with her blog updated from time to time. Well deserved! Please accept this award. Congratulations!!!


Valentine day is fast around the corner and the entire world seems to be enticed by it's mood. I see the world painted in red almost everywhere I go. Looks like the Valentine swings have set in weeks before the day arrives. Shops are filled with red hearts, pillows, greetings, balloons, tinsel items, etc. Even bakeries have not left a step behind. Heart shaped cakes and cookies adorn their display shelves. These were hardly seen few years ago when this Cupid day was hardly known.

I have never taken Valentine day seriously. Simple because you don't need a special day to love someone. But, it is still a good idea to celebrate a day that signifies love. Love can break all boundaries. It's a basic instinct of tender affection and compassion. Then, doesn't it deserve a day to be marked? An occasion to commemorate? A day of significance? It's nice to make someone feel special or be felt special by someone!

The other day a newspaper read that 'Young guys and gals heading to be hooked up before Valentines'. Not my take. I don't understand why! Anyways, why should I step a foot behind when the world is celebrating? I made this wonderful, rich, moist and vegetarian chocolate cake to surprise my sweetheart.

If all the restaurants are packed and you don't find a space for yourself or if a Ram Sena or Shiv Sena or any other Sena terrorizes you to go out with your loved one, don't stop yourself from making this cake and rejoicing it with your cupid love. Dim the lights, fragrant the romance with scented candles, pour the wines, mellow the music, bring the cake out and let the hearts speak!


I was clear that I wanted chocolate cake for the occasion. Also, as mentioned on my previous posts, I am experimenting on egg-less versions. After the recent success with cookies, I looked forward to some more recipes with potential variations. This one is with milk and milk powder and has been a success. This cake is simply good. So eat your heart out without any guilt.

Death by Chocolate

INGREDIENTS

1 1/4 cup plain flour (125 g)
1/2 cup milk powder (50 g)
1/2 cup milk (60 ml)
1 cup sugar (100 g)
A little more than 3/4th cup cocoa powder (80 g)
1/2 cup veg oil/ melted butter (50 g)
1 tsp vanilla essence
1 tsp baking powder
1 tsp soda bi-carbonate
A pinch of salt
1/5th cup coffee liquor (20 ml)

DIRECTIONS

Pre-heat the oven. Warm the plain milk. Add the milk powder to it and stir well till it dissolves completely. Use soy milk powder to make it vegan. Add in the oil/butter, the liquor, (if using) and vanilla essence and whisk well.

In another bowl, mix the flour, the baking powder, soda and salt along with sugar and cocoa powder. Combine well. Add the wet mixture to the dry ingredients and fold them.

Grease and flour a baking tin and transfer the above cake batter to the baking tin. Bake for more or less 30-40 min on 180 deg C (depending on your oven). Test with toothpick for done.

Remove and allow to cool. Slice the cake across into half horizontally. Drizzle the coffee liquor on both the sides of cake slices allowing them to absorb well.


Prepare the frosting:

125 g dark chocolate, chopped
1/4 cup heavy cream (20 ml)

Heat heavy cream or whipping cream in a sauce pan. Remove from heat and add 100 g of finely chopped bittersweet dark chocolate. Stir well until smooth. Allow to cool a bit.

Spread about 1/3 of the frosting between the two layers. Lay the other slice of cake over this. Frost the top of the cake with and the sides with the remaining frosting. Chill the cake for an hour or more for the frosting to set well.

Garnish the cake with shavings of white chocolate. You may use dark chocolate for the same. I used white chocolate garnish for aesthetic purpose only. The white strikes the cord well against the deep dark background.

This cake is a little on the heavier side. It's a sure delight for a true chocolate lover. A small helping is sufficient to satisfy the craving needs. Warm the cake for a minute in microwave before serving. Pair it with vanilla ice-cream.

Slip into the eternal world of this decadent chocolate cake. These will surely leave you unresistingly indulgent with every bite you'll savor. Eat your heart out on a piece or two! Share it with your loved ones and get showered with loads of pampering this Valentine. Truly a delightful treat!


It was 10 years ago that I made Bangalore my home. I was introduced to this city by my dad who moved here on course of his transferable job. Back then, I was a young girl in my teens who had just completed 12th grade, having given Common Entrance Test (CET), I was on an ambitious lookout for an engineering seat in a prestigious college.

Those were the days when dad was staying alone in Bangalore, before we moved with him later. It was post the CET exams during the holidays that dad would take us around the fairly novel city, showing us the city with passionate enthusiasm. Malls were limited, but we had stretches of Brigade and MGs to stroll, Cubbons and Lalbaugs for weekends, Bannerghatta zoos to spend the entire day... Coming to this city, it was with high hopes and ambitions to build a good education and career. Both happened and succeeded.

I loved the city the very first instance for a few reasons which I still hold close to my heart. One of the best weathers throughout the year, which no other city in this country enjoys as much we do. The tranquility and sereneness is truly a paradise which makes it called as 'the pensioner's city'. This is also a city of youngsters with a lot of life, enthusiasm, energy and spirit.

Those were the days when Bangalore was on the brink of development. IT was springing to boom. Today it's a different scene all together. Bangalore has changed and is seeing changes at a galloping pace. Weather is changing steadily and it's alarming to see the rate at which the city is massively growing. With the decrease in number of trees and the invariable increase in traffic, noise and pollution, we really need to ponder where we are heading to. Bangalore is my home. It pains to see the city and the lifestyle changing rapidly. It's just a hope that this change would decelerate in unhurried and dawdling manner.


These were a few heavy words from my grave thoughts. The weather these days is very foggy and chill and I love to cozy myself in the warmth of the quilt. As I wake up every morning, the first thing I look forward to is a cup of steaming hot tea to warm up ourselves. These Raisin n' Walnut Cookies were made for these mornings and evenings to sip with the hot tea. They are just lovely with good crunch on the crust and chewy centers. You'll like them too.

Raisin n' Walnut Cookies

Dry Ingredients:

1 cup whole wheat flour (150 g)
1/2 cups all purpose flour (50 g)
1/2 tsp baking powder
1/2 cup brown sugar (50 gm)
A pinch of salt

Wet Ingredients:

1/2 cup unsalted cold butter (100 g)
1/2 tbsp ground flax seeds
3 tbsp warm water
1 tsp vanilla extract

Add in:

1/2 cup raisins (50 g)
1/2 cup chopped walnut kernels (50 g)


DIRECTIONS

First grind the flax seeds with warm water till they become a mushy egg-like paste. Set aside for later use.

Mix in all the dry ingredients, both the flours, baking powder, salt and sugar in a mixing bowl. Add in cold butter. Using your fingers, work the flour–sugar mixture into butter until dough resembles coarse breadcrumbs.

Next, add the ground flax meal paste along with vanilla extract to this. Fold in gently. Add the raisins and walnuts. Knead gently to form a smooth dough. Chill in fridge. Unlike last time where I was impatient to wait, I allowed the dough to chill for an hour in the fridge. Shape the cookies to rounds and flatten them a little. Place them on the baking tray and bake them a 180 deg C for about 10-15 minutes or till they brown. Remove and allow to cool before serving.

The nutty whole wheat flour combined with all purpose flour is a healthy permutation. Flax seeds have nutty flavors too. Raisins have a tangy sweetness and paired with these deeply wrinkled walnuts, all combined together bring out the best in them in form of these cookies. I have made these a little plumper this time, but the next time I may try to flatten them more for solely crispy baked cookies.


Indian curries are not as difficult to make as it is often assumed. There are few basic and common ingredients which you may have to stock in your pantry, like the coriander powder, cumin powder, garam masala (mélange of different spices), turmeric powder and chilli powder. You can win a crowd with just these basic stuffs. If one is a spice lover, then do not hesitate to extend yourself to add whole spices like cinnamon, cloves and cardamom, which can further add piquancy to the dishes.

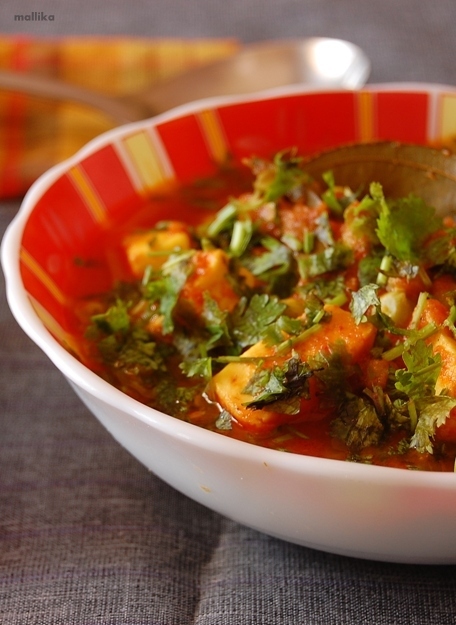
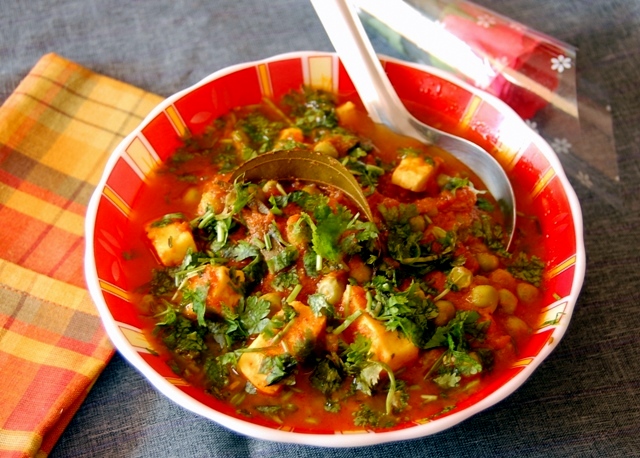
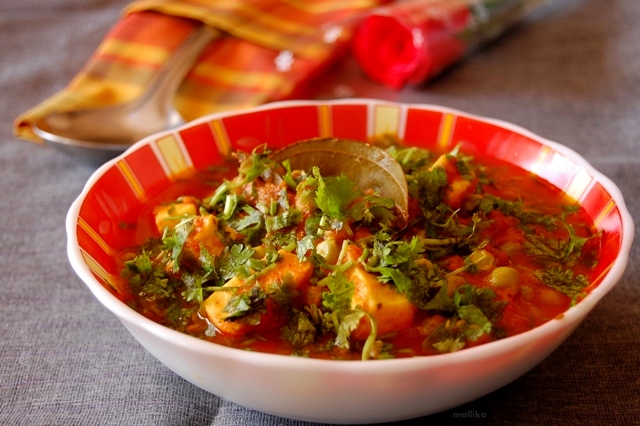
Mutter Paneer is one such aromatic, spicy Punjabi curry made from Indian cottage. Paneer is just a simple homemade Indian cottage cheese which made without any aging. It's also a good alternative to use left over milk. Simple method to prepare it is by curdling heated milk with lemon juice or other food acids like vinegar. Curd and whey are allowed to stand and separate after which it is strained and squeezed from whey to form a colloidal solid curd mass.

This dish is probably one of the most frequently ordered dish in Indian restaurants. Most restaurants use full cream and mono-sodium glutamate, making the dish creamy and heavy. Although the taste would differ a little when made at home, it is still adorable and endearing delectable.


Mutter Paneer

INGREDIENTS

200 gms paneer cubed
250 gms shelled peas
3 medium tomatoes, pureed

Whole Spices:

1 tsp cumin seeds
2 bay leaves
A stick of cinammon
2 cloves
2 cardamoms

Dry spice powders:

1 tsps coriander powder
1 tsp cumin powder
1/2 tsp garam masala
1/2 tsp turmeric powder
1 tsp chilli powder

2 tbsps of oil
1 1/2 cups water
Salt to taste
Coriander leaves chopped fine to garnish

Grind to paste:

2 medium onions
1 tbsp ginger
1 tsps garlic
1 green chilli


DIRECTIONS

Fry or roast the cottage cheese (paneer) for few minutes till it has browned lightly on both sides. Drain and keep aside.

Heat the oil and fry the cumin seeds, bay leaves, stick of cinammon, cardamoms and cloves for few mins. Next add the ground onions paste for a minute or two till lightly brown. Now add the tomato puree and fry for a little while till you see oil leaving on the sides. Add in the dry powders, the salt and fresh cream (if required) and let it simmer for a few minutes. Now add the green peas and the fried paneer. Garnish mutter paneer with freshly chopped coriander leaves.

This recipe may look complicated, but it is not at all. It is just about having a stock of all the right ingredients. As I mentioned, since we love spices, I tend to use whole spices to add more spicy flavors to the dish. You may avoid them if preferred. In case you do not have the whole spices, increase the quantity of garam masala for spice. They would still be good. Addition of about 2 tbsps of heavy cream to this dish makes it rich and creamy. I skip on fresh cream and only use it occasionally. This dish is good with roti or basmati rice.