My house help has been off for a week long leaving me in a state of utter dismay. I am without my her for the past 5 days and the next 2 days to come. And then, just yesterday I almost fainted when she called me testifying her extension of 2 more days. Life at home has sprung into chaotic scene devoid her presence. Several tasks that seized unattended adherence seemed to require vital attention. I almost broke my back giving bath to my baby, washing her clothes (no, we don’t use the washing machine for my baby’s clothes, they are hand washed and sanitized), followed by dusting and mopping the floor yesterday. Thankfully, dear husband vouched in to help me with the vessels.

Heck. Right from cleaning the chimney, the stove top to lobbing garbage, the chores seem unending. I end up exploiting 2 hours of what my maid does in less than hour. Suddenly, it seemed she was the most important person to me.


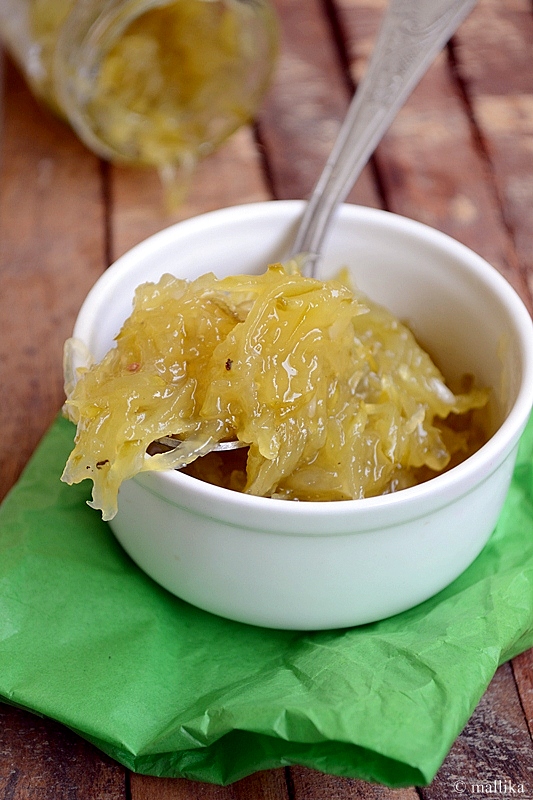
Between all these chores, there are some things that give a lot of solace, like food. Something quick and simple, yet so satisfying and immensely comforting. Leftovers of rotis made for our breakfast, carried over for the evening and transformed into a quick snack to go along with that coveted cup of desi chai. As kids we relished this to an extent that my mom would often cook a few extra rotis at breakfast to make these for our evening snack for her hungry kids back from school. It had no name, we would simply call it sihi roti (sweet roti in Kannada). She makes them for my daughter now. While she fries the entire roti on tava with ghee till crisp and then scatters sugar or honey till it caramelizes, I like to tear it into strips and do it in a wok instead, saving the extras in an air-tight container for a couple of days. This crisp sweet treat is delicious, made with whole wheat flour and sans butter it's healthier made with ghee. Hope you'll enjoy it too.


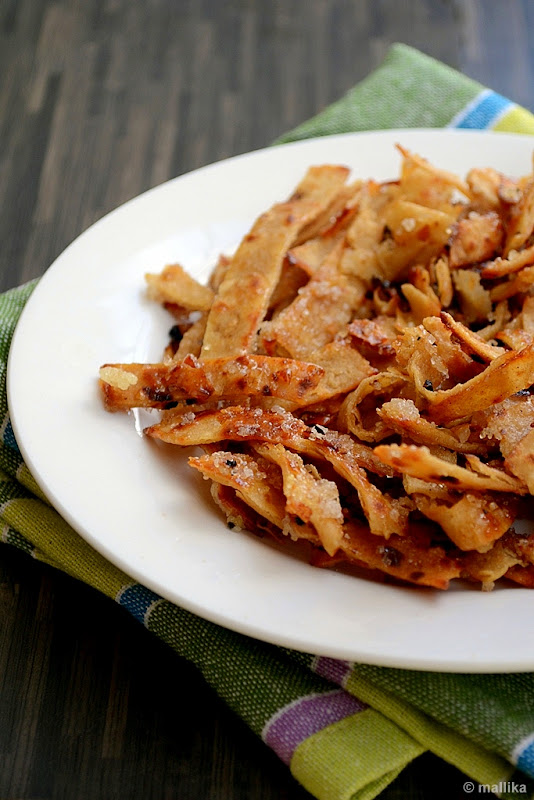
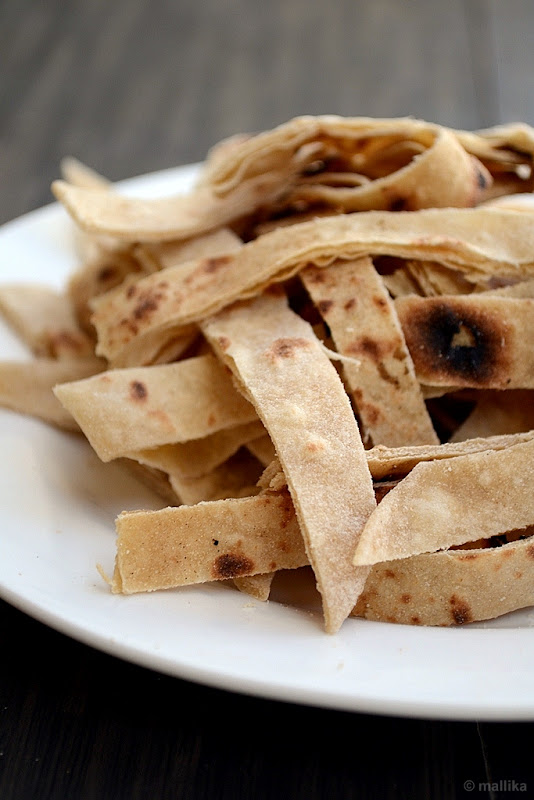
Caramelized Roti Crisps

INGREDIENTS

1 roti/wheat tortilla
1 tbsp. ghee / clarified butter
1 tbsp. sugar / honey
1/2 tsp. cardamom powder

DIRECTION

Tear the roti / wheat tortilla into rough bite sized pieces or into neat long strips as I did. Heat a wok / fry pan and add in a tbsp of ghee. Add in the torn roti and stir well so that all the pieces fry well. Stir for 2-3 minutes till the roti strips begin to get crisp. Sprinkle the sugar over and stir gently on low flame to coat all the strips, taking care you don't break them. The sugar will begin to melt and caramelize in a few minutes. Switch off the flame as they caramelize and turn golden brown. Sprinkle the cardamom powder and mix well. Serve with hot cup of tea.


Glad the Sunday is here. Yet another weekend and I am glad I got to bake these muffins. We spent our Saturday watching the romantic comedy flick Cocktail at Fame Cinemas yesterday, indeed worth the watch, and will tempt you to redo your wardrobe!

I'm hit with mid-week crisis on Wednesdays, generally. This week's been too hectic with a good amount of workload, deliverables carrying on my shoulder, some of which have been carried over the weekend too. I have been bogged down by the tight timelines of the deal I am currently working on. Weekend seemed far with two more days to go and I had felt I had worked long enough through Monday and Tuesday. Can we have a mid-week holiday too??? Wink-wink! Sigh.


It’s imperative I need bounty energy to knock this pressure off, punch it down and bounce back in action to sustain through the week. And what can do better than these mocha muffins, flavoured with coffee and chocolate, sweet crisp topping from damerara, a powerhouse of energy that I can take to work which will be a real saver, an energy booster I will rely on for my tea breaks, which I have been avoiding to race against my submissions. For a chocolate lover I have in myself, I know well it can only do good to my senses and that coffee adds in the kick factor. And not just for me, but also for the man I live with, who adores chocolates intensely, these muffins have been an instant hit with my family and friends.


Mocha Muffins

INGREDIENTS

1 tbsp. sunflower oil
225 gm. plain flour
1 tbsp. baking powder
2 tbsp. cocoa powder
115 gm. salted butter, melted
150 gm. damerara sugar
1 large egg, beaten
125 ml milk
1 tsp. almond / vanilla extract
2 tbsp. strong coffee
1 tbsp. instant coffee powder
55 gm. plain chocolate chips
25 gm. raisins

Cocoa Topping

3 tbsp. damerara sugar
1 tbsp. cocoa powder
1 tsp. all spice powder


DIRECTIONS

Oil a 12 cup muffin pan with sunflower oil or line them with muffin paper cases. Sift flour, baking powder and cocoa powder into a large mixing bowl.

In a separate mixing bowl, add the melted butter and damerara sugar together, then stir in the beaten egg. Pour in the milk, almond / vanilla extract, coffee, the coffee powder.

Add this wet blend into the dry ingredients and gently mix them together. Then add in chocolate chips, the raisins to the flour mixture, stir together till just combined. Do not over stir - a little lumpy batter is just fine.

Divide the muffin batter into the paper cases till 2/3rd full. To make the toppings, place the damerara sugar in a bowl, add cocoa powder and all spices powder and mix well. Sprinkle the topping over the muffins, then transfer to a pre-heated oven and bake at 190 deg C for 25-30 mins, till risen and golden brown.


The recipe may seem quite a lot, it does fetch 12 large muffins which is quite a lot for our family. So I halved the recipe to get 6 large muffins. However what I have mentioned here is the original recipe for 12 muffins. Reduce it to half if you need to bake fewer muffins, But then these are delicious. They have chocolate, coffee and all things good, so you may want bake all of it and yet not feel guilt about devouring them. They do well as tea time accompaniments or even take away picnic treats.


I do generally make some sort of a dessert or other on weekends, that needn’t be a bake alone. I’ve baked plenty of cakes in the past, but have hardly unleashed my creativity in terms of decorating cakes, something I always wanted to try my hand at. I always cringe to the thought that my low-fat fresh cream will never whip well to hold its shape. Of the several attempts made to whip Amul cream to perfection, I account to more flops than successes. If you are in India, are a reverent baker, then you know well what I am relating to.

Unfortunately options here are limited. Agar has at times helped me stabilize the cream, but then it does not make an attempt to the stiff peak stage that one would expect if you want to beautify your cakes. Eventually, after hours of effort going into freezing bowls, beaters and cream, I have often ended up being dissatisfied with the results, also constantly looking out for alternative dessert to be made from of the crudely whipped low-fat cream.

Then there have been other win win occasions where the cream whipped up considerably... especially when I managed to skim off that excess floating liquid (water) from the top of cream. But this cream tends to be moody. At times if it weeps out that moisture, it whips up, else will only make me weep!


Unveiling the mystery of my whipped cream!

Recently, I came across locally fetched cream on stands of Foodworld and thought I should share with all who are in similar shoes as me, for the ones who are looking out for a local cream rather than the expensive imported ones. ‘Milky Mist’ is an Indian brand for medium fat cream and whips beautifully light, airy and creamy. It’s a simple milk fat cream and though it doesn’t explicitly mention as whip cream, it does work like charm.

I picked this cream recently to use it in my curries. However back home as I went through the nutrition list, the fat content mentioned on the pack showed 39%. I stashed it into my refrigerator, however, on the back of my mind, the curiosity to whip it was killing me. In less than an hour, I pulled out my stand mixer, attached the beaters and went on a whipping spree. 39% fat does work for my job! My guess is the cream has no added preservatives and suggests to be used in 10 days from manufacturing date. On the flip side, the supply is very irregular and I have to often follow-up with the supermarket for more of these.

See how beautifully it whips. Aaah… glory!


I have always admitted my love for Italian food. And I will always. My love for pastas is profound. We make our way out to binge over them at least once a week. And that needs no excuse. And with my little one adding to that bandwagon of cheese and pasta lovers, I deliberate we are growing big as a group.

My little toddler exhibits her fondness for cheese and tang flavors and relishes them exceptionally well. Over the past few weeks, I have sworn by the arrabiata sauce recipe for most of my pastas so much that I safely hang on to it. We kind of ran over boredom with this however. I mean how much of same stuff can you eat over and over again? In a bid to experiment a little more than the usual, I played around with totally different flavors this time.

BTW, I got a pretty bottle of Balsamic Vinegar that looks nothing less than wine and tastes closely similar too. Sort of like vinegar in wine, I guess it’s that. Aged grapes were meant to be wines, weren’t they?


How much I love these BBC GoodFood magazines that I am a regular subscriber of them. As the month end draws closer, I eagerly wait for their monthly edition, couriered and hand delivered, saving me from the menacing task of hunting them down in supermarkets. The magazine is par excellence, with good write-ups, strikingly drool-worthy photographs and wide variety of tried and tested recipes to try out, I am totally convinced it will be my best bed side reading for several nights to come. For 75 odd tried and tested recipes in one book for 100 bucks a magazine, isn’t that cheap? Now that’s what I call a clean deal! All these years I was hooked to their website, now I am glad they are finally in India, I have them my hands on!

I worked with Balsamic flavors in savory for the first time, wondering really how much of body it would render to the vinaigrette, considering pasta itself is bland and void of any flavor. While I am quite confident with a tomato sauce or white sauce that’s thick enough to hold the pasta, I speculated if the pasta would go loose in this recipe. Boy! I was wrong. I’ve known what magic Balsamic does when roasted with strawberries, but to contemplate in dressings, they just make the dish exotic and top notch.

I toyed around the recipe for Spaghetti with Tomatoes and Mozzarella Sauce from the Pasta edition (March month) of the GoodFood magazine (I love owning my copy), making a few subtle changes to the original recipe. Instead of cherry tomatoes I chopped 1 plump tomato, used Balsamic instead of rice vinegar, jalapenos instead of capers, which I did not have at hand and worked with basil instead of mint it called for. Also added olives for more flavor. The outcome was fabulous with burst of fresh tongue tickling flavors from Balsamic, olives, tomatoes and herbs. The Vinaigrette itself was appetizing and delicious. Do anticipate them to be commendable in salads too.

Spaghetti with Honey Balsamic Tomatoes and Mozzarella

Inspired by BBC GoodFood Magazine

INGREDIENTS

A fist full of Spaghettis
2 tbsp. extra virgin olive oil (I used Colevita extra virgin olive oil)
1 Red onion, finely chopped
4-5 cherry tomatoes, chopped to two (I used 1 plump tomato chopped instead)
4-5 pitted black olives, halved
1 jalapenos, chopped
Juice and zest of 1 lemon
1 tbsp. Balsamic Vinegar (I used Colevita)
1 tsp. Honey / Sugar
Salt and Pepper to taste
1 tsp. Fresh/Dried Basil leaves
Generous sprinkle of mozzarella cheese


DIRECTIONS

Bring a large vessel of water to rolling boil along with a teaspoon of salt added. Add the pasta, taking care to handle them gently to avoid any breakage. Spaghettis have lovely noodle lengths and look pretty when swirled around and served. Boil the pasta till al dante. Drain the water completely, drizzle some olive oil over the pasta and toss gently. Set aside to cool.

In a separate bowl, soak the chopped red onions in a mixture of balsamic vinegar, lemon juice and honey. Season liberally with salt and pepper. Allow the onions to soak and soften for at least 5 minutes. Then add in the olives, jalapenos and chopped tomatoes. Season liberally with fresh/dried herbs (basil or mint) to taste.

Toss this vinaigrette to the cooked pasta. Throw in some mozzarella and toss well gently. To serve, swirl the pasta around the fork and using a second fork transfer it to the serving plate gently so that it holds up nicely. Scatter over the veggies and dressing and serve with fresh gratings of mozzarella cheese.


I don’t actually arm myself in measuring out and following a recipe to the tee where no baking is involved. It doesn’t matter much when you vary ingredients and mess around here and there, it actually brings out your signature taste. Unlike while baking desserts, for savory and spiced dishes I think it’s best to believe in your intuition rather than exactness of the recipe. If you still think exact measurements matter, you can find the recipe here. To make a vegan dish, substitute honey with sugar and skip mozzarella all together.

If sun shines high and you’re looking for a light summer dish that screams for some flavoursome summer time meal, you have to try this. Call it a salad, a main course or just a one pot dish, it’s fresh, light and refreshing with a summery feel.


We are getting past the summers, which simply to me signifies the end of mango season. The rains will kick in hopefully, which officially is June, yet we’ve not had the first showers, blame the climatic changes, cite environment reasons or simply the delay. Even as I look forward to the much indispensable rains, I am mourning at the end of summers. I have a heart ache as I frantically look around for the disappearing Alphonsos, only to find they are almost end of season. Our splurge in mangoes will soon come to a slow end. Sigh!

This season we raced on mangoes boisterously. We’ve had a good dose, real good if I can say so, still I can’t seem to get enough of it. In all honesty they were never used in any desserts, never adulterated, only stripped and eaten pure. So this space was left void of any mango desserts as you can see. While I’ll be welcoming jackfruits, jamoons, watermelons, guavas and papayas warmly this monsoon, a part of me does not want to bequeath this vibrant summer fruit. These sweet, succulent, juicy, sun kissed ocher-shaded luscious fruits that made our faithful summer indulgences will be missed till next summer.

While these seasonal beauties are fading away from the market, I found my answer in the Aam Murabba, a preserve made from raw mangoes that can stay well for a long time. I found solace that I could still relish some real mangoes in form of preserves long after mangoes have washed-out from the season. Unlike the ones where that are artificially flavored with synthetics, are tooth-achingly sweet with deep ambers from synthetic coloring and taste very little close to the real mangoes, these are mild, tart and deliciously fragrant.

A murabba is an Indian jam, grated tart mangoes in a sweet suspension of sugar syrup, often warmly spiced and flavored with cardamom and/or spices.


Aam Murabba / Mango Jam

INGREDIENTS

2 cups raw mangoes, grated (Totapuri mangoes used here)
2 cups (400 grams) sugar
1 tsp. freshly ground cardamom powder
A few saffron strands, optional

DIRECTIONS

Wash and grate the raw mangoes. You may peel or leave the green skin on for a coarser jam. Heat a cup of water in a pan, add the grated mangoes and cook uncovered for 8 to 10 minutes stirring constantly. The mango pieces will turn softer.

Once the mangoes are soft and cooked, add in the sugar and stir well to cook further. Dissolve saffron in some of this sugar syrup and add to this. Allow the murabba to cook in sugar syrup and reduce to a double string consistency.

Remove from the fire, add the ground cardamom seeds and mix well.

All it cool down completely. Bottle in a sterilized glass jar and store refrigerated for up to 6 months.


This Aam murabba or mango jam is a good way to preserve raw mangoes in a thick cardamom flavored sugar syrup. They stay long, at least for a few months refrigerated, though I doubt it would even last that long considering how lip-smacking it is! You can enjoy this jam/murabba spread on bread, toast, rotis and puris.


Aah! Finally the weekend is here and it feels so so good, that I can't possibly express the immense joy I get on the dawn of Fridays. It's the day of the week I look forward to the most; it gives me joy, hope, lightens my heart and heightens my spirits. And even as the day comes to an end on a Thursday, I can feel the excitement and dip in pressure with the weekend drawing closer. The worst of work load on a Friday doesn't stir me, fortified with an ability to deliver my best, probably the positivity and the hope that Saturdays and Sundays will give that well deserved respite and the time I deserve for my family. Wish God blessed us with few more Fridays a week. Life would have gotten only better!


Undoubtedly, my job is an integral part of my life and I love it every bit. I've never been a person who could stay home, probably the feeling of being insecure to be cut off from the happenings in the world outside would haunt me severely. Being confined to the four walls is not just me. My job helps me pursue my professional aspirations and improve business acumen, just as I had dreamt of where and what I should be while in my college.

Yet on the flip side, I compromise high on my family time. That realization hit hard only after my baby was born. Till then, job and career meant beyond all. And like every mother it would be a treat to watch my little baby grow every minute, evolve to the persona she will embellish into, I find solace in the fact that I have my mom by my side, donning my shoes, playing my role in my absence, ensuring my little one is not deprived of any need or personal care.


And that speaks why I look forward to the weekends, only to be with my family and do everything for them that I don't can't do over the week.

If Eva Toneva's simple eggless vanilla ice cream with 2 ingredients couldn't help me resist my temptations to make some at home, David Lebovitz's recipe for Stracciatella ice cream sold me completely to it. Having made the classic version couple of times I wanted to be a little experimental with this. And so gladly I admit I did, you can't just help yourself stay away from spoonfuls of this simple vanilla decadence with Italian-style chocolate chips even as it sits freezing. A litre of ice cream was easily half the volume by the time it was done.


Stracciatella Ice cream

INGREDIENTS

400 ml of sweetened condensed milk
500 ml cream (25% fat Amul cream used)
1 tsp. vanilla extract
60 gm. dark chocolate

DIRECTIONS

Pour the cream into a bowl. Whip it to soft peaks. Add in the condensed milk along with vanilla extract. Beat mixture using a hand mixer. Pour into a freezer proof container. Cover with plastic film and freeze in freezer.

Transfer it from the freezer to fridge at least 20 minutes before serving. This basic vanilla ice cram can be served as it or with toppings if desired.


For Stracciatella:

The vanilla ice cream can be enjoyed as is, however to make it decadent and exotic go ahead to make Stracciatella. Melt the dark chocolate in microwave on high for a minute. Alternatively, use a double boiler technique to melt the chocolate. Transfer the melted chocolate to a paper piping bag. Snip off the tip for the chocolate to flow. Drizzle the chocolate randomly over the almost-frozen mixture, then stir, breaking up the ribbons of chocolate as they freeze, to create little ‘chips’. Scoop out and serve!

PS: The original recipe calls for equal quantities of cream and condensed milk. I have made this ice cream couple of times, however I like to add in 50-100 ml. of extra cream as I found it too sweet for our tastes. I suggest you taste and adjust sweetness accordingly.

Eggless_Banana_Walnut_Chocolate_Muffins_1


So my frivolous love for bananas continues with this post….

Hope you don’t bog me down for this one. It’s not that I am head over heels for bananas in desserts, but the bananas and chocolates go together so well, the twosome combination is a pair made in heaven. That probably is my opinion alone. In fact my husband thinks its otherwise. He abhors bananas in desserts, to his taste it ruins the dessert entirely.

We were out at Swenson’s on a recent weekend to enjoy some goblets of ice cream. Their colossal menu in lanky brochures are sure to instigate sundae cravings in anyone. Earlier the week, my husband picked up a Times daily deal that randomly caught his interest while flipping through a newspaper ad.

The deal didn’t go down well with us, given the fact we were offered limited choice to pick from. It wasn’t just worth the penny saved on discount. Every option we were allowed to choose from had bananas in it, not certainly my husband’s choice. With puckered brow and frown on his face, he beheld a manifestation which Swenson’s wouldn’t like to envisage, I am sure.

Eggless_Banana_Walnut_Chocolate_Muffins_2


While I made my choice for a Fruit n’ Nut Sundae, given his weakness for chocolates, he finally ended up indulging in a Chocolate Sundae, with loads of chocolate ice cream, gooey chocolate sauce, cream, nuts, and of course banana chunks (that according to him would have been decadent minus the bananas).

Bananas apart ;), that made up for a nice romantic evening we spent together. Of course with a baby around, you can never make it romantic, can you? May be the song Paani da rang vekh le currently playing on my iPod would have conjured up for that romance. :) I am so much in love with this number from Vicky Donor (wish I got to see the movie too…) that I have it playing in loops! Good job Aayushman, love your voice.

Ironically, despite the dislike of bananas in desserts, one of our all-time favorite still remains the Banana bread. For the chocolate lover boy I have at home, I made these Banana Chocolate Muffins with walnuts and it turned out that from the small batch of 6 large muffins that I got, I was left with none the moment they were out of the oven. I got to click these snaps in less than 5 minutes I was given for the countdown, so please bear with these photographs shot in the evening in low light conditions.

Eggless_Banana_Walnut_Chocolate_Muffins_3


Eggless Banana Walnut Chocolate Muffins

INGREDIENTS

1/2 cup mashed bananas (about 1 large over ripe banana)
1/2 cup milk
1/4 cup butter (replace with vegetable oil for low fat)
1 tbsp. cocoa powder (add a tsp. more for a denser chocolate flavor)
1 scant cup all-purpose flour
1/2 cup fine sugar
1 teaspoon baking soda
Handful of chopped walnuts

DIRECTIONS

Preheat oven to 350ºF/180ºC. Line the muffin tin with paper cases.

Mash bananas along with milk in a food processor. To this, add melted butter and whisk well. Set aside.

In a separate glass bowl, sift the all-purpose flour, cocoa powder and sugar along with baking soda.

Make a well in center of sifted flours. Add the wet mixture to the dry ingredients. Fold gently. Few lumps are perfectly fine, they give texture to the muffins. Finally fold in the walnuts. The batter should be thicker than the regular cake batter.

Scoop out spoonful of the muffin batter and dollop them into the lined muffin tins. Scatter a handful of walnuts and brown sugar for a good crusty, crisp topping. Very optional, but rest assured you will love biting into that crunchy topping, also rendering caramelized butterscotch flavor to the cake. Bake for 20 minutes at 180ºC or until a skewer comes out clean. Allow to cool before removing from pan.

Eggless_Banana_Walnut_Chocolate_Muffins_4


So what differentiates muffins from cupcakes? Traditionally is that muffins are meant to be denser with lower fats and sugars, usually left without frosting. They are supposed to have drier texture than cupcakes, however most bakeries replicate the recipe for cupcakes with high fat and sugar content in them, making them unhealthy and unfit for regular consumption. With this recipe I used butter, but for low fat version use vegetable oil instead of butter, also replace all-purpose flour to an equal mix of all-purpose flour and whole wheat flour for a healthier option.


Some energy bars are here for you to please. These bars may look ugly, but they aren’t really. They can be your little dessert treats for your dinner time or make up a great snack for mid-afternoons too. If that’s a good enough reason then you should make them now.

If not, let me boast a little more to please you. These are not just delicious but quite healthy too. They are sugar free, so will do perfectly fine for your waist line. Furthermore, they are diabetic friendly, baby friendly, dairy-free, gluten-free and vegan too. Are you convinced???


My snack box is currently packed with these energy bars. They have been a hit at home and the fact that they are healthy (I really like this term :D) totally spoils us for more. I got about 12 bars and they got over too soon. So I went back making more of these and realized how easy they were to whip up and equally yum to snack on. No cooking, no baking, just a simple whiz of handful ingredients like dates, nuts and any fruit juice. Amazingly, it’s the dates that render a moist natural sweetness to this dish that you won’t realize there is no added sugar, yet being sweet, I like to think I am on diet, especially with these.

I have some wicked thoughts to adulterate these bars. How about adding in some cocoa powder to make sinful Date & Nut Bars? Or maybe, I should care for some Fig & Nut Energy Bars? Not a bad thought, yeah? I let you know, soon.


Date & Nut Energy Bars

Inspired by the recipe on Natural Delights

INGREDIENTS

2 cups pitted and chopped Dates
2 cups Raw Cashew Nuts
1/2 cup Raw Almond (I used mine with skin)
2 tbsps. orange juice

DIRECTIONS

Combine chopped dates, cashews & almonds in a food processor. Medjool dates can be best used here. If not, use any moist date you have at hand. I used Lion seedless dates, which were moist enough for this recipe. Dried ones will not help. Pulse and process all the ingredients together until the texture is coarse. Add little orange juice at a time until it reaches a dry but moist dough consistency. Scrape the bar mixture into a tin lined with aluminium foil. Press evenly with a rubber spatula. Chill for about an hour. Remove from refrigerator and cut into desired sizes.


I kept these bars thin, but you may double the recipe and get thicker bars if you like. The bars are quite rich due to a good amount of nuts in them. These tend to be sticky but as they sit in the refrigerator, they get better. I placed a foil between each date bar and stacked them. This recipe is surely a keeper.


I must have been lucky to have stashed a few over ripe bananas into my freezer that day. It must have been my day. I’ve rarely frozen bananas. If they overripe and rot, they go to the trash bins. But then that’s hardly the case. We mostly manage to consume them otherwise. Had seen this ice cream on Smithfield some time ago and was seriously wooed by the thought of a quick and healthy, delicious ice cream. Call it sheer temptation! I love the way its called – Chunky Monkey Ice cream. Cute and jazzy. Donno whoever named it so, its funky though :D


I haven’t splurged at buying an ice cream maker yet, but I am way too tempted to. Have been looking for options. Kenwood is a great brand though, shelling nearly 4k is not worth in my opinion. Unless I get my hands on practically and see how it really performs, I think I am glad to do with my blender for the moment. Also for the fact that my always freezer is loaded and full to the brim, I doubt I will have any space left to keep the bowl freezing.


This ice cream recipe is a perfectly delicious mid-afternoon summer treat that does not require an ice cream machine. What’s best is there’s no cooking involved, it’s jiffy, dairy-free, gluten-free, sugar free, and yet has all the perks of a delicious ice cream. It’s healthy enough that I made this for my toddler who enjoyed it thoroughly and left crying for more! Pop some peeled bananas in the freezer the previous night and the next day you are ready to go. I peeled and chopped them to small chunks for easier churn. It’s amazing how much frozen bananas have a texture similar to ice cream when churned. A handful of walnuts and good chocolate chunks will elevate the taste. Does this remind you so much of Ben and Jerry’s delicious banana ice cream with chunks of chocolate, banana, and walnuts? This thing tastes similar.

This 5 minute healthy chunky monkey ice cream couldn’t get easier to prepare.


Chunky Monkey Ice cream

INGREDIENTS

3 bananas, peeled, chopped and frozen
2 tbsp. chopped walnuts
Handful of chocolate chunks or chocolate chips
A tablespoon of honey (optional)

DIRECTIONS

Place frozen bananas in your food processor. A tablespoon of honey is optional, you can add it if you like your ice cream sweet. Pulse until its mashed well and comes to consistency of ice cream. If you have difficulty while churning the frozen bananas, or if banana isn’t binding, try adding 1-2 tbsp. non-dairy milk or wait for a minute or so to defrost slightly and then churn. Scoop out a ball of soft serve into a serving bowl. Top with chopped walnuts and chocolate chunks. Serve immediately.


I am hooked to this ice cream and like to make this often. Trust me, yeah, I really do. The little one loves it too. This was an easy cheat option to fool her when she showed her revulsion towards the real fruit. Minus the chocolate, she hardly knows it just the same thing frozen. In an indulgent mood, I like the Chunky Monkey Supreme version with peanut/almond butter and cocoa powder added for richer taste. That’s my craving for dessert.