Caramel custard brings back my old memories when were were young. This is one of the desserts which my mom would make during party times. Whenever we had parties hosted at home, she would steal the show away with loads of compliments for her caramel custards and puddings. I cannot forget those moments when my mom used to wind up a well planned party with her delicately and deliciously home-made desserts accompanied with vanilla ice-cream.

I adore her as those were times when the world was limited. Back in 1990s, cable tvs were not so common. We were the lucky few who had that privilege then. But then the channels were limited to a handful of about 5-6. That apart home computers were no where in space! So internet was not widely known as now. Despite all this, I still wonder how my mum managed to learn cooking and baking cakes, puddings, biscuits and cookies, pizzas, including grilling, etc. to perfection. We used to live in company bungalows with frequent visits from dad's colleagues and their families. I still remember how enthusiastically she would enquire the recipes from other ladies and then note them down in an old notebook (which is still well preserved at home). Frequent exchange of snacks, side dishes, bakes, desserts were common between homes. With time as cable boomed, more recipe shows on tv helped her. She would never tire cooking and feeding all of us. With all the busy chores, she would often take time out to try new recipes. I admire how she evolved herself with so many limitations.


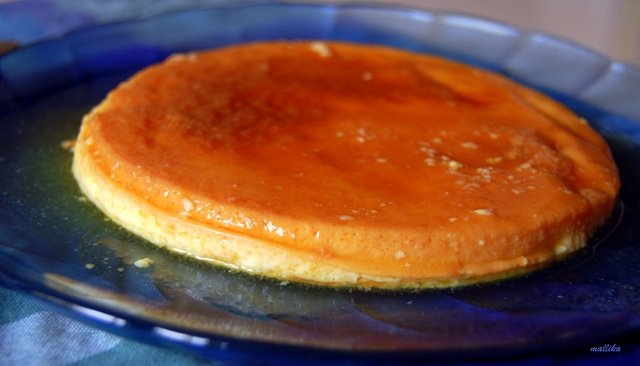
So here's the recipe for caramel custard:

500 ml milk
100 ml cream
100 gm + 30 gm sugar
2 eggs
2 tbsp vanilla extract

Sprinkle evenly about 25-30 gm of sugar and heat it on a pan. Turn the pan across the heat and let the sugar just begin to melt. There is a very little line of difference between caramelizing and carboning/charring. When the sugar has just melt and gets a nice golden brown glow, remove from the flame. If it darkens, it will get a bitter taste. So we need to be careful and quick with this. Either prepare in the custard mold or transfer to molds and allow to set. It will harden. Do not touch as it will be hot enough to burn your hand.

To prepare the custard, put the milk and sugar in a pan and bring to a boil. In the meantime whisk the egg yolks well. Allow the milk to cool down. Once warm, incorporate the milk to the eggs slowly mixing well. Add the vanilla extract and transfer to the mold. Place the custard bowl in a larger bowl of water and bake for 20 minutes till done.

Leave to cool and refrigerate for 2 hours. Place a serving plate on top of the set custard and invert instantly. Serve cold.


Mild sweetness with silken smoothness that promises to melt in your mouth. What I love about custards! Enjoy!


Where do I start and what do I say about this dish! For someone who visits Bangalore, they are bound to make acquaintance with this breakfast/snack dish. Kharabhath is a typical Bangalore breakfast and widely available in every hotel and eatery joint of this city. It's spicy and is generally served with Kesaribath which is a sweeter counterpart. This sweet-spice combo is called as ChowChow Bath and is loved by most Bangloreans. In other parts of Karnataka, minus the tomatoes and it's called as Upma. It is quite filling and can keep you away from hunger for hours!


Kharabath

INGREDIENTS

1 cup Rava/Sooji (Cream of Wheat)
1 large onion, chopped
2 green chillies, slit or finely chopped
1 large tomato, chopped
3 tbsp vegetable oil
½ tsp mustard seeds
½ tsp cumin seeds
A pinch of turmeric powder
1 tsp urad dal
1 tsp channa dal
¼ cup roasted peanuts
A sprig of curry leaves
Fresh coriander leaves to garnish
Salt to taste
A dash of lime juice


DIRECTIONS

Roast the rava stirring constantly till the rava gets a light brown color. Then keep it aside. Boil about 3 cups of water and keep it aside. We boil the water so that it is of the same temperature as that of the rava and the other fried ingredients. This helps in faster cooking of the rava.

Now heat 3 tbsp oil in a kadai/pan and add mustard seeds and cumin seeds. Once the seeds begin to splutter, add the curry leaves, channa dal, urad dal and roasted peanuts to it and fry till they turn light brown. Now, add chopped onions and green chillies. Next add chopped tomatoes, turmeric and salt and fry them for another 2-3 minutes. Now add the sooji and fry for few miniutes. Pour the hot water into the mixture. Bring it boil on low heat for about 3 mins. The water should be absorbed by the rava and cooked. Turn off the heat and add a dash of lime juice. Garnish with coriander leaves. Serve hot.


As I walk into my regular supermarket, my eyes often fall on these shelves stacked with colored glasses and plastic bottles with visually fancy brands and varied fancy names. They vary from jams to preserves, from flavored yogurts to healthy muesli, from breakfast spreads to peanut butters. These fancy bottles are indeed tempting. I have myself been tempted many times to pick some of these. And why not! It's easy for anyone to just grab a bottle home, scoop out and serve at any time of the day, instead of cooking right from scratch. And with those added flavors, they taste great in mouth! Isn't that true? But, I have been far more cautious these days to resist my temptation to buy these stuffs.

Most of us know well that these store products do come with their dose of added preservatives and loaded flavors. Even the ones, that say are flavour free and unadulterated are not completely healthy as they contain preservatives. So considering this, it is gratifying at times to make something as simple and delectable as this one at home. Some of these store bought stuffs are real easy to make at home. Peanut Butter is one such spread that's as simple as mix, blend and ready! It is not so difficult to conjure up a delicious breakfast from the most basic ingredients. Eggless French Toast with Homemade Peanut Butter. Simple, easy and great on taste!


In this one, I have preferred using whole wheat bread to go the healthier way. However, use white bread as it tastes the best.

Here's what we need:

½ cup of milk
1 tsp cornstarch
½ tsp vanilla extract
2 slices whole wheat bread
1 tsp butter/oil
½ tsp castor sugar/powdered sugar
A pinch of cinnamon powder

Combine milk, cornstarch and vanilla in a wide mouthed bowl and stir until cornstarch has dissolved completely. Dip the bread slices in milk mixture. Heat a non-stick pan, place the bread slices on the pan. Add butter or oil on the sides of bread and allow it to brown lightly. Turn bread over and brown on the other side. Sprinkle with powdered cinnamon sugar or topping of your choice. Serve hot. I served mine with homemade peanut butter.

Homemade Peanut Butter:


To make Homemade Peanut Butter, here's what we need:

1 cup roasted peanuts
A dash of honey
A pinch of salt
1 tbsp oil, if required

Peanut Butter is so simple and easy that it can be called a kid's play. Let your little ones sneak into the kitchen and handover this task to them! As simple as throwing a cup of roasted peanuts with a dash of honey and a pinch of salt into the food processor, grind them for few minutes till they turn to a paste-like consistency. Transfer to a clean bowl and enjoy as a spread at the breakfast table.


Daily Breads is one place in Bangalore where you get amazing salads (atleast I haven't seen any other joints offering salads) where we get to make our choice of ingredients. Select what you want and they make it for you. I have been missing them from the time we moved. I always wanted to make them at home the similar way, so that I don't miss them.

Weekdays are getting hectic and cooking a dinner sometimes does get tiring. Salads are helping me make my cooking easy. Sometime these salads can be so complete that they substitute our dinners. This is one such evening where it was not just the coleslaw, but a lot more added to it to make it nutritious and healthy and moreover complete our meal. Fruits and vegetables all brought together, this is coleslaw with apple potato penne salad. This salad goes well with any lunch or dinner or as is. It's perfectly filling and makes up for a good meal. I no longer miss Daily Breads.


Coleslaw with Apple Potato Penne Salad

INGREDIENTS

1/2 cup finely shredded cabbage
1/2 shredded lettuce leaves
1 apple chopped to cubes
1/2 cup potato, boiled and chopped to cubes
1/2 tomatoes, chopped
1/2 cup penne pasta
4 tbsp mayonnaise
4 tbsp sour cream/ yogurt
Few crisp toasted and broken bread pieces
Salt and pepper to taste
Few parsley leaves torn roughly

DIRECTIONS

Boil penne pasta as per the instructions given on the pack. Toast the bread pieces till crisp and break them to bite sized pieces. Add these to all the rest of the ingredients. Beat yogurt with mayonnaise and add to the above. Garnish with fresh torn parsley and serve.


Making ice-cream at home was always on my mind and I had been thinking about it from past few weeks. I finally got a chance to make one last weekend on the occasion of my dad's birthday. Vanilla is a basic one which complements so well with many other deserts. So I started out with vanilla flavored first.

I remember my mom making ice cream at home when we were kids. We had no ice cream maker. So it was made in the traditional way of freezing and churning it couple of times. We used to help her by transferring the mixture to the freezer box, keeping it in the freezer to set, removing it, keeping it again, in course of which we would eat up half the ice cream :) By the time the ice-cream was actually done, it would almost see it's end. But it's something we enjoyed thoroughly. She is still of the opinion that it's not worth spending all the time and energy in making it at home when we get better ones with varied flavors in the market. Well, I wanted to try it myself before I could second on that!

I agree that making ice cream at home can be a tedious and lengthy process and the resulting product may not be as smoother and creamier as the one we get in market. That is primarily because of the higher fat content and continuous pumping of air during the freezing process. Adding to this are the artificial colors, flavor, stabilizers, emulsifiers and preservatives. But there is something about the homemade one that you would want to make it at home again and again. It's free from all the artificial flavoring, coloring and preservatives... it feels so good to make and proud to eat!


Since I had no ice cream maker to assist me in making ice cream, I had to make it the traditional way. These machines give much better texture and are smoother as the ice crystals are broken down during the process of freezing and added emulsifiers. I used an electric mixer to break the ice crystals. The longer you freeze and churn, the better is the result.

Although the end result is close to what we get in the market, it has more ice crystals in it which is quite evident while tasting it. But it's still so close that you will not miss the store brought one! Top it up with anything you like, like I did mine with grated dark chocolate.

Here's what we need:

1 litre full fat milk, boiled and cooled
200 ml heavy cream
1 cup powdered sugar
1 tsp vanilla essence
1 tbsp grated dark chocolate


Add sugar, cream and vanilla essence to the milk and mix well. You can use condensed milk instead of milk and sugar. Condensed milk works way better than regular milk. Adjust the sugar if using condensed milk as it already contains sugar in it. Transfer to a freezer proof bowl, cover and freeze it for about an hour. When it is just about to solidify, remove and churn it using a hand blender or mixer. If doing it by hand, mix vigorously till all the ice crystals are broken down. Transfer again to a freezer proof bowl, cover and freeze it for about an hour. Again when it's just about to solidify, remove and churn it using a hand blender or mixer. Continue doing this for about 6-8 times, till most of the ice crystals are broken down. Finally scoop out to ice cream bowls and top with anything of your choice. Enjoy scoops of homemade vanilla ice cream!

This is my first attempt with homemade ice cream and I am pretty much satisfied with the results achieved. I would strongly recommend using condensed milk as the crystallization would be far more reduced and ice cream would result to be more creamier.


Akki Roti is very traditional to Karnataka cuisine. Akki in Kannada means rice. Simple akki roti is made of rice flour, water and salt. Masala akki roti has more added to it. It's commonly savored for breakfast and goes well with eerulli gojju/ onion chutney. Since it is made of rice flour, it's very filling and goes perfect for breakfast. It's not really easy to spread it directly on pan considering it being sticky. So I use cling wrap to spread the dough on to and then transfer to the skillet. It comes out perfectly well.

Here's what we need:

2 cups rice flour
3/4 cup water
1 large onion, finely chopped
1 carrot, grated
1/2 cup freshly grated coconut
A sprig of curry leaves
1-2 green chillies, finely chopped
1 tsp Jeera
Finely chopped coriander leaves
1 tbsp oil
Salt to taste


Heat the water till it's just warm. This helps in better mixing of the rice flour. Mix all the above ingredients except oil and make a soft dough. Now stretch a plastic cling wrap (food grade) across the working surface. About 30 cm x 30 cm should be sufficient. Seal the far corners using a cello tape. Divide the dough to balls bigger than lemon, but smaller than lime. Spread some oil on your hand and pat the dough evenly on all sides. Heat a non-stick pan. Using both your hands, gently remove the akki roti from one hand balancing it on the other. Place it on the non-stick pan. Allow it to cook partially on one side. Turn it over allowing the other side to cook. Spread some oil and flip over again so that it turns crisp on the edges. Remove and serve with onion chutney.


Aloo has always been a hot favorite among most Indian dishes. Not only does it add volume to the dishes, it also complements with most of the Indian vegetables and style of cooking. I had a litre of fresh milk that broke apart. I had no other option but to make paneer (cottage cheese) out of it. Today it was time for Paneer bhurjiwale aloo.

Paneer Bhurjiwale Aloo

INGREDIENTS

1 tbsp Oil
1/4 tsp Cumin seeds
1 Onion, finely chopped
2 Green Chillies, finely chopped

Mix the below dry ingredients:
1/4 tsp Turmeric Powder
1 tsp Cumin powder
1 tsp Coriander powder
1/2 tsp Garam Masala powder
1/2 tsp Red Chilli powder
1/2 tsp Mango powder/ amchoor powder

200 gms Paneer, coarsely mashed by hand
3-4 potatoes, boiled and peeled
Salt to taste
Coriander leaves


DIRECTIONS

Heat oil and allow cumin seeds to splutter. Add finely chopped onions and green chillies and fry for 3 minutes. Then fry all the dry ingredients for half a minute. Add the potatoes and fry further for another few minutes. Then add the paneer and mix everything well. Salt to taste. Adjust the spice to your taste. Cover and cook for about few minutes. Garnish with fresh coriander leaves. Serve hot with rotis or rice.


Summers always bring joy to Indian families. Apart from the regular summer vacations that kids enjoy, it's a family bonding time too. This is the time to make trips to meet family and friends who are miles away or to eagerly await for guests to be home. And this is something which we loved too!

Whenever we had relatives come over for vacation, amma would take every effort to make them feel homely and comfortable. Since it is the mangoes season, there was a sure treat for them with mangoes. We commonly had mango rasayana at home... you can say almost everyday.

What can be a better way to treat yourself this summer with mangoes and yogurt. Mango yogurt is a perfect way to soothe your heart and soul!

Mango Yogurt

INGREDIENTS

200 gms thick curd/yogurt
75 gms sugar
Puree/Pulp of 1 mango
2 drops of vanilla essence


DIRECTIONS

Pulp / puree the mango. I like it roughly pulpy as I like to bite into pieces of mango. If you prefer smooth, then pulp the mango. Beat yogurt with sugar till smooth. Add the pulp and fold well. Finally add the vanilla essence. Vanilla brings out the flavor of mango and hence enhances the flavor of the dish.

This recipe is just with mangoes and yogurt. Mango yogurt mousse also made in a similar way, but with gelatin. Gelatin is mixed with warm water, added to the above and allowed to set. Garnish with fresh mango slices. Mango mousse is ready to be served.


My fascination for Italian food doesn't seem to end. There's something about it that makes me go gaga over it. Well, this was the time for me to post my Fettuccine delight!

Fettuccine is a commonly savored Italian ribbon pasta. Fettuccine was my first attempt of making pasta at home. Even before I made Lasagna, I made Fettuccine through the video on Videojug. It may sound a tedious process, but it actually isn't. One just needs to get a hang of how to make the dough and then we are all set. The step by step video will make it much simpler. The dough definitely needs to be more dry and stiffer than wheat dough, just sufficient to roll it into sheets. The best thing about fresh home made pasta is that it takes less than a minute to be cooked in boiling water. It is healthier as it's free from wax, oils and preservatives.

To make homemade fresh Fettuccine pasta, I suggest you follow this video on Videojug. Nothing can be better than this! Boil water, add salt and cook the pasta for a minute till it's just done. Run through cold water. Drizzle oil and keep it aside.


Basic Italian tomato sauce

1 large onion, finely chopped
2 cloves garlic, minced
1 cup tomato puree
3 tbsp tomato sauce
1/2 cup water
2 tbsp oil
1 tsp sugar
Salt and pepper to taste
Parsley/ cilantro for garnish

Heat oil in a thick bottom pan. Fry onion until it's golden, but not brown. Add garlic and saute for 3 minutes. Add the tomato puree, tomato sauce, water, sugar, salt and pepper. Reduce the flame and boil until the sauce has thickened a bit. Pour over the pasta and mix well. Garnish with fresh parsley or cilantro leaves. Serve hot.


This is a basic Italian tomato sauce. You can add any other spices like oregano, celery, parsley, bay leaf, cinnamon, etc. You may serve this pasta as a main course with salads and desserts.

The video on Videojug uses an egg pasta. I followed the instructions as is, however I omitted the eggs. Instead use any flavorless vegetable oil and it still simply works fantastic.


Most custards commonly made contain egg and it's egg that thickens the milk and gives it a smooth consistency. Egg-less custard is a great alternative for those vegetarians who do not consume egg. Instead of eggs, we use cornstarch.

In India, though we do not get commercially available egg alternatives, we are fortunate to get good eggless curtard/pudding mix in varied flavors. I generally stock a packet of flavored custard powder for those uncalled moments of sweet temptations. Making them ahead during late noons and enjoying a bowl of fruit salad with custard and ice cream post our dinner is one of our favorite desserts. It also brings reminiscences of our childhood where fruit salad with custard topped ice creams was one of the common desserts served when we had guest around.


Fruit Salad in Eggless Vanilla Custard

INGREDIENTS

4 tbsp cornstarch
1/3 cup sugar
2 cups milk
A pinch of yellow food coloring
1/2 tsp. vanilla
Chopped fruits and nuts
1 tsp butter

DIRECTIONS

Use store bought custard/pudding mix in varied flavors. Prepare the custard as per the directions on the pack. If you don't have one, then here's a handy list of how you can make one at home.

Mix together the cornstarch and sugar. Add 2 cups milk gradually. Cook over medium heat until it thickens. Add 1/2 teaspoon vanilla and the food coloring if preferred. Stir and let cool. Add in loads of chopped fruits of your choice. I used apples, black grapes, strawberries, bananas, mangoes here. You may use varied fruits of your choice.

Heat some butter and fry some cashew nuts, almonds and raisins. Add it to the fruits salad and mix well. Chill and serve. Garnish with reserved fried nuts and chopped fruits.


Though what I have used here is a store bought custard mix in vanilla flavor, the above is a great alternative to store bought custard packets and I use it during those times when I run out of custard mix. It accompanies well with ice-cream, fruit toppings, fruit salads and as a base for pudding.