I like my Pizzas with thin crusts. Every time we order Pizza in a restaurant, we are often greeted with a basic thick crust pizza. And that gives me a feeling that I am biting into more of breads than the toppings. I am also fond of nice thick layer of vegetable toppings. So this time I went ahead to make my thin crust pizza dough at home. It's simple to make, but requires planning ahead in time.

Making the dough requires some standing time for the yeast to culture, so just plan your meal ahead so that you can prepare the dough. Once the dough is rolled out, all it requires is spreading the sauce, the toppings and loads of cheeeeese! It's pizza customized to your taste buds. So what can be better than that! I shall share the pizza dough recipe this time and the toppings probably the next time.


Homemade Pizza dough

INGREDIENTS:

1 tsp. dry yeast
2 tbsp. warm water
A tsp. of sugar
1/3 cup yogurt or warm milk
1 cup all purpose flour / wheat flour
1 tsp. Olive oil
Salt to taste


DIRECTIONS:

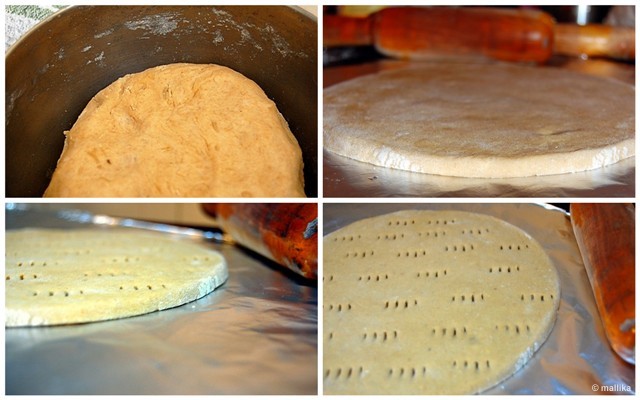
In a small bowl, mix the dry yeast in warm water, add a tsp. of sugar and stir to dissolve it. Set aside for about 5 minutes so that the yeast dissolves well and becomes frothy.

Heap the flour into a large bowl and make a hole in the center. Pour the yeast mixture, salt to taste and 1 tbsp. of olive oil. Stir all the ingredients to form a soft dough. Add very little water if its stiff to bind, add just enough flour to hold together if its too wet. Knead the dough well and cover with a kitchen towel. Set aside in a warm place for an hour to rise.

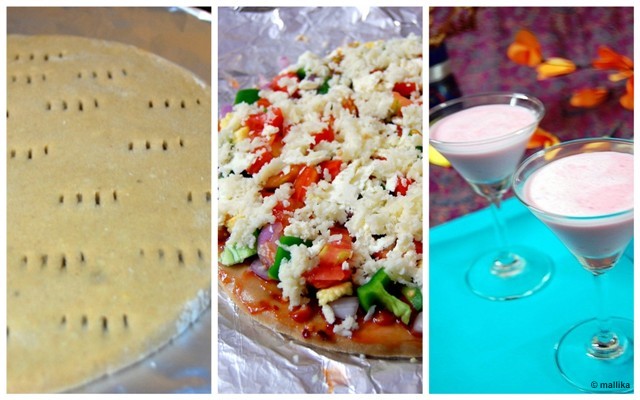
After an hour or two, the dough would have doubled in size. Now punch the dough down and divide into 2 balls. Roll into thin crust or thick crust as per your preference. Poke a few holes into the dough using fork to prevent the dough from rising from the center. Pizza base is ready for use!

Updated: If using a microwave with convection mode, its best to pre-bake the pizza on either sides for a couple of minutes. This will ensure the dough is not raw or half baked while the cheese has melted and turned golden brown.


And just in case you do not have pizza sauce handy, or you ran out of stock and you do not have sufficient time at hand to slog in front of your stove, then make this super easy and quick version. I have an express recipe for a homemade pizza sauce. This was picked from one of the Italian cookbooks, the name of which I can't recall at the moment. Fry a tablespoon of finely chopped garlic with olive oil till translucent. Add a cup of ready-made tomato sauce to it. Sauté for a min or two. Add a dash of Italian herbs or seasoning and the pizza sauce is ready! This sauce is good pastas and lasagnas too.

Lay the pizza base. Spread the sauce. Dress it with toppings of your choice. Top with cheese. Pop into the oven and bake till cheese browns. And your Pizza is all ready to be served!

Spiced Veg Pizza


INGREDIENTS:

1 medium chopped onion
1 yellow capsicum
1 red capsicum
1 green capsicum
2 baby corns
1 tomato
1 tbsp pizza sauce
1 tbsp mozzarella cheese
1 tbsp cheddar or Parmesan cheese
1 tsp red chili flakes
Salt & pepper to taste

DIRECTIONS:

Wash and chop all the vegetables to medium to small bite sized pieces. Lay the homemade pizza base on a baking tray or pizza stone, spread some pizza sauce, sprinkle a tbsp of cheddar or Parmesan cheese. Then arrange the vegetables on the base. Add salt, pepper and chili flakes to taste, as preferred. I don't usually add any salt as the cheese has enough salt in it. Finally top the pizza with loads of mozzarella cheese. Bake in a pre-heated oven on 180 deg C.

Serve hot with Italian herbs, oregano and more chili flakes for that extra spice. Enjoy!

And if you like Deep pan or Thick crust pizza, then this bite is for you! Enjoy!!!


A traditional Punjabi food would definitely comprise of Parathas without which their menu would remain incomplete. In a week, this would be a compulsive part of the breakfast menu. Travel north and you are bound to be greeted with Thelewalas selling hot Parathas on street side. Loaded with ghee and butter, spiced up well, they are a sure to leave your taste buds lingering for more. Yum indeed! The thought itself leaves me tempting and wants me to grab for some right away! Since wheat is primarily grown in Northern part of India, it for a staple part of their dietary intake.

Mooli Paratha is one of my personal favorites and I love it for the simple mélange of flavors that it creates with each bite. It's just so enticing. Almost every weekend, we indulge in various types of Parathas. They are always either on our breakfast or lunch menu and sometimes dinner as well. This weekend it was Radish/Mooli paratha. Wheneven I have dull, weary looking radish lying in the fridge, I make it a point to use them this way. They never go waste this way!


Prepare the dough first:

For the dough:
2 cups Wheat flour
Salt To taste
Water

For the Mooli parathas, here's what we need:

3 Mooli (Radish)
1/2 tsp Red chilli powder
1/2 tsp Cumin seeds
1/2 tsp Coriander powder
2 Green chillies, chopped finely
2 tbsp Coriander leaves
A hint of Amchoor powder
Salt To Taste

Add water to wheat flour and salt and knead to a stiff dough. Drizzle a tsp of oil on the dough and coat it on all sides. Cover and keep aside for sometime.

Wash, peel and grate the radish. Add salt to it and leave it aside for 15 minutes. Squeeze and drain all the water. Use this water to knead the dough as it contains the nutrients. Add cumin seeds, coriander powder, red chilli powder, green chillies, amchoor powder and coriander leaves and mix well. Add more salt (if needed).

Roll some dough (about 2 lemon sized) into small disk. Place 2 tsp of stuffing at the centre, pull the edges up and cover from all the sides. Roll again into a thick, round parantha. Heat a tava and fry the mooli paratha on both sides to crispy brown. Put some oil over the paratha. Serve the mooli paratha hot with pickle and curd.


I love cookies. But I still desist indulging often in store bought biscuits and cookies. It's okay at times. But on a daily basis, I would prefer something more homemade which is lighter, simpler and healthier. Well, following my mum's way. Despite knowing that biscuits, cookies, pastries, etc do carry butter and sugar content, I still try and have a control on them. If the recipe called for a cup of sugar, I would prefer using a little lesser than what it asks for. The same goes with butter. It probably would taste great and richer, but I think we are just fine with less.

I recently made a small batch of almond cookies. They were such an instant hit that they got finished even before I could click few snaps of them. They were crisp, crunchy and delicately almond flavored. I decided to make another batch of them, but with a variation. Since I had always have a bag of oatmeal at home, I thought it would be a good idea to use them in cookies. And again it's time for my favorite chocolate flavored ones.

As the cookies were baking in the oven, it's chocloatey aroma spread across the house transforming the entire house to smell like a cookie shop. It was just heavenly! Aromatic and truly decadent. These are perfect for tea time and go well with a hot cuppa coffee.


Cocoa-Oatmeal Cookies

INGREDIENTS:

1 cup all purpose flour
50 gms cold butter
1/2 cup rolled oats
1/2 cup cocoa powder
1 cup granulated damerara sugar
1/4 tsp baking powder
A pinch of baking soda
A pinch of salt
1/4 cup chopped cashew nuts (or mixed, as desired)
1/4 cup milk or as desired


DIRECTIONS:

Don't melt the butter. Instead mash the cold butter well into all purpose flour till it resembles bread crumbs.

Mix all the dry ingredients (i.e. from rolled oats to nuts in the list) in a separate bowl. Then add all the dry ingredients to the above. Mix well. Add milk and gently mix so that it forms a soft dough or a thick batter (batter will be thick enough to scoop out). Scoop out dollops of batter to a parchment paper or aluminum foil. Make sure to leave enough space between each dollop as it will swell during baking process.

Place the tray in the oven and bake on 350 degree for about 15 minutes depending on your oven. The resultant cookie will be chewy and slightly crunchy on the edges. If you bake further the cookie will turn crunchier. Enjoy with tea or coffee or just plain milk!


We like living a good and healthy lifestyle. Despite a fast life, hectic work schedules, I still manage to pull time out to cook an entire day's meal. It gets real hectic sometimes. Fitting in time and managing a healthy meal which is full of nutrition is an everyday challenge.

Recently we decided to go on a change in our breakfast routine. It so happens that everyday I spend time in preparing a complete breakfast which begins from cooking the breakfast, followed by preparing tea and post cleaning process. By the time the morning chores are done, it's time to prepare for lunch. This leaves hardly any time for other jobs which are then pushed for the weekend. We decided to put an end to all this. Going the healthy way, we switched to eating oats during the week days and cooking breakfast was for the weekends.

Day 1, day 2, day 3, day 4... by now I was bored eating the same oats which have no taste nor are appealing. Other than the usual porridge (which is ok for a day or two), it was the monotony that was killing me. We then switched to corn flakes which was still better for me. All said, this did save a lot of time for us and it has helped us focus on many other important jobs.

Since oats are high in fiber and healthier option for weight loss, I decided to make my own bar of Granola bars which I can munch on whenever I go through hunger pangs. They make up for a great breakfast and are equally as good as oat porridge. It's great for breakfast, a tea-time snack or even as a dessert! Indulge a great treat the healthy way!


Homemade Granola Bars

INGREDIENTS

1 cups quick rolled oats
1/4 cup chopped almonds
1/4 cup pitted dates, well chopped
1/4 cup golden raisins
1/4 cup rice crispies
1/2 cup honey
1/2 cup brown sugar
1 teaspoon vanilla extract, optional
25 gms melted butter or vegetable oil
1 tablespoon water

DIRECTIONS

Granola bars can be either made in oven or on stove top. I find stove top easier, so I make it that way. Mix dry ingredients 1 to 5 and toast on a medium low flame for about 10 minutes till crisp and brown. Nuts should turn crisp. Set it aside to cool a little.

Next, in a saucepan mix butter, honey and brown sugar and heat on a medium flame till the sugar melts and begins to bubble. If you see the sugar caramelizing, add a tsp of water or more. Remove from heat when it is slightly thick and bubbles. Add the vanilla essence. Quickly add the toasted oats and nuts and mix well. Spread on a parchment paper and using the back of a wooden spoon, spread it across gently. Cover another parchment paper and press them down gently. Let them cool. Cut into bars once cooled. Enjoy anytime as desired!


I seem to be more inclined towards baking these days. With a brand new baking dish that I received as a surprise gift from my hubby (with a card on it that read 'For the love of baking'), I was all thrilled and excited to experiment with baking further more. I have been thinking of making bread at home from past few days. My first attempt at making bread was so much fun and exciting. I was nervous and had goosebumps at every stage, right from working with the yeast to making the dough, resting overnight or even baking it. I have made cakes and puddings several time. Thoughts kept crossing my mind if this would turn out right or not. But this was the first time I was working with yeast or making bread, which meant I really wanted my effort to yield the perfect results!

My attempt at making Focaccia was not just successful, it came out so good that we finished the bread even before I could take a photograph of how it looked like inside! I made a Rosemary Thyme Focaccia. Not an easy one I must say, 'coz if you need to make this you may have to plan in advance a day ahead.


Rosemary Focaccia

INGREDIENTS

Prepare the dough:

1 tsp dry active yeast
1/2 cup warm water
1 tsp sugar
Salt to taste
1 cup all-purpose flour

Prepare the dough the night before you make the focaccia for the next day. Mix active dry yeast in warm water with sugar and salt and leave it for 5 minutes. Once its completely dissolved and looks frothy, add in the all-purpose flour and whisk. It would look sticky and messy. Form a sticky dough and leave it covered with a cling film overnight. You may either leave it in the refrigerator or outside in a dry warm place. I kept mine outside.

Prepare the herb oil:

3 tbsp olive oil
1 tbsp fresh Rosemary leaves
1 tbsp fresh Thyme
1 tbsp fresh Parsley
1 tbsp Italian oregano seasoning
Salt to taste

Finely chop the herbs. Warm the olive oil and add the herbs into the oil. Allow the flavors to blend well. I made mine overnight. You can add pretty much anything that suits your taste. Add garlic flakes, sun dried tomatoes, olives, jalapenos, I added a dash of chilly flakes to mine as we love spice.

Prepare the focaccia:

1 cup of all-purpose flour or whole wheat flour
Herbed olive oil

The next morning, you should see that the dough has doubled in size and will give a yeasty smell as you remove the cling film. Punch it down and add another 1 cup of all-purpose flour or whole wheat flour along with 3 tbsp olive oil and mix gently. Fold the dough. The dough will now take a better shape. It will leave the sides, but stick to the bottom. That's how we want. Adjust the salt. Next transfer the dough to the baking dish, gently pull it on all sides using your hands and make a half inch layered flat dough. Leave it to rise for an hour.

After an hour, the dough would rise. Using the fingertips, gently dimple the dough and spread the spiced oil over it and into the pockets. Make sure that we don't dig too deep. We want leave the air pockets for a softer bread. Bake in oven for an hour at 350 degrees or till the top looks golden brown. As the bread goes through the baking process, you can feel the aroma of the baked bread rising through the air making your home smell like a bakery! Serve warm as is or with garlic butter. I think the next time I bake, I'll make sure I have a bigger batch going into the oven!


I have a BIG sweet tooth, but my husband does not. He is not fussy. He relishes sweets to an extent, but is very conscious of the calorie intake. He has a tumult of not taking sweets at night. He sticks to his diet very religiously. I, on the other hand I go totally gaga over sweets. And it's not just the love for cooking and baking, but also finishing them till bowl clean! Aaah, now that's truly me!

I get a constant NO NO from him for eating sweets in any form at any hour of the day. I have a tongue with some great sensitivity to food! I am constantly monitored for my intake of calories. On a good note, it really helps me feel the pinch and guilt which I wouldn't have felt otherwise. But what makes it difficult for me is that I crave to bake... which means not only end up making, but also finishing!

This weekend I tested my skills at making some good Chocolate Truffle Cake. It came out great and we (should I emphasize on I instead of we !!!) finished the entire batch by the end of the day!

Chocolate Truffle Cake

Prepare the cake:

1 ½ cups All purpose flour/Maida
3/4 cup Cocoa powder
1 cup Castor sugar/powdered sugar
1/2 tsp Baking power
A pinch of salt
1 cup Milk
75 gm Unsalted butter or 5 tbsp Oil
2 eggs
1 tsp Vanilla essence

Sieve and mix all the dry ingredients together (first five in the list). Beat eggs with sugar till they turn fluffy and pale yellow. To this, add butter, milk and vanilla essence. Beat the mixture to blend the ingredients thoroughly. Mix the dry ingredients into the wet one. Tranfer to a greased cake tin and bake at 350-375 degrees for about 40 minutes till done. Cool and slit the cake across horizontally into 2 pieces.


Moisten the cake:

2 tbsp rum
2 tbsp sugar
2 tbsp of water

Heat 2 tbsp rum with 2 tbsp sugar and 2 tbsp of water till it comes to a boil. To moist the cake, drizzle this rum mixture on both the cake slices.

Frosting the cake:

100 gm butter
2 tbsp cocoa
2 tbsp powdered sugar
2 tbsp cream
A pinch of salt
Few drops of vanilla extract

Melt butter over a saucepan and keep it aside. To this add in the cocoa, powdered sugar, a pinch of salt and few drops of vanilla extract. Mix and beat well till it forms soft peaks. Add in the cream and keep aside. This will thicken further as it cools down.

Assembling the Truffle:

To assemble, please the base and spread some cocoa frost from the middle to the edges of the cake. Place the second layer over it. Then heat the cocoa mixture till it just melts and drizzle it over the chocolate cake to cover it completely. Decorate with a few almonds. Allow it to set in the refrigerator for an hour. Serve as is or warm to serve with vanilla ice cream.


Over years, my mom has regularly made recipes from Maharastrian cuisine and she makes them exceptionally well. She can make a great Bharleli Vangi and her Batata Poha and Sabudana khichdi have been firm family favorites. Owning to the fact that we spent considerable number of years in Maharashtra, our cooking does have a Maharashtrian influence. Infact my dad has lived most of his life in Maharashtra, so this influence came us naturally!

I had not made this till recently I wanted to try something different out of brinjals. Not many like brinjals. Most of the people whom I have come across have either disliked it or are allergic to it. But back at home, it was a personal favorite of my dad's. He would love brinjal in any form and was particularly fond of Badanekai Huli which mom made. Me not being a fussy eater, would eat everything. Luckily, my husband is fond of brinjals too. It has been a common in his house in form of Baingan Bharta or Baingan Aloo ki subzi. This was unique to him and was a definite hit! I am happy!

You will find the similar dish made in the border districts of Karnataka. It's called Badane Yennagai and very commonly made in northern districts of Karnataka like Hubli and Belgaum. It's traditionally had with jolada rotti. The recipe is almost similar with very little or no variation in the ingredients. There are several recipies for the same, with a litte variation in the ingredients used.


Bharleli Vangi

INGREDIENTS

10 small brinjals/eggplants
2 tbsp oil
1 tsp mustard seeds
1/2 tsp asafoetida/hing
1 large onion, finely chopped
1/2 tsp turmeric powder
A sprig of curry leaves
Few fresh coriander leaves

Dry Roast the following:

6-7 whole red chillies
1/4 cup dry coconut/copra
1/4 cup roasted peanuts
4 tbsp sesame seeds/till seeds
1 tbsp each coriander-cumin seeds

Grind to paste the following ingredients with the above dry roasted mixture:

1 tsp ginger-garlic paste (optional)
2 tbsp Maharashtrian Goda Masala (optional)
1 tsp tamarind pulp
1 tbsp jaggery
Salt to taste

DIRECTIONS

With the stems intact, give four vertical slits (like +) to the brinjals from the top to the bottom. Keep them in salt water for 10 minutes and rinse to remove any bitterness. I avoid this step.


Dry roast coconut, sesame seeds, coriander-cumin seeds and whole red chillies together till light brown. Grind the roasted mixture with tamarind, jaggery, peanut powder, ginger-garlic paste, Goda masala and salt to taste. Stuff all the brinjals with above masala. A little masala may be left over. Do not discard.

Heat oil in a kadai or a non stick pan. Add mustard seeds. When it splutters, add asafoetida, curry leaves, onions and turmeric powder. Fry till the onions brown. Add the brinjals and fry for sometime. Add the leftover masala and 1/2 cup water. Cover and cook for few mins till the brinjals are cooked. I cook mine in a pressure cooker as it saves a lot of cooking time. Give one whistle on pressure cooker so that the brinjals are just done and don't turn too mushy. Remove into a serving dish.

Garnish with coriander leaves. Serve hot with bhakar, roti or rice.

Sabudana Khichdi


Sabudana Khichdi is a very authentic signature Maharashtrian dish. Although this is not very commonly known to many people of other regions/states, one is bound to fall in love with this once introduced. It's commonly made during the fasting days.

My paternal mother would fast every Monday and Thursday. The fast was not meant to starve, but to refrain from consuming wheat, rice, pulses and a couple of forbidden food items. These were days we would wait eagerly for, as she cooked the most awaited dish, Upavaschi Sabudana Khichdi. I simply loved it and I still do it to this day.

During our stay in Khamgaon when dad was posted in Maharashtra, I would eagerly look forward to Thursdays. We would hit the market streets on Thursdays, when this dish along with other Upavaschi uphar was made. Crowds thronged the temples, followed by the streetside hole-in-the-wall shop that stood adjacent to the temple. My complain was why can't this be sold more often on daily basis by more vendors. With this dish being so popular, why not sell it more? But I guess it's so commonly made in all Marathi homes that they would probably not think of buying it outside!

As kids, we loved this dish and looked forward to days when mom made it. But she would resist from making this more often as we always over-indulged. Besides this, sago is heavy on stomach and not an easily digestible food. This is the reason why it is eaten on fasting days so that it helps in beating hunger for longer time. Before leaving Khamgaon, amma picked few packets of good sago. I took some from her and attempted to make them at home... not for fasting, but for breakfast. It was a big hit, as my husband who was not particularly fond of it earlier (he tasted them for the first time in Khamgaon after all my hype) is now a big fan of the same!

Sabudana Khichdi


Upavascha Sabudana Khichdi

INGREDIENTS

1 cup sabudana(sago)
2 tbsp. oil
2-3 green chillies, chopped finely
1/4 cup coarsely ground groundnuts
1 boiled & peeled potato
1/2 tsp. cumin seeds
1 tsp. sugar
Salt to taste
A sprig of curry leaves (optional)

DIRECTIONS

Wash and soak sabudana in water for atleast 4 hours. I prefer soaking overnight. The best method to get perfectly soaked sago would be to drain the water after washing sago. Soak sabudana by adding just enough water to cover them. Do not go above 1/4 inch more than sabudana level. You can sprinkle more water later if required. The sabudana should swell well. You can test them by pinching the granule between your fingertips and they should turn mushy.

To the sabudana, add in crushed roasted peanuts along with salt to taste. This will help to reduce the sabudana granules from sticking to each other while stir frying.

Heat the oil in a pan and add cumin seeds. When the seeds crackle, add finely chopped green chillies and torn curry leaves. Add the sabudana mixture and stir well. Leave the pan uncovered and allow the sabudana to cook till they turn translucent in color. Add the chopped boiled potatoes and cook for another 4-5 minutes. Finally add the sugar and mix well. Turn off the flame and serve hot.


Ask a Punjabi what a comfort food is? You are sure to get a spontaneous answer :) Ask my father in-law and he definitely has a spontaneous answer ;) Many of my previous posts have been on Punjabi cooking. I have close ties with Punjabi cooking and have got to learn a lot from my mother and mother in law. I got to learn the best of Parathas from my mother in law, while recipes like chole, rajma and have been inspired by my mom's cooking. My mom makes amazing chole, so I am bound to have learnt the same from her. I have been applauded many times for the channa chole that I make. I have mastered it well. This was one among the first few complicated recipes I learnt to cook (the list of ingredients do make it sound too complicated, but it actually isn't :D ).

Just before marriage, I once cooked Punjabi chole at home. I sent a batch of the home cooked chole to my to-be-in-laws as well. The next day DH told me that my father in-law complimented me saying that I cooked chole better than my mother in-law. I still carry that compliment close to my heart and it makes me feel so proud!

Today, I share with you the recipe for Punjabi Chole. It is guaranteed to leave your taste buds lingering with varied flavors.


Punjabi Chole

INGREDIENTS

250 g Kabuli Chana, soaked overnight
1/2 tsp turmeric powder
2 tbsp Oil
1 tsp cumin seeds (jeera)
2 bay leaves
2 cinnamon sticks
2-3 cloves
2 cardamom pods

Grind to paste the following:

1 large onion
4 cloves garlic
1 inch ginger
1 green chilli

2 tomatoes, pureed
1 tsp deggi mirch /red chilli powder
1 tsp coriander powder
1 tsp cumin powder
1/2 tsp garam masala
1 tsp mango powder (amchur)
A bunch of fresh coriander, finely chopped
1/2 tsp lime juice

DIRECTIONS

Soak kabuli channa overnight. Pressure cook them in ample water (twice the soaked channa), salt and turmeric. Reserve the extra water from the cooked dal.

Heat a kadai/wok. Add cumin seeds, bay leaves, cinnamon sticks, cardamom pods. Fry for half a minute. Donot allow them to brown, they may turn bitter. Add the ground paste and fry for 2 minutes. Add tomato puree next and cook for a minute or two. Now add deggi mirch/red chilli powder, coriander powder, cumin powder, garam masala and amchur powder. Cook for sometime till the water evaporates and you get a thick gravy. Add the boiled kabuli chana with the water. Cover and cook for all the flavors to blend well. Add a dash of lime juice in the end before serving. Garnish with chopped coriander.

Note: If you want a dark colored chole, you can place 2 used tea bags while cooking the channa. This gives a dark colored chole. Along with this you can also add some imli (tamarind paste) for a tang.


I have been craving to make chocolate brownies at home from a very long long time. I've been holding this craving for baking, only for the fact of not getting a bar of cooking chocolate or unsweetened chocolate. Here in India, any milk chocolate is sugary and the concept of cooking chocolate has not evolved yet.

From a long time, I have been looking for a good brownie recipe made from cocoa powder. I wanted mine to be gooey, moist and deep chocolate-y. I kept researching for several recipes, but was not thoroughly satisfied. Most of the recipes call for unsweetened dark chocolates. I have tried making them at home with cocoa powder and have not been satisfied with the results, Not that they turned out bad, but they turned out more like flat cakes and not the actual brownies I was looking for.

After researching a lot again and being dissatisfied with most of the recipes, I came across this site during the search. This is exactly what I was looking for! A cocoa brownie that does not ask for dark chocolates! Finally! I felt the recipe was perfect and the photos were definitely promising me the brownies I wanted.

With high expectations, I set out to prepare this brownie on my weekend. I am extremely happy with the results and this recipe will surely make to my bookmarks :) We did enjoy a good batch of brownies with evening tea and a few made it to the brownie fudge with vanilla ice-cream.


Best Cocoa Brownies

INGREDIENTS

150 gm unsalted butter
1 ¼ cups sugar
1 cup cocoa powder
¼ tsp salt
½ tsp vanilla extract
2 large eggs
½ cup all purpose flour
½ cup walnuts (optional)

DIRECTIONS

Pre-heat the oven to 350 deg F.

Set a large pan with water on heat. Place small wide mouthed pan on the larger pan in such a way that the water boiling in the larger pan does not touch the bottom of the smaller pan placed on it. The smaller pan should be wide mouthed and should completely cover the pan below so that the steam does not escape. This is called a double boiler.

Melt the butter. Add sugar and salt and stir until well combined. Next add the cocoa powder. Reduce on cocoa if you think it's overpowering. Stir until mixture is smooth. Mixture should be hot, but not boiling. Remove and keep it aside. Don't worry if you find the mixture granulated. It will turn fine on baking.


Add the eggs one at a time. Beat well with every addition. Add the vanilla. Mix again. The batter will look thick and shiny now. Then add the flour and blend everything well. Add in the nuts, if required. I used chocolate chips in mine. Line the baking tin with parchment paper or aluminum foil. Spread evenly on a baking tin.

Bake for about 20 to 25 minutes. Test with a toothpick. The top would look cake-y, center will still be a little moist. That's how we want it to be. Do not over-bake the brownie. Remove and cool completely. Cut into squares or rectangles. Serve warm as is or as brownie fudge with hot chocolate sauce and ice-cream.

My husband says that these were the best brownies that he's ever had. At least, I am glad I do not have to depend on dark chocolate if we ever have a brownie craving. I can make these any day, any time, with the simplest of ingredients sourced.