I have come across many bachelors and friends who crave eating a simple home cooked meal. Dal-Chawal, anna-saaru, they say. I have been through similar moments during the time I lived single. Every time I came back home from college, tired and torn by the day's activities, one thing that I would look forward to was fulfilling my hungry tummy. Those were the days when I was staying alone by myself. Just a morsel of good home cooked food was what I craved for. The thought of going to the kitchen and cooking a meal for myself was good on mind, but was lethargic too. Or I guess, it was the boredom to eat all alone. But of course, I would make them at home on weekends... that meant treating myself.

Every time, I went home for vacation, it meant feasting myself on amma's food. Amma's food is just unbeatable. Just the thought would make me yearn to go back home, sit on the table and relish the hot food that comes out of the kitchen to the table, lovingly cooked and fed by amma. A simple home food can not only be healthy, but more satisfying and fulfilling. Today, I appreciate the care and efforts that she took to feed us lovingly every single day without any qualms. I know what it means to cook a full meal, to be careful that it is healthy, tasty, filling and lovingly fed.

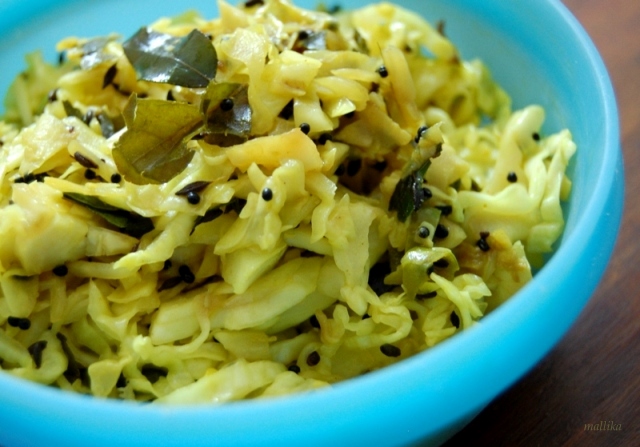
I am sharing with you my plate of lunch made over the weekend. A full meal, the Havyaka way with Hesaru KaLu Kai HuLi, Bendekai palya, Eerulli gojju served with rice and homemade amTekai uppinakai. Uddin happala and curd may be missing in this pic, but is definitely a part of this meal! And to end with a sweet note, nothing can be better than Shavige payasa.


I love the use of garlic in roasted form. They are so intense and can impart such great flavors to a recipe. Garlic may not compliment all dishes, considering it is pungent. Not everyone would even savor it's taste. But to me, I just love it! Considering it is good for heart, it gives me more excuse to use them often!

Amma's Hesaru KaLu Kai HuLi is one of my favorite Havyaka dish which tastes heavenly when tempered well. There are few ingredients that can make or take flavors away in a South Indian cooking. The secret behind a great tasting South Indian food is in it's tempering. And many of the gravy dishes do call for a good tempering... tempering in the right way. Another go get ingredient is the use of compounded hing/asafeotida. This is very different from the powdered stuff that we get. I find the powdered hing that we get is nothing but a dry powder which has no taste or flavours. This works good for recipes that don't require the hing flavors, but for an authentic Manglorean HuLi recipe or gassi, the compounded one is a must. Try them yourself both the ways, you bet you'll know the difference.


Hesaru KaLu Kai HuLi

INGREDIENTS

1 cup sprouted green gram/hesaru kalu
A little more than 1/4 cup grated fresh coconut
1 tsp cumin seeds/jeera
2 tbsps coriander seeds/dhania
1/4th tsp fenugreek seeds/methi seeds
4-5 red chillies (I used Byadgi chillies)
1 small lemon sized tamarind (soaked in warm water)
1 tsp powdered jaggery
A little compounded hing/asafoetida

For tempering:

1 tsp oil
1 tsp mustard seeds
3-4 curry leaves
5 cloves of garlic, crushed in a motar & pestle


DIRECTIONS

Pressure cook the sprouted moong dal with salt and turmeric until they are soft. Dry roast the cumin seeds, coriander seeds, methi seeds and red chillies till they are just browned. Grind the cooled dry roasted ingredients along with coconut and tamarind to make a smooth paste. Add this masala paste to the cooked moong dal. Add little water if required and bring this to a boil. Adjust salt, add jaggery and allow this to come to a boil. Mix the compounded hing in a little warm water or probably remove a little curry out into a cup and mix in the compounded hing. Add this to the boiling curry. I always use compounded hing/asafoetida for these kind of recipes as the flavor it imparts to the dishes is just out of the world. I don't think this curry would be even closer to what it should be without this!

Next the temper. In a small pan, heat oil. Add mustard seeds and let it splutter. Add curry leaves and chopped/crushed garlic. Add this tempering to the above prepared curry and cover immediately. Mix well and serve. Goes very well with hot ric
e.


Tiramisu is one of the most popular Italian deserts. Although it doesn't require any introduction, for the uninitiated Tiramisu is a creamy, melt in mouth cake primarily made up of lady finger biscuits dipped in espresso or strong coffee decoction, layered with a whipped mixture of egg yolks, mascarpone, and sugar, and topped with cocoa. Ref: Tiramisu.

These days there are different versions of Tiramisu. Some made with Rum or Marsala wine or Coffee liquor, some made with raw eggs only, while some have Zabaglione in them. Although traditionally it has mascarpone in it, cream cheese or whipped cottage/ricotta cheese is also used as a low fat version. We first had our bite of Tiramisu (imported from Belgium) at Bliss and paid a whopping price of Rs. 150 bucks for a fairly small bite of cake (We finished the cake in just 2-3 bites!). It was heavenly!


I set out to try them at home. I went through a few hazzles while making them. Firstly, the Mascarpone cheese was almost impossible to get in India. I have made ample searches, saw cheddar, mozzerella, gouda, cottage, processed cheese, etc, but absolutely no Mascarpone! Mascarpone cheese is very high in fat and since not easily available in India, I settled to use the low fat version, Cottage cheese which is easily available everywhere.

Initially, I thought of making lady fingers at home. Internet searches gave ample of recipes to make lady finger cakes at home, but the thought of making everything from scratch seemed really tedious and I settled to use sponge cakes instead. It is a bit time consuming as I made cottage cheese fresh at home. However in the end, the cake turned out fantastic.

Tiramisu

Prepare the Zabaglione:

6 egg yolks
1 cup milk
1/2 cup sugar
1 tbsp unsalted butter
1/4 tsp Vanilla extract/essence
A hint of salt

Zabaglione generally is made of eggs alone. But we are not very fond of the sole egg-y flavor. So to reduce it's intensity, I made it the custard way. Omit milk in the above recipe if you like the egg-y flavor. Beat the eggs well with sugar. Heat the milk till its hot, but not boiling. Temper the milk into the eggs slowly and carefully so that the eggs don't split or scramble. Transfer to a double boiler and heat through till the custard is thick and coats the back of the spatula. Remove from heat and add the butter and vanilla essence. Allow to cool in the refrigerator.


Prepare the Cream cheese:

1 cup cottage cheese
1 cup confectioners sugar
1/2 cup whipped cream

Run the cheese along with sugar in a mixer till it is smooth and creamy. Add the heavy whipped cream with the above prepare zabaglione. Gently fold everything. Refrigerate so that it sets well.

You can either purchase store bought cottage cheese, else prepare at home. I made mine at home.

Prepare the Cottage cheese:

1 litre milk
1 tsp lime juice

Heat the milk. Once it comes to a boil, add lime juice. The whey and curdled milk should separate now. The curdled milk will float on top. Allow to cool a bit and strain the whey through a cheese cloth. Allow the mixture to drain for an hour, then take the ends of the cheesecloth and twist to drain any remaining whey. Homemade cottage cheese is ready!

Prepare the coffee mixture:

Either use expresso or make strong coffee decoction at home. Add a 1 tbsp of rum to it.


Assembling the cake:

Keep the cake, coffee mixture, and cream filling at hand. Dip the cake in the coffee and line the bottom of the serving dish. Place the cake side by side till the bottom is fully covered. Next, scoop a big dollop of cream cheese mix and spread well to cover the cake. Lay another layer of cake and cream mix and top it with cocoa powder. Refrigerate overnight and serve the next day for the flavors to blend well. Slice and serve.


For the times when we had heavy lunch or dinners, the following dinner or next afternoon's lunch would always be light. This was was the care mama took of our tummies. She strongly believed that after a heavy, greasy and creamy hotel food, it's best to settle for simple home cooked par-boiled veggies which gave the stomach mechanism some break... after all it requires some rest too! And the Simple Sautéed Cabbage was one of those simple delicacies that purely brought out the flavor of cabbage. This simply spiced par-cooked cabbage would be such a rescue and I thoroughly enjoy this as a side dish or even as salad. Here it goes, the mum's way...


Here's what we need:

1/2 cabbage, finely shredded
1 tsp Oil
1 tsp mustard seeds
1 tsp cumin seeds
1/2 tsp turmeric powder
A sprig of curry leaves
1-2 green chillies, slitted
Salt to taste

Heat oil in a kadai/wok. Add mustard, cumin and allow them to splutter. Add turmeric and slitted green chillies and fry another minute. Then add the cabbage and salt and sauté for few minutes. Sauté till the cabbage is par-cooked. Turn off the flame and cover. The heat is sufficient for it to cook a little further. This way the cabbage is not over cooked and it does not loose it's crunch. We love cabbage done this way. Serve hot with rice or roti as a side dish.


I like my Pizzas with thin crusts. Every time we order Pizza in a restaurant, we are often greeted with a basic thick crust pizza. And that gives me a feeling that I am biting into more of breads than the toppings. I am also fond of nice thick layer of vegetable toppings. So this time I went ahead to make my thin crust pizza dough at home. It's simple to make, but requires planning ahead in time.

Making the dough requires some standing time for the yeast to culture, so just plan your meal ahead so that you can prepare the dough. Once the dough is rolled out, all it requires is spreading the sauce, the toppings and loads of cheeeeese! It's pizza customized to your taste buds. So what can be better than that! I shall share the pizza dough recipe this time and the toppings probably the next time.


Homemade Pizza dough

INGREDIENTS:

1 tsp. dry yeast
2 tbsp. warm water
A tsp. of sugar
1/3 cup yogurt or warm milk
1 cup all purpose flour / wheat flour
1 tsp. Olive oil
Salt to taste


DIRECTIONS:

In a small bowl, mix the dry yeast in warm water, add a tsp. of sugar and stir to dissolve it. Set aside for about 5 minutes so that the yeast dissolves well and becomes frothy.

Heap the flour into a large bowl and make a hole in the center. Pour the yeast mixture, salt to taste and 1 tbsp. of olive oil. Stir all the ingredients to form a soft dough. Add very little water if its stiff to bind, add just enough flour to hold together if its too wet. Knead the dough well and cover with a kitchen towel. Set aside in a warm place for an hour to rise.

After an hour or two, the dough would have doubled in size. Now punch the dough down and divide into 2 balls. Roll into thin crust or thick crust as per your preference. Poke a few holes into the dough using fork to prevent the dough from rising from the center. Pizza base is ready for use!

Updated: If using a microwave with convection mode, its best to pre-bake the pizza on either sides for a couple of minutes. This will ensure the dough is not raw or half baked while the cheese has melted and turned golden brown.


And just in case you do not have pizza sauce handy, or you ran out of stock and you do not have sufficient time at hand to slog in front of your stove, then make this super easy and quick version. I have an express recipe for a homemade pizza sauce. This was picked from one of the Italian cookbooks, the name of which I can't recall at the moment. Fry a tablespoon of finely chopped garlic with olive oil till translucent. Add a cup of ready-made tomato sauce to it. Sauté for a min or two. Add a dash of Italian herbs or seasoning and the pizza sauce is ready! This sauce is good pastas and lasagnas too.

Lay the pizza base. Spread the sauce. Dress it with toppings of your choice. Top with cheese. Pop into the oven and bake till cheese browns. And your Pizza is all ready to be served!

Spiced Veg Pizza


INGREDIENTS:

1 medium chopped onion
1 yellow capsicum
1 red capsicum
1 green capsicum
2 baby corns
1 tomato
1 tbsp pizza sauce
1 tbsp mozzarella cheese
1 tbsp cheddar or Parmesan cheese
1 tsp red chili flakes
Salt & pepper to taste

DIRECTIONS:

Wash and chop all the vegetables to medium to small bite sized pieces. Lay the homemade pizza base on a baking tray or pizza stone, spread some pizza sauce, sprinkle a tbsp of cheddar or Parmesan cheese. Then arrange the vegetables on the base. Add salt, pepper and chili flakes to taste, as preferred. I don't usually add any salt as the cheese has enough salt in it. Finally top the pizza with loads of mozzarella cheese. Bake in a pre-heated oven on 180 deg C.

Serve hot with Italian herbs, oregano and more chili flakes for that extra spice. Enjoy!

And if you like Deep pan or Thick crust pizza, then this bite is for you! Enjoy!!!


A traditional Punjabi food would definitely comprise of Parathas without which their menu would remain incomplete. In a week, this would be a compulsive part of the breakfast menu. Travel north and you are bound to be greeted with Thelewalas selling hot Parathas on street side. Loaded with ghee and butter, spiced up well, they are a sure to leave your taste buds lingering for more. Yum indeed! The thought itself leaves me tempting and wants me to grab for some right away! Since wheat is primarily grown in Northern part of India, it for a staple part of their dietary intake.

Mooli Paratha is one of my personal favorites and I love it for the simple mélange of flavors that it creates with each bite. It's just so enticing. Almost every weekend, we indulge in various types of Parathas. They are always either on our breakfast or lunch menu and sometimes dinner as well. This weekend it was Radish/Mooli paratha. Wheneven I have dull, weary looking radish lying in the fridge, I make it a point to use them this way. They never go waste this way!


Prepare the dough first:

For the dough:
2 cups Wheat flour
Salt To taste
Water

For the Mooli parathas, here's what we need:

3 Mooli (Radish)
1/2 tsp Red chilli powder
1/2 tsp Cumin seeds
1/2 tsp Coriander powder
2 Green chillies, chopped finely
2 tbsp Coriander leaves
A hint of Amchoor powder
Salt To Taste

Add water to wheat flour and salt and knead to a stiff dough. Drizzle a tsp of oil on the dough and coat it on all sides. Cover and keep aside for sometime.

Wash, peel and grate the radish. Add salt to it and leave it aside for 15 minutes. Squeeze and drain all the water. Use this water to knead the dough as it contains the nutrients. Add cumin seeds, coriander powder, red chilli powder, green chillies, amchoor powder and coriander leaves and mix well. Add more salt (if needed).

Roll some dough (about 2 lemon sized) into small disk. Place 2 tsp of stuffing at the centre, pull the edges up and cover from all the sides. Roll again into a thick, round parantha. Heat a tava and fry the mooli paratha on both sides to crispy brown. Put some oil over the paratha. Serve the mooli paratha hot with pickle and curd.


I love cookies. But I still desist indulging often in store bought biscuits and cookies. It's okay at times. But on a daily basis, I would prefer something more homemade which is lighter, simpler and healthier. Well, following my mum's way. Despite knowing that biscuits, cookies, pastries, etc do carry butter and sugar content, I still try and have a control on them. If the recipe called for a cup of sugar, I would prefer using a little lesser than what it asks for. The same goes with butter. It probably would taste great and richer, but I think we are just fine with less.

I recently made a small batch of almond cookies. They were such an instant hit that they got finished even before I could click few snaps of them. They were crisp, crunchy and delicately almond flavored. I decided to make another batch of them, but with a variation. Since I had always have a bag of oatmeal at home, I thought it would be a good idea to use them in cookies. And again it's time for my favorite chocolate flavored ones.

As the cookies were baking in the oven, it's chocloatey aroma spread across the house transforming the entire house to smell like a cookie shop. It was just heavenly! Aromatic and truly decadent. These are perfect for tea time and go well with a hot cuppa coffee.


Cocoa-Oatmeal Cookies

INGREDIENTS:

1 cup all purpose flour
50 gms cold butter
1/2 cup rolled oats
1/2 cup cocoa powder
1 cup granulated damerara sugar
1/4 tsp baking powder
A pinch of baking soda
A pinch of salt
1/4 cup chopped cashew nuts (or mixed, as desired)
1/4 cup milk or as desired


DIRECTIONS:

Don't melt the butter. Instead mash the cold butter well into all purpose flour till it resembles bread crumbs.

Mix all the dry ingredients (i.e. from rolled oats to nuts in the list) in a separate bowl. Then add all the dry ingredients to the above. Mix well. Add milk and gently mix so that it forms a soft dough or a thick batter (batter will be thick enough to scoop out). Scoop out dollops of batter to a parchment paper or aluminum foil. Make sure to leave enough space between each dollop as it will swell during baking process.

Place the tray in the oven and bake on 350 degree for about 15 minutes depending on your oven. The resultant cookie will be chewy and slightly crunchy on the edges. If you bake further the cookie will turn crunchier. Enjoy with tea or coffee or just plain milk!


We like living a good and healthy lifestyle. Despite a fast life, hectic work schedules, I still manage to pull time out to cook an entire day's meal. It gets real hectic sometimes. Fitting in time and managing a healthy meal which is full of nutrition is an everyday challenge.

Recently we decided to go on a change in our breakfast routine. It so happens that everyday I spend time in preparing a complete breakfast which begins from cooking the breakfast, followed by preparing tea and post cleaning process. By the time the morning chores are done, it's time to prepare for lunch. This leaves hardly any time for other jobs which are then pushed for the weekend. We decided to put an end to all this. Going the healthy way, we switched to eating oats during the week days and cooking breakfast was for the weekends.

Day 1, day 2, day 3, day 4... by now I was bored eating the same oats which have no taste nor are appealing. Other than the usual porridge (which is ok for a day or two), it was the monotony that was killing me. We then switched to corn flakes which was still better for me. All said, this did save a lot of time for us and it has helped us focus on many other important jobs.

Since oats are high in fiber and healthier option for weight loss, I decided to make my own bar of Granola bars which I can munch on whenever I go through hunger pangs. They make up for a great breakfast and are equally as good as oat porridge. It's great for breakfast, a tea-time snack or even as a dessert! Indulge a great treat the healthy way!


Homemade Granola Bars

INGREDIENTS

1 cups quick rolled oats
1/4 cup chopped almonds
1/4 cup pitted dates, well chopped
1/4 cup golden raisins
1/4 cup rice crispies
1/2 cup honey
1/2 cup brown sugar
1 teaspoon vanilla extract, optional
25 gms melted butter or vegetable oil
1 tablespoon water

DIRECTIONS

Granola bars can be either made in oven or on stove top. I find stove top easier, so I make it that way. Mix dry ingredients 1 to 5 and toast on a medium low flame for about 10 minutes till crisp and brown. Nuts should turn crisp. Set it aside to cool a little.

Next, in a saucepan mix butter, honey and brown sugar and heat on a medium flame till the sugar melts and begins to bubble. If you see the sugar caramelizing, add a tsp of water or more. Remove from heat when it is slightly thick and bubbles. Add the vanilla essence. Quickly add the toasted oats and nuts and mix well. Spread on a parchment paper and using the back of a wooden spoon, spread it across gently. Cover another parchment paper and press them down gently. Let them cool. Cut into bars once cooled. Enjoy anytime as desired!


I seem to be more inclined towards baking these days. With a brand new baking dish that I received as a surprise gift from my hubby (with a card on it that read 'For the love of baking'), I was all thrilled and excited to experiment with baking further more. I have been thinking of making bread at home from past few days. My first attempt at making bread was so much fun and exciting. I was nervous and had goosebumps at every stage, right from working with the yeast to making the dough, resting overnight or even baking it. I have made cakes and puddings several time. Thoughts kept crossing my mind if this would turn out right or not. But this was the first time I was working with yeast or making bread, which meant I really wanted my effort to yield the perfect results!

My attempt at making Focaccia was not just successful, it came out so good that we finished the bread even before I could take a photograph of how it looked like inside! I made a Rosemary Thyme Focaccia. Not an easy one I must say, 'coz if you need to make this you may have to plan in advance a day ahead.


Rosemary Focaccia

INGREDIENTS

Prepare the dough:

1 tsp dry active yeast
1/2 cup warm water
1 tsp sugar
Salt to taste
1 cup all-purpose flour

Prepare the dough the night before you make the focaccia for the next day. Mix active dry yeast in warm water with sugar and salt and leave it for 5 minutes. Once its completely dissolved and looks frothy, add in the all-purpose flour and whisk. It would look sticky and messy. Form a sticky dough and leave it covered with a cling film overnight. You may either leave it in the refrigerator or outside in a dry warm place. I kept mine outside.

Prepare the herb oil:

3 tbsp olive oil
1 tbsp fresh Rosemary leaves
1 tbsp fresh Thyme
1 tbsp fresh Parsley
1 tbsp Italian oregano seasoning
Salt to taste

Finely chop the herbs. Warm the olive oil and add the herbs into the oil. Allow the flavors to blend well. I made mine overnight. You can add pretty much anything that suits your taste. Add garlic flakes, sun dried tomatoes, olives, jalapenos, I added a dash of chilly flakes to mine as we love spice.

Prepare the focaccia:

1 cup of all-purpose flour or whole wheat flour
Herbed olive oil

The next morning, you should see that the dough has doubled in size and will give a yeasty smell as you remove the cling film. Punch it down and add another 1 cup of all-purpose flour or whole wheat flour along with 3 tbsp olive oil and mix gently. Fold the dough. The dough will now take a better shape. It will leave the sides, but stick to the bottom. That's how we want. Adjust the salt. Next transfer the dough to the baking dish, gently pull it on all sides using your hands and make a half inch layered flat dough. Leave it to rise for an hour.

After an hour, the dough would rise. Using the fingertips, gently dimple the dough and spread the spiced oil over it and into the pockets. Make sure that we don't dig too deep. We want leave the air pockets for a softer bread. Bake in oven for an hour at 350 degrees or till the top looks golden brown. As the bread goes through the baking process, you can feel the aroma of the baked bread rising through the air making your home smell like a bakery! Serve warm as is or with garlic butter. I think the next time I bake, I'll make sure I have a bigger batch going into the oven!


I have a BIG sweet tooth, but my husband does not. He is not fussy. He relishes sweets to an extent, but is very conscious of the calorie intake. He has a tumult of not taking sweets at night. He sticks to his diet very religiously. I, on the other hand I go totally gaga over sweets. And it's not just the love for cooking and baking, but also finishing them till bowl clean! Aaah, now that's truly me!

I get a constant NO NO from him for eating sweets in any form at any hour of the day. I have a tongue with some great sensitivity to food! I am constantly monitored for my intake of calories. On a good note, it really helps me feel the pinch and guilt which I wouldn't have felt otherwise. But what makes it difficult for me is that I crave to bake... which means not only end up making, but also finishing!

This weekend I tested my skills at making some good Chocolate Truffle Cake. It came out great and we (should I emphasize on I instead of we !!!) finished the entire batch by the end of the day!

Chocolate Truffle Cake

Prepare the cake:

1 ½ cups All purpose flour/Maida
3/4 cup Cocoa powder
1 cup Castor sugar/powdered sugar
1/2 tsp Baking power
A pinch of salt
1 cup Milk
75 gm Unsalted butter or 5 tbsp Oil
2 eggs
1 tsp Vanilla essence

Sieve and mix all the dry ingredients together (first five in the list). Beat eggs with sugar till they turn fluffy and pale yellow. To this, add butter, milk and vanilla essence. Beat the mixture to blend the ingredients thoroughly. Mix the dry ingredients into the wet one. Tranfer to a greased cake tin and bake at 350-375 degrees for about 40 minutes till done. Cool and slit the cake across horizontally into 2 pieces.


Moisten the cake:

2 tbsp rum
2 tbsp sugar
2 tbsp of water

Heat 2 tbsp rum with 2 tbsp sugar and 2 tbsp of water till it comes to a boil. To moist the cake, drizzle this rum mixture on both the cake slices.

Frosting the cake:

100 gm butter
2 tbsp cocoa
2 tbsp powdered sugar
2 tbsp cream
A pinch of salt
Few drops of vanilla extract

Melt butter over a saucepan and keep it aside. To this add in the cocoa, powdered sugar, a pinch of salt and few drops of vanilla extract. Mix and beat well till it forms soft peaks. Add in the cream and keep aside. This will thicken further as it cools down.

Assembling the Truffle:

To assemble, please the base and spread some cocoa frost from the middle to the edges of the cake. Place the second layer over it. Then heat the cocoa mixture till it just melts and drizzle it over the chocolate cake to cover it completely. Decorate with a few almonds. Allow it to set in the refrigerator for an hour. Serve as is or warm to serve with vanilla ice cream.