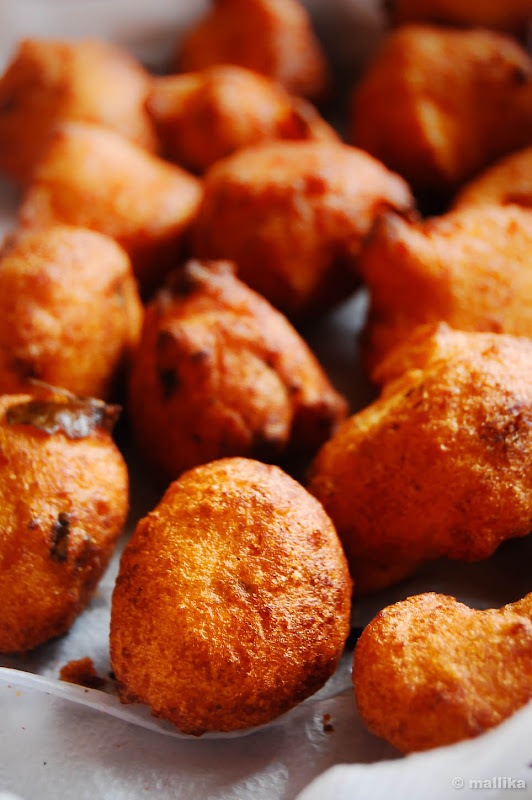
My dad is a good cook, except for the fact that he rarely ventures into kitchen and cooking :D. There are a few dishes however he does attempt occasionally to keep his culinary skills at bay. He has a good understanding of salt and spices, one of the key factors to being a good cook. He can make a simple tomato tava fry or even our traditional affair of his beloved Huli with simplicity, yet perfection. One of his favorite always remains this urad dal vada or the fried lentil dumplings. And if you ever expressed a craving for these, just the word is enough for him to don the cooks cap and please you with these vadas. One wouldn't disagree that he indeed is a good cook.

When we recently got a chance to taste the fresh hot vadas, right out of the frying pan to the salver, pairing them with freshly ground spicy coconut chutney, we couldn't stop ourselves from savoring each of these endlessly. These were surely the best treat we could ask for that evening. His vadas are no doubt excellent and I do admit men do make great cooks ;). Each of us must have served ourselves several helpings back to back, to an extent that by the end, almost none were left for dad himself. I am not a fan of fried stuffs, but a few days later, I felt too tempted to try them myself at home. And my temptation was beyond just vadas, I was keen on making these chat-pata Dahi vadas. One call away to dad to get the exact recipe and the next moment these vadas were all ready, some to eaten and rest to be drowned in yogurt dressing.


Dahi Vada

INGREDIENTS

Urad dal Vada

1 cup urad dal
1 tsp grated ginger
8-10 peppercorns
3 green chillies, well chopped
1 sprig curry leaves, finely chopped
Salt to taste
Oil, for deep frying

For the Dahi/Yogurt Dressing

3 cups of yogurt
Salt and sugar to taste
1 tsp red chilli powder
1 tsp Jeera/Cumin powder
1 tsp chaat masala
1-2 tbsps of tamarind dates chutney
Finely chopped coriander leaves, to garnish

DIRECTIONS

Wash and soak the urad dal in water for about 4hrs. Drain all the water out and grind it to a paste with little or no water. Add in the rest of the ingredients. Heat oil in a frying pan. When the oil is hot enough, drop blobs of the batter. Use a spoon and with the help of your fingers, tip the thick batter gently into the hot oil. Fry gently on all sides on medium low heat till it's golden brown. Remove and allow the excess oil to drain on a kitchen paper. The vadas are ready to be served.


To make dahi vadas, add in salt and sugar to the yogurt. If you like sweeter version, add in more sugar. Also consider that tamarind chutney has a hint of sweetness in it too.

Dip the vadas in warm water and gently squeeze out the water from it. Lay the vadas in a serving dish. Top it well with yogurt till it's covered completely. For best results, soak the vadas for at least a couple of hours before serving.

To add body and flavor, top them with tamarind chutney. Sprinkle chili powder, cumin powder and chaat masala evenly over it. Garnish with coriander leaves.

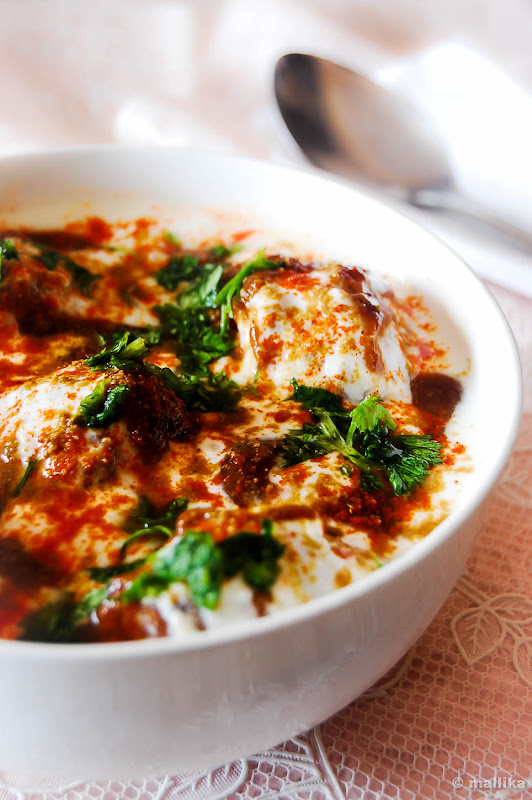
I am particular about the tamarind chutney in my dahi vadas, since they have the power to elevate your fourth senses to a greater level! This dish is a burst of varied flavors - salt and sweet, spicy and tangy flavors over these lentil dumplings can send a tickling sensation down your taste buds. I bet you will love them too. They make an excellent dish for large gatherings and parties too.


Amaranth greens, also called the Chinese spinach is a common leafy vegetable available in India. It's popularly known as dantina soppu or harive soppu in Kannada and is more commonly used in South Indian cuisine. They come in two varieties, the green leaves and the reddish tint leaves. Amaranth leaves are coarser and denser than spinach and fenugreek leaves when cooked.

There aren't many recipes that I make with amaranth leaves, neither do I get them home as often as spinach or fenugreek leaves. If you have any recipe for these leaves, do share with me. I am always on the lookout for new recipes which make our lunch different from the usual. My recipe here is using the red amaranth leaves.

These leaves are an excellent source of vitamins and minerals, however due to considerably higher content of oxalic acid in them, it interferes in the absorption of calcium and zinc in the body. Hence, it is also suggested that people with kidney disorders, gout or arthritis, should consume it in smaller quantities. Reheating of cooked amaranth greens is also discouraged, due to nitrate conversion in the leaves. One of the best methods to consume these leaves without having to recook them is in form of this chutney and we love it this way.

This Chutney is very simple and takes a matter of hardly few minutes to prepare. It is extremely tasty and easy to make. What's best is it requires no coconut, hence reducing your job too!


Amaranth/Dantina Soppu Chutney

INGREDIENTS:

1 bunch Amaranth leaves
3 green chillies
2 tsp tamarind pulp
1/2 tsp jaggery (optional)
Salt to taste
1 tsp oil

Seasoning:

1 tsp oil
Mustard seeds-1 tsp
Urad dal- 2 tsp
Red chillies- 2-3
Hing-a pinch

DIRECTIONS

Wash the Amaranth leaves a couple of times in running water and keep them aside. In a kadai/pan, pour little oil and fry green chillies for a few seconds. Once the green chillies have blisters on then, add the cut amaranth leaves and fry them for 2-3 mins till the leaves get wilted and cooked. Turn off the flame and allow it to cool down.

Once cooled, add the tamarind pulp, jaggery (optional) and salt to taste. Grind this coarsely with little or no water.

To season this chutney, heat little oil in a pan. Add in the mustard seeds, urad dal, hing and broken red chillies. Fry them till the mustard begins to splutter. I love the aromas that rise from the seasoning, they are heavenly! Add this seasoning to the chutney and mix well. Serve with hot rice or rotis.
Another variation to this chutney is to exclude urad dal and add crushed garlic cloves instead to the seasoning. They add a lot of flavor and health factor. The oil that is released from the red chillies while frying them for seasoning adds an amazing aroma to this dish, making this chutney extremely tasty and flavorsome. This tangy amaranth chutney not only tastes yummy, but goes very well with hot rice, rotis or even dosa.

Lauki Malai Kofta

Make Lauki Malai Kofta | Lauki Malai Kofta Recipe
Apologies guys! It's been some time since I have been away from blogging and the blog world. I did take a month's break from blogging to wrap up other important work on my list, but extended it to two months! Also, my health took a toll, which took longer for me to be back here. I am sure I have missed a lot on other spaces, but I will soon resume to catch up with you guys.

During my absence, I received lot of responses from my readers and followers. I was often complimented for my bakes and desserts, while was also requested why common everyday cooking hardly saw the space. I had to ponder. Somehow, I wondered if everyday cooking needs to be mentioned here. There are hundreds of recipes and I know it would be great to jot them here. But, I put up this space as a repository for my own future reference too, so I can come back to view those recipes.

There have been many requests for Indian recipes, breakfast dishes, main course meals, quick bites, savories and much more beyond just desserts, no matter how common they may sound to us. So with my comeback, I promise to bring more of these.

One of the main course recipes I had seen a while ago was this Makhani Masala from ecurry. I totally fell in love with this Malai Kofta recipe. The rich dumplings in creamy gravy looked so perfect and tempting, as if they were taken off a restaurant menu. I had to try them to convince myself that they could replicate the flavors too. I followed Soma's Makhani Masala recipe exactly the same way. For the dumpling however, I used Lauki koftas instead of paneer, just to put in some health and reduce on guilt of eating this rich gravy ;). I have made Lauki koftas in the regular low fat gravy way on many occasions, but this creamy version is surely the one you will crave for those occasional treats. And yes, do reserve this for those special occasions... where you want to be showered with compliments of being a Master Chef!

The recipe may seem long and intimidating, but I promise you, it's worth every bit.

Lauki Malai Kofta

For the Lauki Koftas

INGREDIENTS

1 big bottle gourd/lauki, grated and water squeezed
1 green chili, finely chopped
1 tsp garam masala
1 tsp red chili powder
Cornflour to bind
Salt to taste

DIRECTIONS:

Bind all the above ingredients with cornflour to form a dough. Bottle gourd has a lot of water content, hence it's best to add salt to the grated bottle gourd and leave it aside for 10 mins before squeezing all the water away. Reserve this water for the gravy to be made later. You may use cornflour or chickpea flour to bind the ingredients. Make lemon sized balls and deep fry in oil on low flame till the koftas are cooked and turn golden brown in color. Keep aside till the gravy is made.

Lauki Koftas are delicious by themselves and served with hari chutney, they make good party appetizers too. When I make these, I always make more, because by the time they are out of the fry pan, they are grabbed and gone within few minutes. Proceed below to make the makhani masala, which you can make ahead in time and freeze/refrigerate till ready to use.

Makhani Masala

INGREDIENTS

1/2 tbsp ginger garlic paste
1/2 cup onion paste
2 bay leaves
2 black cardamoms
2 green cardamoms
1 tsp fenugreek/methi seeds
1/2 tbsp kasuri methi (dried fenugreek leaves)
5 cups pureed fresh tomato
1 teaspoon red chili powder
1/2 teaspoon cinnamon powder
Salt to taste
3 hot green chillies slit (optional)
1/2 cup melted butter/ghee
1.5 cups heavy cream (I used Amul cream)
4 cups whole milk
1 tablespoon cashews, soaked and ground into a paste
3 teaspoons kasoori methi (dried fenugreek leaves available at the Indian groceries)

DIRECTIONS:

Heat butter/ghee/oil in a pan. Add bay leaves, cardamoms and fenugreek seeds. As the seeds begin to sizzle, add in the ginger garlic paste, onion paste, chili powder and stir fry till the fat separates. Add tomato paste, green chillies, cinnamon powder and crushed kasuri methi. Simmer to cook and reduce the gravy till the oil separates.

Add the milk & cream, cashew paste, crushed kasoori methi and simmer for about 10 minutes. Adjust the salt to taste.

Add the koftas into the gravy one at a time carefully. Turn the flame off the moment you add in the koftas and serve immediately. The koftas will soften in the gravy. Hence, add the koftas only when you are ready to serve. You may reserve some koftas aside and serve it fresh with the gravy on top of it. Garnish with chopped coriander leaves and fresh cream before serving.


This is a rich indulgence and not an everyday food you can have. A low fat cheat version is by reducing the cream and using yogurt instead. But the flavors would differ and that's a compromise for health. If you are looking for that authentic restaurant flavor, I wouldn't recommend you to use substitutes. After all, there's no harm if you indulge in these once a while. Sometimes, it's fun to break rules, may be diet rules too!


Halwa is one of the most popular traditional Indian dessert, made from rich and fresh ingredients by cooking in milk, simmering till it reduces along with clarified butter/ghee and adorned with nuts and raisins. They are rich in taste and flavors and can be served warm or cold. Various kinds of halwa can be made, depending on the ingredients they are prepared from. The commonly loved Gajar ka Halwa is best tasted warm with a dollop of ice-cream. My version with beetroot is no different.

The story goes this way. We had an over dose of beet roots a few weeks ago and I had to finish them off with hitting boredom or seeing them end up in the trash. A few stir fries and curries had already made us see enough of the fiery deep crimson red color that it's hang over would last for months! I used the final batch of 4 beetroots to make this halwa and it was worth every effort.


Beet is a popular tropical reddish purple rooted vegetable liked or disliked for it's odd color. I know many who don't like beets, don't cook them or even eat them. I guess it's probably due to it's intense color. I have less liking for it as a vegetable, but still cook them once a while. But this dessert is one which you shouldn't stop from giving a try. If you admire carrot halwa, then you will surely love these too. Except the color, there it isn't much different.

Here are a few tips that can help you. You can use canned condensed milk or khova for this recipe instead of reducing the milk over the stove. Low fat milk with few tbsp of milk powder would work equally good. Take care not to grate the beets too fine, they may dissolve while cooking. Squeeze as much juice as possible from the grated beet and use it to make red velvet cake.


Beetroot Halwa

INGREDIENTS

1/2 kg beetroot, grated
1/2 litre Milk
225 gm Sugar
1 tbsp clarified butter
1/2 tsp cardamom powder
Nuts and Raisins for garnish


DIRECTIONS

Wash and grate the beetroots. Sauté the beetroot on a pan till it softens a little, approximately for about 5 minutes. Add in the milk. It will bubble up as it boils. Cook on a gentle flame for about 20 minutes stirring every 5 minutes. Add in the sugar, stir well and cook till the sugar melts and dissolves well. Cook until all the milk is reduced and has been absorbed. It will result in a mushy mass. That's how we want it.

Add a tbsp of clarified butter/ghee and cook further for 2 minutes. Add in plump raisins and freshly crushed cardamom seeds.

Fry the cashew nuts in a tsp of ghee. When it turns golden, transfer it to the halwa. Set a few aside to garnish the halwa while serving. Serve warm.


My parents visited us the day I made this and they throughly enjoyed it. Warm servings of this halwa, freshly seasoned with cardamom and nuts made an exotic treat for all. A dollop of vanilla ice cream would elevate this dessert to a greater extent.

Do not leave the cardamom out. It has an impeccable luxurious flavor that it imparts to this dessert making it warm, rich and endearingly good. A single bite of this simple looking, yet rich, sweet and calorific dessert will leave you craving for more.

Note: Apologies readers! I shall take a month's break from blogging as I am tied with work and personal needs to cater to. But I promise I shall be back soon. Till then, happy reading and cooking! Chio!


Most of my desserts are a little low on sweetness. We love it that way, just with hints of sweetness, unless if it were a cake or mousse with no frosting. This is probably the reason why I love bittersweet dark chocolates with over 60-70% cocoa over the most loved milk chocolates. But my sensibilities do warn me that people in general adore high sugar levels in most sweetmeats, which I agree would be great considering it is actually how a dessert is meant to be. I try being considerate and adjust an extra helping of sugar if I have guests around, but I guess sometimes, that too runs on a lower range! Health is just a smaller part of the concern, while the primary reason is our palatable tastes.

I promised. I would be back with another dessert from Mulberries. Well, that was long ago ;) With many parts of the world celebrating the coveted spring and with summer fruits, berries and stone fruits showing major prominence on most blog spaces, I thought I shouldn't keep myself a step behind. So I had the perfect reason to bring out my mulberry compotes and pair them with fresh cherries and yogurt to layer my verrines.

A verrine is a well known French dessert which is made by layering ingredients in a small glass, generally in verrine glasses. It can be either sweet or savory. This one with Mulberries and Cherries is a healthy classic verrine with health from fruit compotes and goodness from yogurt. The yogurt impart a tangy twist. This verrine is mild on sweetness and goes great as a breakfast dessert.


Mulberry & Cherry Verrine

INGREDIENTS

1/2 cup mulberry compote
1/2 cup cherries, chopped
1 cup hung yogurt
2 tbsp sugar

DIRECTIONS

Beat the thick hung yogurt with sugar. I used sugar free here. Layer the verrine glasses with mulberry compote. The compote I made had vanilla in it. You can add vanilla to the yogurt too. Top with some yogurt and freshly pitted chopped cherries. Top another layer with mulberry compote, some yogurt and freshly pitted chopped cherries.

Chill and serve for best flavors. Garnish with a few fresh cherries and mulberries before serving.


I love the entire process of creating and layering the verrines. Those verrine glasses are my all time favorites from the rack and I take immense care of them. I haven't done a neat job here to create the aesthetic look, but I loved those purple hues we get as we dig into our glasses. The thick yogurt and fruit alternating in it made it more a breakfast dessert, with a well balanced sweetness and tart.

To make a more exotic fruity dessert, substitute with cream cheese or sour cream. The varied mingled flavors that you can create with each verrine will surely leave you with a treat.


I have almost recovered from my flu and weakness and I am in much better health today. I was a weak child, in sense of catching cold and flu virus since childhood. Running nose was so common with me, almost all the time. That followed with fever, blocked nose and continuous sneezes that would make me look no better than a circus clown with a naturally inflamed red nose! It was a nightmare that always made me feel guilty.

If someone sneezed meters away, I would have probably caught the virus within minutes. No joke! At a point, even my high school teachers, college lectures and friends had a tough tough time with me. One of my college lectures found it so disturbing in his classes, that my mother was summoned for complaints regarding my condition and proper introspection. Poor mom of mine had been dealing with all this for long. Blood tests said nothing, just high eosinophil count, a condition of allergy. And that allergy meant negativity towards almost everything. Changing weather, summers or winters, humidity, dust, rains, loud noise, headlights, sleep, food, etc, etc, etc. Allopathic medicines only gave temporary relief. In my opinion, no relief at all, just a suppression. Amphetamines, antihistamines yielded no solution. How much could one deal with it?

For times when I would often fall sick with common cold or fever, my mom would patiently extend herself to make treatments at home. She opinionated that conditions with common cold or fever could be dealt at home with care and did not require extensive allopathic medications. She always jokes "Allopathy medicines would take just a week to cure, while home remedy would take 7 long days to cure." We hardly went to doctors for such conditions. She would prepare different types of Kashayas, Fire roasted ginger roots, Jeshtmaddu roots and several other home remedies for cure. She took immense care on food too. Food on those days were light, focussed on easily digestible ones. Rasam, Saar, Tambli were very common with over cooked mushy rice, again to aid for ease in digestion.

Even today, she continues to follow the same principles and it works wonders. You bet, I can't be as efficient as her when it comes to remedies, but I make a sincere attempt to follow her during my bouts of common colds, flu and fever. Even as I am recovering now, I have been careful with food I am cooking. This TiLi Saar is one of my favorites and it makes presence on my dining table very often. Not just when I am sick and low, but for those days when simple home food can be the most comforting.


TiLi Saar

INGREDIENTS

1/2 cup pigeon lentil/toor dal, well cooked and mushy
2 cups water
1 tbsp tamarind pulp
1 tbsp sambar/rasam powder
1/2 tsp compounded asafeotida
1 tsp turmeric powder
Salt to taste

Tempering:

1 tsp clarified butter/pure ghee (replace it for coconut oil for a vegan version)
1 tsp mustard seeds
A sprig of curry leaves
2 red chillies

Garnish:

Chopped coriander leaves

DIRECTIONS

Pressure cook the toor dal with water and turmeric powder for 15 min. Ensure the pigeon lentil/toor dal is over cooked so that it can be mashed well. Once cooked, mash the lentils, add the tamarind paste, sambar/rasam powder, 2 cups of water and the compounded asafeotida (hing). Bring this to a gentle boil. Add more water to make it thin.

Heat some clarified butter / oil in a pan. Add a tsp of mustard seeds, a sprig of curry leaves and 2 red chillies. Fry till the mustard begins to splutter. Remove from heat and temper the prepared TiLi saar. Serve hot over steaming rice.


TiLi means light or runny, in sense watery. TiLi saar is basically similar to rasam and is popular in coastal parts of Karnataka. You can substitute half the tamarind to tomato puree and make Tomato saar. Tempering can be changed to add garlic flavors with pepper and cumin. Eaten commonly with a generous dollop of homemade ghee (clarified butter) over ganji, over cooked mushy rice, they can be the most comforting home food I can ask for.


I have been unwell from a couple of days with constant cold, cough and high temperature. I was bedridden this weekend, yet trying not to miss out on Football World cup and finals of Wimbledon with weary watery eyes. While I am trying to recover and bounce back into life and action, cooking has taken a short backseat as I am depending on light and easily digestible food. And this one comes from my drafts.

I am posting this recipe for Hazelnut & White Chocolate Cookies which I made for our tea time a few weeks ago. The cookies were simple to make and since I had all the ingredients at hand, I didn't want to miss a try. They came out good, had crunchy edges and softer centres. I loved the crunch from hazelnut. White chocolates aren't my favorites, so they are mostly consumed this way. White chocolate flavor is not the highlight of these cookies, so if you love them, just increase the quantity. Or probably just use milk chocolate chips instead. Our perfect tea time cookies.


Hazelnut & White Chocolate Cookies

INGREDIENTS

1 1/2 cups plain flour
1/2 tsp baking soda
1/4 tsp salt
1/2 cup soft butter
1/2 cup granulated sugar
1/2 cup light brown sugar
1/2 tsp vanilla extract
1/2 egg, cold from the fridge
1/4 cup chopped hazelnuts
1/4 cup white chocolate, chopped

DIRECTIONS

Put the flour, chopped white chocolate, bicarbonate of soda and salt into a bowl. Cream the butter and sugars in another bowl. Beat in the vanilla extract and a cold egg, and then mix in the dry ingredients. Increase or decrease the quantity of egg depending on your cup size. Use egg sufficient to wet the ingredients and bring them together to form a soft dough.

Roll into balls, flatten them a little and place them on a lined baking sheet about an inch apart. Top with a broken hazelnut, if preferred.

Bake on 180 deg C for approximately 18 minutes or till the cookies are done. Transfer them to a cooling rack to harden as they cool.


Hazelnuts are not so common in India. They are mostly sourced as imported products. When I came across them on one of my shopping trips, I couldn't resist but grab a packet at a big price tag. The only form of hazelnuts that I have ever eaten were from Nutella. So we really loved them. Hazelnut compliments white chocolates very well, but my guess would be, they would make a heavenly combination with dark chocolates. No doubts, Nutella rocks!


The weekends always go by in a hush bush. By the time it's Friday and we rejoice over it, it's Monday again that comes by, as if in a blink of en eye. While we are in the middle of the week and I am buried with piles of workload, I look forward to those weekends with a difference. We have been eying at getting more adventurous. I guess it's a better way to put across than say healthy! ;) We finally got our most awaited bicycle, that too a 21 geared mountain bike B-twin and I am enjoying every moment with it.

Just a hunt for the perfect unisex mountain bike took a lot of our time and energy, but it was all fun. Hunted through many shops, mostly to find bicycles that cater to male needs than ease it for women on bikes. Heck! Especially if you are an Indian woman, short at height (that's anything below 5'5", and now don't get at guessing my height!), then you are in trouble for geared bikes! Hate that centre stem that makes it painfully difficult for female riders. After few heated discussions and a couple of hiccups, we made a final stop at Decathlon to take our perfect pick, the French branded B-twin. Getting hang of the gear system was a roller coaster and that didn't take long. Looking forward to an audacious bicycle trip!


Back home it was time to celebrate this with some fresh, home baked Double Chocolate Chip Cookies with inspiration drawn from Nigella's Totally Chocolate Chocolate Chip Cookies from Nigella Bites. Yet another chocolate indulgence at it's best! I hardly changed the recipe, except the title! These are no doubt, the BEST chocolate cookies ever! The original recipe calls for huge amounts of chocolate chips which would lead me to chocolate coma, so I reduced hugely on that! I suggest you to try this recipe yourself and know how good it will do to you!


Double Chocolate Chip Cookies

INGREDIENTS

60g dark chocolate
75g plain flour
15g cocoa, sieved
1/2 tsp baking soda
1/4 teaspoon salt
60g soft butter
38g light brown sugar
25g white sugar
1/2 tsp vanilla extract
1/2 egg, cold from the fridge
90g dark chocolate chips

DIRECTIONS

Preheat the oven to 170°C. Melt the dark chocolate either in the microwave or in a heatproof dish over a pan of simmering water.

Put the flour, cocoa, bicarbonate of soda and salt into a bowl. Cream the butter and sugars in another bowl. Add the melted chocolate and mix together. Beat in the vanilla extract and cold egg, and then mix in the dry ingredients. Finally stir in the chocolate chips.

Scoop out equal-sized mounds using an ice cream scoop and place them on a lined baking sheet about an inch apart.

Cook for approximately 18 minutes till the cookies are done. Transfer them to a cooling rack to harden as they cool.


You can get 6 large cookies or 12 small cookies out of these. I made them in 2 batches. The first half went into the oven, while the second half into the freezer. The first batch looked almost like what you see on Nigella's site. Absolutely decadent! Crusty and rock-like, yet deeply fudgy, just like a brownie. The moment I brought them out of the oven, they vanished quickly. My husband and me devoured almost 3 warm cookies each at a time! So none were left to be photographed.

I really wish I had saved atleast one of that batch for this space. The second batch which came out of the freezer could easily be rolled to a dough. I didn't see the need for an ice-cream scoop. I could easily roll them in between my palms and they went into baking again. The chocolate chips I used in these got melted away with the heat while baking. Unfortunately! Each bite came with the punch of bitter sweet dark chocolate and it was truly a decadent pleasure for the chocolate lover in me.


Been long since the seasonal mangoes made their appearances on most of the vegetable counters in supermarkets and road side cart sales. Mango season hasn't ended yet and you guys still wondering why I don't have a single post with mangoes yet? I am trying hard to catch up with some mango desserts. Now does this make you ponder what on the earth is so hard about whipping a mango dessert? Not at all!

Mangoes have been showing up on almost every meal of ours, be it breakfast, lunch or dinner. Whatever the meal be, it's incomplete without the mangoes to end with. I am hardly in a mood for any dessert these days and all I am in love with are these delightfully juicy, ripe, sweet mangoes. The crave is so bad that they are not just our post meal desserts, but also hunger pang killers. Back home from work or from an outing, I seek immense pleasure from freshly cut mangoes. And it's Alphonso and Bainganpalli types that make up to my favorite mango treats!

Just the sight of the gleaming amber mangoes can make me go down my knees for some humble bite into them! So now that I have explained the absence of mangoes from my blog, I did promise myself some mango verrines reserved for this space, which would use mangoes in their true form. Absolutely no decking up, no adulterations! Just a little manipulation! ;)


Mango & Vanilla Verrines

INGREDIENTS

1 cup milk
1/2 cup milk cream (I used 25% fat)
1 tbsp corn starch (an egg yolk can be used too)
1/2 cup sugar
1 tsp pure vanilla extract
1/2 cup thick undiluted mango pulp

DIRECTIONS

Mix the corn starch or egg yolk in 1/4 portion of milk. Heat the rest 3/4th of milk to a boil with sugar. Add in the corn starch milk in slow streams and stir well continuously. In case of using egg yolks, temper the egg yolk with the boiled milk prior to avoid any curdling. Once tempered, add it to the hot milk and thicken further. This will thicken up soon. Stir well and scrape the sides too. As it bubbles and thickens well, add the cream and turn off the gas. Add in the vanilla. It will lighten the entire mixture, but should still be thick. If it's runny, heat it further to thicken up a little. Remember it thickens further as it cools down too. Let the custard cool to room temperature. You may also use a store bought custard powder and prepare it as per the directions on the pack. Once cool mix in a tsp of mango pulp to this. It's purely optional, so leave it out if you like the alternating vanilla mango flavors.

Meanwhile, keep the verrine glasses ready. To assemble the verrines, drop a tbsp of thick custard alternating it with a tbsp of thick mango pulp, till it fills the glass to brim. Allow it to set well and cool further in the refrigerator.


Before serving, I topped each verrine with a cherry and roughly broken oatmeal cookie. Serve cold.

The mangoes I used here were naturally sweet, so they did not require any extra sugar to sweeten them further. The vanilla custard being sweet balances out the sweet tang flavors very well. I always love mangoes in their true form, unless they are really raw and sour. It's like, if you asked me what I would prefer out of the two, Mango ice cream or fresh mangoes with ice cream, I would undoubtedly choose the latter. That's how I am fascinated with these. I rarely make desserts out of mangoes, especially if they are sweet. Even in desserts I love to keep them neat and unadulterated.

The flavors in this dessert were fruity, mellowed and soft. They make a good serving post breakfast too. For a more exotic version, I suggest you use stabilized whipped cream instead of custard. It works out to be really rich. Worth for an occasion. I use custard only for the sole reason that it cuts down on calories from the use of whole whipped cream. Not entirely sure considering the sugar in it, but it does give me a reason to go for a few more servings!


We at times like to settle for some simple desserts on weekday nights while the exotic ones are reserved for the weekends. Though we generally avoid indulging in heavy dinners followed by rich desserts, it's sometimes nice to just sooth down and pamper ourselves after the stress and hustle-bustle of the day, with sometime really as simple, yet exotic as this Vanilla Cheesecake.

No, I wouldn't admit that it's as quick as whipping a dessert in minutes and serving them, but it's fairly simple. I developed this light, yet rich-tasting dessert for our dinner a few months ago. I know it would seem too long to post, but I held on to this post thinking it wasn't the best of the photographs I took that night to justify it here. The summers were warm and as mentioned the temperatures were at peak too. So when I brought them out of the refrigerator to photograph them, they went on a melting spree in few minutes! By the time I could get good lighting and adjustments, they almost began to leach, putting me off completely.

I like desserts which I can prepare ahead of time. That gives me time to focus on other items on my menu. I would love to experiment more with cheesecakes, probably baked ones too. I could make these for entertaining events because I can prepare them ahead of time, which is what I love. But at the moment I am yearning for a spring form pan for more to be baked!


Vanilla Cheesecake

INGREDIENTS

For the crust:

1 pack digestive biscuits
1 tbsp margarine butter

For the cheesecake:

1/4 cup silken tofu
3 cups plain soy milk (400 ml)
1 tsp vanilla extract
1 pack china grass/agar-agar (vanilla flavor)
1 cup sugar (avoid if your pudding mix already has sugar)

DIRECTIONS

Crush the digestive biscuits and add in the melted butter. Mix well so that it resembles bread crumbs. Cover the bottom and sides of the cake tin with a cling film if you don't have a spring form pan. Layer the biscuit crumbs on the bottom of the pan and press it down well evenly. Push it into the freezer till you prepare the cheesecake.


Bring 2 cups of the plain soy milk to a boil. Mix the china grass mix to the rest of the soy milk. Add in the sugar to it if your china grass mix has no sugar added in it. The china grass pack that I used had sugar in it, hence I didn't add any extra sugar. Once the soy milk has come to a boil, add in the china grass milk to it. Bring it to a gentle boil or until the agar-agar has completely softened into the soy milk. Turn off the flame, remove from heat and allow it to sit for a while.

Meanwhile, blend the silken tofu until very smooth. Add extra vanilla if required. Add in the warm china grass milk to it, blend again till it's one uniform mixture. Transfer this to the prepared biscuit base. Cover the top with a cling film if required and refrigerate for few hours, preferably overnight.

Before serving, melt some dark chocolate and pipe it through a zip lock bag in stands over top of the cheesecake. Top with chocolate shavings if required. It compliments well with the vanilla flavors of the cheesecake.


When I made the cheesecake, I used very little silken tofu fearing that it would give out uncooked taste in the dessert. That's why it melted away instead of holding firm shape. The silken tofu particularly added to the creamy texture. I also did not allow it to sit for hours and brought it out before it could set completely, though this did not hamper the taste in any ways. I would suggest you increase the tofu by another half a cup and allow a setting time of atleast 6 hrs.

If you are not a vegan and have tasted those exotic rich and creamy cheesecakes, then you would surely sue me for the difference! These are light, absolutely light! Most vegan cheesecakes would use Toffutti Better than Cream Cheese, but that option was far from possible for me. I can't think of getting hold of something like that here. So I have just skipped that and used pureed silken tofu instead.

The vegan cheesecake was light, dreamy and good. Hubby dear took the first bite and gave thumbs up saying it was totally yum! With common cheesecakes being rich, heavy and relatively high in calories, this one was light, low fat and healthier than it's siblings. Not to forget being vegan too, it's totally guilt free!