That's yet another addition to my ever-growing book collection. Earned points from my account and got a gift voucher from Crossword. That ended up in me buying another cookbook and this time it was exclusively Chocolate. I purchased this book named Chocolate: The Food and the Music, with recipes using chocolate as base ingredient. The hardbound book comes with CD which carries a collection of sweet melodies along with 100 odd tempting chocolate recipes. I guess it's probably aimed at making a romantic evening dessert for two. :)


I have been scanning through recipes from the book for long now and decided finally I should put it to use. DH got a new pack of oats and it's been lying to be used for our breakfast. He loves it, especially when he's had heavy dinner the previous night. I fuss over it. Agreed it's good to keep your tummy light, but I think it's a little too light, sort of like a patient's food :( I eat it, but by no means reserve any liking for it. May be I should put it this way... I don't like them in form of porridge, probably? What I do instead is to disguise it in food in form of oat flour. I pound some regular oats to fine powder and make instant oat dosa. They are good for disguise and one can't say oats have gone into it. I recently experimented with some oat flour muffins and they were yum!


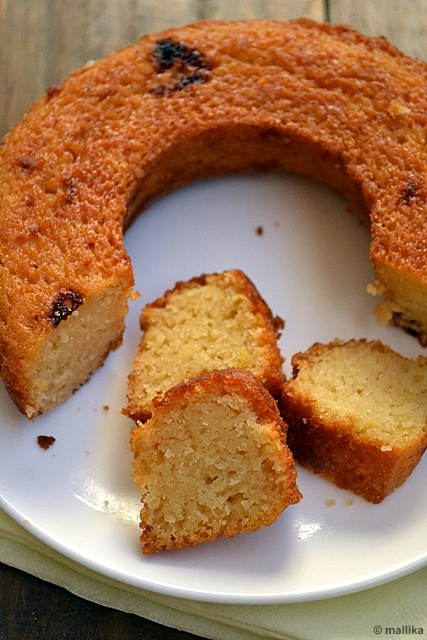
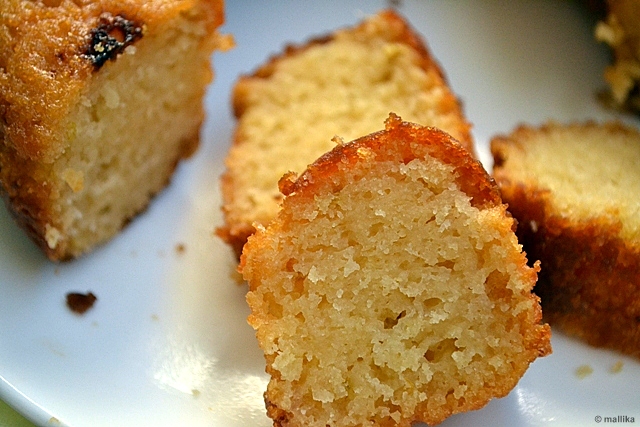
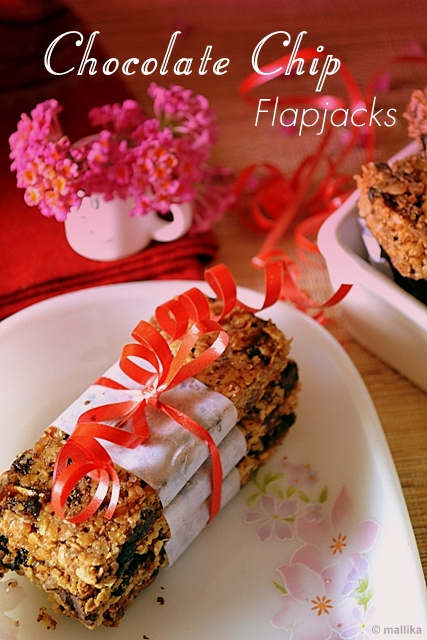
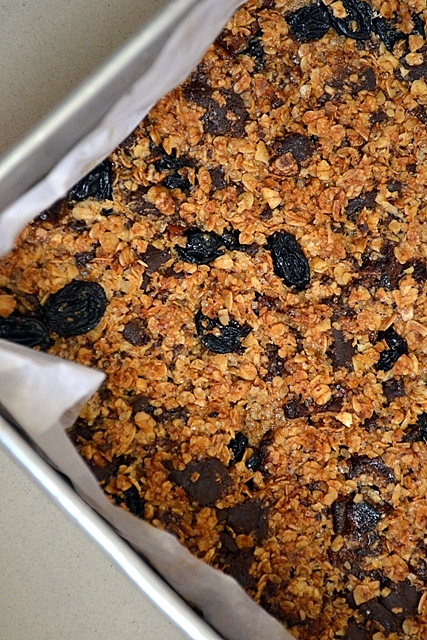
A flapjack is a sweet tray-baked oat bar made from rolled oats, butter, brown sugar and golden syrup. This dish is found in the United Kingdom and the Republic of Ireland, and is also found in Australasia, but known as a 'muesli bar'. In other countries including Canada, the United States, and South Africa, flapjack refers to a form of pancake, although flapjacks do exist as 'Hudson Bay Bars'. Source: Wikipedia Now call it Flapjacks, Granola Bars, Muesli Bars or Hudson Bay Bars, I love them all!

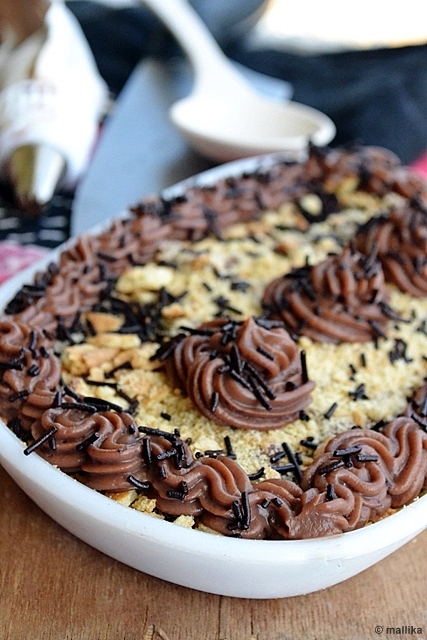
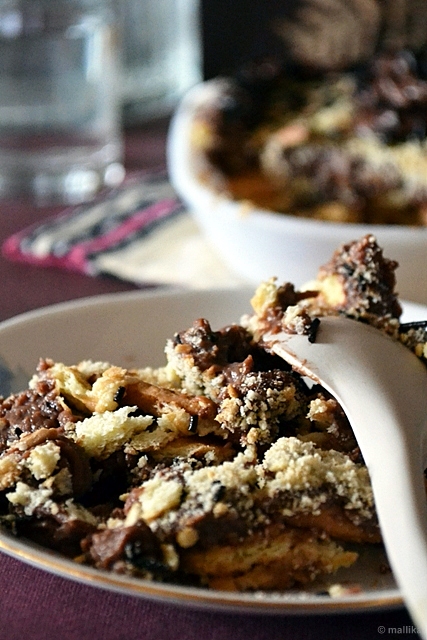
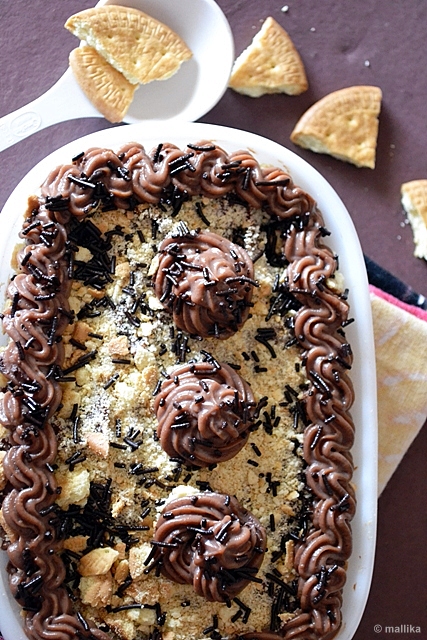
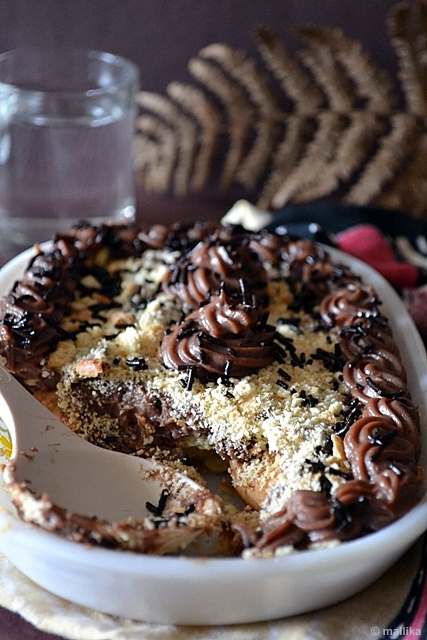
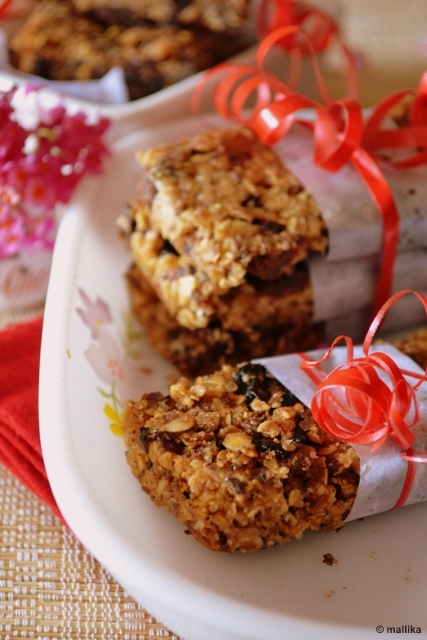
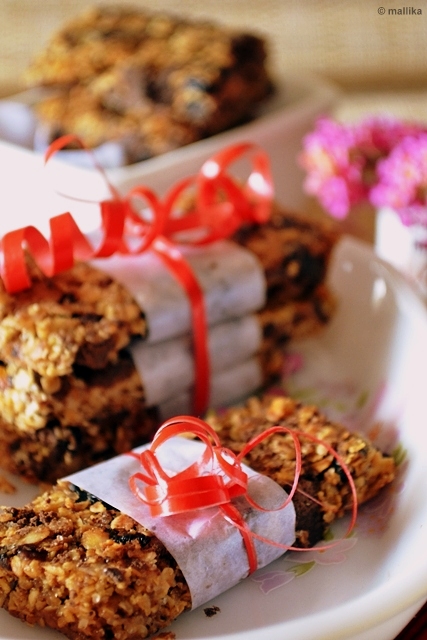
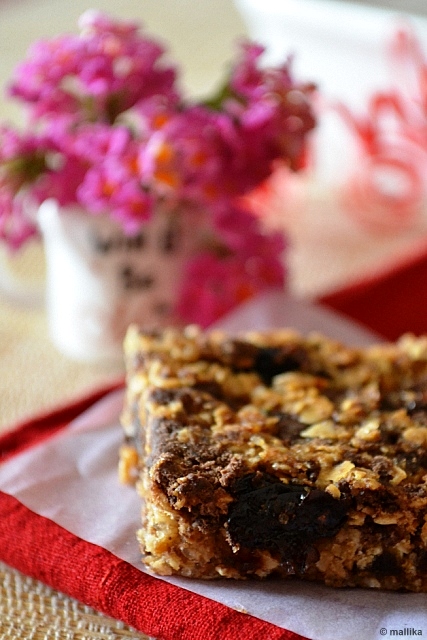
I am gripped by books that have catchy photographs, it's an eye-candy. This is one such book which has an amazing collection of tempting chocolate recipes which I would love to re-create. Chocolate Chip Flapjacks were made inspired from this book. I tweaked the recipe a little by reducing the amount of butter to 100gm and sugar to 30gm and increased honey by 3 tablespoons. Also threw in a good amount of dates which is sweet by nature too. Again, as I insist always, test-taste your food for sweetness before you push them into oven for baking. However, the recipe I've put down here is right from the book with no changes.


Chocolate Chip Flapjacks

Adapted from the book Chocolate: The Food and the Music

INGREDIENTS:

115gm butter
60gm caster sugar
1 tbsp honey or golden syrup
350gm rolled oats
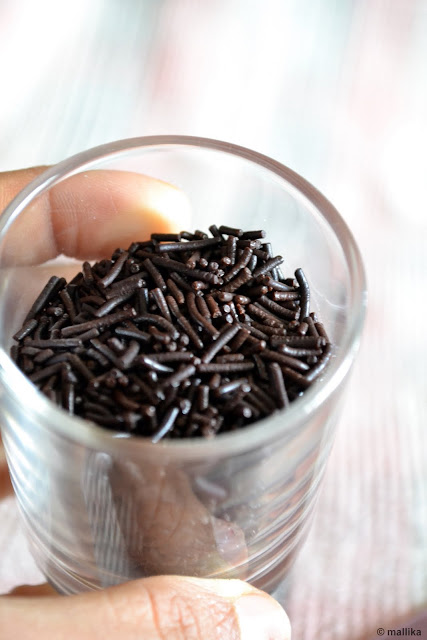
85gm dark/plain chocolate chips
85gm sultanas
50gm pitted and chopped dates


DIRECTIONS

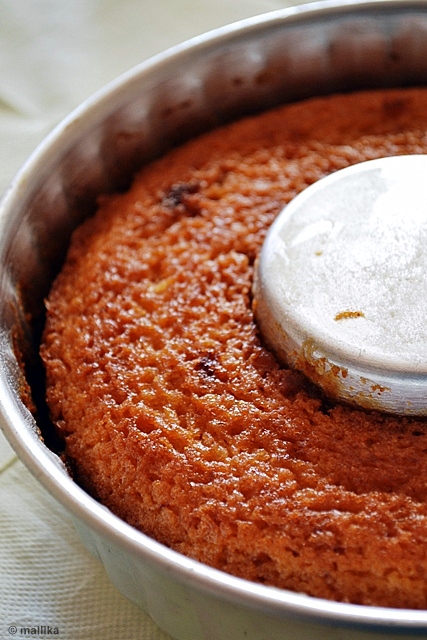
Pre-heat the oven to 180 deg C. Lightly grease a 8" cake tin.

Place the butter, caster sugar and honey in a saucepan and cook over low heat, stirring often, till the sugar has melted and mixture has combined well. Remove the saucepan from heat and stir in the oats and mix in till they are well combined. Add the chocolate chips, the dates and sultanas and combine well. Turn into the prepared tin and press down well. Bake in the pre-heated oven for 30 mins. Cool slightly and mark squares on it. When almost cold, cut into squares and transfer to wire rack to cool completely.


Flapjacks are extremely easy to make. I suggest instead of the stove-top method, you can even microwave the said ingredients, mixing them at regular intervals, till the sugar has melted. Just toss in rest of the ingredients and bake them. I assume this would be simpler and may be I should give it a try next time. You can add dry fruits, nuts as per your tastes. These are great as snack bars for kids or tea time treats. Also good for travels and as picnic accompaniments.


My countdown begins as I have just about a week to go. My heart is aching as my maternity leave comes to a fag end and I shall soon resume work full time. Time has flown so quickly and my tiny tot is in her fourth month. Resuming work won't be any easy as I leave my little one behind and shall be away for 10 odd hours. My heart wrenches and eyes wet even as I think of being without her. I have been her throughout the night and day all these months, almost every minute. Staying away from her with be a challenging task for sure.

On another note, we have named her Ridhi and we love her name. It's unique and means wealth/ prosperity/ success/ good fortune in Sanskrit. Hunting a name for her was an ardent task in itself. Hundred odd names were looked up, many suggested by our near and dear ones, mostly to be rejected. Blame me. I am choosy. My better half was not any better. I had many conditions, so did he :) Name should be unique, be meaningful and hopefully should be associated with some God or Goddess... etc, etc, etc...


As kids we had couple of common names in our class that would lead to an awful confusion while names were called out. Fortunately enough I did not face such incidents in my high school or pre-college, but, I have been through it while in my graduation where I shared my name with another girl for four years. I am hopeful she won't have any hassles of facing half a dozen similar names in her class :D I would often blame my parents as I never liked my name till Ms. Sherawat made my name popular! I know it's thinking a little too ahead, but least, as she grows old she would not blame us as I did!

As my countdown to join work begins, I am going into a panic mode. The passionate cook in me hasn't been able to cook or bake much and with me resuming office soon, I fear if I will be able pursue my passions. I am hoping I should, for the love of cooking and blogging. For moment I'm feeling positive.


What I have for you today is this Chocolate Biscuit Pudding made using microwave method instead of the traditional stove-top one. I've made this sort of a pudding cake earlier in vanilla flavor and have received several positive reviews by my readers on it. In fact, it's one of the most popular posts on my blog and I am glad it's received well since it's been a never fail recipe for me personally.

I have been using microwave quite a lot off late as it simplifies my work a tad bit. I am loving to make eggless custards in microwave as there is no hassle of custard settling at the bottom. Just mix in everything and microwave for a few minutes, stirring them in intervals. I bet you will love this method too.


Chocolate Biscuit Pudding

INGREDIENTS

1/2 lt full fat milk (approx 2 1/2 cups)
2 tbsp cornstarch
200 gm sugar
2 tbsp cocoa powder (+ more if you prefer darker)
100 gm Marie biscuits
A few tbsp of warm milk
Chocolate vermicelli to decorate

DIRECTIONS

Microwave method: Dissolve all the ingredients in a microwave safe pot and microwave on high for about 8-10 minutes or till thick. Stir the mixture in regular intervals of 2 minutes. Check the consistency and microwave further if it's not thick enough. Ensure it's thick enough to coat the back of a spoon. Remove and allow it come to room temperature.

Stove-top Method: Dissolve the cornflour into 1/4 part of milk and set aside. Bring rest of the milk to a boil. Pour in the cornflour milk mixture in a gentle stream, stirring the milk continuously. It's best to do this in a non-stick pan.

Dip each biscuit in warm milk and lay them side by side on a pudding plate. Spread the prepared pudding onto the biscuit layer. If you want to make a cake, follow up with another layer of biscuits and pudding. Fill the pudding into piping bag with star nozzle. Sprinkle biscuit crumbles on the pudding layer and pipe decorations on the prepared cake. Refrigerate for 2 hours. Decorate with chocolate vermicelli on top before serving.


I made this pudding as a weekend activity while my hubby was baby sitting our daughter. It's super quick and easy using microwave method. The pudding sets well in the refrigerator and tastes great cold, so I suggest you do that. I admire art in any form. The creative side of me has hardly been able to explore much of cake decorations, except for the Black Forest Cake I made for dad last year. I'm inspired by blogs who can pool in so much time and patience to blossom their creativity in practice. I'm sold instantly. This pudding is a testimony to satisfy that urge in me to decorate cakes. It's magical.


Mango season is almost seeing it's end and I realize I do not have a single post on mangoes for this season. We have been enjoying mangoes thoroughly almost every single day. Neelam variety of mangoes have hit the stands already and soon the last batch of mangoes for this season will dissapear without any being used in desserts, soley to please my blog first and our taste buds next :)

I love mangoes in their true form, especially if they are naturally sweet. To me they can compete with any dessert. These days our meals complete with mangoes, thus leaving no room for any other dessert. I initially thought of using them in a baked version of my beloved mango cheesecake which I made sometime back. But soon the thoughts on baking took a backseat as time is not at my luxury these days. I think of baking and my baby calls out for me with her cries even before I can pre-heat my oven or get my pans out. Thoughts disappear. The pans are back in their shelves. I need to attend her. I sit down to write a line or two for my blog and again she calls out for me. I need to attend. Period! Finally I get a chance today... to jot down beyond just a sentence or two. Phew!


Year's ago when we were kids, Nestle's condensed milk, Milkmaid often came with a complimentary recipe booklet which had a collection of some excellent recipes made using condensed milk. My mom would collect these recipe books, file them and often make sweet treats for us. I was inspired by a recipe for an eggless mango ice-cream from an old recipe booklet that I had borrowed from my mom's collection. I modified it to make the ice-cream more creamier and rich.

Do you by any chance know how I chop my mangoes? It's been a trade secret for long. Sssshhh ;) That's reveled now :D. I use a peeler to peel off the skin from the fruit. Then chop them to long wedges or squares as desired. I find this process easier and mess-free for the clumsy me. And that old steel peeler cum grater has been an obedient friend of mine serving it's purpose on a daily basis as needed. I can't survive without it.


Mango Ice-cream

Inspired by Milkmaid's recipe booklet

INGREDIENTS

2 ripe mangoes weighing almost 750 gms
400 ml sweetened condensed milk
200 ml low fat milk cream
1/2 tsp vanilla essence
100 ml prepared thick custard

DIRECTIONS

Prepare a thick custard by heating a mixture of 100 ml milk and 10 gm cornflour. Heat it till the mix thickens and coats well on the back of a spoon. Refrigerate till needed. Alternatively, you may use a store bought vanilla/mango flavored custard powder and prepare the same using instructions on the pack. I used a store bought vanilla custard powder for this recipe.

Wash the mangoes, skin them and chop the fruit roughly. In a mixie or using a blender puree the mangoes along with cold sweetened condensed milk, ice cold low fat milk cream (I used 25% Amul cream), prepared custard and the vanilla extract. Blend them well till they are homogeneous. A touch of vanilla enhances the flavor of mangoes. Transfer the ice-cream to a freezer proof, air-tight container and freeze them for an hour or two. Remove when you see the sides of ice cream setting. Run the ice cream in a mixie or a blender and return it to the freezer. Repeat the process a couple of times for creamier ice cream. Return to freezer and freeze for a couple of hours till set. Remove the ice cream and leave on the counter for 5-10 mins before serving. This will soften the ice cream a little and help in scooping it out with ease. Alternatively, you may dip the scooper in hot water first and then scoop out the ice cream to serve.


The original recipe suggested the use of gelatin which will help in reducing crystallization of the ice cream during the freezing process. Gelatin wasn't the best option for me, so I skipped it and had no problems with that. This is by far the creamiest ice cream I have made. I left the ice cream sit in freezer over night and I had no trouble with ice crystals forming on the ice cream.

Making ice cream at home needs some amount of patience especially if you do not have an ice cream maker. The daunting job of freezing, churning and re-freezing would be saved to a greater extent. I am envious of the one's who own it. But then making this way has it's own charm. My family enjoyed every scoop thoroughly, sought out for more helpings. Served with freshly chopped mangoes, we could taste the freshest, ripe fruit that went into it with every bite. This is my best way to bid adieu to the summers.


Before she came into our life, our weekends would tend to be laid back and relaxed. Unlike other days, waking up late on Sundays, to enjoy a cup of tea and biscuits is followed by warming up for the lovely day ahead. While he holds my attention to the bits of snippets read from the newspaper I get busy preparing the breakfast. Later a walk down to the nearby supermarket is the most looked forward to as I enthusiastically load my baskets with items and groceries required for the week ahead.

An odd vegetable rarely seen peeks through the regular stack of veggies, seasonal fruits catch a paramount attention and new food products on stands excite me to the pinnacle. Sometimes just a handful of items may suffice our needs, but I always end up going over board shopping in a supermarket, especially on a weekend when time is at our luxurious disposal. The stroll over the counter rarely ends in window shopping. Yeah, this often happens :) Temptation over powers and rules over resistance. I stack my crates and load them with stuffs that tempt me, mostly fresh items that were not seen on my previous visit, picked right off the rack. The battling eyelids of my husband showing reluctance are often ignored. Back home, I am a content woman. :D


Since a couple of months I have been missing food events and blogger's meets. I pinch myself to say a no. But at this stage my baby needs me the most and hence missing these events is inevitable. I love meeting bloggers personally in these meets. Apart from just good food, there's lots more to it... loads of talks, sharing thoughts and new acquaintances, all revolving around one common passion, that's called FOOD!

When I happened to miss one such event, I had to make something different from usual to compensate the miss :) Pastas and pizzas happen to be our all time favorites. Fruits and vegetable are bought fresh on a day to day basis. I love using an array of vegetables that bring out varied colors and contrast on plate. The scarlet reds from plum ripe tomatoes, bright yellow shades of gold from the corn, dotted with somber shades of capsicum and olives are a color treat to my eye. This pizza puts together a great color wheel!


Corn, Capsicum and Olive Pizza

INGREDIENTS

2 medium sized Pizza base (Refer to this recipe for a Homemade Pizza dough. A store bought pizza base will also do.)
1 cup Pizza sauce, recipe for Homemade Pizza sauce

1/2 cup onions
1/2 cup tomatoes
1/2 cup fresh corn kernels
1/2 cup green capsicum
1/2 cup black olives

1/4 cup mozzarella cheese

DIRECTIONS

Pre-heat the oven to 250 deg C.

Chop the vegetables as per your choice. I cut onions and tomatoes into rings, hand picked corn kernels from fresh corn while the capsicum was chopped to bite sized strips. The black olives I used were readily cut rings. Spread the pizza sauce on the pizza base. Top them with onion rings, followed by capsicum, corn kernels and black olives. Top this with shredded mozzarella cheese. A heavy topping of shredded quality mozzarella cheese will make this pizza delectably rich.

Bake in a pre-heated oven for about 30 minutes. If using a store bought pizza base, please reduce the baking time, generally 15-20 mins should suffice. Bake till the cheese becomes golden brown in color. Slice and serve hot.


Creamy Mint Coleslaw

INGREDIENTS

2 cups shredded cabbage
1/4 cup shredded carrots
1 tbsp finely chopped onion
1 tbsp fresh mint leaves
1/2 cup mayonnaise (I used eggless mayo)
1 cup thick yogurt
1/2 teaspoon lemon juice, optional
Salt and Pepper to taste

DIRECTIONS

Mix mayonnaise, yogurt and lemon juice in a small bowl. Blend well. Add in the vegetables and freshly torn mint leaves. Toss well. Adjust salt and pepper to taste. Keep in refrigerator until ready to eat.


Pairing with this veggie loaded pizza, I made this comforting creamy coleslaw. It's light, yet creamy and saucy. I kept it low on mayo and heavy on thick yogurt, loving the tang it rendered. If your yogurt is sour, skip the lemon juice.

I love making pizza base and pasta sauce at home. May be a little extra effort, but the result is worth it. My pizzas are generally laden with vegetables and go easier on cheese. I love to keep my pizzas heavy on vegetables and lighter on cheese. This was a perfect compensation for a Sunday lazily spent and the event missed.


Just a couple of weeks ago I had mentioned about the SCS group dispatching a pack of Apple goodies. They contacted me later again with an invite for a live cooking demonstration of Washington Apples by Chef Vicky Ratnani. Had it not been for my daughter who was then less than a month old, I would have made every effort to be a part of that demo. Nevertheless, I am hopeful I will get more opportunities in future to attend similar blogger and press meets and not miss any :).

Almost during the same time when I posted this Apple Chutney made from the apples I received from SCS, I also made this dessert. I am not a fan of cinnamon in my desserts. I owe it to our Indian cooking traditions where cinnamon is extensively used as a spice in cooking various savory meals, but never in desserts. Using cinnamon extensively in desserts is more a Western concept similar to what cardamom is to us. Unfortunately, my attempts at liking cinnamon rolls have been disastrous too :( I have to admit I still love cardamom over cinnamon in my desserts.

Somehow apple desserts have always been paired with cinnamon flavors. Though personally it's not my favorite, my mom persuaded me to try cinnamon flavor in this pudding since apples made it's base. I was at my mom's place due for delivery and this dessert was served to my family for our lunch. The dessert being eggless was most relished by dad. Unaware that this was a Apple Cinnamon Pudding, he found it interestingly different from our traditional Indian desserts :) Glad he loved it.


Apple Cinnamon Pudding

INGREDIENTS

2-3 tbsp. corn flour
1 cup milk
1/2 cup brown sugar
2 tart apples
1 tbsp butter
1/2 tsp. cinnamon
Toasted flaked almonds and raisins to garnish


DIRECTIONS

Wash the apples thoroughly. Par, core and grate them. Heat a tablespoon of butter and add the grated apples. Cook them on low flame till they have softened well and most of the water content from the apples has evaporated. Turn off the flame and add in cinnamon powder. Set aside to cool.

Dissolve corn flour in 1/4th cup of milk and set aside. Boil the rest of the milk along with brown sugar. Reduce the flame and slowly add in the corn flour milk mixture in a thin stream stirring the milk continuously. Simmer and cook till the mixture thickens and coats the back of a spoon. Allow to cool. Finally add in the above cooked apples to the prepared pudding and mix everything well. Transfer to a pudding dish and refrigerate for 2-3 hours and serve cold. Garnish well with toasted flaked almonds and raisins.


The pudding overall was great and my family loved it. The toasted flaked almonds and raisins added crunch and nuttiness to the dish which I enjoyed the most. Not the best pudding to my tastes since I still can't seem to love cinnamon in my desserts. I may need more time on that. However, this doesn't mean you will not like it. You probably will if you love apple cinnamon combo.

gaund laddu


Boy! Time has been racing real fast and I wish to hold it in hand. It's been now close to two months since a little angel came into our lives. It felt just the other day when she was born and now she's already 2 months old. From her deciphering cries to toothless gummy smiles, from her weaker neck to a now steadier head, I see her changing with every passing day. She's growing big at a rapid pace, it's a learning phase for both, her and me, an experience I shall always cherish.

gaund laddu gaund laddu


As I watch my little one grow, I'm amazed to see how she expresses herself through her coos, lip smacks and jerky arm and leg movements. She loves to throw her hands up in air and cycles her feet hard. Her energy levels are high and infectious and can tire the most active ones too!

She's expressive, loves experimenting with different facial expressions — pouting her lips, raising her eyebrows, widening her eyes and furrowing her brow. She enjoys being a part of crowd, loves to be cuddled, hugged and pampered. I guess she recognizes me well now. I don't exactly remember when she smiled first, but she smiles more often now and rewards me with beaming, toothless grins and that makes up for all the sleep deprived nights I have been through. It's magical.

gaund laddu gaund laddu


In the past two months, my life has changed by leaps and bounds. Along with her birth, came shoulders of responsibility for my mother too. She's stressed by the new demands of having a baby in the house as she holds dual responsibility... both for me and my baby. Primarily my food concerns her the most, since as a lactating mother, traditionally there's a diet pattern to be followed and she takes care of those needs. The recipe I post here today comes from my mother which she made specifically for my nursing period.

Gaund ke Laddu or Panjiri is a popular North Indian sweet made from whole wheat flour and edible gum fried in clarified butter, heavily laced with almonds. Gaund is an edible gum extracted from the bark of a tree and is known to provide heat to our body, hence usually consumed in the winters. Panjiri is normally given to nursing mothers as it helps in increasing the body heat, hence assist in the production of breast milk.

gaund laddu


Gaund ke Laddu - Panjiri

INGREDIENTS

1 cup whole wheat flour
1 1/4 cup powdered sugar
1 cup clarified butter (ghee)
3/4 cup coarsely chopped almonds
1/2 cup Gaund (edible gum)
1/2 cup puffed lotus seed (makhana)
1/2 cup khus khus (poppy seeds)
1 tsp powder ajwain (carom seed)
1 tsp dry ginger powder

gaund laddu


DIRECTIONS

In the frying pan, add a tablespoon of ghee and fry the chopped makhana for few minutes till they become crisp. Don't let them brown too much. Mix in the khus khus and set aside. Heat 2 tablespoons ghee in the same frying pan and fry gaund. Gaund comes in form of yellow translucent crystals of varying sizes. Hence the amount of ghee required to fry them will depend on the size. If you think they haven't cooked well, add in more ghee. Fry them until they puff up like popcorn. Crush them with hand or in a food processor. Set aside.

In same frying pan, add the remaining ghee and fry whole wheat flour on low flame till it is aromatic and has changed it's color slightly. Add in the chopped almonds, ajwain and ginger powder to the fried flour and stir fry for another 10 minutes. Stir the mixture continuously to prevent burning.

Add the remaining fried ingredients, the gaund, khus khus and makhana to the flour mixture. Mix it well and roast for another few minutes. Remove from the heat and immediately add in the powdered sugar and mix the entire stuff well quickly. Shape them into laddus while the mixture is hot or serve as is. Store them in an air tight container. Since there is no water content, these laddus will stay fresh for long.

gaund laddu


The makhana and the gaund here is deep fried in ghee and then added to the dish. However you can try roasting them with lesser amount of fat to cut down on those unwanted calories. My mother substituted khus khus in place of melon seeds which are traditionally used.

These delicious gaund laddus are rich in taste and may sound heavy on calories, but who cares? I'm going through 'once a lifetime' phase and during this period I am pampered for a festive indulgence. I relish this traditional winter delicacy with a glass of warm milk for breakfast. They make up for a great dessert too.


The past few weeks have seen newspapers and media flooding with speculations of the wedding of the century. Did you witness the Royal wedding of William and Kate? I was glued to the television set through the entire afternoon witnessing the ceremony as they celebrated their wedding in pomp and style. And with all that media hype, Britain's royal wedding did capture the attention of billions of viewers all over the world, including me.

Princess Diana was a style icon on the fashion circuit who graced thousands of magazine covers around the world. She was paparazzi's delight for her style and controversial reasons before her death. Now that Kate Middleton is called upon as the Dutchess of Cambridge, it is inevitable that Kate will become a fashion icon who will often be compared to Diana.

I sat through the noon watching the royal wedding live on TV. Prince William is known to have fondness for chocolate biscuit cake. Biscuit cakes happen to be one of my favorites too. On any given day I would love to make this cake. Craving hit me hard as I watched the royal wedding cake brought out for the occasion. I had no cooking chocolate at hand, so making a Chocolate Biscuit cake was out of question. Instead a jar of country Marmalade, imported from Scotland called out to be used, hence sought out for traditional English dessert fit for the occasion. I settled to use a recipe inspired by Nigella's book 'How to be a Domestic Goddess' with certain modifications to the original recipe.


Marmalade Bundt Cake

Inspired by Nigella's book 'How to be a Domestic Goddess'

INGREDIENTS

250 gm self-raising flour*
100 gms caster sugar
125 gms butter (I used low salt butter)
1 drop vanilla extract
100 gms orange marmalade
2 beaten eggs
Zest of 1 orange


DIRECTIONS

Pre-heat the oven at 180˚C oven. Grease with butter and flour a bundt cake tin and keep it aside.

Beat the butter and sugar together till it's fluffy. Add the marmalade and vanilla and stir thoroughly. Add the sifted flour and zest of 1 orange. Stir to combine well and pour the cake batter into a bundt cake tin. Bake in a pre-heated oven for around forty five minutes until golden brown. Test with a skewer. Allow to cool on rack for few mins.

Note: If your recipe calls for self-rising flour and you only have all-purpose, here's how you can make one at home.

Measure the desired amount of flour into a container. For each cup of all-purpose flour, add 1 1/2 teaspoons of baking powder. Mix to combine.


Notes: If your marmalade has less zesty flavor you may increase the amount of orange rind used. The marmalade I used was of excellent quality, had loads of citrus peel, was low on sugar and high on fruit preserves with no added flavors or preservatives. In case you do not have marmalade at hand, you may try the same recipe with any other fruit jam. I suggest you taste your cake batter for sweetness since marmalades and jams have pre-added sugar.

The cake can be served warm and compliments well with tea. The cake turned out excellent with the perfect texture and crumb. The orange rind gives a zesty, refreshing flavor which I highly recommend. This is a rich tea cake with balanced zesty flavors from orange and vanilla tones.


Deep frying and I don't always go well. Side line the health factors, just the intimidating thought of keeping a wok filled with sizzling hot oil and having to work with it sounds a very daunting job. Stir fries and shallow fries are common in my household and are done on a day to day basis, but loading a skillet full of oil for deep frying is a reserved feat, also something I prefer to push for the weekends.

I read a snippet from newspaper not long ago that consuming oil reheated at high temperatures can be harmful and carcinogenic to health. Since then, eating deep fried items outside home has reduced considerably. We proactively avoid it fearing ill effects on health. I despise discarding a wok full of used oil down the drain post frying, since it's an utter waste :( That's another reason that whenever I do fry, I ensure all my frying is done in the same batch of oil in one go, instead of reheating the same. That saves time and wastage too.


Cravings for spicy fries don't always haunt me, but when they do, they can be pretty bad! Not long ago, an afternoon, as I sat down to blog, browse and blog hop, post our lunch around 4 pm, I stumbled over this crispy fried snack Gobi 65, by Pavithra. This was etched in my mind. I could hardly hold my temptations longer. Her step by step photography through the recipe motivated me further. It was a sudden urge to have something hot and spicy that evening. Lucky enough, I had a huge cauliflower already cut into florets sitting my fridge, thus making the daunting task of cleaning and chopping even more simpler.

Gobi 65 is a very popular snack available in most Indian street food stalls and restaurants, with versions of this snack in Paneer, Chicken, Mushroom, etc. which are equally popular. It's more commonly found in outlets which cater to Indo-Chinese food. The ingredients are simple and readily available in most kitchens at any hour. Hence no fuss too.


Gobi 65

INGREDIENTS

1 medium sized cauliflower, cut into florets
1 cup thick sour yogurt / Indian set curd (use thick curd)
1 tbsp fresh minced ginger garlic paste
1-2 tsp garam masala
3 tsp Kashmiri red chilli powder
Salt, to taste
Cornflour, about 3 tbsp for each batch of florets
Oil for deep frying
Curry leaves, green chillies, lime wedges - for garnishing


DIRECTIONS

Grind garlic and ginger to paste. Wash the curry leaves thoroughly and pat it dry. Cut and clean the cauliflower, drain out all the water.

In a separate bowl, take some thick curd. I used thick sour curd, hence omitted the lime juice mentioned in original recipe. Add the fresh minced ginger garlic paste, Kashmiri chilli powder, garam masala and salt. Check for salt, sourness and spice levels in this stage. Whisk the batter, add the florets and mix well.

Meanwhile, heat oil in the deep pan. Now take handful of the florets in a small bowl add 3 tbsp of cornflour mix well. Allow the florets to be nicely coated with flour, dusting out excess flour. Cornflour gives a good crispness and crunch on frying. Drop each floret into the sizzling hot oil one by one and fry them. As they fry, add in few curry leaves. Remove from the oil and drain them on a kitchen towel. You can sprinkle some chaat masala if you like. Serve hot with ketchup.


Most restaurants use red food color to bring out brightness in food on plate. I somehow dislike that artificial redness from food colors. I refrain from using any color, instead use Kashmiri lal mirch (Kashmiri chilli powder) which brings out a good deal of color. Pretty decent, if not for the blood red. For more heat, you may fry a green chilli in the same oil briefly till they blister and serve along with these fritters. I served them with freshly chopped onions, lemon wedges and tomato ketchup. A yum treat for an evening snack. This crispy, tongue tickling appetizer is not just great for an evening snack, but serves as a great starter too.


The SCS group contacted me recently to dispatch a pack of Apple goodies. The courier arrived last month a day before I went into labor. I have to apologize SCS for this delayed post. As I eagerly unwrapped the sturdy, sexily packaged box, beneath it held beautiful plum red and green Washington apples, each unique in its variety, kind, color and character. As I unpacked the box, I could appreciate the sweet tart essence wafting from these apples. We could barely resist these.

The box came with an information pamphlet and about 7 varieties of apples: Red Delicious, Granny Smith, Gala, Braeburn, Golden Delicious, Fuji, Honeycrisp. It spoke about the significance and characteristic feature of each apple. A few tart ones, making them perfect for bakes, crisps and cooking and few sweet ones to snack on anytime. You can find the same information on their website 'Washington Apples'.


Recently on a television show, it was shown that most of the imported apples come dipped in a polymer chemical solution which prolongs the life and gives it that glossy healthy shine, also posing a health hazard. These apples did have a glossy shine on them, however I am unable to comment if they went through the same process. Since I did not want to risk, I peeled their skin for the recipe.

We enjoyed most of these. The tart ones were well used in a few recipes to suit our meal and they were well appreciated. The idea came from my mom as she has attempted the same chutney a couple of times with the Indian rural apples which are smaller and tart too. I made an appetizing, tongue-tickling chutney from the Granny Smith Apple which had a good amount of tartness, making it perfect for this lip smacking chutney.


Apple Chutney

INGREDIENTS

1 Granny Smith apple
1 tbsp vegetable oil
1 tsp nigella seeds (kalonji)
1 tsp fenugreek seeds (methi seeds)
1 tsp fennel seeds (saunf)
1 tsp cumin powder (jeera powder)
1 tsp coriander powder (dhaniya powder)
1 tsp asafeotida (hing)
1 tsp chilli powder
1 tbsp jaggery/brown sugar
Juice squeezed from 1/2 a lime
Salt to taste


DIRECTIONS

Clean and core the apple. Peel the skin if required. Dice it to small chunks or bite sized pieces. Marinate with salt and lemon juice and keep them aside till we use them for cooking. This will prevent them from darkening.

Heat a tbsp of vegetable oil in a kadai/frying pan. Add a teaspoon each of nigella seeds, fenugreek seeds and fennel seeds and fry briefly till you get a nice aroma from them. If the oil is very hot, it takes about 15-20 seconds. Turn off the flame and quickly stir in the dry powders, the asafeotida, cumin powder, coriander powder and chilli powder. As you do this an amazing aroma from these spices will hit you. Turn off the flame to avoid the spices from burning.

Add in the chopped apple pieces and stir well to coat all spices. Switch on the flame and cook the apples covered on medium low heat for about 15 minutes or till the apples are soft. Add the jaggery/brown sugar to taste. Mash a few pieces so that you get a thick chutney. Cook further for another 5-10 mins. Adjust the salt to taste. You may serve this warm or at room temperature.


You may grate the apples for a finer chutney. We loved those bites from fruit chunks in our chutney. This sweet and tangy chutney goes well with rotis and rice too. It complimented our lunch well and we enjoyed this apple treat. One can hardly identify that this dish is made from a fruit. Thanks to the SCS group for this wonderful gift. We enjoyed the varieties and look forward to more of these in Indian markets.


If you folks hopped on to this space and wondered why there's been no update, then there's a reason. In the past few weeks you may have noticed a lag in my posts and responses to mails and comments. Blog has been muted for sometime now. Our near and dear ones are aware of the recent happenings in our lives. Cooking, blogging and similar tasks have taken a transient backseat as we've headed towards accepting new duties in life. Life has been hectic and far more busy than ever.


I have been eagerly looking forward to share the good news with all of you. We are pleased to inform that we were recently blessed with a little princess on March 15th 2011. Our lives have changed forever and we are currently enjoying the ardent task of parenthood. Primarily for me, as motherhood beckons, I am actively engaged through the night and day with my little one who has currently captured our sole attention to herself :). I have been losing sleep through the night to wake up at wee hours, catering to all her needs.

Motherhood has been most challenging and beyond what I thought. But every time I see my little princess it gives me utmost joy and every minute spent with my little one has been duly rewarding. It's been the most blessed moment for us and many thanks to all our family, friends and well wishers for their hearty wishes and prayers. I shall be back soon, may be a couple of posts from my drafts... till then be hooked to this space!