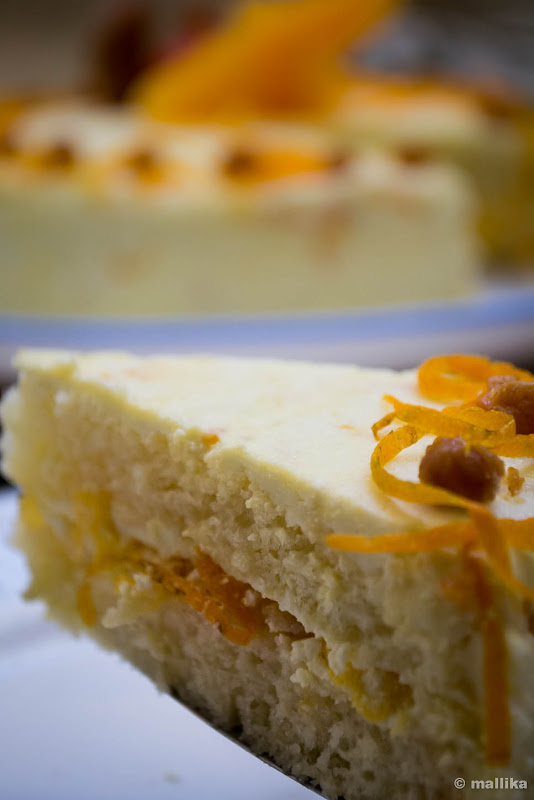
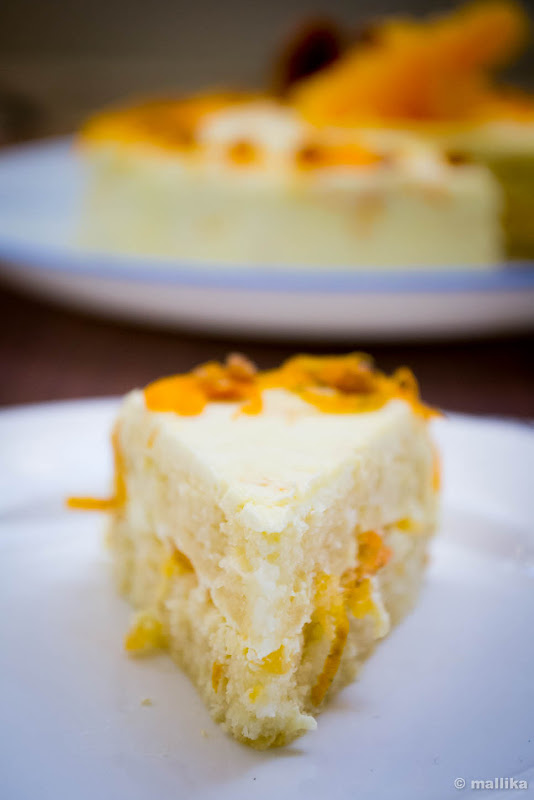
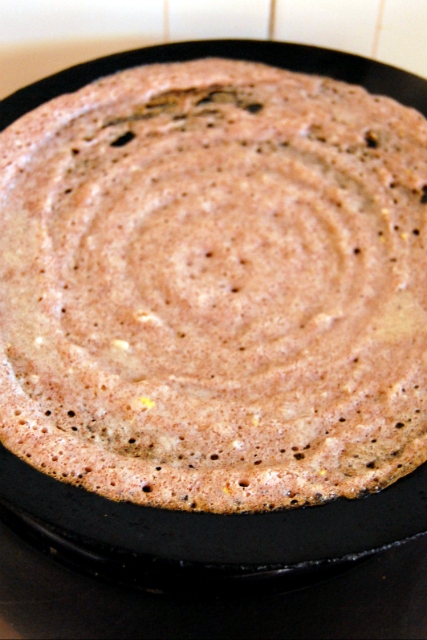
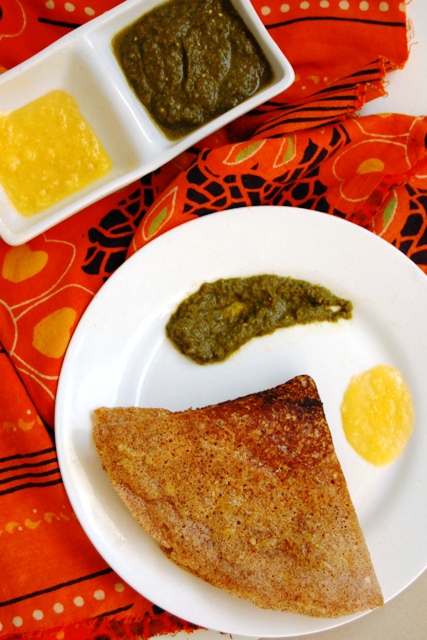
I am just back from a short hiatus. The past two weeks have been extremely hectic for me as an official tour took me to the 'City of Pearls', Hyderabad. My weekdays were phenomenally stressful, packed with working late hours, loads of learning and deadlines I had to submit. It's a city I had heard about and visiting it for the first time was indeed exciting. I always look forward to the gastronomical adventure in most of my trips and just as I expected the Hyderabadi biriyani and Karachi biscuits did not disappoint me for sure. Of course I had limited time at hand since this was not meant to be a holiday trip... but I am not complaining!


Even as I begin to unpack my stuffs I am ready packing off for a week long planned holiday tour. It's been a travel packed month as I am looking forward to a fun packed trip to northern frontiers of our country. A distance travel, sangeet, mehandi, baaraat, marriage, bidai... meeting relatives, fun with shopping and some gastronomical delight with floats of ghee and gleam with butter in food to indulge into and more is what we are looking forward to. Delhi, Jalandhar, Amritsar is calling us for lots more.

Back in Bangalore right now the summers are here and the sun has been blazing real hot. My sunscreens, gogs and umbrellas are out of their hiding as temperatures soar high. They'll make their trip north too. Fruit juices, milkshakes and ice-creams have been ruling our menu to quench thirst. I am missing our chill winters terribly. Also my humble prayers to rain God for a few showers.

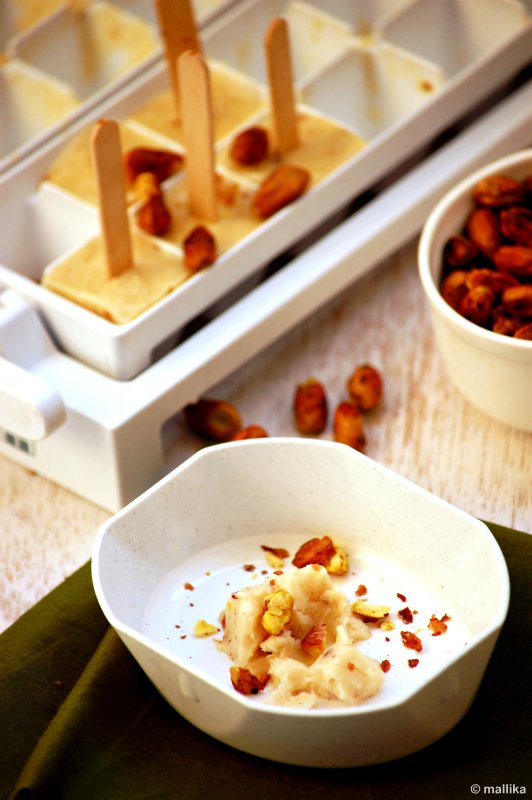
This Kahlua ice-cream was made to beat the summer heat. Sure treat for coffee lovers.

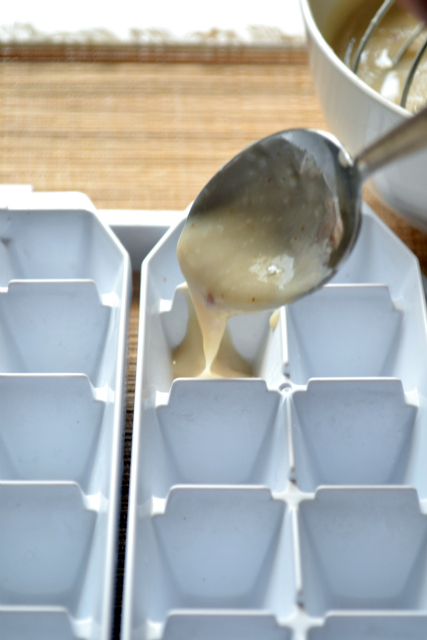
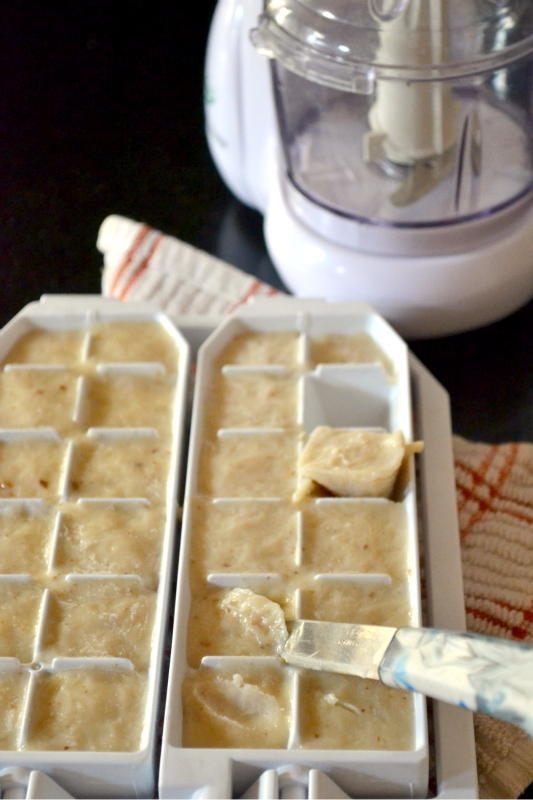
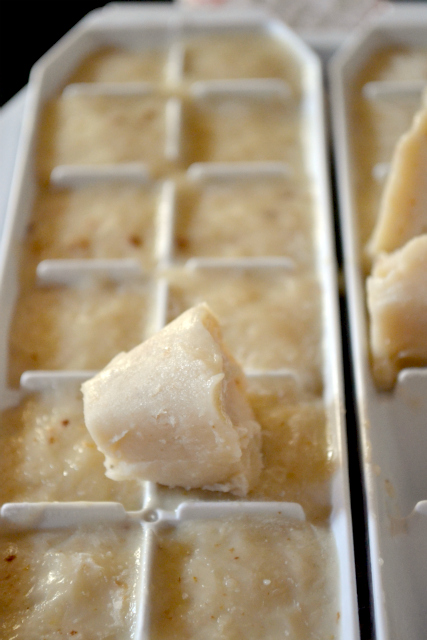
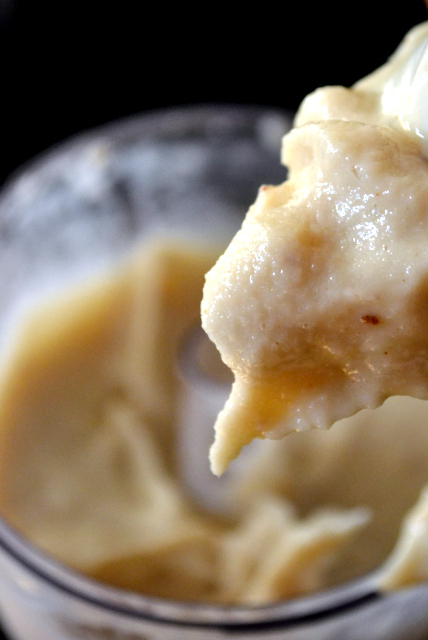
A couple of my readers have dropped me questions on how I manage to get good ice-creams without any ice-cream maker. Though I would still stress on the fact that homemade ice-creams cannot be as creamy and voluminous as store bought ones. My simple trick is to fill the ice trays with the ice-cream batter, freeze them chill and then churn them in a high speed blender/mixer. It breaks the ice-crystals easily. Transfer to another container and then you return them to the freezer. It helps to a large extent.


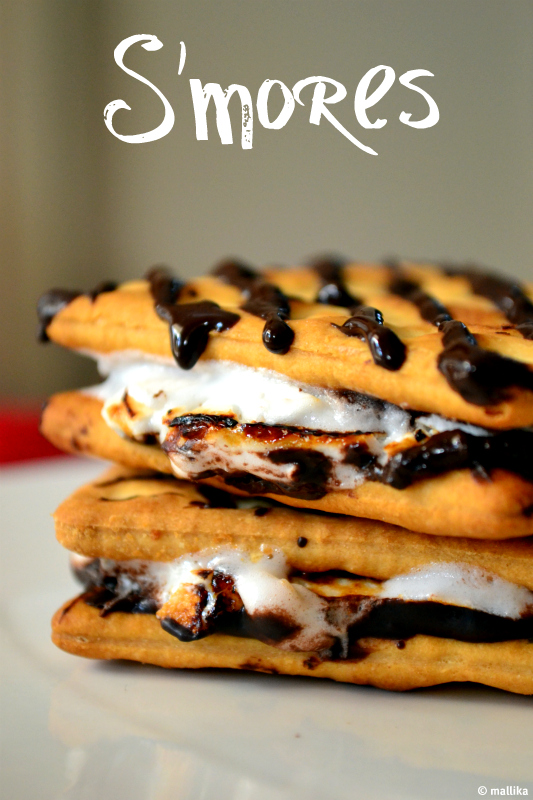
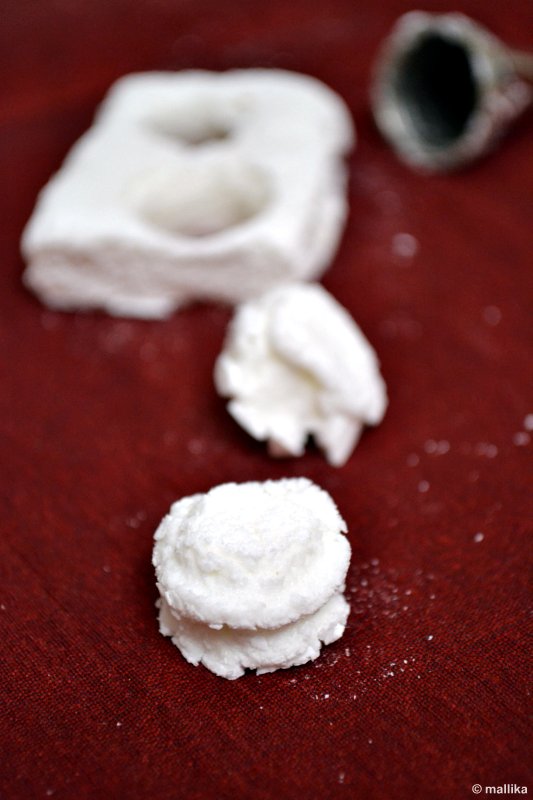
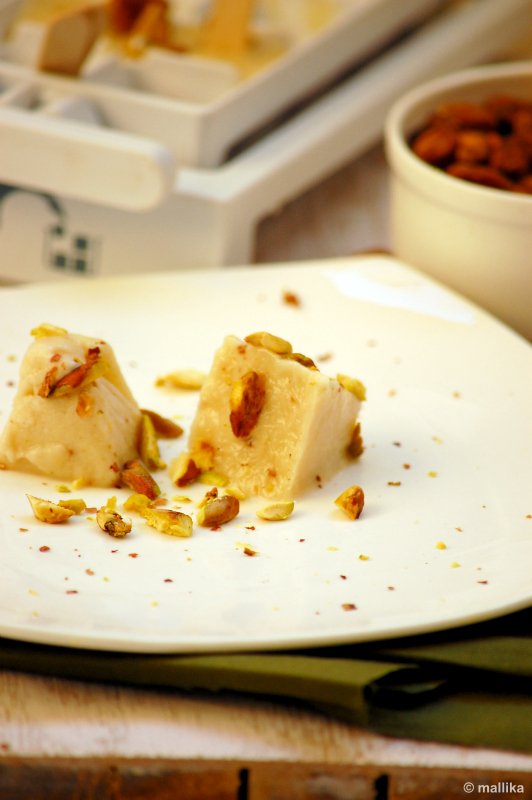
Kahlua Pistachio Mini Popsicles

INGREDIENTS

200 ml middle fat cream
200 ml condensed milk
200 ml full fat milk
40-50 ml Kahlua (replace with strong coffee decoction instead for non alcoholic version)
2 tbsp chopped Pistachios
Sugar adjusted to taste

DIRECTIONS

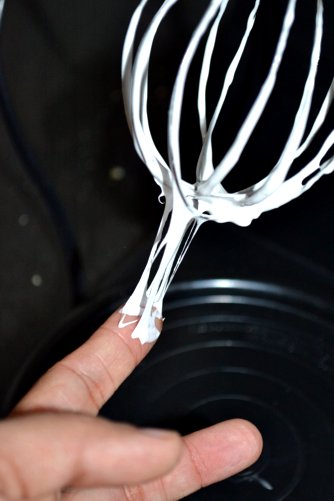
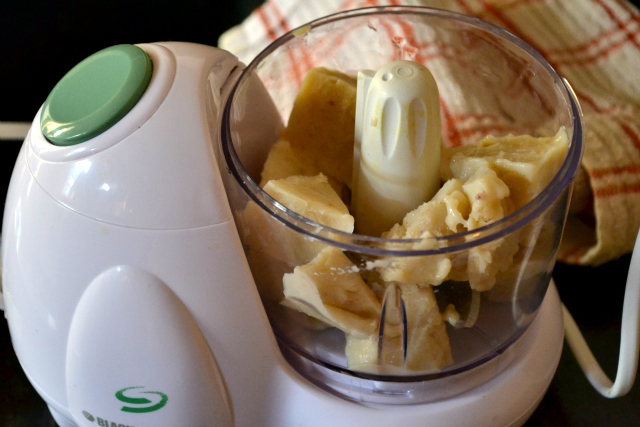
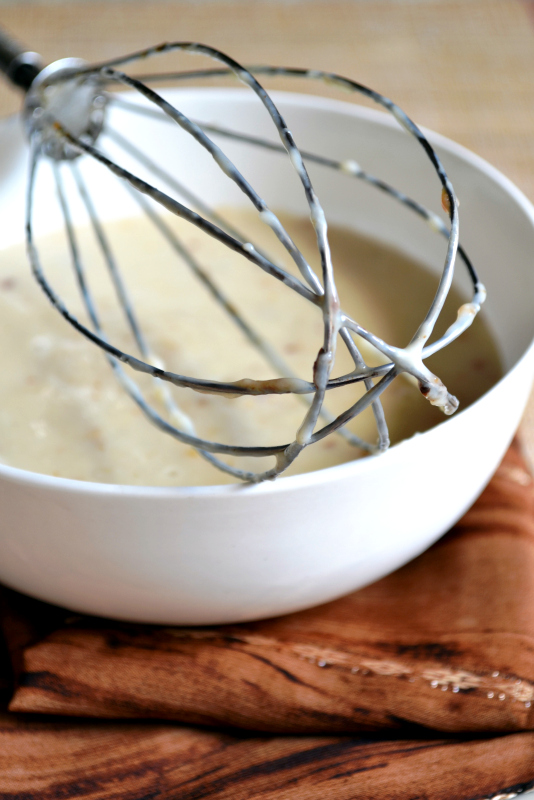
Combine condensed milk along with the full fat milk. I do this in a mixie. Whip the middle fat cream to soft peaks. I used Milky Mist here. Add this to the whipped milk. Give a quick whizz. Add in the Kahlua. Replace with strong coffee decoction instead for non alcoholic version. Taste and adjust sugar to your taste.

Transfer this to ice trays and freeze them for 2-3 hours. Once almost set, transfer the ice-cream to a mixie and give a quick whizz till the ice cream is creamy. Transfer to the ice cream tray again and repeat twice. In the final churn add the pistachios and mix well. Transfer to popsicle moulds if available. You may also transfer to regular freezer proof containers and serve like regular ice cream.


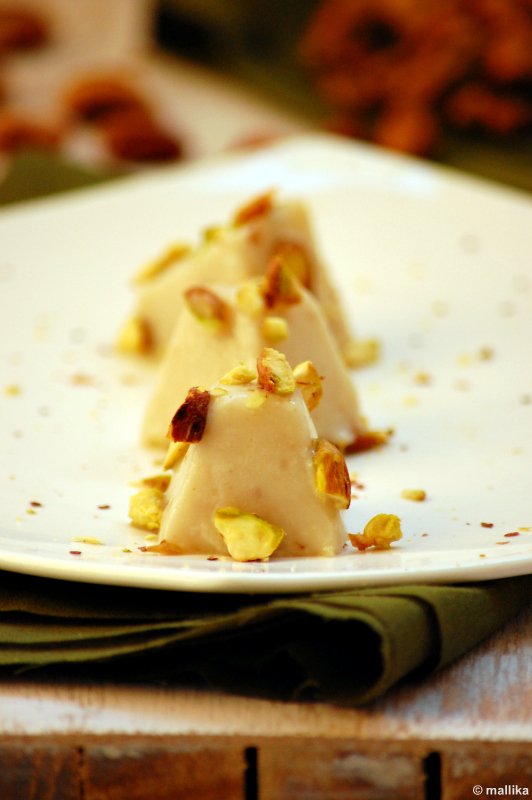
I hope this ice cream brings smiles on your faces. It's super simple, easy-peasy and makes up a great treat. Simple to remember recipe with ingredients in equal quantities. Do try it sometime and be prepared for accolades to follow :) Hope you have some soothing moments with this treat while I shall be back with more next week.


Over the years that I have spent blogging on Vegbowl I never had a guest post and I wonder why? Having spent three years on this blog passionately, I should have ideally done this task earlier, probably been inviting more bloggers to write and share their recipes on Vegbowl. Somehow I kept procastinating on this. Better late than never, I have decided to invite my pals and blogger friends to help me share and fill my space with recipes and thoughts that they wish to pen down here. It's a good start I must say and that will kill any monotony in my style which I have been carrying throughout here. Do you wish to be a part? Mail me now!

To begin with I am incredibly happy to share my guest for the day Sharmilee as she shares her recipe for Baby Corn Pulao on Vegbowl with us. Sharmilee is an extremely talented blogger from Coimbatore, India and blogs on Sharmispassions. Her website has been around since 3 years and has gained immense popularity as she hosts a huge reportire of varied dishes ranging from starters to desserts with immense efforts that are shown in her step-by-step recipes and droolworthy photographs. I have been a huge fan of Sharmilee's work and I am glad to invite her to my place. Thank you Sharmilee for gracing my virtual space with your fabulous dish.


I always admire the pics at Veg Bowl and love MD's writing style, I never miss to read them. When she approached me for a guest post, I had no second thought as she is one of my fav and inspiring bloggers and a good friend too :) Thank you MD for the opportunity.

Recently vegbowl has moved to its new home and I wish MD and Vegbowl good luck in all the future endeavors!

Coming to baby corn pulao recipe, I recently tried this from a magazine, it was a instant hit at home so thought to share it with you all.


Baby Corn Pulao

Basmati rice - 1 cup
Water - 1.5 cups
Baby Corn - 8 cut into small pieces
Big Onion - 1 cut lengthwise
Curd - 1 tbsp
Salt - to taste

To Temper:

Bayleaf - 1/2
Cinnamon - 2
Cardamom - 2
Ghee - 1 tbsp
Oil - 1 tsp

To grind:

Big Onion - 1 chopped roughly
Garlic - 5 pearls
Ginger - 1/2 inch piece
Turmeric powder - a genrous pinch
Red Chilli powder - 1 tsp
Dhania powder - 1 tsp
Garam masala powder - 1/2

Method:

1.Grind the ingredients listed under 'to grind' with little water and grind to a fine paste. Soak basmati rice for 15-20 mins, drain water. Add a tsp of ghee and saute the rice in a pan for 2 mins till the moisture leaves. Set aside.


2.In a pressure cooker, heat oil + ghee add the items listed under 'to temper' saute for a minute. Then add onions and saute till slightly browned. Then add the masala paste and baby corn, saute till raw smell completely leaves.It may take around 5-7 mins.


3.Then add curd, required salt and give a quick stir. Then add rice and water and pressure for 3-4 whistles in medium flame. Wait till pressure releases then fluff it up with fork gently without breaking the rice.


Serve hot / warm with onion raita.


My Notes:

• You can use the same recipe to make sweet corn pulao too.
• Adjust spice level according to your taste buds. The measurement above is medium spicy.
• You can serve it with plain or onion raita


Thanks Sharmilee for sharing your recipe here. It is an honor to know such a fabulous blogger like you!


This watermelon sorbet is so easy and simple that I reckon you to try at least once. The fact that you'll need no fancy ice-cream maker to whip it will make you thank me for that. It's a beauty that watermelons come with such naturally sweet flavors and bold red colors which add up to the dreamy prettiness of this sorbet. I found it hard to keep my little toddler at bay too! Seriously!

I may not be a hunter for recipes, but I know if something's got hooked to my mind, getting it off isn't that easy till I've made it. Sort of a similar thing with this sorbet too. Having tried my hands at couple of ice-creams and fro-yos, I realized I never featured any sorbets here. Not surprising though, since I've never been a fan of ice-candies, so you'll know why I hardly make them. I have a strong inclination for ice creams so my obvious choice have always been them. But the fact is this sorbet is different from those regular ones. You'll love it if you favor your fruits, even if it means you are not a fan of sorbet.


Summers are here, the weather has been stupendously hot and watermelons are in season. They accompany us back home every time we are out on our grocery shopping. So it's not surprising we are melon freaks. They are light and refreshing. They bounce life with their naturally sweet flavor, also them making a great summer snack. They have brilliant color and textures perfect for sorbets. That's a good enough reason I should make them.

Traditionally, sorbet is a frozen dessert usually made from fruit juice with a mushy consistency. My recipe deviates from the essence of using sweetened water flavored with fruit, instead I chose to freeze the cut fruit pieces and then blitz them in a food processor. It's short-cut, healthy, low-cal and guilt free. A watermelon contains about 6% sugar and 92% water by weight, so it needs no extra water and freezes beautifully well.


Watermelon Sorbet

INGREDIENTS

1 kg watermelon
1-2 tbsp sugar

DIRECTIONS

Deseed and chop the watermelons to bite sized pieces. Snack on a few pieces to taste and check for their sweetness. If naturally sweet you may refrain from adding sugar. Else, add a tablespoonful or two of sugar. Squeeze juice from half a lime and toss them well. Transfer them to a freezer proof container and freeze them for at least 5-6 hours or overnight. Just before making the sorbet, remove them from freezer and allow them to sit on counter top for 3-5 minutes. Give them a blitz in a food processor till the watermelon ice cubes break to crystals, yet don't let them melt. Work quickly. Scoop them out to a serving glass and serve immediately.


This incredibly refreshing icy sorbet is just lovely. The flesh adds so much texture and helps to hold the dessert well. It's filled with goodness from fruit, has vibrance in flavor with beautiful peppy color. Easy to make and elegant to serve. Simple and delicious. Just the right thing for summer soother!

I have two celebrations going on today. My little toddler turns one this very day. Exactly a year ago, it was today she was born which brought immense joy and happiness to our lives which words can't possibly express. Secondly, my bloggy baby has turned 3. The summer of 2009 on March 15th, somewhere in the noon, I published my first post publicly. Little did I know that I would sail a long journey with my blog, which grew constantly and in every way is an identity to me and my work. Happy Birthday both my babies, I love you both!


My attempts at making homemade marshmallows without corn syrup were successful and much appreciated, however not vegan. I’ve made these marshmallows couple of times now and they turn out perfect each time. Simple, easy and just 2 ingredients for a recipe that will not fail. Armed with that confidence and of sheer curiosity, I’ve been trying to experiment with agar-agar as a replacement for gelatin.

Of several sites I’ve read, successful vegan marshmallows have been possible with Xanthum gum, protein isolates, both of which I can’t fetch locally, hence agar is closest ingredient I can rely on. My struggle with making vegan marshmallows has been for a while, but to no avail. Agar simply fails to act the way gelatin does. My guess is that agar and gelatin have a different composition and gelling properties at different degrees, so they behave differently.


It’s magical what gelatin does to sugar syrup when whipped at high speeds, converting the entire syrup into a snow-white mass of fluffy, creamy, melt-in-mouth marshmallows… amazing! Agar fails to whip up the sugar syrup or stabilize it. My experiments with various proportions of agar, also cooked agar with the syrup and attempted to heat agar separately, all yielded disastrous effect to the end result. Even cooked agar at times failed to dissolve well, leaving speckles in the suspension. It either ended up in a pale caramel colored gooey, slimy mass of colloid or a sticky toffee like brittle, nowhere close what marshmallows are meant to be. An utter flop. An assurance that vegan marshmallows cannot be made with sugar and agar alone, they definitely need something more to be whipped up and stabilized. Till I get some Xanthum gum and protein isolates in my reach, I shall leave vegan marshmallows to rest in peace.


That apart, making homemade marshmallows is a breeze and fun too. Many with whom I shared these, were actually stunned when I told these were homemade… a pause, a blink in the eye and prying, some astonished if it was seriously homemade or just tagged so… had to convince! For the chocolate lover that we have at home, these marshmallows may not have made much of an impact, but these S’mores definitely did! He said “Wow, these are yum. Can we have more of these please!!!” S'mores as they call it for some more please... these little sandwich bars are popular American traditional campfire treats consisting of a roasted marshmallow and chocolate sandwiched between two pieces of graham cracker, sinfully yum and decadent.


S’mores

INGREDIENTS

2 Graham cracker squares (I used Nutrichoice cracker squares)
10 gm. chocolate bar, broken/melted if necessary (milk, dark, semi-sweet or bittersweet chocolate)
1 large homemade marshmallow

DIRECTIONS

On a clean plate, place one cracker square. Top it with the piece of dark chocolate. Microwave on high for 15-20 seconds to melt the chocolate slightly. Stick a fork into the marshmallow or using a tong, swirl the marshmallow lightly over open flame till the edges are golden brown. Do not hold longer as they will melt and fall apart. A couple of swift turns should do the job. Immediately place the marshmallow on top of the partially melted chocolate. Alternatively, you may toast the marshmallows under a grill too. Top it with the second cracker and press down gently so that some of the chocolate and marshmallow goo slides out on the sides. When the S'more is fully assembled, let it sit for a few seconds. Gently press them together and eat them like a sandwich! They taste best when warm.


Graham cracker squares are not available in India. An alternative would be digestive biscuits. However, I chose to use Nutrichoice cracker squares. They are thin, salted cracker squares and balance the sweetness from chocolate-marshmallow filling, just right for our tastes. The warm bittersweet chocolate and gooey marshmallows render creaminess to the dessert with a luscious center while the Nutrichoice cracker squares poise the sweetness, perfectly balancing it out. These are perfect little desserts which can be made ahead and taken to parties and adventure trips, pretty enough to win accolades.

Homemade Marshmallows


Over the years there have been couple of recipes I’ve wanted to try but could never attempt for reasons plenty. In a land where ‘certain’ ingredients used primarily in Western cooking were unheard of and almost impossible to fetch, I wouldn’t blame myself if I pushed those recipes aside. Fortunately though, today we live in a pretty diverse city which has access to many of these imported items, it is still a challenge to fetch a Filo sheet, Wonton wrappers or even Puff Pastry sheets. I have not been lucky yet. I have given up mt hands on a local whipping cream, then would you expect me to look out for corn syrup, xanthum gum, agave nectar, etc.? Thanking my stars, least I have access to some good dark chocolate, vanilla extract or butterscotch chips, not with ease though!

I don’t remember eating marshmallows as kids. It’s not something we get here in stores. Only a couple of years ago, on our vacation to Ooty, I must have tasted my first marshmallows. And because you are on a vacation to a new place, you often tend to try foods that are speciality of that place, homemade chocolates and marshmallows happen to be quite popular here. And as predictable it can be, it was not one of those favorites among my parents for the lack of flavors or taste. And hence forgotten too…

Homemade Marshmallows Homemade Marshmallows


Then, two years ago when my husband and me went on a vacation trip to Munnar and last year to Ooty, these marshmallows rocked my memories of those soft, pillow-like, melt-in-mouth candies. I had the freedom to enjoy couple of them there and packed a few to be eaten back home. Again as predictable it can be, marshmallows were never among my husband’s favorites too! So all that pack was devoured by me alone. Of course, to satisfy my husband’s chocolate addiction, our dear Rocky Road Bars were their counterparts!

Being a vegetarian, I was ignorant then that the animal product, gelatin goes into making these marshmallows. Though it doesn’t bother me much, since I am not staunch about vegetarianism (it’s just our way of life… didn’t we consume cod liver oil as kids… or what about the capsules... were eggs ever vegetarian…?), bringing home gelatin did bother me. Over the past two weeks I have been craving for marshmallows and my frantic search for stores in Bangalore didn’t lead me anywhere. Even the candy shops in malls ran out of stock. Are they kidding me???

Homemade Marshmallows


I badly wanted to make them in my kitchen. Google gave ample recipes, most of them had one thing in common, corn syrup and gelatin. Corn syrup is an ingredient that is impossible to get locally and I would have preferred the recipe without gelatin. I’ve never used gelatin in the past, since agar-agar has worked mostly for me. I was skeptical how the marshmallows would turn out if agar powder was used. Despite all the possible research online, I concluded that gelatin was the only way I could get these right, at least for my first attempt. Again, since this was the first time I was attempting marshmallows, I decided to stick by what the recipe demanded, of course minus the corn syrup.

It turned out that these marshmallows were the best ever I’ve tasted. Absolutely yum and totally melt-in-mouth feel. If you taste one of these you’ll realize why you may never want to go back to the store-bought ones. Making these were darn easy and hardly any effort. With no candy thermometer at hand, I was mentally prepared for disasters… what if the sugar syrup ended in a caramel… will I get the right consistency… what the heck is that soft-ball stage… will the syrup whip well to marshmallow cream… will I be able to lift these marshmallows off the tray… if these fail, then what next… ???


Quite a lot of study went into making these little sweet treats. Several sites, recipes, reviews, comments which helped me gear up making these in my kitchen. I was armed with puffed rice at hand to make rice krispies, should these fail on me. And if the marshmallow cream failed to set, my digestive biscuits and dark chocolate were at my custody for some S’mores. Bear with me, these photos were taken at night on my kitchen counter with flash on. What was meant to be a weekend activity, I ended up making these on a weekday night. Put my little tot early to sleep and nudged myself to make these, I could barely hold my excitement. Sugar syrup went on a rolling boil and I kept looking for that soft-ball stage. Every time I threw a drop of that syrup in cold water it would dissolve into thin water. I gave up on that technic and instead stuck by India method of single thread consistency. A safer bet. Dropped a tiny dollop of syrup on a steel plate, allowed it to cool a little and then checked their consistency between my thumb and forefinger for a single string. It worked well. My mixer bowl had the gelatin blooming, however the moment the sugar reached that right stage, in the final boil, I threw in the gelatin to the hot syrup and gave a quick stir. Off the flame, I put the hot vessel directly on my stand mixer and gave the hot sugar syrup the desired blitz till it fluffed up and doubled in volume. Unlike what most recipes suggest (pouring the sugar syrup down the side of the bowl into the gelatin mixture), I added gelatin to the boiling syrup to avoid any lumps or un-dissolved gelatin stuff. I guess it worked well for me.

Homemade Marshmallows


Homemade Vanilla Marshmallows (without Corn Syrup)

INGREDIENTS

1/2 cup cold water
2 tbsp. gelatin
2 cups granulated sugar
3/4 cup water
A pinch of salt
1/2 tsp. vanilla extract

To dust:

1 tsp. vegetable oil
1/8 cup cornstarch
1/8 cup powdered sugar

DIRECTIONS

Prepare a pan: Mix corn starch and powdered sugar. Grease a square baking dish and dust with the cornstarch-sugar powder thoroughly. Grease a spatula with vegetable oil to transfer the prepared marshmallow cream.

Sprinkle the gelatin over cold water and allow it to bloom. Prepare your stand mixer by attaching a balloon whisk. A balloon whisk will help in pumping good amount of air, thus helping them double faster. In a heavy saucepan, combine water and sugar. Bring to rolling boil on medium heat, stirring occasionally. If you have a candy thermometer at hand, boil it till it registers 115 degrees C (235-240 F), soft ball stage. In case you don’t have one, drop a blob of syrup on a steel plate, allow it to cool a little and then check it’s consistency between the thumb and forefinger for a single string formation. As it cools down further you should be able to roll it into a soft ball. Many recipes suggest a soft ball stage by testing the syrup in a bowl of cold water, though I’m not sure why it didn’t work for me. Sugar tends to crystallize, hence keep a keen eye on your boiling syrup. Once it reaches the soft ball stage, quickly add in the salt and bloomed gelatin to the sugary syrup. Turn off the flame immediately and give a quick, proper stir to ensure that the gelatin has dissolved completely. It took me about 8-10 minutes to reach that stage.

Turn on mixer at low speed, slowly increasing it to high, beating it on the highest speed. Beat until very thick, fluffy and double in volume, about 12 minutes is what it took for me on a stand mixer. The entire mass will turn to a clean white fluff and when this cream no longer increases in volume it should be done. At this stage, add in the vanilla extract or flavoring of your choice and give a final whirl for a minute. Do not overbeat as it may stiffen and make it tougher to transfer. Do not feel tempted to touch or taste the marshmallow cream at this stage as it’s very sticky and stingy in nature and you’ll end up in mess everywhere!

Using the oiled spatula, transfer the cream to the greased tin. Scrape off all the batter from the bowl and spread evenly into the prepared pan. Gently level the tops using the greased spatula. Cool overnight or at least 4 hours before slicing. To slice, carefully transfer the entire sheet of marshmallows to a sugar-cornstarch dusted cutting board. Grease a very sharp knife or scissors and cut into desired squares. I suggest not to use a ridged knife as I had trouble cutting with them. Instead a sharp leveled knife should do that job better. Toss with remaining sugar-cornstarch mixture until all sides are evenly coated and no longer sticky.

Homemade Marshmallows


To make mini-marshmallows, I used the rear end of greased piping nozzle, pressed them down on the marshmallow sheet and cut out rounds. To be used on marshmallow floats. They keep for over a week in air-tight containers. The longer you have them, the denser they get, making them perfect for cup of hot chocolate.

The entire process may sound lengthy and tedious, but honestly it isn’t much of an effort to make this fluff. Glad that these marshmallows turned out extremely yum and surpassed my expectations. My husband who’s not a fan of marshmallows too gave me a thumbs up. This recipe is a keeper for sure and I do intend to play with more flavors in future. Also, next on my card is an attempt to get them done the vegan way. Let’s see if the agar stuff works… will keep you posted.


You have to pardon me for my inconsistency in blogging these days. Please.

Being without my laptop since a couple of days makes me totally incompetent to maintain my blog at the desired pace I intend to and I feel totally at lag. I generally prefer posting at least one recipe each week, but haven’t been able to linger on to that. My camera flash card is flooded with pictures of food, food and more food, but seriously, haven’t got enough time to download them and edit. Couple of drafts have been sitting incomplete, soon to be posted. Worse, I received several wishes on my birthday last month from my friends and blogger pals, but I haven’t been able to respond to mails or thank any. My sincere apologies guys… !!!


I hate this procrastination. Ever since I have been without my system, I’ve been nudging my husband to lend his lappy on weekends, only to keep this space burning and alive, with a positive hope that I shall soon be united with my beloved lappy. To say that I am technologically dependent is an understatement, now that living without a system hasn’t given me any peace of mind, but driving me nuts. On the contrary I have some positive news for you all. :)


Coming to the point, after a lot of thought and wait, I finally decided to purchase my own domain. Yes, after 3 years of blogging I still feel passionate about it. I love doing this every bit, so I took a plunge to move from http://www.vegbowl.blogspot.com/ to http://www.vegbowl.in/. Now doesn't that call for some celebration??? Now here's some Fruit and Nut Chocolate Bark to raise the toast!


Fruit and Nut Chocolate Bark

INGREDIENTS

2 cups chopped Dark Chocolate
2/3 cup mixed roasted nuts (such as roasted walnuts, pistachios, almonds and melon seeds)
2/3 cup mixed dried fruit (such as raisins, quartered figs and apricots)

DIRECTIONS

Line a tray with foil or parchment paper. Microwave the chocolate in medium bowl for 2 minutes on high power. Give a stir, the chocolate should be melted and smooth. If not microwave for another minute. Alternatively melt the chocolate in a double boiler over saucepan of simmering water, stirring until melted and smooth.

Scatter nuts and dried fruit evenly over the paper/foil. Pour melted chocolate onto the fruit nut mix, spreading gently using a spatula. Chill until chocolate is firm, about 30 minutes. Peel off the paper. Cut chocolate into irregular pieces. Serve the bark.


This chocolate bark is packed with goodness from fruits and nuts. I am a huge fan of dark chocolates, I always have them to munch on. My love for dry fruits and nuts is profound, I can add them to anything sweet and savory too. And am a bigger fan of roasted nuts, given the immense flavor and crunch they give to anything added. The bittersweet incense from the chocolate stark out beautifully when paired with the roasted earthiness from nuts and mellowed sweetness from dry fruits.


I am totally pepped up with this thought of celebrating a day symbolizing love with your Valentine. Isn’t that so cute? Unfortunately, it falls on a Tuesday this year, that means we’ll be at work and the day will be spent like any other week day. Shades of red have always been my favorite color, so there is no reason why I shouldn’t be soaked in colors of Valentine. And be it a festival or an occasion, you know I just need an excuse to make a dessert!

Initial thoughts of making chocolate cake for my Valentine took a backseat when I saw the bright oranges brought in from the Sunday shopping peeping out from shopping bag. They screamed to be used, probably not for the cake, but to be eaten fresh. As I packed a few off to be refrigerated for later use, the whipped cream on the refrigerator counter sat gleaming at me. Fresh cream cake wasn’t on my mind honestly. Experiments with fresh cream haven't had many success with me, so I didn't dare to this time. Buttercream was a safer route. After a real long time (I can say almost close to a year and half), I got eggs for the fat-less sponge base. Can’t get a better cake than a cake with Orange buttercream icing, yeah? Absolutely!


Oranges are in season. Seeing them flood the market in shades of bright yellow orange hues makes me go crazy for them. I cannot simply resist oranges, so reminiscent of a fruit which we often depend on to quench our thirst, especially during train and bus journeys. I completely adore fresh fruits, but wonder why I’ve rarely played around with them in my dessert. We relish fruits on a daily basis with stocks of banana, watermelon and muskmelon being quite a regular at home. Guess while I’m chopping fruits for a dessert a lot of it goes directly to my mouth rather than the dessert itself!

I have been toying around this idea of using oranges again to make a Gateaux since my previous bake with Baked Orange Cheesecake. Oh yeah, people loved it! It was hit at home. I’ve discovered a new found love in the zesty refreshing flavors of orange, prior to which the peels were meant to be discarded. I love that citrus zester and have been using more often since. I went on a serious hunting spree for that one tool! Totally worth the effort!

Keeping in mind the Valentine day, I baked this Orange Fresh Cream Gateaux over the weekend. This did not come as a surprise to my hubby as he very well knew that a cake was on the way for him. The eggs fluffed well to make the fatless sponge base devoid of any fat using the recipe inspired by Tarla Dalal. Drizzled juice directly from fresh oranges on to the cake. Now how good is that for you? A quick round of whip given to the cream and a good amount of orange rind and juice went into it, speckled bright and yellow. Spread the stuff and assembled it in less than an hour. It was a breeze.


Orange Buttercream Cake

INGREDIENTS

Fatless Sponge:

2 large sized eggs
50 gms (2 oz.) plain flour (maida)
50 to 80 gms fine tea sugar or powdered sugar

Buttercream Icing:

200 gm. softened butter
2 tbsp. powdered sugar
1 tsp. orange rind
A few slices of orange segments
2-3 tbsp. orange juice (for moistening the cake and icing)


DIRECTIONS

Sieve the flour. Grease and dust a baking tin. Beat the eggs and sugar very well until thick and double in quantity. Fold in the sieved flour carefully and mix gently with a metal spoon. Pour the mixture into the prepared baking tin. Bake in a hot oven at 200 degree C (400 degree F) for 15 minutes. The cake is ready when it leaves the sides of the tin and is springy to touch. Take out from the oven and leave to cool for a minute. Loosen the sides with a knife, invert the tin over a rack and tap sharply to remove. Cool the cake.


Slice the cake to two. Moist them well with fresh/canned orange juice. I used fresh juice here. Whip the butter and sugar to soft peaks. Add in fresh/canned orange juice along with fresh orange zest and whip further till stiff peaks form. Slather a dollop of cream and spread well on the center. Scatter a few orange segments and top it with the second slice. Slather and coat the cake with the remaining cream and top with candied zest and orange segments and chill for at least 3-4 hours. Serve.


I am not a huge fan of buttercream cakes, simply because they leave that buttery creaminess on the roof of mouth. Saying that this cake was not only loved by my Valentine, but also my mom and sis with whom it was shared. The cake got over even before I could carry it over for the 14th Feb! The orange rind is refreshing and makes the cake totally sinful. I was not totally satisfied the way I frosted this cake. I should have chopped off the cake hood flat before frosting. I could definitely have done a much better job. Frosting a cake is a real test of patience. You need to treat that cake like your baby, gentle and with care.

Are you geared up to celebrate this Valentine day with your special one? Do you plan to create a special dessert for your Valentine this year? What's your flavor? Would you go for Vanilla or Chocolate or is that a fruity one like mine? Share your thoughts with me.


It’s been long since I baked some cookies and this seemed the perfect occasion when I should be baking more of them. My little tot is in her teething phase and loves putting almost everything into her mouth. Door-mats seem to entice her more than anything else and we have a tough time hiding them from her. We’ve been playing a lot of peek-a-boo games with her and my little brat is full of untiring energy, life and zest. She’s been gaining strength and weight to crawl and pull herself well now, but should have some more time to go before she can be independent on her feet. While she loves pulling objects and putting them to her teeth, we have a terrible time objecting her from doing so! This seemed the perfect reason for me to bake some cookies so that she can hold them and bite into her itching teeth.

With 2 bunny teeth on lower and 1 on upper gums and the fourth breaking its way out, she hasn’t yet got over her itch to bite into almost anything close to solid. While she’s pretty fussy with her choices when it comes to food, digestive biscuits seem to be her favorites. And no, not the milk dipped softened ones done specifically for her, but a solid bite into the biscuit is what she demands. I played around with these Chocolate & Coffee Whole Wheat Cookies, adapted from the cookbook, Chocolate: The Food and the Music to make cookies which were healthy so she can bite into. I’ve made 2-3 batches of varying ingredients, all on similar lines of the base recipe. For my little one, I skipped chocolate and coffee. I omitted egg completely, instead used thin flax-meal paste. For the adults, I like to use same amount of coffee liquor as much the volume of an egg. They turn out good each time promising to be good companions for your cup of tea. And my little toddler surely seems to be enjoying them.


Chocolate & Coffee Whole Wheat Cookies

Adapted from Chocolate: The Food and the Music

INGREDIENTS

3/4 cup unsalted butter, plus extra for greasing
1 cup brown sugar
1 egg (replace with 1 tbsp. gooey flax-meal paste or 1 tbsp. of coffee liquor if making for adults)
1/2 cup all-purpose flour
1 tsp. baking soda
A pinch of salt
1/2 cup whole wheat flour
1 tbsp. bran (I used whole wheat bran)
1 1/3 cups semisweet chocolate chips
2 cup rolled oats
1 tbsp. strong coffee (Add more for stronger flavor)
2/3 cup walnuts, toasted and coarsely chopped


DIRECTIONS

Preheat oven to 375 degrees F. Grease 2 large cookies sheets. Cream the butter and sugar together in a bowl. Add the egg (replace with 1 tbsp. gooey flax-meal paste or 1 tbsp. of coffee liquor, if making for adults) and beat well, using an electric mixer.

In a separate bowl, sift together the all-purpose flour, baking soda, and salt, then add in the whole wheat flour and bran. Mix in the egg / flax mixture, then stir in the chocolate chips, oats, coffee and nuts. If it's for the baby, skip the chocolates and coffee. Mix well.

Drop tablespoonful of the mixture onto the prepared cookie sheets, dabbing each lightly using the back of a spoon (if you prefer thin, crisp cookies), leaving room for the cookies to spread during cooking. Transfer the cookie sheets to preheated oven and bake for 16-18 minutes, or until the cookies are golden brown.

Remove from the oven, the transfer to a cooling rack and let cool before serving.


I like thin, crisp cookies which have a crunch with every bite. That my prefect bake. On the other hand, my husband prefers more chewy cookies over the crunch. If you want your cookies crisp, you bake 2 minutes longer. For chewy ones, remove the cookies as they begin to brown on edges.

We use flax quite a lot in Indian cooking, specially South. While my mom’s roasted flaxseed chutney powder is my favorite, I personally dislike the flavor of flax in my baked goods. So I was cautious with my use of flax-meal powder this time and made a pretty thin paste instead of a thick gooey one. I like to think these are good for you. They have bran, rolled oats, whole wheat flour, flax-meal, walnuts and chocolate chips in them. Now, isn’t that goodness of everything in one?


Almost at the end of January and I am surprised how fast the month of January passed by. Wasn't it hardly a few days ago that we spent a gala holiday time partying for the New year? And boy, we've already crossed a month! Personally for me, this month has been packed with lots of surprises and challenges. On professional front, I am excited as my career graph moves a step ahead and am looking forward to the new learning and challenges it poses. Fortunately, the strong support from my family ties keep me enthusiastic and passionate about my work.

A lending hand does come from my parents, especially my mom. And with their relentless support I have been able to manage home smoothly. At times, when I am back home exhausted from a long day at work, mom resues me with her ready to cook batters, instant powders and spice mixes. Even her freshly chopped vegetables or picked and cleaned greens give me a helping hand that make our life much simpler. Preparing the batter or chopping vegetables may look less of an effort, but honestly it's one of those kitchen jobs I always detest to do. Like this simple Ragi dosa that doesn't require much of an effort, but a good amount of time for soaking and grinding. Looks extremely simple and hardly an effort, yet not so! While I generally get Ragi dosa batter from my mom, this weekend I pursued to make them myself so that my litte one could relish them too. This also happens to be my husband's favorites and he prefers this over the plain urad dosa.


Ragi Dosa

INGREDIENTS

1 and 1/2 cup ragi flour
1 cup urad dal
1 cup raw rice
1-2 tsp methi seeds
Salt to taste

DIRECTIONS

Wash and soak urad dal, rice and methi seeds in ample amount of water for atleast 3-4 hours. Discard the soaked water. Grind them together to a smooth paste using less than half a cup of water. Finally add in the ragi flour and stir the batter very well. The batter should be thick, not runny. Transfer this batter to a large vessel which can accommodate double the volume. Place in a warm dry place, like that of a pre-heated oven. Allow the batter to ferment overnight or atleast 8 hours. By then the batter will rise due to fermentation. Beat the batter well before preparing the dosa.

Oil an iron griddle and heat it. If using a non stick pan, oiling is not required, but I suggest you use an iron griddle for best thin and crisp dosas. Take a laddle full of batter and spread them on the griddle gently using the back of the laddle. If you find the batter too thick and not spreadable, then add little extra water, beat well and make dosas. Serve hot with fresh chutney.


Ragi or finger millet is extremely healthy, gluten-free and rich in iron and vitamins. You can make thin or thick dosas depending on your taste. We prefer thin and crisp dosas, sometimes paper-thin too and they go very well with ghee and chutney. On occasions when I am short of time to make chutneys, I serve these with a dollop of ghee-honey mix. As kids we've loved that combination and I can eat almost anything that way... breads, rotis, dosas, idlis... I guess almost anything. It's one of those traditional tricks my grandma used to lure kids to enjoy our breakfast. Simply mix equal quantites of ghee and honey and serve a dollop of this with the dosa. They taste yum!