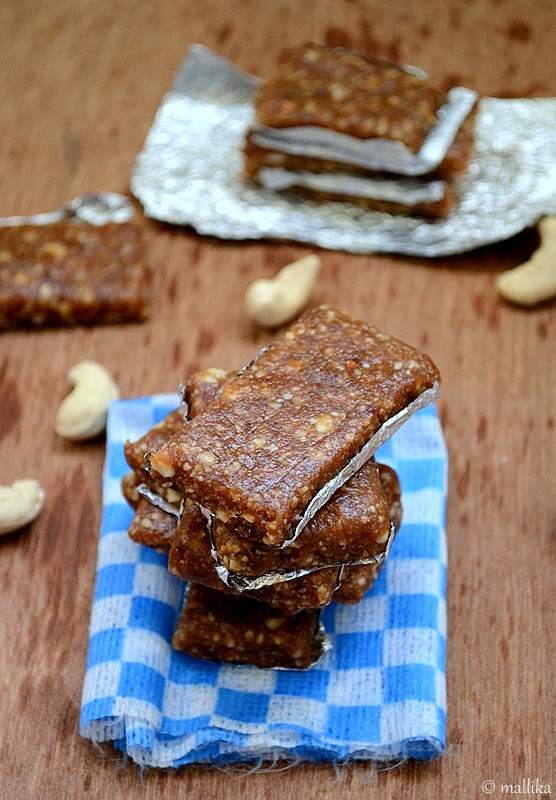
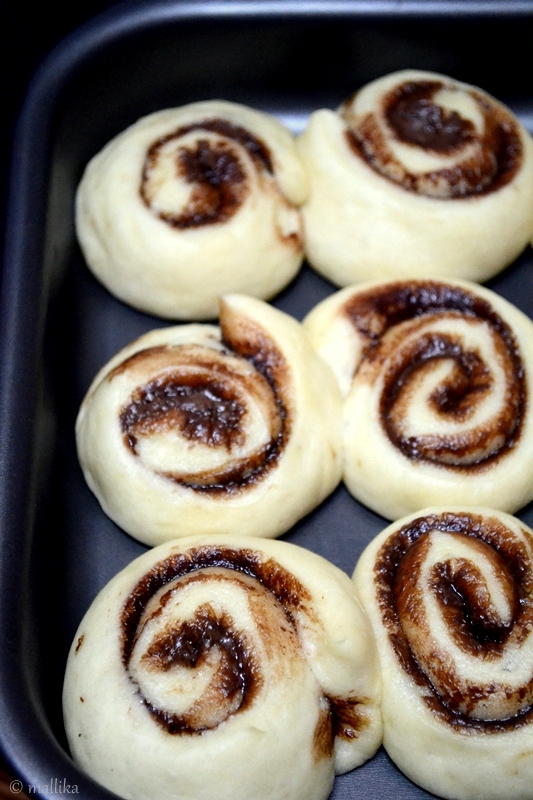
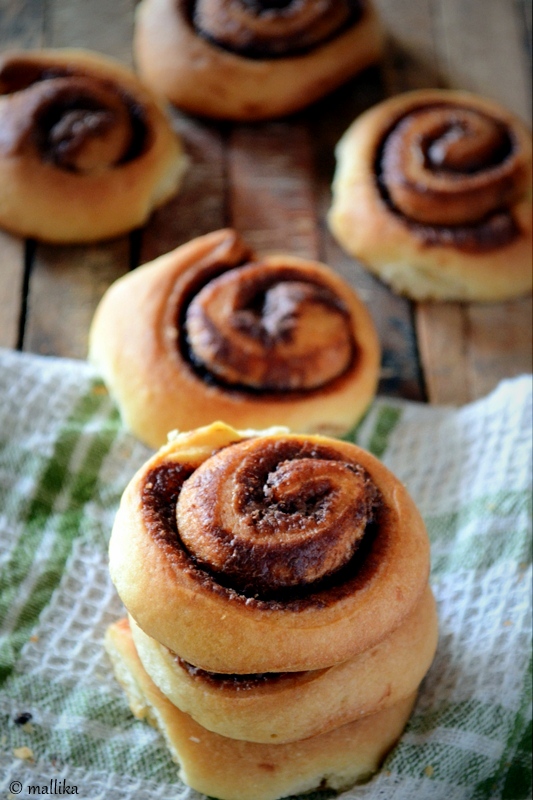
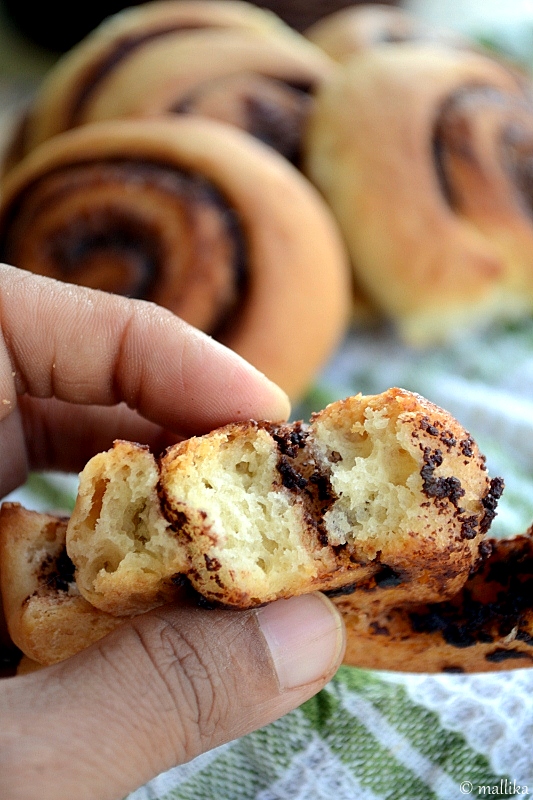
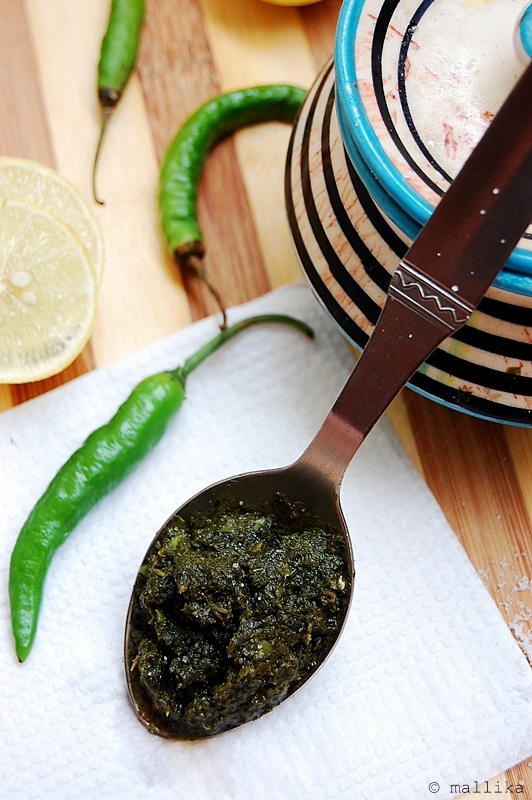
Aah! Finally the weekend is here and it feels so so good, that I can't possibly express the immense joy I get on the dawn of Fridays. It's the day of the week I look forward to the most; it gives me joy, hope, lightens my heart and heightens my spirits. And even as the day comes to an end on a Thursday, I can feel the excitement and dip in pressure with the weekend drawing closer. The worst of work load on a Friday doesn't stir me, fortified with an ability to deliver my best, probably the positivity and the hope that Saturdays and Sundays will give that well deserved respite and the time I deserve for my family. Wish God blessed us with few more Fridays a week. Life would have gotten only better!


Undoubtedly, my job is an integral part of my life and I love it every bit. I've never been a person who could stay home, probably the feeling of being insecure to be cut off from the happenings in the world outside would haunt me severely. Being confined to the four walls is not just me. My job helps me pursue my professional aspirations and improve business acumen, just as I had dreamt of where and what I should be while in my college.

Yet on the flip side, I compromise high on my family time. That realization hit hard only after my baby was born. Till then, job and career meant beyond all. And like every mother it would be a treat to watch my little baby grow every minute, evolve to the persona she will embellish into, I find solace in the fact that I have my mom by my side, donning my shoes, playing my role in my absence, ensuring my little one is not deprived of any need or personal care.


And that speaks why I look forward to the weekends, only to be with my family and do everything for them that I don't can't do over the week.

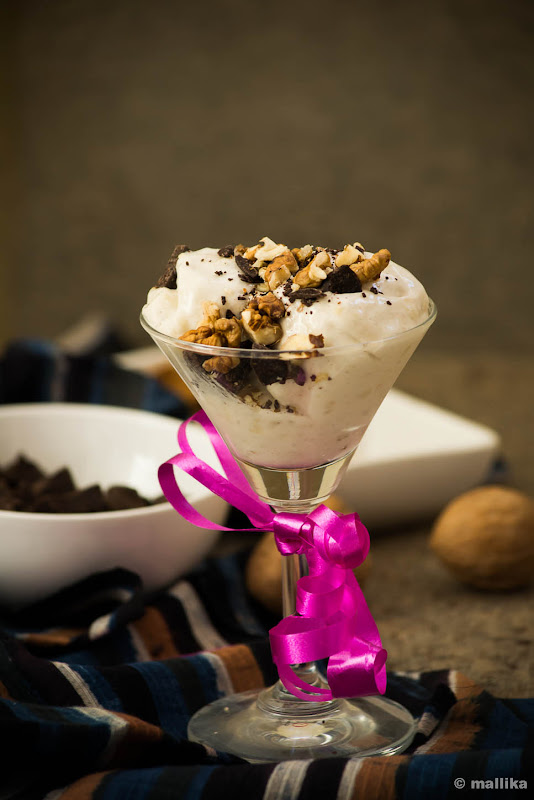
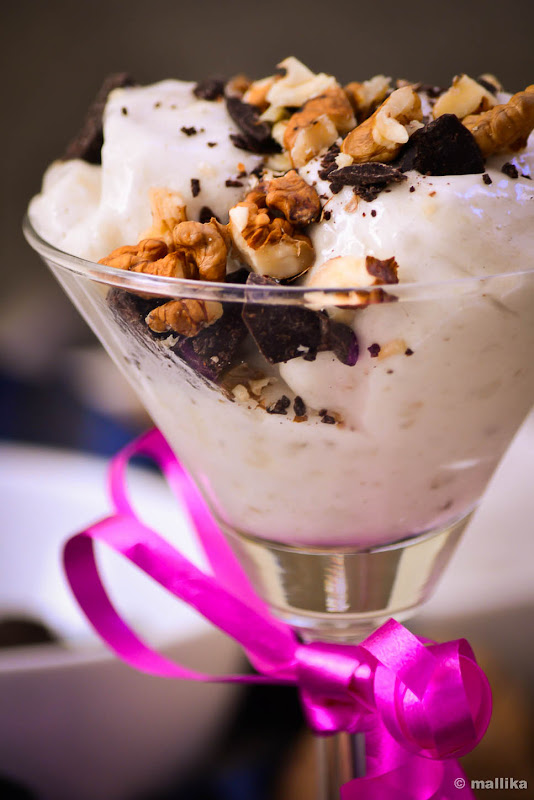
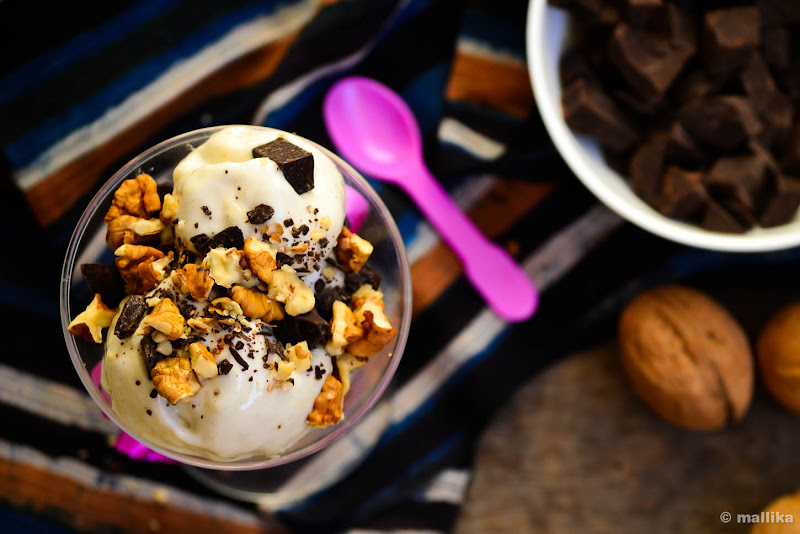
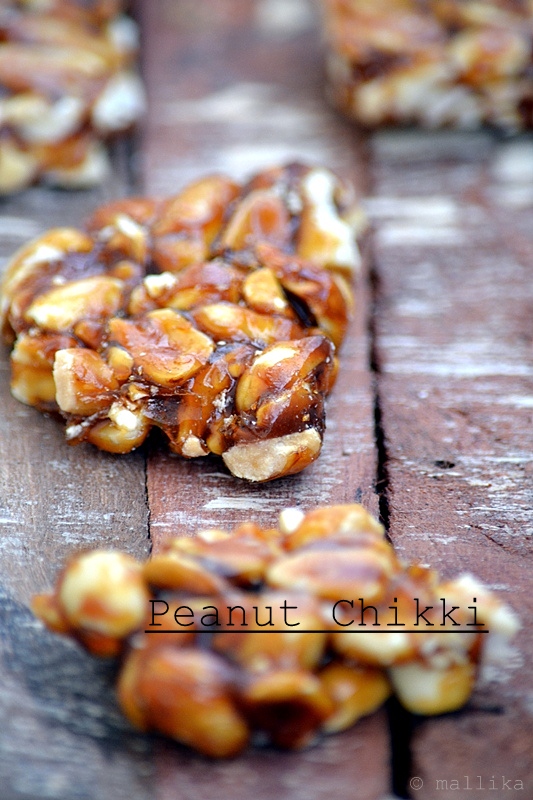
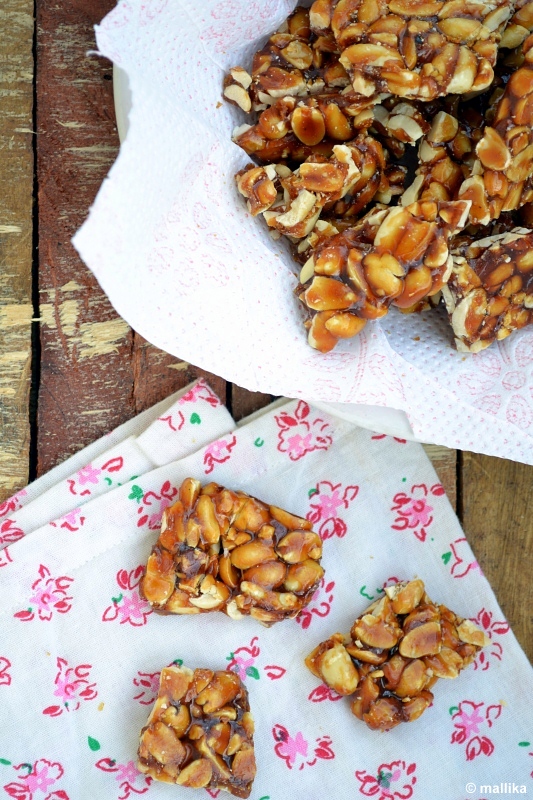
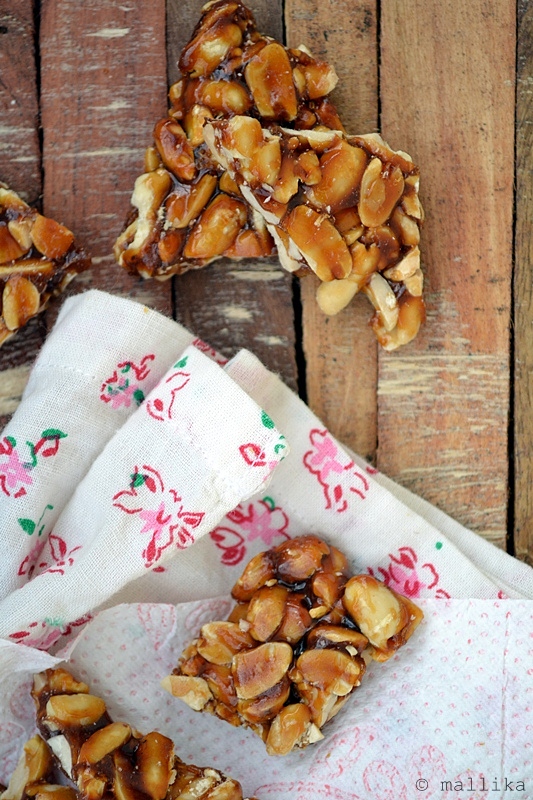
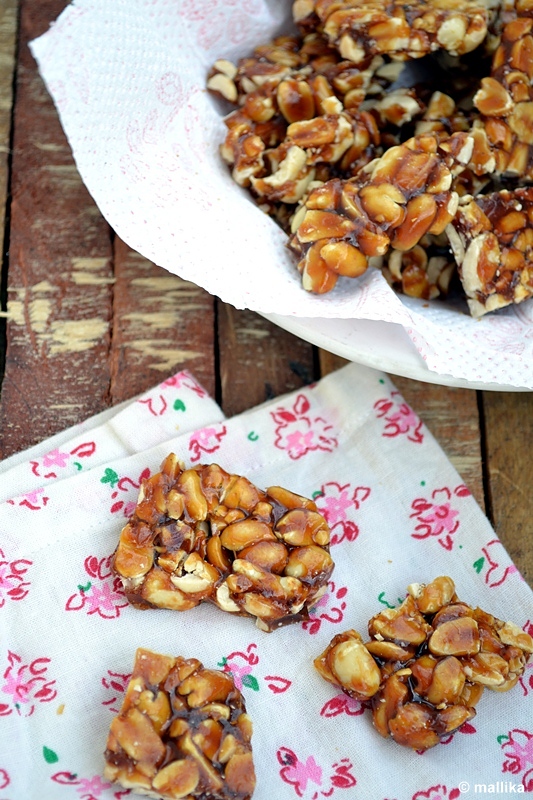
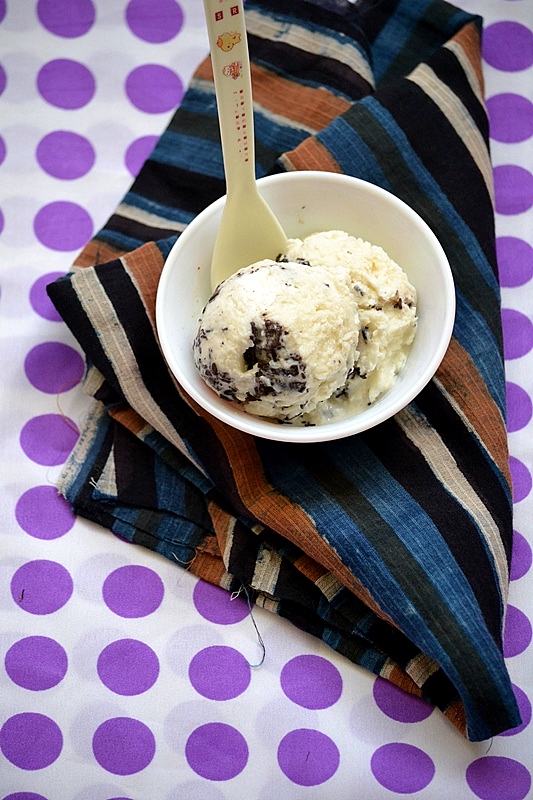
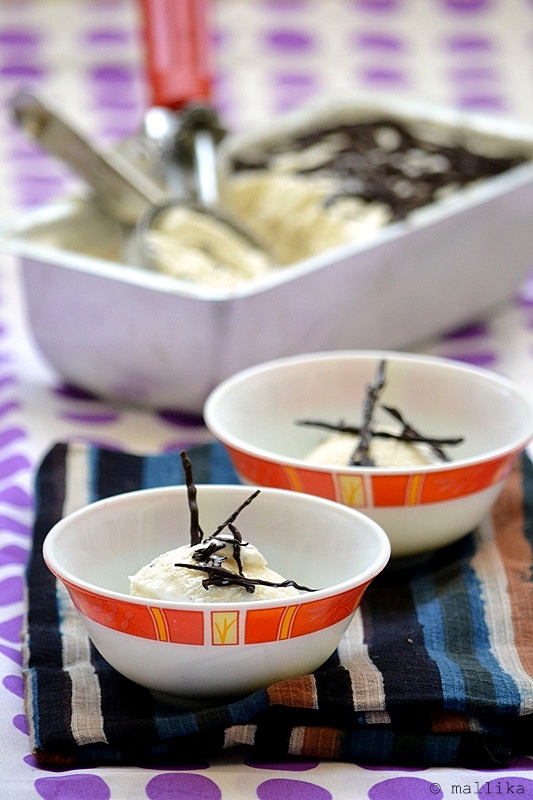
If Eva Toneva's simple eggless vanilla ice cream with 2 ingredients couldn't help me resist my temptations to make some at home, David Lebovitz's recipe for Stracciatella ice cream sold me completely to it. Having made the classic version couple of times I wanted to be a little experimental with this. And so gladly I admit I did, you can't just help yourself stay away from spoonfuls of this simple vanilla decadence with Italian-style chocolate chips even as it sits freezing. A litre of ice cream was easily half the volume by the time it was done.


Stracciatella Ice cream

INGREDIENTS

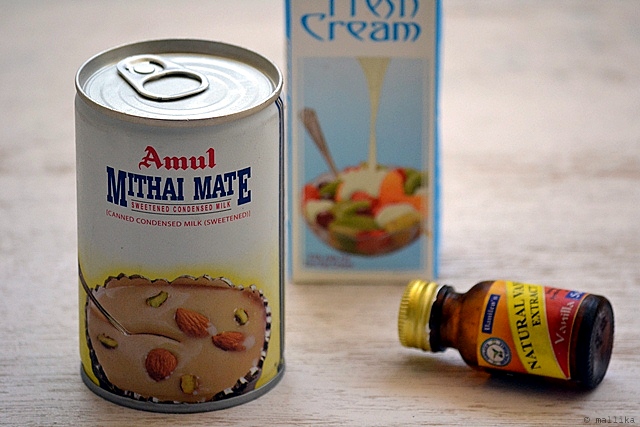
400 ml of sweetened condensed milk
500 ml cream (25% fat Amul cream used)
1 tsp. vanilla extract
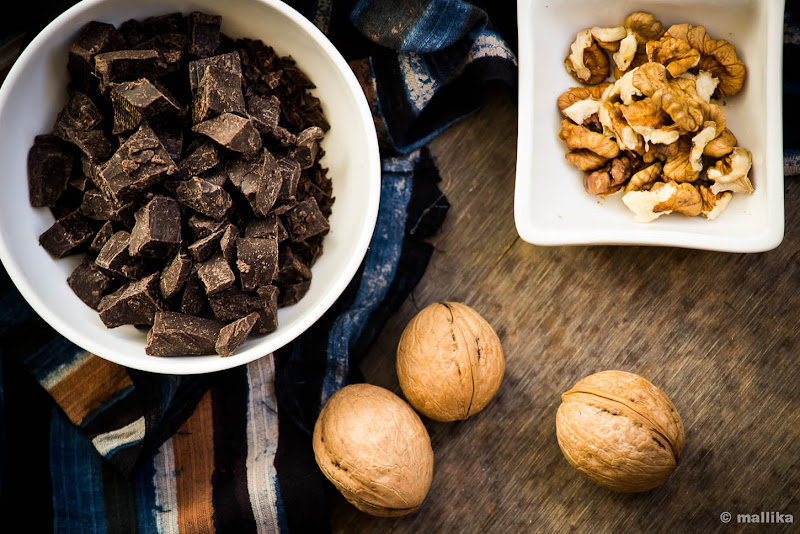
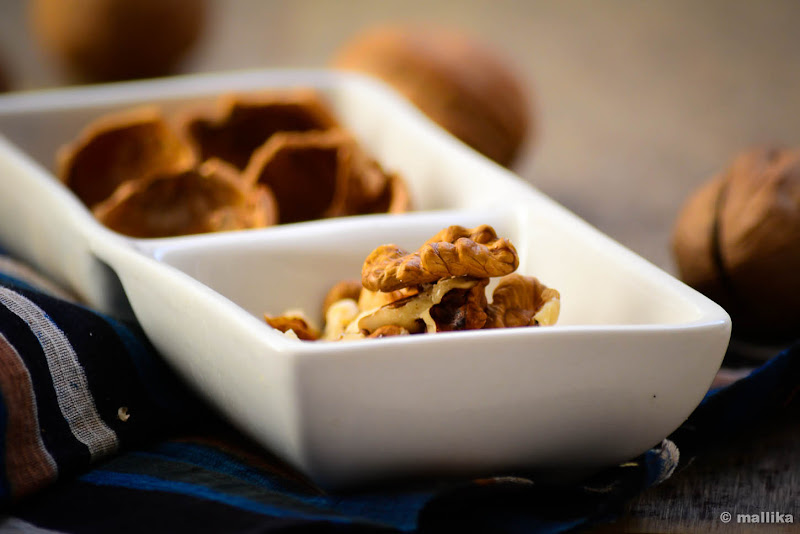
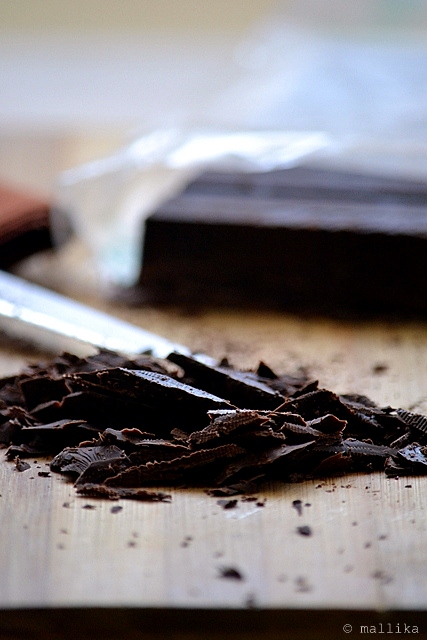
60 gm. dark chocolate

DIRECTIONS

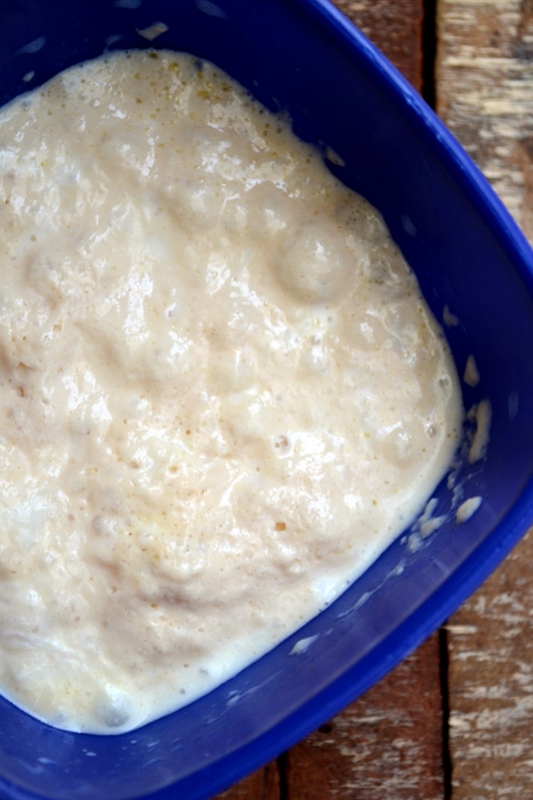
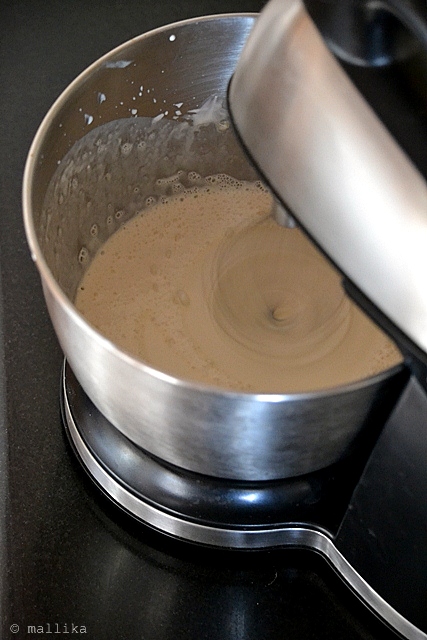
Pour the cream into a bowl. Whip it to soft peaks. Add in the condensed milk along with vanilla extract. Beat mixture using a hand mixer. Pour into a freezer proof container. Cover with plastic film and freeze in freezer.

Transfer it from the freezer to fridge at least 20 minutes before serving. This basic vanilla ice cram can be served as it or with toppings if desired.


For Stracciatella:

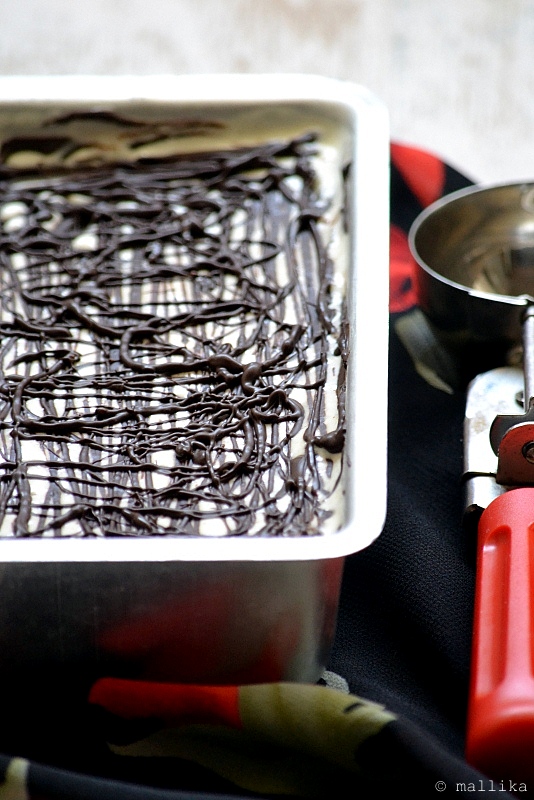
The vanilla ice cream can be enjoyed as is, however to make it decadent and exotic go ahead to make Stracciatella. Melt the dark chocolate in microwave on high for a minute. Alternatively, use a double boiler technique to melt the chocolate. Transfer the melted chocolate to a paper piping bag. Snip off the tip for the chocolate to flow. Drizzle the chocolate randomly over the almost-frozen mixture, then stir, breaking up the ribbons of chocolate as they freeze, to create little ‘chips’. Scoop out and serve!

PS: The original recipe calls for equal quantities of cream and condensed milk. I have made this ice cream couple of times, however I like to add in 50-100 ml. of extra cream as I found it too sweet for our tastes. I suggest you taste and adjust sweetness accordingly.

Eggless_Banana_Walnut_Chocolate_Muffins_1


So my frivolous love for bananas continues with this post….

Hope you don’t bog me down for this one. It’s not that I am head over heels for bananas in desserts, but the bananas and chocolates go together so well, the twosome combination is a pair made in heaven. That probably is my opinion alone. In fact my husband thinks its otherwise. He abhors bananas in desserts, to his taste it ruins the dessert entirely.

We were out at Swenson’s on a recent weekend to enjoy some goblets of ice cream. Their colossal menu in lanky brochures are sure to instigate sundae cravings in anyone. Earlier the week, my husband picked up a Times daily deal that randomly caught his interest while flipping through a newspaper ad.

The deal didn’t go down well with us, given the fact we were offered limited choice to pick from. It wasn’t just worth the penny saved on discount. Every option we were allowed to choose from had bananas in it, not certainly my husband’s choice. With puckered brow and frown on his face, he beheld a manifestation which Swenson’s wouldn’t like to envisage, I am sure.

Eggless_Banana_Walnut_Chocolate_Muffins_2


While I made my choice for a Fruit n’ Nut Sundae, given his weakness for chocolates, he finally ended up indulging in a Chocolate Sundae, with loads of chocolate ice cream, gooey chocolate sauce, cream, nuts, and of course banana chunks (that according to him would have been decadent minus the bananas).

Bananas apart ;), that made up for a nice romantic evening we spent together. Of course with a baby around, you can never make it romantic, can you? May be the song Paani da rang vekh le currently playing on my iPod would have conjured up for that romance. :) I am so much in love with this number from Vicky Donor (wish I got to see the movie too…) that I have it playing in loops! Good job Aayushman, love your voice.

Ironically, despite the dislike of bananas in desserts, one of our all-time favorite still remains the Banana bread. For the chocolate lover boy I have at home, I made these Banana Chocolate Muffins with walnuts and it turned out that from the small batch of 6 large muffins that I got, I was left with none the moment they were out of the oven. I got to click these snaps in less than 5 minutes I was given for the countdown, so please bear with these photographs shot in the evening in low light conditions.

Eggless_Banana_Walnut_Chocolate_Muffins_3


Eggless Banana Walnut Chocolate Muffins

INGREDIENTS

1/2 cup mashed bananas (about 1 large over ripe banana)
1/2 cup milk
1/4 cup butter (replace with vegetable oil for low fat)
1 tbsp. cocoa powder (add a tsp. more for a denser chocolate flavor)
1 scant cup all-purpose flour
1/2 cup fine sugar
1 teaspoon baking soda
Handful of chopped walnuts

DIRECTIONS

Preheat oven to 350ºF/180ºC. Line the muffin tin with paper cases.

Mash bananas along with milk in a food processor. To this, add melted butter and whisk well. Set aside.

In a separate glass bowl, sift the all-purpose flour, cocoa powder and sugar along with baking soda.

Make a well in center of sifted flours. Add the wet mixture to the dry ingredients. Fold gently. Few lumps are perfectly fine, they give texture to the muffins. Finally fold in the walnuts. The batter should be thicker than the regular cake batter.

Scoop out spoonful of the muffin batter and dollop them into the lined muffin tins. Scatter a handful of walnuts and brown sugar for a good crusty, crisp topping. Very optional, but rest assured you will love biting into that crunchy topping, also rendering caramelized butterscotch flavor to the cake. Bake for 20 minutes at 180ºC or until a skewer comes out clean. Allow to cool before removing from pan.

Eggless_Banana_Walnut_Chocolate_Muffins_4


So what differentiates muffins from cupcakes? Traditionally is that muffins are meant to be denser with lower fats and sugars, usually left without frosting. They are supposed to have drier texture than cupcakes, however most bakeries replicate the recipe for cupcakes with high fat and sugar content in them, making them unhealthy and unfit for regular consumption. With this recipe I used butter, but for low fat version use vegetable oil instead of butter, also replace all-purpose flour to an equal mix of all-purpose flour and whole wheat flour for a healthier option.


Some energy bars are here for you to please. These bars may look ugly, but they aren’t really. They can be your little dessert treats for your dinner time or make up a great snack for mid-afternoons too. If that’s a good enough reason then you should make them now.

If not, let me boast a little more to please you. These are not just delicious but quite healthy too. They are sugar free, so will do perfectly fine for your waist line. Furthermore, they are diabetic friendly, baby friendly, dairy-free, gluten-free and vegan too. Are you convinced???


My snack box is currently packed with these energy bars. They have been a hit at home and the fact that they are healthy (I really like this term :D) totally spoils us for more. I got about 12 bars and they got over too soon. So I went back making more of these and realized how easy they were to whip up and equally yum to snack on. No cooking, no baking, just a simple whiz of handful ingredients like dates, nuts and any fruit juice. Amazingly, it’s the dates that render a moist natural sweetness to this dish that you won’t realize there is no added sugar, yet being sweet, I like to think I am on diet, especially with these.

I have some wicked thoughts to adulterate these bars. How about adding in some cocoa powder to make sinful Date & Nut Bars? Or maybe, I should care for some Fig & Nut Energy Bars? Not a bad thought, yeah? I let you know, soon.


Date & Nut Energy Bars

Inspired by the recipe on Natural Delights

INGREDIENTS

2 cups pitted and chopped Dates
2 cups Raw Cashew Nuts
1/2 cup Raw Almond (I used mine with skin)
2 tbsps. orange juice

DIRECTIONS

Combine chopped dates, cashews & almonds in a food processor. Medjool dates can be best used here. If not, use any moist date you have at hand. I used Lion seedless dates, which were moist enough for this recipe. Dried ones will not help. Pulse and process all the ingredients together until the texture is coarse. Add little orange juice at a time until it reaches a dry but moist dough consistency. Scrape the bar mixture into a tin lined with aluminium foil. Press evenly with a rubber spatula. Chill for about an hour. Remove from refrigerator and cut into desired sizes.


I kept these bars thin, but you may double the recipe and get thicker bars if you like. The bars are quite rich due to a good amount of nuts in them. These tend to be sticky but as they sit in the refrigerator, they get better. I placed a foil between each date bar and stacked them. This recipe is surely a keeper.


I must have been lucky to have stashed a few over ripe bananas into my freezer that day. It must have been my day. I’ve rarely frozen bananas. If they overripe and rot, they go to the trash bins. But then that’s hardly the case. We mostly manage to consume them otherwise. Had seen this ice cream on Smithfield some time ago and was seriously wooed by the thought of a quick and healthy, delicious ice cream. Call it sheer temptation! I love the way its called – Chunky Monkey Ice cream. Cute and jazzy. Donno whoever named it so, its funky though :D


I haven’t splurged at buying an ice cream maker yet, but I am way too tempted to. Have been looking for options. Kenwood is a great brand though, shelling nearly 4k is not worth in my opinion. Unless I get my hands on practically and see how it really performs, I think I am glad to do with my blender for the moment. Also for the fact that my always freezer is loaded and full to the brim, I doubt I will have any space left to keep the bowl freezing.


This ice cream recipe is a perfectly delicious mid-afternoon summer treat that does not require an ice cream machine. What’s best is there’s no cooking involved, it’s jiffy, dairy-free, gluten-free, sugar free, and yet has all the perks of a delicious ice cream. It’s healthy enough that I made this for my toddler who enjoyed it thoroughly and left crying for more! Pop some peeled bananas in the freezer the previous night and the next day you are ready to go. I peeled and chopped them to small chunks for easier churn. It’s amazing how much frozen bananas have a texture similar to ice cream when churned. A handful of walnuts and good chocolate chunks will elevate the taste. Does this remind you so much of Ben and Jerry’s delicious banana ice cream with chunks of chocolate, banana, and walnuts? This thing tastes similar.

This 5 minute healthy chunky monkey ice cream couldn’t get easier to prepare.


Chunky Monkey Ice cream

INGREDIENTS

3 bananas, peeled, chopped and frozen
2 tbsp. chopped walnuts
Handful of chocolate chunks or chocolate chips
A tablespoon of honey (optional)

DIRECTIONS

Place frozen bananas in your food processor. A tablespoon of honey is optional, you can add it if you like your ice cream sweet. Pulse until its mashed well and comes to consistency of ice cream. If you have difficulty while churning the frozen bananas, or if banana isn’t binding, try adding 1-2 tbsp. non-dairy milk or wait for a minute or so to defrost slightly and then churn. Scoop out a ball of soft serve into a serving bowl. Top with chopped walnuts and chocolate chunks. Serve immediately.


I am hooked to this ice cream and like to make this often. Trust me, yeah, I really do. The little one loves it too. This was an easy cheat option to fool her when she showed her revulsion towards the real fruit. Minus the chocolate, she hardly knows it just the same thing frozen. In an indulgent mood, I like the Chunky Monkey Supreme version with peanut/almond butter and cocoa powder added for richer taste. That’s my craving for dessert.


Hope you had a good weekend just like I did.

These sweet little buns made my weekend. It was fabulous.

Saturday was phenomenally good with a family outing to my workplace. What’s so good about being at workplace, where one spends 10 odd stressful hours slogging, that too on a weekend? Our org campus is massive, sprawling green, with pebble and stone laden pathways that wind beautifully into buildings that become our workspaces on our weekdays. Yeah, on a regular week day we probably would not take time out see this serene beauty surrounding us with the same eye, however over the weekend it was a completely different thing. No stress from work, no timelines to adhere, no brain racking meetings, no conference calls to answer to, no stressful last minute rush… simply a relaxed day out in the plush greenery with my family. It put a sense of pride in me to show my family my workplace, the place where I spend most part of the day.


I had plans to bake some cinnamon rolls for the weekend. I wished to proof the bread dough on Friday night, but pushed it for Saturday as other priorities consumed my energy. I had cinnamon rolls on my mind for quite some time and couldn’t get them off even in my sleep! Just managed to rush through the morning before leaving out from home to proof the dough. Put in the bit of muscle work (kneading) by multi-tasking between the breakfast and packing for the day out. Sneaked to click a few photographs too… here and there ;) Phew!

Back home, sun shone bright and nice in sky. Had left the dough on the balcony and it rose to doubles and triples. I was elated like a kid!

Initially, I had plans for cinnamon rolls. I almost put together brown sugar and cinnamon, when a jar of nutella put me into confusion! Felt too tempted for a chocolate version. Anyway, we are not too high on cinnamon in our desserts, so took a second opinion from my husband and he was too swift to vote for Nutella rolls. Chocolate seduction in a bread roll! Deliciously yum!


Nutella Bread Rolls

INGREDIENTS

For the dough:

2 cups all-purpose flour
1 cup warm milk (maybe a little more or less)
2 tsp. active dry yeast (I used Baker’s here)
1/4th cup melted salted butter
1/4th cup powdered sugar

For the filling:

Nutella spread or any chocolate hazelnut spread

Sugar glaze or melted chocolate to drizzle (optional)

DIRECTIONS

Dissolve 2 tsp. of active dry yeast in half a cup of warm milk and a teaspoon of sugar. Warmth helps yeast wake up from its sleep and sugar aids in providing food to the yeast. Keep it aside for 10 minutes till it turns active and frothy. This is how it should look.


In a glass bowl, combine all the ingredients for the dough, the yeast milk, sugar, butter and flour, pouring just as much extra milk as necessary so as to form a sticky soft dough. I use a wooden spoon to mix the ingredients. As you beat the ingredients, the dough will initially tend to be sticky, but later will begin to leave itself from the sides of the bowl.


Knead into a smooth elastic dough with as little flour as possible. Stickier the dough, lighter will be the bread. Beat/knead the dough for atleast 5-7 minutes so as to release its gluten which helps in a nice, light bread.


Place the dough in a bowl, cover it and allow the dough rise until it has doubled in size (should take about 90 minutes in warm condition).


This is how it would look after 90 minutes. Look at the texture when pulled apart.


Once risen, punch the dough down...

Knead it further for 5 more minutes.


Using a rolling pin, roll the dough out on a lightly floured surface to form a rough rectangular shape with uniform thickness.


Spread the nutella paste all over the dough. Sprinkle with nuts if desired. Beginning with the long edge closest to you, begin rolling the dough into a tight roll.


Slice the roll into 9 even pieces. Place them on the baking tray and keep them in a warm place (like an oven pre-heated to 40 deg C and turned off) for at least 1 hour, until they've roughly doubled in size. By now I had transitioned from evening to night, so you can see that by the time the rolls went to oven it was late! Bake them at 180 deg C for 30 to 35 minutes.


I rarely do step-by-steps, but this time around I succeeded, at least to an extent. You ought to thank me for that. I use regular tea cups for measurement, so you can be assured of its correctness.

These nutella buns are rich and soft, and deliciously sweet. Complimenting them with a dollop of nutella frosting will make them absolutely irresistible.

These are quite easy to make. And honestly, there is nothing better than the smell of homemade buns fresh out of the oven. Heavenly!


Showing you a slice of what I eat is so typical of me! So here it goes...


As a kid, one of my favorite pass-time sweet snack was Chikki. Like I guess for many too. And that meant home-made ones only. Growing up years saw us primarily eating healthy good food. Mom hardly allowed us to buy these bars from market as she feared the hygiene factors involved in these 'unbranded products' which were sold mostly in small tea-stalls and bakeries as loose unpacked products with no manufacturing date, expiry date or content information. She concerned the quality of product and to satisfy our cravings would make them often at home.

And even today as an adult, having crossed 2 decades and now closing to my 3rd decade, I have not run out of love and cravings for them. Seriously, I am hooked to it. I walk up to the snack counter at my work place, almost daily, just to grab a few pieces of these nutty caramelized peanut bars, post my lunch, to relish a healthy favorite treat. Of course, they come from a known manufacturer and I like to bite into their fresh, crisp polythene wrapped bite sized portions. It's an alternative for healthy dessert. And at a gullible price of Rs 1 for a piece each, I can't ask for anything better than this to satisfy my sweet cravings.

I am sharing this recipe which I got to learn from my mother, her way.


Caramelized Peanut Bars / Chikki

INGREDIENTS

2 cups peanuts
1 cup regular sugar
1-2 tbsps. ghee/ clarified butter
1 tsp. cardamom powder
1 tsp. ginger powder (optional)

DIRECTIONS

Grease a flat steel plate with some ghee and set aside.

Roast the peanuts on a medium low flame, stirring frequently till they change their color to golden brown and become aromatic.

Take the sugar in a kadai or a heavy-bottomed pan. Heat it on a medium low flame stirring continously till the sugar melts and begins to turn golden brown. At this stage we need to keep a constant eye on the sugar syrup. When all of the sugar melts completely, switch off the flame and add in the peanuts quickly. You need to be swift and quick here. Just before you stir in the peanuts, add in the cardamom and ginger powder. Quickly stir all of the peanuts into the sugar, mix well and transfer it to the greased plate. Smooth the prepared chikki with the back of a flat wooden spoon. Using the tip of a knife, drag lines across to form sqaure/bite sized pieces. Allow to cool then break them off.


These can also be made with jaggery as well. Infact, traditionally I believe jaggery was used. Jaggery takes more time generally than sugar and getting right consistency is a bit tougher than that with sugar.

These chikkis can be stored for a couple of days in an airtight container, in a cool, dry place. I have made similar chikkis with Til/Sesame in the past. I could cut them into prefect squares, however this time around I delayed a bit and couldn't get them in desired shapes. Nevertheless, they taste great. So who's complaining!

Lemon Mint Spiced Drink


We had a day off yesterday. We made mighty plans for the May day. Husband dear had planned to take our little daughter and me out to the jungle to show the wild habitat. A trip to Bannerghatta national park for our little toddler followed by the jungle safari was on our agenda. The day before, I got busy scuffling through the bags packing bottle and baby food required for the little one the next day. We were eagerly looking forward to spending an entire day outside in the jungle along with the company of lions and tigers. Plans flopped when my husband found out that the zoo and jungle safari were closed Tuesdays. Instead, we made it to the Namma Metro ride in the late afternoon, followed by a stroll on Brigade road, some cold coffee to soothe our thirst, return ride by Metro and called it a day.


For the day we had a hand, we relaxed through the morning wrapping up regular kitchen chores. The little baby went to her usual nap post her breakfast and I got busy cleaning up the kitchen counter. A small bunch of mint leaves, picked and washed left over from the morning breakfast of Pudina Paratha lay untouched. A green chilli lay there right next to it. I probably forgot to use all of the mint and chillies.

This Lime n’ Mint Spiced Drink was a welcome outcome of my forgetfulness :).


Lime n’ Mint Spiced Drink

INGREDIENTS

Juice from 2 limes
Handful of fresh mint leaves
1 green chilli
500 ml. chilled water
Salt & Pepper to taste

DIRECTIONS

In a blender, add a handful of fresh mint leaves along with a green chilli and blend well. Add in about 50 ml. water, lime juice and salt to taste and blend again. Transfer to a tall glass jug. Top it up with remaining cold water and shake well. Add in more lime juice if you like it tart and tangy. Stir well. Serve.


Lime juice served cold with mint crushed in a blender along with a green chilli, salt and pepper is a warm drink that can do equally good to you on chilly winters or hot summer noon. To keep it rustic, I did not sieve through. But if you want it clear, just sieve through and serve chilled. To make the drink pretty, just dip the rim of glass in some of the juice, roll it over some salt and then pour the juice. Stick a lime slice on the side and you are set to go!

Broken_Wheat_Dalia_Upma_1


So we were off to Delhi and then Punjab for a couple of days. A trip that promised us a well deserved holiday, travel and loads of fun. Apart from the series of celebrations and the wedding, it was an excitement to explore more of Punjab frontiers that I had never been to. I feel rejuvenated just as I am back from our Delhi Punjab trip. Undoubtedly as it's known for, both stood out to be a thorough gastronomical feast to our ever hungry selves. If Delhi's metro ride seemed ultimate fun and an easy route to curb the traffic, Amritsar's exquisite Golden Temple was a devout treat to our eyes and peace to our reverent soul. While streets of Jalandhar brought similarities to the small town down like Mangalore, what set them apart is probably their difference in culture, language and food. A food that realms under magical addiction of ghee and butter, served with love and passion for relishing and feeding.

North is famous for culinary creations. I was looking forward to the most coveted Amritsar's Temple Langar, supposedly a must visit if you are around this place. Baisakhi brought in huge volume of devotees and the unending queue to visit the temple premises, following the Langar left us disappointed as we couldn't make it. However, right outside the temple, Bhrawan Da Dhaba blew me off with those fresh Laccha Parathas and Tandoori Kulchas, served with a massive dollop of melting butter, a food fit for kings. Being back home feels good. After all that travel, excess indulgence in food and celebrations, it’s a relief to our tummies and rejuvenated selves. Dalia or broken wheat upma that I made back home gave us a respite from all that heavy foodie indulgences we had over the holiday.

Broken_Wheat_Dalia_Upma_2

Dalia Upma / Broken Wheat Upma

Inspired by Tarla Dalal’s book, Healthy Breakfast
Also available on Tarladalal.com


INGREDIENTS

1/2 cup broken wheat /dalia
1/2 cup chopped onions
1 slit green chilli, chopped
1/2 tsp. grated ginger
1/4 cup green peas
1/4 cup carrot cubes
1/4 tsp. mustard seeds
4-5 cashews
2 tsp. oil
Salt to taste

 To Garnish

2 tbsp. chopped coriander
A dash of lime juice

DIRECTIONS

Clean and wash the broken wheat thoroughly. Drain and keep aside. Heat the oil in a pressure cooker. Add the mustard seeds. When they cackle, add the onions, cashews, green chilli, and ginger and sauté till the onions turn translucent. Add the green peas, carrots, broken wheat and salt and sauté for 3 to 4 minutes. Add 1½ cups of water and pressure cook for 1 whistle. Before serving, add a dash of lime juice to zing the flavors. Garnish with the coriander and serve hot.

Broken_Wheat_Dalia_Upma_3

While on our journey, a couple of my favorite cookbooks kept me and my little one engaged with their recipes and eye catchy photographs, also my ways to wield travel boredom. This Dalia upma by Tarla Dalal was one of the recipe from that cookbook I am hooked to, ever since it caught my attention. Dalia, a food I always considered was fit for the sick and patients, this recipe changed my perception then on. I make upma very often and using dalia is a good twist to the original upma. I’ve made this umpteen number of times and we all love the way it transforms a boring ingredient to an exotic, healthy breakfast dish.