Happy Birthday my dear bloggy... ! Veg Bowl! turned another year older this month. And that's another milestone crossed with two years complete. I can't believe time is swiftly speeding away. It's like a blink of an eye, feels yesterday when I initiated this blog. It's crossed two years now, real fast. The blog's been on bloom, growing through the journey positively and it's been a pleasant one.

Change is constant and with this change is a ceaseless effort to improve my posts, photos, content, outlook and more importantly a balance in the variety of recipes I post. Along this journey, I have grown too and bettered as a cook. I have constantly drawn inspiration from many sources through this journey. Blog hops, magazines, cut outs, pamphlets and newspapers did not cease me any less to be inspired. A stroll into a book store or crossing a magazine stand in a supermarket would grab a second glance, my eyes peeking around eagerly looking out for cookbooks, that pick and flip through the magazine for an arbitrary hunt for recipes, capturing them to reserve in a corner of my mind so that I can replicate it back home.


I have received an unabated support and constant inspiration from my peer bloggers, friends and readers who have been kind enough to drop their suggestions, feedback and comments, either on blog or through emails or word of mouth. The response I have received has been over-whelming. Thanks guys for all the support and encouragement I have received from you. It has been motivating indeed.

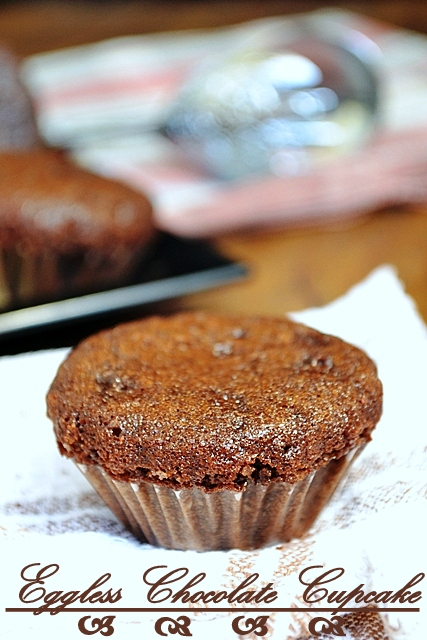
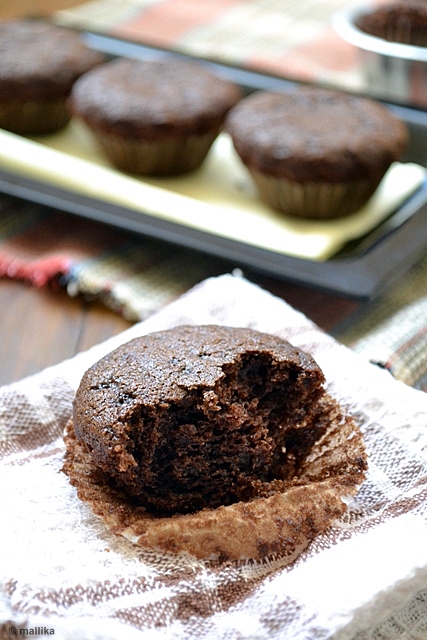
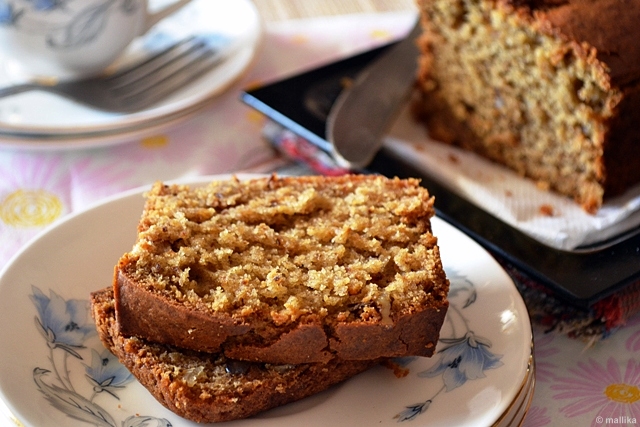
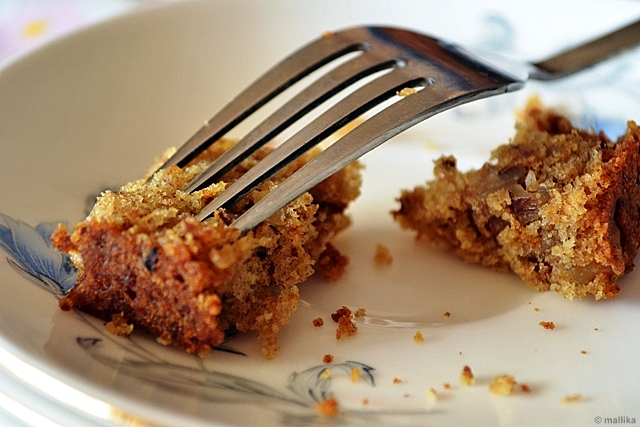
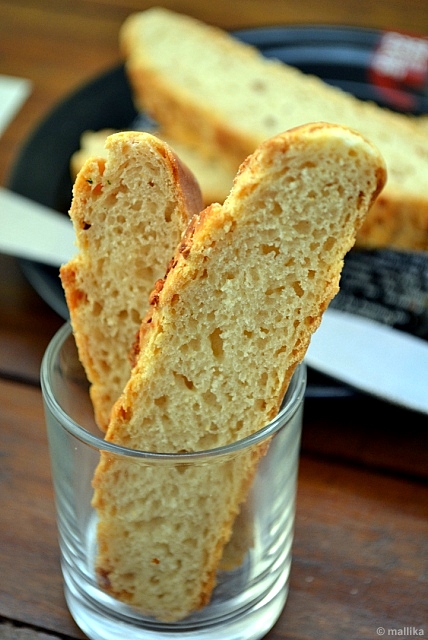
For the second anniversary, I wanted a sweet treat, something that's simple, easy, yet signifying the celebration called for. I picked this Date and Walnut Loaf inspired by the recipe I chose from my Big Book of Baking. The book says use of an egg, however I have made an eggless version of the same, substituting the same with a teaspoon of baking soda and powder each.
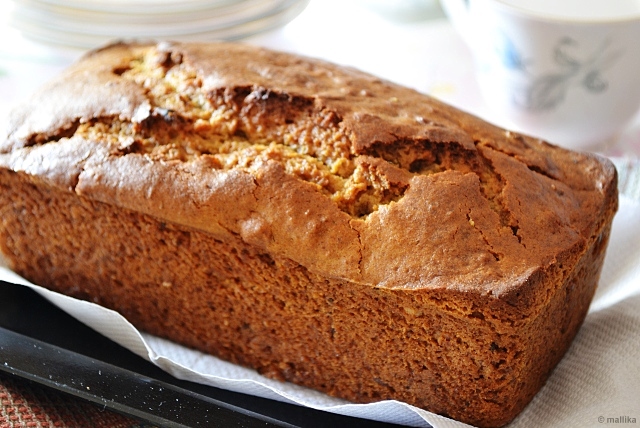

Date & Walnut Loaf

Minimally adapted from Big Book of Baking

INGREDIENTS

1 1/2 cup plain flour
1 cup sugar
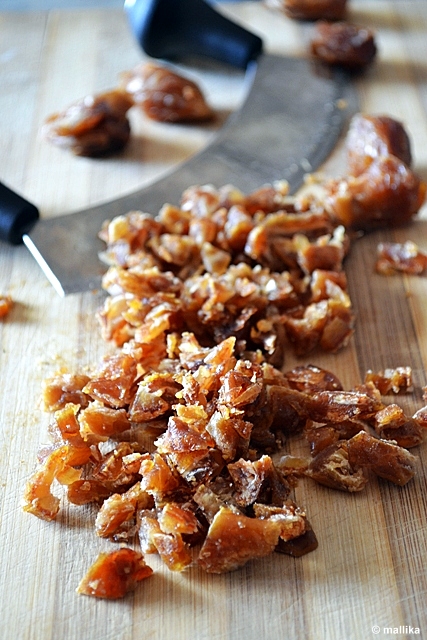
3/4 cup pitted dates, chopped
1 cup hot milk (substitute for non-dairy milk of your choice for vegan version)
1/3rd cup butter (substitute for non-dairy butter like earth balance / vegetable oil of your choice for vegan version)
1 tsp baking soda
1/2 tsp baking powder
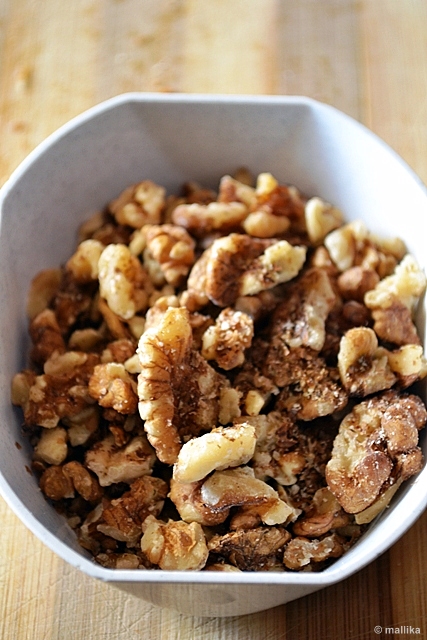
1/2 cup chopped walnuts


DIRECTIONS

Preheat oven to 180ºC. Grease and prepare the loaf tin by smoothing some butter on all the sides.

Place dates and hot milk / vegan milk in bowl and allow it to stand for 10 mins so that the dates soften. Pulse this in a mixer till the dates combine with milk and resemble a smoothie texture. You may leave it coarsely ground if you like those few fruity pieces coming through the cake as you bite into them.

Beat the softened butter / vegan butter and sugar together till it's fluffy. Add vanilla. Stir well again. Add the dates milk mix to this and stir well again.

Sieve the flour in another bowl. Add in sugar, baking powder, soda into it. Mix them well.

Make a well into the dry ingredients. Pour in the wet ingredients and mix till they just combine. Finally add in walnuts. Spoon mixture into the loaf pan, bake for 30-40 minutes until done.


Pardon me for my infrequent blogging and response. I know it has been sluggish than ever these days. I may not be able to give my due attention to blogging. I shall soon take a break from blogging to embrace tasks that will take priority in my life in the months to come. I am soon stepping into motherhood and this promotion comes with a lot of anxiety, joy, nervousness, tension and excitement. After going through months of emotional and physical upheaval, as we step into parenthood, we look forward to a brighter life with the little new one to come. Our lives will change forever, for the good. We need your prayers, best wishes and loads of good luck. Thank you for all the constant support and encouragement, I hope you guys still stand by.


Recipes that are super quick and take barely few minutes are always on my menu list. As a working woman, these recipes are a great rescue, real time savers. Mondays through Fridays are time when I breeze through my kitchen, washing, cleaning, cooking as fast as I can, to make time for packing lunch or dinner for both of us and rush to work. You can imagine our mornings like a movie played in a fast forward mode! Sometimes, it's a crazy rush we deal with!


Cooking has to be full fledged, be it any day. Especially if it's lunch... rice or rotis, a dal, a vegetable subzi, papad, pickle, yogurt... yes I love all of it on my plate. And it's only when I see my plate full in it's standard fashion, would I be completely satisfied.

With such routine that's streamlined by me, I don't like to bend my schedule when it comes to food. For those days when I am in hurry, I have a few recipes which are boon to me. They are quick, easy, require the basic ingredients off the shelf. A few ingredients I always have in stock are masala powders like fenugreek, cumin and coriander powder which add great flavor and body to recipes which are simple and basic, yet extremely flavorsome. Potatoes, though not my favorites, are always in my stock for their good shelf life, also a great rescue on days when I run out of greens and vegetables in my kitchen.


One such recipe which I humbly learnt from my mother is this Sukhe Aloo or simply translated to Dry Spiced Potatoes have always been our favorites.

Sukhe Aloo

INGREDIENTS

2 large potatoes, chopped to cubes
1 tsp good quality asafeotida/hing powder
1 tsp fenugreek/methi powder
1 tbsp coriander/dhaniya powder
1 tsp jeera/cumin powder
1 tsp red chilli powder
1 tbsp vegetable oil
Salt to taste
Coriander leaves & lime to garnish


DIRECTIONS

You may either use pre-boiled and diced potatoes or freshly cut potatoes. If you use boiled potatoes, the oil consume is lesser compared to the latter. If you have boiled potatoes at hand, this makes the recipe much faster, taking less than 5 mins to complete the recipe.

In a frying pan, heat a tbsp of oil. When the oil is hot, add in all the dry spice powders, the hing, methi powder, coriander powder, cumin powder, red chili powder and quickly stir fry for 15-20 sec. Don't let the spices burn, else they will turn bitter and lose their flavors. Add in the potatoes and coat them well with these spices. In case you use boiled potatoes, stir fry everything for about 2-3 minutes till the potatoes heat through and the spices coat the potatoes well. If using freshly cut potatoes, you may add another teaspoon of oil. Cover and cook for few minutes till they are done. Add a dash of lime and garnish with coriander leaves.

Just a few dry spice powders go into making this dish exotic and flavorsome. Do not miss on hing and coriander powder, it's such a perfect medley of flavors. The spice coating on the potatoes take a matter of 2 minutes to be put together, creating an aromatic dish which you will love for sure. Pair with any simple dal and these go great with rotis and rice likewise. Enjoy!


Yet another time of the year when spirits soar high and love is in the nip of air. Town is painted red, roses and hearts have flooded markets in bounty.

Here we have the coveted Valentine’s Day! And here's me wishing everyone a Happy Valentine's Day!

It's Monday and my workplace has been painted in colors of red to keep the Valentine spirits alive. Been asked to dress in shades of reds, a walk into the office and red and white heart shaped balloons tucked into AC vents, hanging from the ceiling have surely got us into a mood. Roses distributed by the Fun club committee at my workplace sit adorning my bay. This helped trigger a gossip amongst colleagues, who's seeing whom, where, what, blah, blah, blah, a great way to boost energy and lighten the Monday blues! Who doesn't love gossip anyways? ;)

My DH loves surprising me. I am a spoilt sport at it. Earlier the day, DH did surprise me with a bouquet of roses, something I had least expected, considering both hardly discussed if we would indeed celebrate the day together in anyway. Both had to rush off to work for a busy day we had to look ahead to. An unexpected me stood bare handed only to receive them. None to return :(


Color red amazes my eyes, it's bright and peppy. Fiery as it is, it has a calmer effect on thy self. The color brings in life, passion, energy... perfectly right for the significance of love. If not a celebration for the day, I am happy to be soaked in it's colors for the moment.

Last year I had the time at hand to bake a cake for two. This year was different. I had in mind to bake something special, but couldn't make the time called for it. Hence these simple Eggless Chocolate Cupcakes are great for sudden rescue. A decadent solace!


Eggless Chocolate Cupcakes

INGREDIENTS:

1 1/2 cups plain flour
1/2 cup unsalted butter
3/4 cup cocoa powder
1 cup powdered sugar (plus or minus a tbsp depending on your taste)
1 cup milk/soy milk
1/2 tsp vanilla extract
1 tsp baking powder
1/2 tsp baking soda

DIRECTIONS:

Pre-heat the oven to 180 degree C. Arrange the paper liner into the muffin cups.

Sieve the flour, cocoa powder, powdered sugar, baking powder, baking soda in one bowl. Mix well.

In a separate bowl, add in all the wet ingredients like the unsalted butter, milk and vanilla extract.

The recipe is fairly simple. Add the wet ingredients into dry ingredients and gently fold till its well combined. Transfer the cake mix into the prepared muffin cups. Bake approximately for 20 mins or till done.


The cake is not too sweet, just right for our tastes. Taste the batter and add in more sugar if preferred. The cake almost has a texture of sponge cake. Moist, yet extremely soft and chocolaty. Add in a few chocolate chips to the batter and it will leave you totally amazed. Probably a topping would have made these more sinful. But who cares? These were decadent as is. Small bites, yet absolutely heavenly!

I am almost mastering the art of eggless baking. A few flip flops, a few successful attempts, I am getting to know the knick knacks of a successful eggless baking. It's been fun and I am enjoying it thoroughly for sure. I hope this makes a great treat for your Valentine and you too. Enjoy!

I am sending these to the Monthly Mingle theme "Small Bites – Soul Food for your Loved Ones”, hosted this month by Astrid @Paulchen’s Food Blog.


Cooking at home is mostly Indian, a mix of both North Indian and South Indian cuisines. There's little scope to experiment with recipes on week days, since I owe time outside home and kitchen too. It may vary depending on what's on stock in my pantry... from being Rajma Chawal one day to Anna Saaru the next day. My weekends however are reserved to extensive work outs in kitchen... experimenting with more diverse flavors, cuisines that go beyond our comfort cooking, it's an attempt to recreate my favorite cuisines in my own kitchen, be it Indian or international.

Italian cuisine is such a favorite with us that I inevitable end up either making my beloved pasta, lasagna or pizzas at home over the weekends. Be it picking the right ingredients from the store, making pizza dough from scratch or putting together the herbs and spices for ragu, I love it all.

Ever since I first tasted Pasta with Arrabiata sauce, I have been hooked to it. Also, been incessantly on look out for good recipes to replicate them at home. I haven't understood exactly what an authentic Arrabiata sauce is like, since most Arrabiatas that we have had in restaurants have slight variations in flavors. I guess it comes from the herbs used. But yes, arrabiatas have a thing in common and that's the heavy tang from tomatoes, which I totally adore.


While I am a spaghetti person and love the noodle strands, my husband loves pastas in every other form, be it penne, fusilli, macaronis. Give me a choice and I would pick spaghetti. My Mr. finds it too clumsy to swivel the fork around the noodle and pick them. Probably a sound reason why he chooses Chinese Fried rice over Hakka noodles. Anything, other than the noodle shape. Period. Astonishingly, his evergreen love for Maggie noodles still hold strong roots. There's something in there which hooks men to their beloved Maggie!

A few months ago, I lay my hands on the cookbook 'Vegetarian Cookbook', picked from Crossword. A hard-bound book with some good vegetarian recipes from all over the world, some good photography to accompany it, this undoubtedly would you leave you with cravings and hunger pangs. The book has been with me for a couple of months and the recipes are simple, yet worth the attempt. Pasta all'arrabiata was a winner recipe for me, pretty close to perfecting the flavors we get in an Italian restaurant. A little modification was required in terms of ingredients like dry wine and pecorino cheese which is far from my reach here. May be, you should give an attempt to agree to this.


Penne al'arrabiata (pasta in tomato chilli sauce)

(Adapted from Vegetarian Cookbook)

INGREDIENTS

150 ml dry white wine (I skipped this)
2 tbsp sun-dried tomato paste
1 aubergine, chopped to squares
2 red chillies, finely chopped
2 pod garlic cloves, finely chopped
350 gm penne pasta
4 tbsp chopped fresh parsley
Salt & pepper
Fresh pecorino cheese, to garnish (I used grated cheddar cheese)

Sugocasa

4-5 tbsp extra virgin olive oil
1/2 kg ripe tomatoes, finely chopped
Salt and pepper


DIRECTIONS

First make the Sugocasa, the sauce. Heat a tbsp of oil in a fry pan over high heat until smoking. Add the chopped aubergines and cook till tender. Set aside. Again heat the remaining oil in a fry pan over high heat until smoking. Add in the tomatoes and cook stirring frequently for a few minutes. Reduce the heat and cook gently for about 20 minutes, or till very soft. Season to taste with salt and pepper. Press through a sieve and strain to a saucepan.

Add the tomato paste, the red chillies and garlic to the sugocasa and bring it to a boil. Simmer gently. Add the stir fried aubergines. Taste the sauce. If you like hotter flavor, add more chillies. Adjust the seasoning and stir in half of the parsley.

Meanwhile, bring a large saucepan of lightly salted water to a boil. Add the penne pasta and cook for 8-10 minutes till tender, yet firm to bite. Drain the pasta and transfer to a warmed bowl. Add the sauce and toss well to coat. Sprinkle remaining herbs and garnish with cheese shavings.


Addition of aubergine was not a part of the original recipe. You may add mushrooms, courgette, zucchini or other vegetables of your choice. In case you don't like the bite from chillies, use chilly powder instead like I did. Also, sun-dried tomato paste may not be an easy access to all, hence substitute with thick tomato paste. My pastas are doused in sauce and that's how I like my pasta saucy, so I tend to make a little excess of the pasta sauce always. That's explains why my pasta has a rich red color.

I love to toss my pastas with a dash of mixed Italian herbs, imparting it a nice flavor. While the basic recipe for the pasta remains the same, I have tried the pasta with basil instead of parsley. That too renders awesome flavors with a slight variation in the herbal notes. Serve the pasta hot with garlic bread. This recipe is a keeper for sure and since pastas so often appear on my kitchen counters, I am sure to make this again and again.


Mind you, I am not a pudding person. Neither do I much like the bread pudding combination, unless it were perfectly made and presented to me camouflaged. Clichéd as it may sound, I have a huge fetish for a perfect Crème Caramel or a Crème brûlée. Hardly do people who know me know that one of my deepest craving comes for those dreamy, creamy custards which are rich, thick and delicious, yet silky light in texture. I can pretty much surrender myself to neat caramel flavors, succumb my teeth into such creamy delights and eat it to my hearts content!


Crème caramel is a variant of plain custard (crème) where some sugar syrup, cooked to caramel stage, is poured into the mold before adding the custard base. It is usually cooked in a bain-marie on a stove top or in the oven. It is turned out like crème renversée and served with the caramel sauce on top. (Source: Wikipedia)

I have made Caramel Custard a couple of times and that was only method I learnt from my mom. She graced her well chalked meals with desserts like these for parties and get-together when we were kids. That was a thing of the past. That apart, the regular custard is so common in Indian homes, that it needs no mention here. I always have a stock of pudding mix for those uncalled occasions of sweet tooth tantrums, when I like to whip up some simple fruit salad or may be just plain custard to accompany a scoop of ice cream. A craving again for some Crème Caramel hit hard on me recently and out of the blue, I decided to attempt an eggless version of Crème Caramel.


Eggless Crème Caramel

INGREDIENTS

30 gms of sugar
1 tbsp water
Store bought custard/pudding mix or homemade custard base as per the procedure mentioned here
1 tbsp agar agar
25 ml cream

DIRECTIONS

Make the Caramel base:

Sprinkle about 25-30 gm of sugar along with a tablespoon of water and heat it on a pan. Swirl the pan across the heat gently and let the sugar just begin to melt. Do not stir it. Keep an eye on the sugar as it begins to melt and change the color to amber. There's a thin line of difference between caramelizing and charring. Once the sugar gets a nice golden amber color, it's close to caramelization. It will soon take over a deeper golder brown glow. Remove from the flame immediately as the heat will make it darker further. If it darkens too much, it will take over a bitter taste. So be careful and quick with this. You can prepare this caramel either in the custard mould or transfer the prepared caramel to moulds and allow to set. Transfer it quickly as it will harden in no time. In case it hardens before you transfer to the moulds, you warm up the caramel again which will liquefy the syrup. Do not touch as it will be hot enough to burn your hand.

Prepare the custard:

Prepare the custard as per the procedure mentioned here. If using a store bought pack, follow the instructions as on the pack and prepare the custard/pudding adjusting the sweetness to your taste. Dissolve a tablespoon of agar agar in 25 ml of cream and bring it to a boil. When the flakes dissolve, add this to the prepared custard and whisk well. Once prepared pour the hot custard into the caramel prepared moulds. Cover with a cling film and allow it to set well in the refrigerator for a couple of hours. It's best to leave it overnight.


Prepare Pralines:

The procedure to make pralines is similar to preparing the caramel base mentioned above. Heat a tbsp of sugar with half a tbsp of water and swirl the pan gently, till it reaches caramelization point. Once it turns to thick golden amber color remove it from heat immediately and spread on a greased plate. Allow it cool completely. Using a mortar pestle, crush the praline roughly. You can use nuts like roughly broken almonds and cashews to make nutty pralines.

Pralines give nice crunch to desserts and can be used to top ice creams too. Pralines tend to absorb moisture, hence should be served fresh on desserts.

I adore vanilla flavors and as traditionally claimed my Crème Caramel has it's custard base flavored with vanilla. I may probably want to try more flavors in future, but I leave that to my mood. This dessert consisting of a rich custard base topped with a contrasting layer of hard caramel is normally served cold. I topped this with some homemade crunchy pralines before serving them, just a sprinkle of pralines for a light crunch, also to keep it low on sweet.

I am sending this dessert to Ally where she's hosting Delicious Desserts which comes with a yummy dessert book as a giveaway!


While December 2010 saw cold waves through the country, January, this winter continues to be a chilling season for us, but with a reduced intensity. The weather has been chill and crisp in the dawns and early mornings, while it gets very hot in the noons. Nights turn to be colder again with winter breeze hitting and foggy mornings greeting us again. It's comforting however to wake up and enjoy a cup of hot tea, envelop ourselves in warm winter clothes and head towards chill morning walks to the nearby layout where beautiful flowering trees adorn the streets and birds sing in their full glory.


We love being the nature lovers and this walk amidst the beauty of nature helps us begin our day on a positive note, to unwind ourselves, preparing us for the hectic, tumultuous work packed day that lies ahead of us. As we walk through the foggy mornings, geared with binocs, which happens to be my husband's favorite gadget off late, we pause at the chirp by the birds we hear. DH takes his time and pleasure in bird watching, a hobby that keeps him active and going through the day. I am clueless on what species they belong to, but I do get a regular dose of knowledge from him in this aspect. An excitement on his face is worth capturing a hundred clicks when he spots rare species!

While that keeps him occupied, I spend my time to see the beauty of nature through greenery, flowering trees, fruits, cactus, even weeds, in various shapes, forms, bounty colors that leave me amazed on how God has made this world such a beautiful place. I love these walks through trees lining the layout streets, be it the banyans, the almond trees or the floral beauty of bougainvilleas which adorn the fences of the villas, the withering leaves in different shades of greens and browns make me happy and the time spent worthwhile.


Back home, this creates a mood for me to make dishes that are comforting and immensely satisfying. Warm dishes which compliment the cold weather that we have now. Dishes which are traditionally simple, infused with flavors from earthy spices like ginger and pepper which create an aromatic breakfast when served on the table. The spices are naive and basic, making the dish humble. An addition of a dollop of ghee or clarified butter creates a magic and adds steep exotic flavors in this dish.


Broken Wheat Pongal

INGREDIENTS

1 cup moong daal
1 cup broken wheat
2 tbsp clarified butter/ghee
1 tsp cumin seeds
1 tsp chopped ginger
3 chopped green chilli
1 tsp whole peppercorns
A sprig of curry leaves
Salt to taste
A handful cashew nuts


DIRECTIONS

Wash and clean the moong daal and broken wheat and keep it aside. Lightly crush the whole peppercorns and keep them aside.

Next, heat two tbsp of ghee in a wide mouthed pressure cooker pan. Add cumin seeds. When the cumin seeds turn fragrant, add chopped ginger, green chillis, torn curry leaves and whole and broken pepper. Stir and fry them for a few seconds.

Now, add the moong daal and the washed broken wheat to the above spices. Add sufficient water to this. Add salt to taste. Close the cooker and allow it to whistle thrice. If you do not have a pressure cooker at hand, use a regular cooking pan and cook the daal and wheat till they turn soft and mushy.

Meanwhile, roast cashew in the ghee and keep aside. Once the cooker cools down, add and garnish with the roasted cashews.


Traditionally, rice is paired along with moong dal to make this Pongal. However, I made an attempt to use broken wheat as a substitution for rice. It barely makes any difference. This dish is best served hot with tomato raita or any chutney of your choice. I like to call it our 'South Indian Khichdi' which does good when one is ill and down with poor health.

Subtly flavored earthy spices complement each other so perfectly. We are at the fag end of the winter season and this is such a comfort dish I love to binge on, a dish that brings out warmth with every bite, perfectly suited to bid goodbyes to the winters, welcoming the sunshine that the summer will bring along.


Friday, the 14th January was an eventful day for us Bangalore Bloggers. USA Pears company called out for a bloggers and media meet at Caperberry to celebrate and promote USA Pears festival. This event came into light when Madhuri of Cook-Curry-Nook contacted me asking if I would like to be a part of this bloggers event. I lost out on similar events in the past and didn't surely want to skip this chance. Least, to meet the bloggers whom I have associated with virtually till now. I was looking forward to this.

I quickly nodded a yes to Madhuri, but still unsure on the back of my mind if I would be able to make it to the event. Considering that Friday is a working day for me I pondered if I would actually get a day off from work, since it was festival time and many at my workplace would have planned leaves in advance to get a nice stretched weekend. However, I was fortunate to get a day off and consider lucky enough to attend this event which was scheduled at noon 12.30 pm - 2.30 pm.


It was a quiet food testing and tasting event attended by few bloggers and media personnel. Caperberry on Dickenson Road, a neat and an aesthetically designed art studio cum restaurant was a perfect host to this event.


The imported Pears offered by USA Pears for tasting were sweet with a buttery texture, unlike the Chinese counterparts which have grainy texture similar to apples. Though I have tasted California Prunes and Apples from the same company and also and used them in my recipes earlier, these imported Pears were the first time for my taste buds. To begin with we had an introduction to US Pears from their representative, Rachana who explained well their distinction from the Chinese counterparts. This sweetness and texture make them fantastic ingredient in cocktails, drinks and desserts.


Most of us bloggers being vegetarians did not have any difficulty in choices. Menu was limited and had veg and non veg options to choose from. The cocktails offered had a good variety to chose from and they weren't disappointing at all. Pear dominated the main course too. For the main course, I chose White Wine Poached Pears and Mascarpone Ravioli with Rosemary Butter Sauce. Bland as Raviolis tend to be, I consider the Grilled Pears Stuffed with Cherry Tomato Mozzarella and Pesto better in body and flavor. It's a must try if you plan to visit this place. It was Pears on every course, on every plate!


We hoped there would be a live demo of cooking with Pears, but unfortunately as a testing and tasting event, there was no live cooking demonstrated. Chef, Abhijit Saha took some time out to answer queries we had on cooking with Pears and was kind enough to answer them all.

We are prone to think that fruits always pair well in desserts or drinks, rather than being a core ingredient in a main course dish or a savory. This festival helped break all the traditional norms and school of thoughts. It showed us how well one could use a fruit and pair it with complimenting ingredients to create an exotic dish.


The festival offered us a good chance to taste some great imported US Pear and I hope to use more of these in my forthcoming cooking.It also gave me an opportunity to meet some of the food bloggers whom I have connected only through the web space till now.


Wishing all my readers a Happy Lodhi / Makara Sankranthi / Pongal. Lodhi, Pongal, Sankranthi, all signify a festival of harvest in different names in the vast and diverse culture of our nation. It also marks the end of winter season. This festival is celebrated in innumerable ways across the country depending on the climate, location, agricultural environment and cultural background of the people.

Though we don't really celebrate this festival with much grandeur at home, over years we've made sure that atleast a traditional sweet dish accompanies our regular lunch course, in a way saying that we did celebrate the festival in a small way :) From the time I have taken over my kitchen, what I love cooking during Sankranthi is two versions of Pongal, the sweet and the spicy one. While I have a huge inclination for the spicy version, which I like to make often apart from the festival itself, the sweeter version is more popular with my husband. It renders him some sweet memories of his childhood.

Ideally on this day, what you would probably expect from me is a post on traditional recipe here. Unfortunately, it's been a hectic day for me and I have been unable to take pictures of what was cooking in my kitchen today :( To begin the day with, it was Kharabath for our breakfast, followed by Gajar ka halwa and Sweet Pongal. I've had a busy day apart from just being in the kitchen, but I promise that I will definitely post my recipes for this in the future posts... though I know they wouldn't be as apt for the day today. But for the day, I have an Eggless Mango Cheesecake to offer you which I made a week ago.


Eggless Mango Cheesecake

INGREDIENTS

For the Base:

100 gm digestive biscuits (I used Fruit and Nut Biscuits here)
50 gm melted butter

Cheesecake Filling:

100 ml 25% fat cream
150 ml mango flavored thick yogurt (I used Amul's Aam Srikhand)
50 gm cottage cheese
4 tbsp castor sugar (or to taste)
1 tbsp agar agar / gelatin
1 tsp vanilla essence

Strawberry slices for garnish


DIRECTIONS

Line the sides of a cake tin with a cling film such that extra portions of it hang out. In case you are using a spring form pan, this step may not be required.

For the biscuit base: Put the biscuits into a ziplock bag & crush them to fine powder with the help of a rolling pin. You may also powder the biscuits in a mixie or food processor. I used Fruit and Nut biscuits for a better crunch. Remove and add in the melted butter and mix them well. Press this mixture into the base of a spring form pan or a lined cake tin. Chill this base for 30 minutes.


Pulse the cottage cheese to a fine puree along with 75 ml of the milk cream and vanilla. Whip enough to give it volume. Add in thick mango flavored yogurt. I made a cheat version by using Amul's Aam Srikhand which saves a lot of time and has a considerable thickness too. Add castor sugar to taste.

Dissolve a tablespoon of agar agar in the remaining 25 ml of cream and bring it to a boil. When the flakes dissolve, add this to the above cheesecake mix and give a final vigorous pulse so that all the ingredients are well combined. Transfer this mixture to the prepared biscuit base. Pat the tin gently to remove any air bubble that may have formed. Refrigerate the cheesecake to set for atleast 4-6 hours. Leave it in the refrigerator overnight or for atleast 6 hrs. Before serving, allow it to sit on the counter for 5 minutes. Garnish with fresh mango slices. I garnished mine with strawberry slices as mango is not in season.


Note: If you don't get Amul Srikhand at hand, pulse thick yogurt like Greek yogurt with thick mango puree till it's homogeneous. Add in desired amount to sugar if using Greek yogurt since Srikhand has sugar added in it .

You can make thick yogurt at home by hanging the homemade curd in a clean muslin/thin cotton cloth and leaving it hung overnight in the refrigerator over a large empty bowl which can accommodate the running liquid out of the curd.

I have a spring form tin at hand now, but despite this I preferred to use my smaller round cake tin for this purpose. With just 2 of us, a 9" inch pan would mean a large amount of cake and we surely didn't want any overdose! The yogurt rendered a nice tart which we loved. Mango flavor is light. The cheesecake set beautifully and turned out creamy and delicious. I would love to make this cheesecake again in future when fresh mangoes rock the summers.


I do hope you guys had a gala year end giving a warm, fabulous welcome to the New Year. Hope you had a lot of partying and feasting in the past couple of days. We had guests over our place and with a crowd around, there is always plenty of fun, frolic, laughter and noise. Pairing it if there's good food and wine, it gets all the more better.

An onset with Christmas saw me baking the Christmas Chocolate fruit cake, followed by the New year partying and a few birthday treats, which had us dining out steadily in the past few days, to an extent that we've resolved that we've had enough of it! I had shelved my cooking on and off during the New year stretch, throbbing the luxury of cooking full fledged meals in my kitchen. It was indeed a well deserved break. However, the commencement of the new year saw us dining out on the 1st, 2nd and 3rd of this month with guests and birthday treats, I sincerely hope this trend does not continue through the year long!


Festivities indeed bring a lot of glamor and color to our lives. During Christmas, we had a Secret Santa game organized at our workplace. It's interesting to get sneaky, wondering what each one of us would gift the other person to be a secret Santa and what we would get in return from our secret Santa, transporting our excitement back to becoming and behaving like kids. On the D-day, the puzzling game of exchanging gifts, then the hush-hush of unwrapping them, the excitement it brought was boundless and visibly noticed on all of us in an animated fashion reflecting the cloak-and-dagger mystery.


My secret Santa gifted me a very pretty coffee mug from Cafe Coffee Day. While I find it too massive for it's intended purpose and the fact that I am not a coffee lover, that does not stop me from using this mug. The coffee mug definitely makes an interesting prop for my photo-shoot and I love it. It also adorns well on my crockery cabinet along side our photo frames. Just fits the theme so perfectly there!

Over the weekend as the guests left, I had time all by myself to bake something for the evening supper and make time for photographing them. Weather was conducive too. Ample time for proofing was done overnight for the yeast to rise and the next afternoon it was ready to go into the oven. Interestingly, I did not follow any recipe per se and just went by my instincts and approximations.


Chilli Garlic Bread

INGREDIENTS

25 g active dry yeast
50 ml warm water
1 tsp sugar
200 g plain flour
50 ml warm water, approximately
Salt to taste
1/2 tbsp oil

Topping:

1/2 tbsp butter
1 tsp finely chopped garlic
1/2 tsp chilli flakes


DIRECTIONS

Dissolve dry yeast in warm water with sugar. Leave for 5-10 mins to dissolve and become frothy. Mix the flour and salt to taste. Add in the yeast mixture and warm water little by little till a soft pliable dough is formed. Cover with a warm towel or cling film and leave it to rest overnight in a warm place like a pre-heated oven.

Next morning, the dough should have risen and doubled in size. Punch it down gently. Knead the dough gently with some flour and oil till it springs back up when pressed. Grease and dust the baking tray with some oil and dust flour. Shape the dough to your desired style and transfer the dough gently to the baking dish. Allow to rest there for about an hour or two for the dough to rise again.

Meanwhile, prepare the chilli garlic topping. Melt the butter in a saucepan. Turn off the flame when the butter is hot, but not smoking. Add the finely chopped garlic and chilli flakes to this and mix well so that the butter absorbs all the flavors well. Brush the top of the bread with this seasoning. Leave the bread in a warm place to rise again. Once risen, bake in a pre-heated oven at 220 deg C for 1 hour or till done. Remove from oven, allow to cool on a cooling rack and slice as desired.


I brushed the garlic chilli seasoning on the bread to bake. However once baked the chilli and garlic fell apart. I suggest you press the garlic and chilli into the bread before baking instead of brushing them on top. Or just brush the warm oil to render the flavors. The bread baked warm and beautifully risen. It had an amber glow on it like that of a sun peeking out on a foggy dawn. Prominent flavor was ofcourse garlic with a hint of spice from chili flakes. I also toasted a few slices of bread under grill and these spicy golden brown sticks were fantastic with our tea.

While it will take some time to come out of the holiday lethargy, juggle back to business and get going into the mold of mundane routine, this break has helped rejuvenate our spirits and spring us back alive in action. At the moment however, we are resting in the cozy comfort of warm spiced tea with some of these homemade chili garlic toasts.

I am sending these to Blog Anniversary Event hosted by Suma Rowjee of Cakes and More.