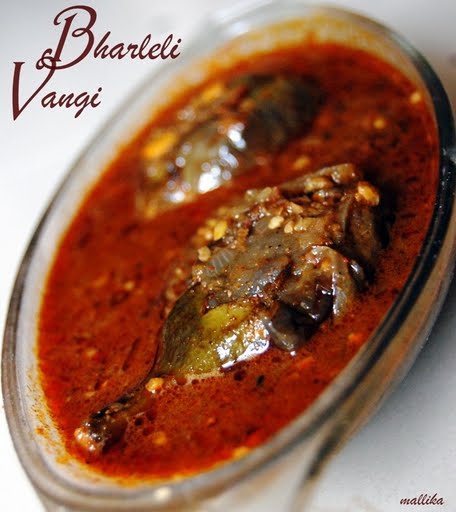
Over years, my mom has regularly made recipes from Maharastrian cuisine and she makes them exceptionally well. She can make a great Bharleli Vangi and her Batata Poha and Sabudana khichdi have been firm family favorites. Owning to the fact that we spent considerable number of years in Maharashtra, our cooking does have a Maharashtrian influence. Infact my dad has lived most of his life in Maharashtra, so this influence came us naturally!

I had not made this till recently I wanted to try something different out of brinjals. Not many like brinjals. Most of the people whom I have come across have either disliked it or are allergic to it. But back at home, it was a personal favorite of my dad's. He would love brinjal in any form and was particularly fond of Badanekai Huli which mom made. Me not being a fussy eater, would eat everything. Luckily, my husband is fond of brinjals too. It has been a common in his house in form of Baingan Bharta or Baingan Aloo ki subzi. This was unique to him and was a definite hit! I am happy!

You will find the similar dish made in the border districts of Karnataka. It's called Badane Yennagai and very commonly made in northern districts of Karnataka like Hubli and Belgaum. It's traditionally had with jolada rotti. The recipe is almost similar with very little or no variation in the ingredients. There are several recipies for the same, with a litte variation in the ingredients used.
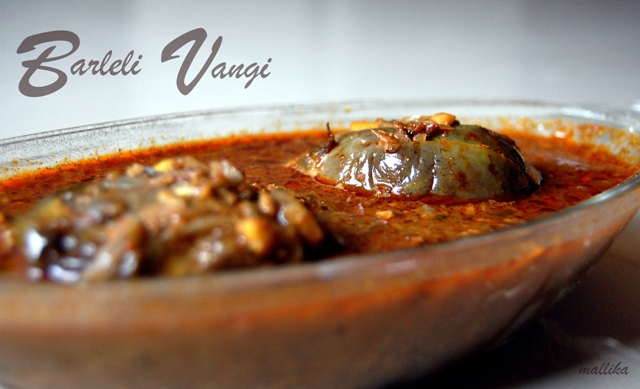

Bharleli Vangi

INGREDIENTS

10 small brinjals/eggplants
2 tbsp oil
1 tsp mustard seeds
1/2 tsp asafoetida/hing
1 large onion, finely chopped
1/2 tsp turmeric powder
A sprig of curry leaves
Few fresh coriander leaves

Dry Roast the following:

6-7 whole red chillies
1/4 cup dry coconut/copra
1/4 cup roasted peanuts
4 tbsp sesame seeds/till seeds
1 tbsp each coriander-cumin seeds

Grind to paste the following ingredients with the above dry roasted mixture:

1 tsp ginger-garlic paste (optional)
2 tbsp Maharashtrian Goda Masala (optional)
1 tsp tamarind pulp
1 tbsp jaggery
Salt to taste

DIRECTIONS

With the stems intact, give four vertical slits (like +) to the brinjals from the top to the bottom. Keep them in salt water for 10 minutes and rinse to remove any bitterness. I avoid this step.


Dry roast coconut, sesame seeds, coriander-cumin seeds and whole red chillies together till light brown. Grind the roasted mixture with tamarind, jaggery, peanut powder, ginger-garlic paste, Goda masala and salt to taste. Stuff all the brinjals with above masala. A little masala may be left over. Do not discard.

Heat oil in a kadai or a non stick pan. Add mustard seeds. When it splutters, add asafoetida, curry leaves, onions and turmeric powder. Fry till the onions brown. Add the brinjals and fry for sometime. Add the leftover masala and 1/2 cup water. Cover and cook for few mins till the brinjals are cooked. I cook mine in a pressure cooker as it saves a lot of cooking time. Give one whistle on pressure cooker so that the brinjals are just done and don't turn too mushy. Remove into a serving dish.

Garnish with coriander leaves. Serve hot with bhakar, roti or rice.

Sabudana Khichdi


Sabudana Khichdi is a very authentic signature Maharashtrian dish. Although this is not very commonly known to many people of other regions/states, one is bound to fall in love with this once introduced. It's commonly made during the fasting days.

My paternal mother would fast every Monday and Thursday. The fast was not meant to starve, but to refrain from consuming wheat, rice, pulses and a couple of forbidden food items. These were days we would wait eagerly for, as she cooked the most awaited dish, Upavaschi Sabudana Khichdi. I simply loved it and I still do it to this day.

During our stay in Khamgaon when dad was posted in Maharashtra, I would eagerly look forward to Thursdays. We would hit the market streets on Thursdays, when this dish along with other Upavaschi uphar was made. Crowds thronged the temples, followed by the streetside hole-in-the-wall shop that stood adjacent to the temple. My complain was why can't this be sold more often on daily basis by more vendors. With this dish being so popular, why not sell it more? But I guess it's so commonly made in all Marathi homes that they would probably not think of buying it outside!

As kids, we loved this dish and looked forward to days when mom made it. But she would resist from making this more often as we always over-indulged. Besides this, sago is heavy on stomach and not an easily digestible food. This is the reason why it is eaten on fasting days so that it helps in beating hunger for longer time. Before leaving Khamgaon, amma picked few packets of good sago. I took some from her and attempted to make them at home... not for fasting, but for breakfast. It was a big hit, as my husband who was not particularly fond of it earlier (he tasted them for the first time in Khamgaon after all my hype) is now a big fan of the same!

Sabudana Khichdi


Upavascha Sabudana Khichdi

INGREDIENTS

1 cup sabudana(sago)
2 tbsp. oil
2-3 green chillies, chopped finely
1/4 cup coarsely ground groundnuts
1 boiled & peeled potato
1/2 tsp. cumin seeds
1 tsp. sugar
Salt to taste
A sprig of curry leaves (optional)

DIRECTIONS

Wash and soak sabudana in water for atleast 4 hours. I prefer soaking overnight. The best method to get perfectly soaked sago would be to drain the water after washing sago. Soak sabudana by adding just enough water to cover them. Do not go above 1/4 inch more than sabudana level. You can sprinkle more water later if required. The sabudana should swell well. You can test them by pinching the granule between your fingertips and they should turn mushy.

To the sabudana, add in crushed roasted peanuts along with salt to taste. This will help to reduce the sabudana granules from sticking to each other while stir frying.

Heat the oil in a pan and add cumin seeds. When the seeds crackle, add finely chopped green chillies and torn curry leaves. Add the sabudana mixture and stir well. Leave the pan uncovered and allow the sabudana to cook till they turn translucent in color. Add the chopped boiled potatoes and cook for another 4-5 minutes. Finally add the sugar and mix well. Turn off the flame and serve hot.


Ask a Punjabi what a comfort food is? You are sure to get a spontaneous answer :) Ask my father in-law and he definitely has a spontaneous answer ;) Many of my previous posts have been on Punjabi cooking. I have close ties with Punjabi cooking and have got to learn a lot from my mother and mother in law. I got to learn the best of Parathas from my mother in law, while recipes like chole, rajma and have been inspired by my mom's cooking. My mom makes amazing chole, so I am bound to have learnt the same from her. I have been applauded many times for the channa chole that I make. I have mastered it well. This was one among the first few complicated recipes I learnt to cook (the list of ingredients do make it sound too complicated, but it actually isn't :D ).

Just before marriage, I once cooked Punjabi chole at home. I sent a batch of the home cooked chole to my to-be-in-laws as well. The next day DH told me that my father in-law complimented me saying that I cooked chole better than my mother in-law. I still carry that compliment close to my heart and it makes me feel so proud!

Today, I share with you the recipe for Punjabi Chole. It is guaranteed to leave your taste buds lingering with varied flavors.


Punjabi Chole

INGREDIENTS

250 g Kabuli Chana, soaked overnight
1/2 tsp turmeric powder
2 tbsp Oil
1 tsp cumin seeds (jeera)
2 bay leaves
2 cinnamon sticks
2-3 cloves
2 cardamom pods

Grind to paste the following:

1 large onion
4 cloves garlic
1 inch ginger
1 green chilli

2 tomatoes, pureed
1 tsp deggi mirch /red chilli powder
1 tsp coriander powder
1 tsp cumin powder
1/2 tsp garam masala
1 tsp mango powder (amchur)
A bunch of fresh coriander, finely chopped
1/2 tsp lime juice

DIRECTIONS

Soak kabuli channa overnight. Pressure cook them in ample water (twice the soaked channa), salt and turmeric. Reserve the extra water from the cooked dal.

Heat a kadai/wok. Add cumin seeds, bay leaves, cinnamon sticks, cardamom pods. Fry for half a minute. Donot allow them to brown, they may turn bitter. Add the ground paste and fry for 2 minutes. Add tomato puree next and cook for a minute or two. Now add deggi mirch/red chilli powder, coriander powder, cumin powder, garam masala and amchur powder. Cook for sometime till the water evaporates and you get a thick gravy. Add the boiled kabuli chana with the water. Cover and cook for all the flavors to blend well. Add a dash of lime juice in the end before serving. Garnish with chopped coriander.

Note: If you want a dark colored chole, you can place 2 used tea bags while cooking the channa. This gives a dark colored chole. Along with this you can also add some imli (tamarind paste) for a tang.


I have been craving to make chocolate brownies at home from a very long long time. I've been holding this craving for baking, only for the fact of not getting a bar of cooking chocolate or unsweetened chocolate. Here in India, any milk chocolate is sugary and the concept of cooking chocolate has not evolved yet.

From a long time, I have been looking for a good brownie recipe made from cocoa powder. I wanted mine to be gooey, moist and deep chocolate-y. I kept researching for several recipes, but was not thoroughly satisfied. Most of the recipes call for unsweetened dark chocolates. I have tried making them at home with cocoa powder and have not been satisfied with the results, Not that they turned out bad, but they turned out more like flat cakes and not the actual brownies I was looking for.

After researching a lot again and being dissatisfied with most of the recipes, I came across this site during the search. This is exactly what I was looking for! A cocoa brownie that does not ask for dark chocolates! Finally! I felt the recipe was perfect and the photos were definitely promising me the brownies I wanted.

With high expectations, I set out to prepare this brownie on my weekend. I am extremely happy with the results and this recipe will surely make to my bookmarks :) We did enjoy a good batch of brownies with evening tea and a few made it to the brownie fudge with vanilla ice-cream.


Best Cocoa Brownies

INGREDIENTS

150 gm unsalted butter
1 ¼ cups sugar
1 cup cocoa powder
¼ tsp salt
½ tsp vanilla extract
2 large eggs
½ cup all purpose flour
½ cup walnuts (optional)

DIRECTIONS

Pre-heat the oven to 350 deg F.

Set a large pan with water on heat. Place small wide mouthed pan on the larger pan in such a way that the water boiling in the larger pan does not touch the bottom of the smaller pan placed on it. The smaller pan should be wide mouthed and should completely cover the pan below so that the steam does not escape. This is called a double boiler.

Melt the butter. Add sugar and salt and stir until well combined. Next add the cocoa powder. Reduce on cocoa if you think it's overpowering. Stir until mixture is smooth. Mixture should be hot, but not boiling. Remove and keep it aside. Don't worry if you find the mixture granulated. It will turn fine on baking.


Add the eggs one at a time. Beat well with every addition. Add the vanilla. Mix again. The batter will look thick and shiny now. Then add the flour and blend everything well. Add in the nuts, if required. I used chocolate chips in mine. Line the baking tin with parchment paper or aluminum foil. Spread evenly on a baking tin.

Bake for about 20 to 25 minutes. Test with a toothpick. The top would look cake-y, center will still be a little moist. That's how we want it to be. Do not over-bake the brownie. Remove and cool completely. Cut into squares or rectangles. Serve warm as is or as brownie fudge with hot chocolate sauce and ice-cream.

My husband says that these were the best brownies that he's ever had. At least, I am glad I do not have to depend on dark chocolate if we ever have a brownie craving. I can make these any day, any time, with the simplest of ingredients sourced.

Avalakkibath Poha

Make Avalakki | Poha Recipe
Avalakkibath. Yet another loved breakfast dish that's commonly made and loved in most Kannada households. This dish finds prominence in Maharashtrian breakfast and snack plates as much as in Karnataka and is commonly called as Poha. There are 2 types in the Maharashtrian version of these... kaanda poha, meaning onion poha and batata poha, meaning potato poha. It's simple, easy to make and we love it both ways. Mom often used to make these on Saturdays or Sundays. Traditionally tomatoes are not added to this dish, but it does taste great and gives a tang with tomatoes. In Maharashtrian style, the urad dal, channa dal is omitted and peanuts are widely used; while in Karnataka style Avalakkibath, the urad dal and channa dal are used and the peanuts are added as optional. The addition of fresh grated coconuts imparts a natural sweetness. I like the use of either peanuts or cashewnuts in avalakkibath as they really give a nutty taste to the whole recipe. My mom uses nuts like cashews and dry grapes many times to enhance the flavors.

Poha


Avalakkibath | Karnataka Style Poha

INGREDIENTS

1 cup beaten rice (thick variety)
2 tbsp coconut oil
1 large onion, chopped
2 green chillies, slit or finely chopped
1 tsp mustard seeds
1/4 tsp turmeric powder
1 tsp urad dal
2 tsp channa dal
2 tbsp broken cashewnuts (or peanuts)
A sprig of curry leaves
Salt to taste
Juice from 1 lime
Fresh coconut for garnish
Chopped coriander leaves to garnish

DIRECTIONS

Wash the beaten rice thoroughly and drain the water. Add turmeric powder and salt, mix well and keep aside. While the poha blooms, proceed to prep the rest of the ingredients such a chopping onions and green chillies.

Heat oil in a kadai/pan and add mustard seeds. Once the seeds begin to splutter, add the curry leaves, channa dal, urad dal and cashews (or peanuts) to it and fry till they turn light brown. Now, add chopped onions and green chillies and fry till transclucent. Next add the beaten rice and gently mix all. Turn heat to medium low and gently mix all the ingredients. Cover and cook for atleast 5 mins. Once cooked, turn off the heat and add a dash of lime juice. Garnish with fresh grated coconut and coriander leaves. Serve hot.


Our first encounter with Baked beans was during our stay in Maldives. Till then we had only heard of them as an American breakfast. I fell in love with them instantly. Since then I have been wanting to try them at home.

The other day as we walked down the regular food store, my eyes fell on these Lima beans. I immediately picked them, not thinking once how I would go about with the recipe. It's only after a couple of researches online, I zeroed to making this for our breakfast.

Baked Beans

INGREDIENTS

1 cup Lima Beans
1 tsp butter
1 tsp Molasses/brown sugar
3 tbsp Tomato ketchup
1 cup water
Freshly ground pepper
Salt to taste


DIRECTIONS

Wash and soak the beans overnight or for about 8 hours. Drain the water and pressure cook the beans in boiling water for 3 whistles. In a pan, saute butter and add the cooked beans. Mix 1 cup reserved liquid from cooked beans, molasses/brown sugar, tomato ketchup and salt. Pour over beans and mix well. Cover and cook on simmer for 15 minutes. Season with pepper. Serve hot with bread toast and a blob of butter.


One of my favorite dal often made back home by amma is this Heerekai tove. There is a sweetness imparted to the dal from ridge-gourd and that makes this different and unique from other dals. Being low on spices, it can go really well with rice or roti and a spicy gravy to accompany.

Here's what we need:

1 Ridge Gourd/ Heerekai
1 Cup split pigeon peas/ Toor dal or Moong dal, cooked
A pinch of turmeric
Salt to taste

For tempering, we need,

1 tsp Oil
1 tsp Mustard seeds
1 tsp Cumin seeds
A sprig of curry leaves
2-3 whole red chillies
A generous pinch of hing/ asafeotida powder
1 Green chilly, finely chopped
1/2 Lemon juice squeezed
3-4 Coriander Leaves

You may use either toor dal (togari beLe) or moong dal (hesaru beLe) for this. I prefer moong dal as it cooks quickly and compliments well with heerekai.

Remove the rough edges on the skin of ridge gourd and chop into bite sized pieces. Do not remove the green skin completely as it contains nutrition. Anyway, this will be pressure cooked in cooker, so removing the skin completely will only result in mushy product after its cooked. So leave the green portion so that the ridge gourd retains some shape. Pressure cook toor dal with ridge gourd, salt and turmeric.

Heat oil in a pan/kadai. Add Add mustard seeds, cumin seeds, asafeotida powder, curry leaves and red chillies. Add the green chilly pieces. Add the cooked dal and stir well. Add water if preferred thin and boil for about 5 minutes. Turn off the stove. Squeeze juice from 1/2 lemon and garnish with freshly chopped coriander leaves. Serve hot with rice or rotis.


Podis are quite traditional to Konkanis. It's commonly called Bajji in Kannada or Bhajias in Hindi. A slight difference would be the use of rice flour and hing. These are made by various veggies and are often enjoyed as side bites in a South Indian meal. Although I am not really fond of bajjis, I do relish them once in a while. My way out eating them may not be liked by many. I discard the fried chickpea covering and enjoy the vegetable alone.

Heerekai PoDi

INGREDIENTS

1 heerekai/ ridge gourd
1/4 cup rice flour
1/4 cup besan/ chickpea flour
1 tsp chilly powder
A generous pinch of hing
Water
Salt to taste
Oil to fry


DIRECTIONS

Slice ridge gourd to rounds of half a cm thick. Dissolve hing in a tsp of water. Mix chilly powder, rice flour, besan (chickpea flour), hing and salt. Add water to make a fairly thick paste. Add water if you like thin, which means lesser coating on the slices. Add rice flour if the mix is too thin. Dip the ridge gourd slices one by one and coated them on both the sides.

Heat oil in a kadai/fry pan till it sizzles. Put few slices, one at a time, giving enough space for the slices to get fried in oil not allowing them stick to each other. Turn the slices upside down and fry till both the sides are crisply fried.

Remove and drain the oil on a kitchen towel. Serve as a snack with tea or with a meal. Enjoy!


Caramel custard brings back my old memories when were were young. This is one of the desserts which my mom would make during party times. Whenever we had parties hosted at home, she would steal the show away with loads of compliments for her caramel custards and puddings. I cannot forget those moments when my mom used to wind up a well planned party with her delicately and deliciously home-made desserts accompanied with vanilla ice-cream.

I adore her as those were times when the world was limited. Back in 1990s, cable tvs were not so common. We were the lucky few who had that privilege then. But then the channels were limited to a handful of about 5-6. That apart home computers were no where in space! So internet was not widely known as now. Despite all this, I still wonder how my mum managed to learn cooking and baking cakes, puddings, biscuits and cookies, pizzas, including grilling, etc. to perfection. We used to live in company bungalows with frequent visits from dad's colleagues and their families. I still remember how enthusiastically she would enquire the recipes from other ladies and then note them down in an old notebook (which is still well preserved at home). Frequent exchange of snacks, side dishes, bakes, desserts were common between homes. With time as cable boomed, more recipe shows on tv helped her. She would never tire cooking and feeding all of us. With all the busy chores, she would often take time out to try new recipes. I admire how she evolved herself with so many limitations.


So here's the recipe for caramel custard:

500 ml milk
100 ml cream
100 gm + 30 gm sugar
2 eggs
2 tbsp vanilla extract

Sprinkle evenly about 25-30 gm of sugar and heat it on a pan. Turn the pan across the heat and let the sugar just begin to melt. There is a very little line of difference between caramelizing and carboning/charring. When the sugar has just melt and gets a nice golden brown glow, remove from the flame. If it darkens, it will get a bitter taste. So we need to be careful and quick with this. Either prepare in the custard mold or transfer to molds and allow to set. It will harden. Do not touch as it will be hot enough to burn your hand.

To prepare the custard, put the milk and sugar in a pan and bring to a boil. In the meantime whisk the egg yolks well. Allow the milk to cool down. Once warm, incorporate the milk to the eggs slowly mixing well. Add the vanilla extract and transfer to the mold. Place the custard bowl in a larger bowl of water and bake for 20 minutes till done.

Leave to cool and refrigerate for 2 hours. Place a serving plate on top of the set custard and invert instantly. Serve cold.


Mild sweetness with silken smoothness that promises to melt in your mouth. What I love about custards! Enjoy!


Where do I start and what do I say about this dish! For someone who visits Bangalore, they are bound to make acquaintance with this breakfast/snack dish. Kharabhath is a typical Bangalore breakfast and widely available in every hotel and eatery joint of this city. It's spicy and is generally served with Kesaribath which is a sweeter counterpart. This sweet-spice combo is called as ChowChow Bath and is loved by most Bangloreans. In other parts of Karnataka, minus the tomatoes and it's called as Upma. It is quite filling and can keep you away from hunger for hours!


Kharabath

INGREDIENTS

1 cup Rava/Sooji (Cream of Wheat)
1 large onion, chopped
2 green chillies, slit or finely chopped
1 large tomato, chopped
3 tbsp vegetable oil
½ tsp mustard seeds
½ tsp cumin seeds
A pinch of turmeric powder
1 tsp urad dal
1 tsp channa dal
¼ cup roasted peanuts
A sprig of curry leaves
Fresh coriander leaves to garnish
Salt to taste
A dash of lime juice


DIRECTIONS

Roast the rava stirring constantly till the rava gets a light brown color. Then keep it aside. Boil about 3 cups of water and keep it aside. We boil the water so that it is of the same temperature as that of the rava and the other fried ingredients. This helps in faster cooking of the rava.

Now heat 3 tbsp oil in a kadai/pan and add mustard seeds and cumin seeds. Once the seeds begin to splutter, add the curry leaves, channa dal, urad dal and roasted peanuts to it and fry till they turn light brown. Now, add chopped onions and green chillies. Next add chopped tomatoes, turmeric and salt and fry them for another 2-3 minutes. Now add the sooji and fry for few miniutes. Pour the hot water into the mixture. Bring it boil on low heat for about 3 mins. The water should be absorbed by the rava and cooked. Turn off the heat and add a dash of lime juice. Garnish with coriander leaves. Serve hot.