I am just back from a short holiday and it was so much relaxing to take this leave as we desperately needed a break from work. We needed this break badly as it's been a year since we hadn't taken any. I am back to work in high spirits!

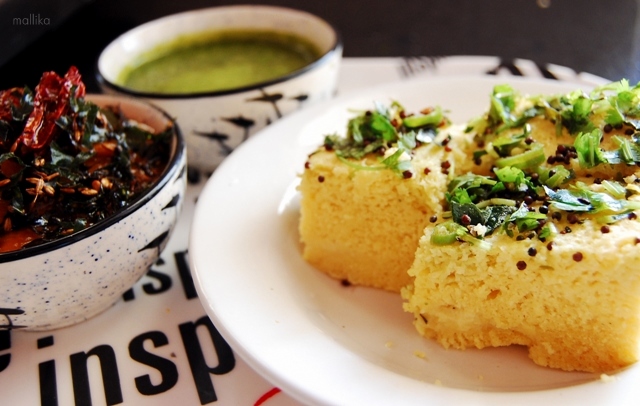
As a continuation to my previous post for Khaman Dhokla, I am posting the recipe for Khatti Meethi Chutney with tamarind and dates. Amma makes this often at home and I am inspired to learn from her. This is one of the simplest and the easiest methods to make and can be used in many other savories, like chats and dips. It calls for no fuss, no cook recipe and can be done in minutes.

I prefer the use of dates due to it's natural sweetness instead of sugar. Dates have a great taste and sweetness that can be easily substituted for sugar. Apart from that, it's also to derive the health benefits from it as it is rich in iron content. This fruit is affluent in natural fibers, sugar, proteins as well as many essential vitamins. So here it goes.

Khatti Meethi Chutney

INGREDIENTS

1/2 cup of dates
1/4 cup thick tamarind pulp
1/2 tsp garam masala
1 tsp chilly powder
Salt to taste
A little water


For tempering:

1 tsp oil
1 tsp mustard seeds
1 tsp cumin seeds
Few broken red chillies
A sprig of curry leaves

DIRECTIONS

Just put all the ingredients to a mixer and pulse them till they become a thick paste. Add water to adjust the consistency. It's good enough to consume this way, but tempering would enhance the flavors further. So heat some oil in a pan, add mustard, cumin seeds, broken red chillies and curry leaves. Fry them for a min and then add to the prepared chutney/dip. It's ready to serve!

The ones that are commonly used in chats or in street foods are made by heating tamarind pulp with sugar and spices till it comes to a slightly thick consistency. It stays for a longer duration. However, as I mentioned this is a quicker and healthier version, this one has a shorter life span and needs to be consumed in a day or two. It will also require refrigeration if it is not consumed in a day.


I am inspired a lot by my amma's cooking. I think most of us are. Somehow or the other our cooking is influenced by the way our mums' cook. The tastes, the ingredients, particularly the spices, all in a way do have an effect. I think we are all brought up in a significant manner and lifestyle which varies from one household to the other. Our food and taste buds are accustomed to particular spices.

Back home, amma is a little low on spices. She makes sure that the food is tasty, healthy, appealing to taste buds, not overly hot or spicy and happily eaten by all... from kids to elders. It is always a mélange of spices, sweet, salt and tang. After marriage, I was greeted into a family who loved spice and oil. I think my mother in law consumes a litre of oil in one week, which would otherwise last a month at amma's place! Though I love spice, I take pleasure in indulging in it once a while, but despise eating everyday. I like it light and easy on the tummy.

My cooking is a mix of both cultures. These days, my husband understands the health benefits of medium spice and appreciates it well. I make sure it's just rightly spiced and low in oil, so that it can cater to health benefits.

Over this weekend, I made this Khaman Dhokla. I have made this one couple of times earlier and was loved by my hubby and his parents as well. It is mildly sweet which caters to my nibbles, has enough spices that caters to their likings well. Khaman Dhokla dressed well with tadka and served with accompaniments like Khatti Meethi Chutney and Pudina Chutney can leave your mouth tangling and craving for some more.


Khaman Dhokla

INGREDIENTS

For Dhokla:

1 cup Besan / Chickpea flour
2 tbsp Rava/ Semolina
1 sachet Eno fruit salt
1 tsp Sugar
Salt to taste
A pinch of Hing/Asafeotida
A pinch of turmeric
1 tbsp oil
1/2 cup water / buttermilk

DIRECTIONS

Make a dry mix of all the ingredients in the list from 1 to 7. Finally add in the oil and the buttermilk and mix well to avoid the lumps. Next transfer to a clean greased plate (1 1/2 inch in height) and place it in cooker. Ensure enough space is let in the vessel for the dhokla to rise in height during the cooking process. Cook without weights on medium-low for 15-20 mins till done. Insert a fork to test. It should come out clean, else cook for some more time. Once done, allow to cool a little so that the dhokla can be removed easily.


Next give a good tadka to the prepared Dhokla. For the Tadka here's what we need:

1 tsp oil
1 tsp mustard seeds
A sprig of curry leaves
2 chopped chillies in rounds
1 tbsp water
1 tsp sugar
1 tsp lime juice

For the tadka, heat the oil in a tempering pan. As the oil heats, add mustard. Next add curry leaves and green chillies. As they splutted add sugar and water. Finally add lime juice and turn off the gas immediately. Allow the dhokla to cool a little. Then add this tadka on top of the dhokla. Dhoklas are soft and fluffy and will absorb the water. This gives a nice moistness to it. Cut into sqaures and serve. Serve this with Khatti Meethi Chutney and Pudina Chutney. This also serves a great snack at a high tea!


Since our childhood days, one of the most common tea time snack back home was always a bowl of Chiwda. And amma always made sure that she would promptly prepare a big batch of chiwda once the old batch was almost getting over. Even today she makes this one without fail. She enjoys this a lot and is a must for her evening bites over a cup of tea. Off late I had been missing this a lot. One morning, I set out to make my batch of Chiwda. I made it similar to my amma's way. However, amma makes it less spicier than I do. I just loved this one so much that I made another batch of these again, but instead of puffed rice, I made them with the paper rice. They were just fantastic. A pass time snack that one can munch on any day at anytime.

My perfect way of relaxing and unwind on a weekend evening is to lazy on the couch... listen to my favourite numbers on my ipod... sipping a hot cup of tea with a big bowl of chiwda. That's my get-away...


Chiwda

INGREDIENTS

250 gm of puffed rice
100 gm roasted peanuts
5-6 green chillies, chopped in rounds
1 tbsp mustard seeds
3 tbsp oil
1 tsp turmeric powder
5 sprigs of curry leaves
Salt to taste
Sugar to taste

DIRECTION

Roast puffed rice till crisp. Keep aside. Heat the oil. Add mustard. Let it splutter. Next add curry leaves, chopped chillies, peanuts and fry them well. Add turmeric, salt and sugar and immediately turn off the gas. Add the puffed rice and mix well till all the spices are mixed. Allow to cool completely and store in an air-tight container. This stays well for a long time. In case the puffed rice lose their crisp, toss them to micro and reheat them or roast them to remove the absorbed moisture and become crisp again.


I have come across many bachelors and friends who crave eating a simple home cooked meal. Dal-Chawal, anna-saaru, they say. I have been through similar moments during the time I lived single. Every time I came back home from college, tired and torn by the day's activities, one thing that I would look forward to was fulfilling my hungry tummy. Those were the days when I was staying alone by myself. Just a morsel of good home cooked food was what I craved for. The thought of going to the kitchen and cooking a meal for myself was good on mind, but was lethargic too. Or I guess, it was the boredom to eat all alone. But of course, I would make them at home on weekends... that meant treating myself.

Every time, I went home for vacation, it meant feasting myself on amma's food. Amma's food is just unbeatable. Just the thought would make me yearn to go back home, sit on the table and relish the hot food that comes out of the kitchen to the table, lovingly cooked and fed by amma. A simple home food can not only be healthy, but more satisfying and fulfilling. Today, I appreciate the care and efforts that she took to feed us lovingly every single day without any qualms. I know what it means to cook a full meal, to be careful that it is healthy, tasty, filling and lovingly fed.

I am sharing with you my plate of lunch made over the weekend. A full meal, the Havyaka way with Hesaru KaLu Kai HuLi, Bendekai palya, Eerulli gojju served with rice and homemade amTekai uppinakai. Uddin happala and curd may be missing in this pic, but is definitely a part of this meal! And to end with a sweet note, nothing can be better than Shavige payasa.


I love the use of garlic in roasted form. They are so intense and can impart such great flavors to a recipe. Garlic may not compliment all dishes, considering it is pungent. Not everyone would even savor it's taste. But to me, I just love it! Considering it is good for heart, it gives me more excuse to use them often!

Amma's Hesaru KaLu Kai HuLi is one of my favorite Havyaka dish which tastes heavenly when tempered well. There are few ingredients that can make or take flavors away in a South Indian cooking. The secret behind a great tasting South Indian food is in it's tempering. And many of the gravy dishes do call for a good tempering... tempering in the right way. Another go get ingredient is the use of compounded hing/asafeotida. This is very different from the powdered stuff that we get. I find the powdered hing that we get is nothing but a dry powder which has no taste or flavours. This works good for recipes that don't require the hing flavors, but for an authentic Manglorean HuLi recipe or gassi, the compounded one is a must. Try them yourself both the ways, you bet you'll know the difference.


Hesaru KaLu Kai HuLi

INGREDIENTS

1 cup sprouted green gram/hesaru kalu
A little more than 1/4 cup grated fresh coconut
1 tsp cumin seeds/jeera
2 tbsps coriander seeds/dhania
1/4th tsp fenugreek seeds/methi seeds
4-5 red chillies (I used Byadgi chillies)
1 small lemon sized tamarind (soaked in warm water)
1 tsp powdered jaggery
A little compounded hing/asafoetida

For tempering:

1 tsp oil
1 tsp mustard seeds
3-4 curry leaves
5 cloves of garlic, crushed in a motar & pestle


DIRECTIONS

Pressure cook the sprouted moong dal with salt and turmeric until they are soft. Dry roast the cumin seeds, coriander seeds, methi seeds and red chillies till they are just browned. Grind the cooled dry roasted ingredients along with coconut and tamarind to make a smooth paste. Add this masala paste to the cooked moong dal. Add little water if required and bring this to a boil. Adjust salt, add jaggery and allow this to come to a boil. Mix the compounded hing in a little warm water or probably remove a little curry out into a cup and mix in the compounded hing. Add this to the boiling curry. I always use compounded hing/asafoetida for these kind of recipes as the flavor it imparts to the dishes is just out of the world. I don't think this curry would be even closer to what it should be without this!

Next the temper. In a small pan, heat oil. Add mustard seeds and let it splutter. Add curry leaves and chopped/crushed garlic. Add this tempering to the above prepared curry and cover immediately. Mix well and serve. Goes very well with hot ric
e.


Tiramisu is one of the most popular Italian deserts. Although it doesn't require any introduction, for the uninitiated Tiramisu is a creamy, melt in mouth cake primarily made up of lady finger biscuits dipped in espresso or strong coffee decoction, layered with a whipped mixture of egg yolks, mascarpone, and sugar, and topped with cocoa. Ref: Tiramisu.

These days there are different versions of Tiramisu. Some made with Rum or Marsala wine or Coffee liquor, some made with raw eggs only, while some have Zabaglione in them. Although traditionally it has mascarpone in it, cream cheese or whipped cottage/ricotta cheese is also used as a low fat version. We first had our bite of Tiramisu (imported from Belgium) at Bliss and paid a whopping price of Rs. 150 bucks for a fairly small bite of cake (We finished the cake in just 2-3 bites!). It was heavenly!


I set out to try them at home. I went through a few hazzles while making them. Firstly, the Mascarpone cheese was almost impossible to get in India. I have made ample searches, saw cheddar, mozzerella, gouda, cottage, processed cheese, etc, but absolutely no Mascarpone! Mascarpone cheese is very high in fat and since not easily available in India, I settled to use the low fat version, Cottage cheese which is easily available everywhere.

Initially, I thought of making lady fingers at home. Internet searches gave ample of recipes to make lady finger cakes at home, but the thought of making everything from scratch seemed really tedious and I settled to use sponge cakes instead. It is a bit time consuming as I made cottage cheese fresh at home. However in the end, the cake turned out fantastic.

Tiramisu

Prepare the Zabaglione:

6 egg yolks
1 cup milk
1/2 cup sugar
1 tbsp unsalted butter
1/4 tsp Vanilla extract/essence
A hint of salt

Zabaglione generally is made of eggs alone. But we are not very fond of the sole egg-y flavor. So to reduce it's intensity, I made it the custard way. Omit milk in the above recipe if you like the egg-y flavor. Beat the eggs well with sugar. Heat the milk till its hot, but not boiling. Temper the milk into the eggs slowly and carefully so that the eggs don't split or scramble. Transfer to a double boiler and heat through till the custard is thick and coats the back of the spatula. Remove from heat and add the butter and vanilla essence. Allow to cool in the refrigerator.


Prepare the Cream cheese:

1 cup cottage cheese
1 cup confectioners sugar
1/2 cup whipped cream

Run the cheese along with sugar in a mixer till it is smooth and creamy. Add the heavy whipped cream with the above prepare zabaglione. Gently fold everything. Refrigerate so that it sets well.

You can either purchase store bought cottage cheese, else prepare at home. I made mine at home.

Prepare the Cottage cheese:

1 litre milk
1 tsp lime juice

Heat the milk. Once it comes to a boil, add lime juice. The whey and curdled milk should separate now. The curdled milk will float on top. Allow to cool a bit and strain the whey through a cheese cloth. Allow the mixture to drain for an hour, then take the ends of the cheesecloth and twist to drain any remaining whey. Homemade cottage cheese is ready!

Prepare the coffee mixture:

Either use expresso or make strong coffee decoction at home. Add a 1 tbsp of rum to it.


Assembling the cake:

Keep the cake, coffee mixture, and cream filling at hand. Dip the cake in the coffee and line the bottom of the serving dish. Place the cake side by side till the bottom is fully covered. Next, scoop a big dollop of cream cheese mix and spread well to cover the cake. Lay another layer of cake and cream mix and top it with cocoa powder. Refrigerate overnight and serve the next day for the flavors to blend well. Slice and serve.


For the times when we had heavy lunch or dinners, the following dinner or next afternoon's lunch would always be light. This was was the care mama took of our tummies. She strongly believed that after a heavy, greasy and creamy hotel food, it's best to settle for simple home cooked par-boiled veggies which gave the stomach mechanism some break... after all it requires some rest too! And the Simple Sautéed Cabbage was one of those simple delicacies that purely brought out the flavor of cabbage. This simply spiced par-cooked cabbage would be such a rescue and I thoroughly enjoy this as a side dish or even as salad. Here it goes, the mum's way...


Here's what we need:

1/2 cabbage, finely shredded
1 tsp Oil
1 tsp mustard seeds
1 tsp cumin seeds
1/2 tsp turmeric powder
A sprig of curry leaves
1-2 green chillies, slitted
Salt to taste

Heat oil in a kadai/wok. Add mustard, cumin and allow them to splutter. Add turmeric and slitted green chillies and fry another minute. Then add the cabbage and salt and sauté for few minutes. Sauté till the cabbage is par-cooked. Turn off the flame and cover. The heat is sufficient for it to cook a little further. This way the cabbage is not over cooked and it does not loose it's crunch. We love cabbage done this way. Serve hot with rice or roti as a side dish.


I like my Pizzas with thin crusts. Every time we order Pizza in a restaurant, we are often greeted with a basic thick crust pizza. And that gives me a feeling that I am biting into more of breads than the toppings. I am also fond of nice thick layer of vegetable toppings. So this time I went ahead to make my thin crust pizza dough at home. It's simple to make, but requires planning ahead in time.

Making the dough requires some standing time for the yeast to culture, so just plan your meal ahead so that you can prepare the dough. Once the dough is rolled out, all it requires is spreading the sauce, the toppings and loads of cheeeeese! It's pizza customized to your taste buds. So what can be better than that! I shall share the pizza dough recipe this time and the toppings probably the next time.


Homemade Pizza dough

INGREDIENTS:

1 tsp. dry yeast
2 tbsp. warm water
A tsp. of sugar
1/3 cup yogurt or warm milk
1 cup all purpose flour / wheat flour
1 tsp. Olive oil
Salt to taste


DIRECTIONS:

In a small bowl, mix the dry yeast in warm water, add a tsp. of sugar and stir to dissolve it. Set aside for about 5 minutes so that the yeast dissolves well and becomes frothy.

Heap the flour into a large bowl and make a hole in the center. Pour the yeast mixture, salt to taste and 1 tbsp. of olive oil. Stir all the ingredients to form a soft dough. Add very little water if its stiff to bind, add just enough flour to hold together if its too wet. Knead the dough well and cover with a kitchen towel. Set aside in a warm place for an hour to rise.

After an hour or two, the dough would have doubled in size. Now punch the dough down and divide into 2 balls. Roll into thin crust or thick crust as per your preference. Poke a few holes into the dough using fork to prevent the dough from rising from the center. Pizza base is ready for use!

Updated: If using a microwave with convection mode, its best to pre-bake the pizza on either sides for a couple of minutes. This will ensure the dough is not raw or half baked while the cheese has melted and turned golden brown.


And just in case you do not have pizza sauce handy, or you ran out of stock and you do not have sufficient time at hand to slog in front of your stove, then make this super easy and quick version. I have an express recipe for a homemade pizza sauce. This was picked from one of the Italian cookbooks, the name of which I can't recall at the moment. Fry a tablespoon of finely chopped garlic with olive oil till translucent. Add a cup of ready-made tomato sauce to it. Sauté for a min or two. Add a dash of Italian herbs or seasoning and the pizza sauce is ready! This sauce is good pastas and lasagnas too.

Lay the pizza base. Spread the sauce. Dress it with toppings of your choice. Top with cheese. Pop into the oven and bake till cheese browns. And your Pizza is all ready to be served!

Spiced Veg Pizza


INGREDIENTS:

1 medium chopped onion
1 yellow capsicum
1 red capsicum
1 green capsicum
2 baby corns
1 tomato
1 tbsp pizza sauce
1 tbsp mozzarella cheese
1 tbsp cheddar or Parmesan cheese
1 tsp red chili flakes
Salt & pepper to taste

DIRECTIONS:

Wash and chop all the vegetables to medium to small bite sized pieces. Lay the homemade pizza base on a baking tray or pizza stone, spread some pizza sauce, sprinkle a tbsp of cheddar or Parmesan cheese. Then arrange the vegetables on the base. Add salt, pepper and chili flakes to taste, as preferred. I don't usually add any salt as the cheese has enough salt in it. Finally top the pizza with loads of mozzarella cheese. Bake in a pre-heated oven on 180 deg C.

Serve hot with Italian herbs, oregano and more chili flakes for that extra spice. Enjoy!

And if you like Deep pan or Thick crust pizza, then this bite is for you! Enjoy!!!


A traditional Punjabi food would definitely comprise of Parathas without which their menu would remain incomplete. In a week, this would be a compulsive part of the breakfast menu. Travel north and you are bound to be greeted with Thelewalas selling hot Parathas on street side. Loaded with ghee and butter, spiced up well, they are a sure to leave your taste buds lingering for more. Yum indeed! The thought itself leaves me tempting and wants me to grab for some right away! Since wheat is primarily grown in Northern part of India, it for a staple part of their dietary intake.

Mooli Paratha is one of my personal favorites and I love it for the simple mélange of flavors that it creates with each bite. It's just so enticing. Almost every weekend, we indulge in various types of Parathas. They are always either on our breakfast or lunch menu and sometimes dinner as well. This weekend it was Radish/Mooli paratha. Wheneven I have dull, weary looking radish lying in the fridge, I make it a point to use them this way. They never go waste this way!


Prepare the dough first:

For the dough:
2 cups Wheat flour
Salt To taste
Water

For the Mooli parathas, here's what we need:

3 Mooli (Radish)
1/2 tsp Red chilli powder
1/2 tsp Cumin seeds
1/2 tsp Coriander powder
2 Green chillies, chopped finely
2 tbsp Coriander leaves
A hint of Amchoor powder
Salt To Taste

Add water to wheat flour and salt and knead to a stiff dough. Drizzle a tsp of oil on the dough and coat it on all sides. Cover and keep aside for sometime.

Wash, peel and grate the radish. Add salt to it and leave it aside for 15 minutes. Squeeze and drain all the water. Use this water to knead the dough as it contains the nutrients. Add cumin seeds, coriander powder, red chilli powder, green chillies, amchoor powder and coriander leaves and mix well. Add more salt (if needed).

Roll some dough (about 2 lemon sized) into small disk. Place 2 tsp of stuffing at the centre, pull the edges up and cover from all the sides. Roll again into a thick, round parantha. Heat a tava and fry the mooli paratha on both sides to crispy brown. Put some oil over the paratha. Serve the mooli paratha hot with pickle and curd.


I love cookies. But I still desist indulging often in store bought biscuits and cookies. It's okay at times. But on a daily basis, I would prefer something more homemade which is lighter, simpler and healthier. Well, following my mum's way. Despite knowing that biscuits, cookies, pastries, etc do carry butter and sugar content, I still try and have a control on them. If the recipe called for a cup of sugar, I would prefer using a little lesser than what it asks for. The same goes with butter. It probably would taste great and richer, but I think we are just fine with less.

I recently made a small batch of almond cookies. They were such an instant hit that they got finished even before I could click few snaps of them. They were crisp, crunchy and delicately almond flavored. I decided to make another batch of them, but with a variation. Since I had always have a bag of oatmeal at home, I thought it would be a good idea to use them in cookies. And again it's time for my favorite chocolate flavored ones.

As the cookies were baking in the oven, it's chocloatey aroma spread across the house transforming the entire house to smell like a cookie shop. It was just heavenly! Aromatic and truly decadent. These are perfect for tea time and go well with a hot cuppa coffee.


Cocoa-Oatmeal Cookies

INGREDIENTS:

1 cup all purpose flour
50 gms cold butter
1/2 cup rolled oats
1/2 cup cocoa powder
1 cup granulated damerara sugar
1/4 tsp baking powder
A pinch of baking soda
A pinch of salt
1/4 cup chopped cashew nuts (or mixed, as desired)
1/4 cup milk or as desired


DIRECTIONS:

Don't melt the butter. Instead mash the cold butter well into all purpose flour till it resembles bread crumbs.

Mix all the dry ingredients (i.e. from rolled oats to nuts in the list) in a separate bowl. Then add all the dry ingredients to the above. Mix well. Add milk and gently mix so that it forms a soft dough or a thick batter (batter will be thick enough to scoop out). Scoop out dollops of batter to a parchment paper or aluminum foil. Make sure to leave enough space between each dollop as it will swell during baking process.

Place the tray in the oven and bake on 350 degree for about 15 minutes depending on your oven. The resultant cookie will be chewy and slightly crunchy on the edges. If you bake further the cookie will turn crunchier. Enjoy with tea or coffee or just plain milk!