The weather God has been playing good and we have been receiving decent occasional showers of rain in the evenings. I feel much better being rescued from the scorch of heat. The summers were bad, not as bad as other parts of the country though. But it still came with potful of troubles with continued power cuts at peak hours of the day, sufficient to give a baker her nightmares!

It can't get more irritating when I have my goodies baking half way through in the oven and then the unexpected power cuts that can go on for atleast a couple of hours leave me feeling miserable and I end up with flat cakes or cookies that have to be used as alternatives or end up in thrash! I am hoping it gets better with more rains, though at the moment it's not any good.

All I want to do right now is to dive down cozily into an armchair, with a thought that I am totally carefree and have nothing much to do. Would probably just want to grab a novel, a cup of tea in one hand, cookies to sink my teeth into, melodies of the past being played on radio in the background, cool breeze kissing my cheeks, the murmurs of rain adding a zing of music to my ears... I am feeling exactly this way at the moment. Does this sound a perfect way to lazy around on your weekend or may be a nice holiday?


With the climate changing to better, the temperatures falling and with a few showers, it feels nice to see the dry, sun burnt grounds converting to patchy greens and hopefully lesser power cuts too! And with the cool breeze kissing my cheeks, it reminds me that it's time I convert my home to a baker's bliss, the time when vanilla and chocolate-y flavors waft through air and we descend gracefully into it's blissful aromas.

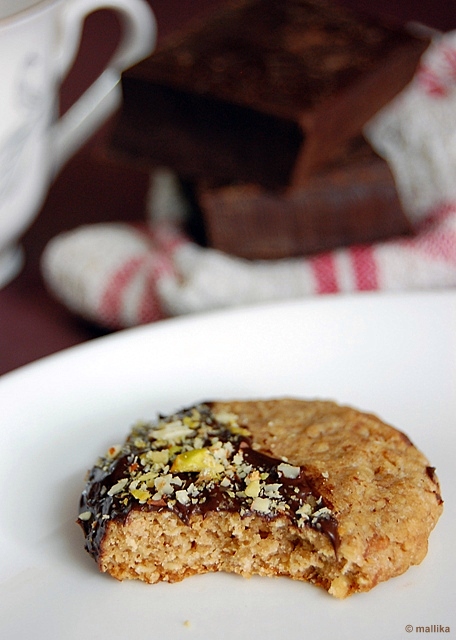
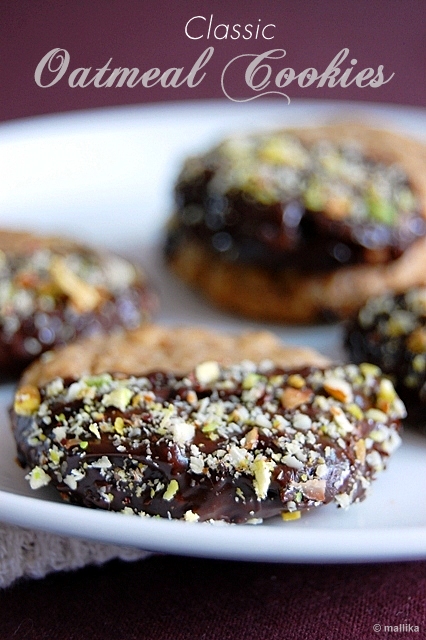
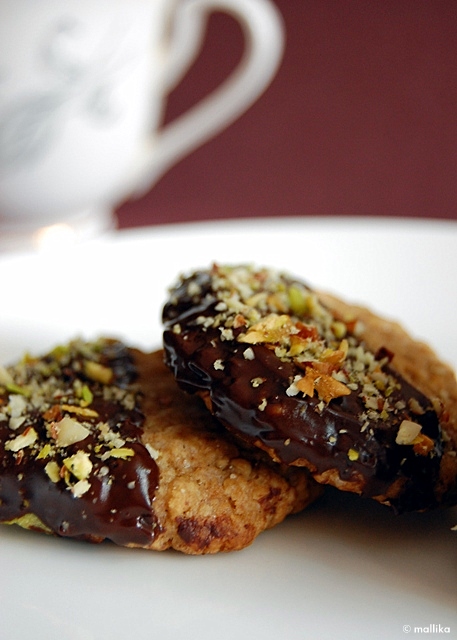
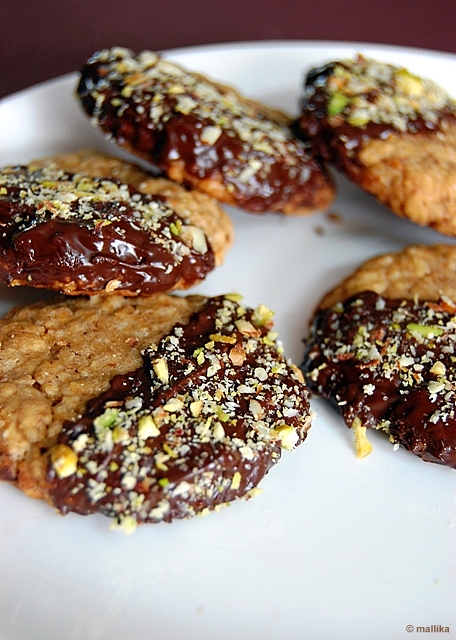
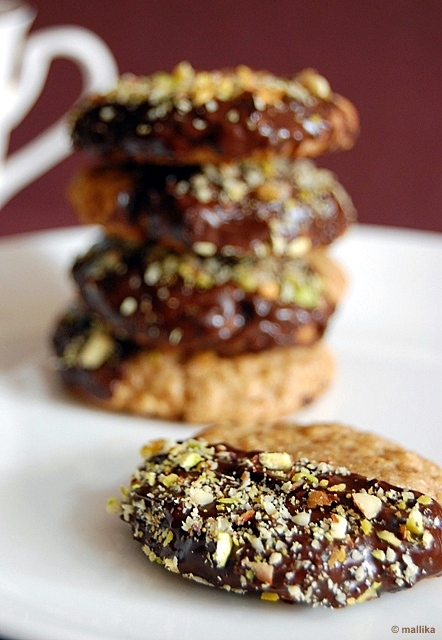
So I headed straight to make these simple delightful cookies for our evenings. I adapted the recipe from here, however made a couple of changes. I kept it neat with no dry fruits or nuts added to the dough. Instead I chose to frost my cookies with chocolate and finely chopped pistachios. My Oatmeal and Raisin Cookies have been appreciated in the past. These are classic American cookies and the best bet for the ones like me who dislike oats in their true nature. Recipe is quite simple and follows a standard procedure of dry into wet ingredients format.


Classic Oatmeal Cookies

INGREDIENTS

1 cup plain flour
1 1/4 cups oatmeal
3/4 cup brown sugar
1/2 cup unsalted butter, softened
1/2 tbsp flax seed powder
2 tbsp water
1/2 tsp baking soda
1 teaspoon cinnamon
1/2 tsp vanilla extract
A pinch of salt

Decorate:

1/2 cup melted dark chocolate
Slivered pistachios

DIRECTIONS

Preheat oven to 375° F. Mix 1/2 tbsp flax seed powder into 2 tbsp water and keep in the fridge for a few hours. You will notice that the flax seed water will turn to a slimy mixture exactly like that of an egg. I have produced the best results from this mixture.

In a mixing bowl, combine the brown sugar, vanilla and butter until well blended. Add the oatmeal, flax meal water and stir well.

In another bowl, stir together the flour, baking soda, cinnamon and salt. Gradually add to the oatmeal mixture, stirring well. Scoop the dough by tablespoonfuls, spacing each about an inch apart, onto the baking tray. Bake for 12-15 minutes. Transfer the cookies to a wire rack to cool.

For the frosting, melt the chocolate over double boiler or in a microwave. Dip one half of the cookie into the melted chocolate. Drain excess chocolate using the edge of a spatula. Dip into a finely chopped pistachios and allow it to cool over a plate.


These are good as is without any frostings. Frosting them is purely optional. I am not good at frosting, or must I admit that I have the least patience to decorate. However, this time I thought I must leave my laziness aside and try some hand at frosting. I opted to coat them partially with molten dark chocolate and pistachios.

I have been experimenting a lot with flax seeds and honestly, off late, I have begun to dislike even the faintest taste from flax seeds. Though the smell is not so pronounced in this recipe, my taste buds seem to identify it easily, which I don't like. So the frosting made it good for me. However, do not resist to try this. If I don't like it, it doesn't mean it's gross. You may love it. My family did. In fact, they merrily enjoyed it. You may use 1 egg instead of flaxseed.


Did I ever admit that my first cake was baked in a pressure cooker? Yeah, you heard this right. Not steamed, but baked in a pressure cooker. That was when I was without any oven and it seemed like a long intense urge to bake a cake out of sheer desperation. I must have seen or heard it somewhere that one could convert the cooker to an oven and I set out to recreate the same in my kitchen that day.

For the ones who heard or secretly saw me fiddling in the kitchen with sand and pressure cooker, would surely quote me to be insane to have baked this way! Just imagine, collecting sieved fine sand from a construction site, preparing the cooker for baking, spreading sand in the base of the cooker (to provide proper circulation of heat around the vessel), covering the cake vessel (oh yeah, didn't have a proper cake tin at hand and used the vessel that came with my cooker!) neatly with foil, made a paper cone, filled it with sand, tipped the cone edge, covered the sides of the cake vessel with sand evenly using the cone, murmured a short prayer, put everything together, baked for close to 45 mins on low heat without pressure whistle... with restlessness in me while it was being baked, prayers on my lips, in trepidation, anxiety on my face while bringing that cake out, that was one hell of a job.


Equipped with basic ingredients for my first cake, that too a chocolate one, I went ahead to bake it daringly this way. It wasn't an easy task, that too risking with a pressure cooker was too daring of me, if I am to think about it today. I still wonder what made my thoughts go so whammy that day! And if you were curious to know if the cake was a disaster, I would say it wasn't disappointing for my first attempt! Though the edges were over baked and I had to scale them, the centers were otherwise good!

That was my last attempt at something as weird as this one. I have an oven now and have come a long way since then. It's been fun making cakes with varieties, though I haven't had much luck with frosting except in this one, owing to the low fat cream which we get here that never holds shape even if I were to whip it to eternity! Any help from you guys would be welcome ;)

I made this carrot cake recently and it was absolutely adorable. I was loaded with compliments on this. The recipe has been adapted from here with no changes.


Carrot Bundt Cake

INGREDIENTS

3 cups grated carrots
1/2 cup brown sugar
1/2 cup raisins
2 eggs
3/4 cup white sugar
1/2 cup vegetable oil
1 tsp vanilla extract
1/2 cup crushed pineapple, drained
1 1/2 cups all-purpose flour
3/4 tsp baking soda
1/2 tsp salt
1 tsp ground cinnamon
1/2 cup chopped walnuts

DIRECTIONS

In a medium bowl, combine grated carrots and brown sugar. Set aside for 60 minutes, then stir in raisins. You will notice that during the standing time, the carrots would leave out water. Don't discard this.

Preheat oven to 350 degrees F (175 degrees C). Grease and flour the bundt pan.

In a large bowl, beat the eggs until it's light and fluffy. Gradually introduce the white sugar, oil and vanilla. Stir in the pineapple. Combine the flour, baking soda, salt and cinnamon, stir into the wet mixture until absorbed. Finally stir in the carrot mixture and the walnuts. Pour evenly into the prepared pans.

Bake for 50 minutes in the preheated oven, until cake is done when tested with a toothpick. Cool before removing from pan. When completely cooled, you can choose to frost or leave it.


This was the first time I baked a cake in a bundt pan. I had a little trouble removing the cake from the pan despite greasing and dusting it well. Do share a few tips on removing the cake the right way from a bundt pan as I had to juggle with removing it.

I had carrot cake recently on one of our adventure trips. It was indeed so good that I could hardly wait to try them myself. I haven't tasted any other carrot cakes, except for the one on this trip. So, when I came across making the cake myself, I can only agree that it can be termed as the 'best ever carrot cake' and that's exactly what the original recipe was titled.

The cake was moist and perfectly balanced with fruits, nuts and spices. We loved the cake when served warm. I just loved that hinted sweetness from carrots and brown sugar. I left it unfrosted as most carrot cakes say that cream cheese is the best frosting and that option was just not viable. A dollop of ice cream may add that extra icing on the top!


Having grown up eating jackfruits as a teenager, it takes me down my memory lane when monsoon months from June to August often greeted us with delicacies of jackfruit, a fruit which people either love most or hate most. While I come in the range of former ones, I know few who can't stand it for it's unique taste.

It reminds me how often my dad would sit down on floor with a massive oiled knife to tear apart the pine skulled fruit, while mom peeled and stoned the fruit and my little sissy and me, as children would surround him to grab those fleshy ripe fruits off and relish them unendingly. And dad would do this task with immense love and passion. The huge jackfruit, often fetched from farms of my uncles and aunts was undoubtedly the most organic, fresh and the best ones we ever tasted.

The fruit is so versatile in use that it can be consumed either in raw form in cooking curries and savories or ripe in Indian sweets. Even the stony seeds are delicacies to the ones like me. Variety of dishes are made from the flesh of jackfruit, common ones like palya, huli, gashi, kadabu, dosa, idli, appam, papad, chips, etc. And even today, whenever I do get a chance, I love to hog on my amma's food. Well, I depend on her heavily for these traditional recipes.


It's a season of jackfruits and I can't get a better post than this one for this season. For the one who's not introduced to this fruit, jackfruit is a very tropical fruit commonly grown and consumed in the Western coastal belts of India.

Gujje Palya (Raw Jackfruit Stir-fry)

INGREDIENTS

1 cup raw jackfruit
3-4 whole red chilies
1/2 cup fresh grated coconut
Lemon sized tamarind
1 tsp mustard seeds

Tempering:

1 tsp oil
1 tsp mustard seeds
1 sprig of curry leaves


DIRECTIONS

Wash and clean the jackfruit. Remove the external core skin. Pit the seeds and chop the flesh into small pieces. This can be a little tedious task if you are a first timer. My grandma is excellent at this and I have a lot to learn from her.

Pressure cook the chopped raw jackfruit pieces with salt and tamarind on 2 whistles. Meanwhile, prepare the spice paste.

Grind together fresh grated coconut, whole red chilies and a tsp of mustard seeds. The ground mustard seeds impart a tangy spice to the dish, which I love the most. Keep this ground paste aside.

Heat some oil in a wok. Add mustard seeds and a sprig of curry leaves. When they begin to splutter, add the cooked jackfruits and stir fry for a minute or two. Then add in the ground paste. Allow the liquid to evaporate a little and cook on slow flame for another 2-3 minutes. Turn off the flame and transfer to a serving bowl. Serve hot as a side dish with rice or rotis.


With my post on Date Walnut Muffins, I had promised that I would list 10 things that make me happy. Here it goes...

1. Cooking and Baking of course! (Can I dare ignore that???)
2. Every cozy moment spent with my husband :) (undoubtedly, it makes me happy!)
3. Being back to MY home after work and being warmly greeted by my hubby's smiling face (oh! what a stress buster!)
4. That each day has gone by on a positive note (yeah, it's important to me that my family and me are in their best of the days, health and happiness)
5. Good food (My 4th sense is has a strong leniency towards appealing good food. That's been more off late!)
6. Travelling to discover new places (that's an inheritance from my hubby dear!)
7. Blogging & Photography (a good blog and great food photography makes me feel real good!)
8. Watching Travel & Living and NDTV Good Times (I am hooked to it from past few years ;))
9. Walking to a book store, picking up a cookery or a painting book and just flipping through pages without any one disturbing! (Often wish, there's a couch to sneak into!)
10. Desserts (I know it's too far to position it the 10th, best for the last! I can't tell you how soothing a good dessert is to my senses!!! It indeed is! )


My dear dad turned another year older and it calls for celebration time. All I had on my mind was this celebration Eggless Black Forest Cake which is one of his favorites. Not just his, but a family favorite too.

Pastry shops were uncommon for us as kids. I can remember this shop by name, Monginis, in Mulund-Bombay, which was our hot favorites then - our only source for some real good cakes and pastries. And we would often hang out there with mom and dad for some good cakes which mom loved and for savories like samosas which were dad's favorite. Though butter cream cakes were easily available even then, fresh cream pastries have become very popular only from past few years, with cake shops and coffee houses springing up every where and with most people, especially youngsters and college-goers hanging out there often.

As we grew up to be teenagers, pastries became popular and more commonly available in cake shops and bakeries. One of the most popular cakes was undoubtedly the Black Forest cake, which I guess, there's hardly anyone who's not eaten or heard of. I am no better and must have eaten hundreds of these as a teenager and continue even today! Black Forest cake consists of layers of chocolate cake, drizzled with rum syrup, sandwiched with whipped cream and torn cherries, topped with a good dose of whipped cream, maraschino cherries and chocolate shavings. Pure decadence. Period!


The below recipe is the most common recipe for eggless sponge cake and the same recipe can be got from many websites. I reduced the butter to half instead of 120 gm which I thought was a little too much and since I had no cola at hand, I used milk instead. It does make a difference. Cola adds fizz and air to the cake while milk made it denser than it should have been. The cake turned a little dry too, but that didn't matter much as the soaking moistened it well. Never the less,the cake was still spongy and good. Here's what we need.

Eggless Black Forest Cake

INGREDIENTS

For the chocolate cake:

2 1/4 cups plain flour (240 gm)
1 can condensed milk (400 gm)
1/4 cup melted butter (60 gm)
2 cups aerated cola (200 ml)
1/2 cup cocoa powder (40 gm)
1 tsp vanilla essence
1 tsp baking powder
1/2 tsp baking soda

For the frosting:

2 cups dark chocolate, grated (200 gm)
1 cup fresh cream powder (100 gm)
1 cup cold water (100 ml)

For the filling:

1 cup maraschino cherries, pitted and chopped

To be mixed into a soaking syrup:

2 tbsp sugar
1 tbsp rum (optional)
1/2 cup water


DIRECTIONS

Sift flour, cocoa, baking powder and soda. In another bowl, mix condensed milk, cola and melted butter and whisk well.

Add the wet ingredients in to the dry ones, whisk well till combined. Transfer to a baking tray and bake for 40 minutes at 180 deg C. Once done, remove aside to cool.

In a bowl, mix the rum and sugar with water. Whip the cream powder with ice cold water till soft peaks are formed. Allow the cake to cool, slice to halves horizontally. Drizzle the sugary rum syrup evenly all over the cake so that it absorbs well. Spread the whipped cream on one half, spread the chopped cherries and top it with the second slice. Frost the cake top and sides with whipped fresh cream. Decorate with whole cherries and grated chocolate shavings. Refrigerate at least for a few hours before serving.


My dad's a staunch vegetarian, which means no eggs included. I've made egg-less chocolate cakes earlier, so making another one wasn't any challenge. Suma was of great help for me to hunt maraschino cherries :) Thanks Suma. However, the biggest challenge for me was to frost the cake with fresh cream. I haven't had much success with whipping the 25% low fat cream available here. I was working with whipped cream powder as frosting for the first time and Divya's blog gave me the confidence that it wouldn't let me down, though I admit I was a little apprehensive how the final cake would turn up. However, I am glad it turned out good and there was hardly any difference noticed.


The cake turned out great. It worked beautiful as a birthday treat. We had a small celebration at home and it was enjoyed by all. The cake requires some maturation time as I assembled it on the d-day, but the syrup was yet to be absorbed well. The cake had absorbed the moist syrup, matured well and tasted much better the next day.

Happy Birthday to the man in my life who taught us to be independent, self motivated and living everyday to the fullest. To take life with a pinch of salt, a little spice, a little bitterness and loads of sweetness, the bitter-sweet way! He's a man who gives us strength, boosts our spirits and is always with us in highs and lows of life. Thanks dad for being there always. :)

Happy Birthday Dear Dad!


We love our indulgences in dates and do often to curb our hunger, almost on a daily basis. It's one of those ingredients that goes into our cereal bowl without a second thought! Known for it's health benefits and natural sugars, it pairs well in a few fabulous desserts and is healthy too.

I initially intended to bake a good Date and Walnut Bread. But having run out of good quantity of the dates at hand required to bake the bread, I settled to make these muffins instead. I was skeptical how these muffins would turn out, since it's practically my first attempt at using dates as a replacer for eggs.

To enhance flavors, I used freshly-ground-at-home cinnamon powder. I haven't come across any store selling cinnamon powder here, so I have a few cinnamon sticks ground to powder for these occasions. Though cinnamon is so commonly used in our everyday cooking, it is not my taste in desserts. Saying this however, I have found them to do pretty well with a few fruity cakes which calls for all spices. Apart from this, I haven't exploited them much in desserts.

The muffins came out to be fantastic. Just perfect. These may not require any toppings, but would do justice if opted for. I topped a few of the muffins with a good helping of chocolate-y nutella which went superb as a frost. I got 6 large muffins from these. I also added in walnuts for that added edgy crunch.


Date Walnut Muffins

INGREDIENTS

1/4 cup pitted dates, chopped
1 cup hot milk
1/4 cup oil
1 1/2 cup plain flour
1/2 cup minus 1 tbsp sugar
1/2 tsp baking soda
1/2 tsp baking powder
1/4 tsp ground cinnamon
1 tbsp heap of walnuts

Frosting:

1 tsp Hazelnut spread Nutella
1/2 tsp broken walnuts


DIRECTIONS

Place dates and hot milk in bowl and allow it to stand for 10 mins so that the dates soften. Pulse this in a mixer till the dates coarsely combine with milk. I like those few fruity pieces coming through in my muffins as I bite into them. Add the oil and vanilla. Stir well again.

Preheat oven to 180ºC. Grease 6 cups of a muffin pan.

Sieve the flour in another bowl. Add in sugar, baking powder, soda and cinnamon into it. Mix them well.

Make a well into the dry ingredients. Pour in the wet ingredients and mix till they just combine. Finally add in walnuts. Spoon mixture into muffin pan, bake for 20 minutes until done.


I topped them with a frosting of Nutella which was spread with a butter knife. They made a fantastic topping. Opt for any other alternative of your choice.

The dates have an inherent sweetness, so test the sweetness to your taste before baking. The next time I make these I would like to try them with bananas. Another alternative should be brown sugar which may go very well in these. These are just my assumptions. I will post them here when I try them.

The sweetness of dates and milk came through well. It was mild and mellowed, just went perfect for the warm weather of the day. These freshly baked warm muffins with nutella frosting is my take this week with a warm cuppa homemade almond milk.

My Russian friend blogger, Natalya from Natalya Cooking has shown a kind gesture by sharing this Sweet Friends award with me and I am glad to accept it. Natalya has some great recipes with her blog translated into 3 languages: French, English and Russian, so that it can cater all masses. Take a peep. Thanks a lot Natalya. That was kind of you. The award comes attached with rules:


List 10 things that make you happy. (I would like to keep that for my next post ;))
Pass the award onto other blogs and let them know you have done so. I would like to recognize two bloggers here. Both are fabulous and talented with great recipes to share with all. Keep up the good job guys!

Saswati
Nitya

Note: I will be editing a few of my old posts with new photographs. So do check them out and drop your feedback. You may like to visit this one for now:

Homemade Pizza Dough
Onion Chutney


May is the month for summers in India and summers have set in well in most parts of our country. While many parts of the country have been crippling in scorching heat, we are lucky to have an envious weather even in the month of May. Though mornings and mid-days do face the summer scorch, we have been fortunate enough to receive occasionally scant, pleasant showers in the evenings. But, this does not stop us from dwelling on juices, cool drinks and ice creams on almost everyday basis to soothe ourselves from the heat in the day.

Since my previous stint with Homemade Vanilla Ice Cream, I haven't posted any ice cream recipes. In fact, I haven't made much at home apart from a couple of flavors. Every time I make, it's gone much before I can capture it for this space! ;) With temperatures at peak this summer season, I have been whipping more ice creams, experimenting with different flavors that I hadn't done in the past.


I recently made this Caramelized Peanut Butter Ice Cream which turned out fabulous. We relished it thoroughly and I thought it's a must share recipe, coz I made it fat free, the gelato way. I made this ice cream from scratch, but I believe using a Peanut bar or Indian Chikki would be a cheat version of this Ice Cream. I haven't tried that yet, so if you have tried, do let me know how it turns out to be.


Caramelized Peanut Butter Ice Cream

INGREDIENTS

400 ml milk
1 tbsp corn flour
150 g damerara sugar
100 g roasted peanuts
1 tsp of vanilla essence
A pinch of salt

DIRECTIONS

Add the corn flour to the milk and heat it through till the milk thickens. Stir continuously. Once the milk becomes thick, remove from flame and keep aside to cool.

Roast the peanuts. Remove their skins. Grind them to powder in a mixer and keep aside.

Next caramelize the sugar. Heat the sugar on a medium low flame with a tsp of water and swirl around gently so that the sugar doesn't burn. Once the sugar has melted keep a close watch on it. Let it brown and caramelize. Turn off the flame and add the roasted, powdered peanuts and salt and mix well. Allow to cool.

Once cooled, grind the caramelized peanuts to a paste in a heavy duty grinder along with the vanilla and 1/4th of the thickened milk. Once the peanuts have released butter and are thoroughly fine, add in the remaining of the thickened milk and pulse again.


Chill thoroughly, then freeze in your ice cream maker according to the manufacturer's instructions. In case you do not have an ice cream maker, then try this. Transfer to freezer proof air-tight container. Freeze for an hour or two until the edges have started setting in to ice. Remove and pulse again. Freeze again. Repeat for another 2-3 attempts to break the forming ice. Serve!

To frost the cone, melt some dark chocolate in a double-boiler. Dip the mouth (open end) of the cone into the melted chocolate and invert it. Allow the chocolate to drip down naturally. Before the chocolate sets, coat the chocolate with some crushed peanuts. Allow to set (may be in a fridge if u like). Scoop out the ice cream and serve a nice dollop on the frosted cone. Top it with chocolate chips.


The best part of this recipe is that I haven't used any cream. Being made with milk alone it's a guilt free indulgence. The corn flour worked wonders, making it creamier and giving it a good texture that an ice-cream needed. Without an ice-cream maker at hand, I was immensely glad with the final result. Not being too high on sweetness, it tasted great with bold flavors of peanut butter hinted mildly by caramel and vanilla flavors. I am sure to try various other flavors with ice creams this summer.

So if you are being severely reprimanded by the scorch of the day and if it's only cool treats like ice creams that helps you beat the heat, then you must give this a try!


I doubt if there's any one out there who dislikes Okra or Lady's finger or our very own Bhindi. I haven't met many, sorry any! It's a vegetable that is universally known, commonly accepted with grace and love in many cuisines worldwide. And in Indian homes, it makes a prominence with no compromises. Be it in South India or North India, it's a common vegetable you'll find in most Indian homes.

Both, DH and I are fond of Okra and we make it a point to buy it often, almost on every grocery shopping, at least once a week. Variations with Okra may be limited, but this vegetable surely has a distinctive flavor of it's own that makes it require minimal dressing.

This raita is a take from my mother's kitchen. Not often does she make this as she prefers a good subzi over this one. But this yogurt based dish was often whipped by her at parties where they made an elegant match for many other accompaniments, be it with rotis and parathas or flavored rice. The yogurt lover that I am, you can imagine the crave I have, which I can not resist when these are served.


Bhindi Raita

INGREDIENTS

200 gm Okra or bhindi
1 tbsp oil
Salt to taste
1 cup yogurt
1 tsp cumin powder
1 tsp chili powder

Temper:

1 tsp oil
1 tsp mustard
A few sprigs of curry leaves


DIRECTIONS

Wash and clean the okra. Allow it to dry on a kitchen towel. Ensure it's completely dry, else it make turn a little slimy while cooking. Chop the okra to small round pieces. Set them aside.

In a pan, heat a tbsp of oil. Add the chopped okra in the hot oil. Do not add any water during the cooking process. Add salt and sauté for few minutes till they soften. They may look slimy, but will reduce once removed from heat. Remove from heat when they look a little crispy. Let them cool.


Prepare the dressing. Take some yogurt in another bowl. Add a tbsp of water to make it a little thin if you like. That's how I like mine. Add in the salt, cumin and chili powder to taste. Whisk it. Add the fried okra to this spiced yogurt.

Make a tadka or to temper, heat a tsp of oil, add in the mustard and curry leaves. As it begins to splutter, remove from heat and add them to the okra in yogurt. Sprinkle a little chili powder on top and serve.


Ensure that the fried okra is cooled before adding into the yogurt. Else, it may turn the yogurt sour, unless you plan to serve it immediately. You may serve this at room temperature or even chill it.

The tempering can be changed. Use cumin seeds instead of mustard. Garnish with coriander leaves or add a dash of chili powder before serving.

I made this for our dinner the other day and we just loved it. The fried okra in mildly spiced yogurt has subtle and simple flavors with the tarka that adds all the glamor to this dish.

For all the mother's out there... Happy Mother's Day! A special Mother's Day wish to the lady of my life, my beloved amma. Happy Mother's Day Amma!


When I first started blogging more than a year ago, I restricted this blog to being a personal space. With time, as the recipes accumulated and started piling up, I wondered if this site should go out to all. Then, with a few of my friends approaching me for recipes that they liked of mine, I decided upon to make it public.

These were recipes mostly transitioned to me by my mother or adapted from cookbooks and cookery shows, mostly jotted down in my diary. I hadn't taken blogging seriously then and never even intended to at that point in time. I barely blog hopped, forget even dropping comments. I silently continued to post recipes, with latency in posting at times. For obvious reasons, I hardly got comments. In fact none from food bloggers. And it did not make any difference.

It was during these occasions when my blog was running muted, food blogger, Suma came across my site leaving a comment. An unexpected me can't possibly express how elated I felt from that comment. Hardly had I realized that my blog had opened up to readers whom I had never seen or known. With time, I realized that there was an enormous blog world outside mine, who were more enthusiastic than I was, who've spent couple of years in blogging, guys who have been rocking the blog world! That was the beginning of my 'real blogging' or must I say 'blog hopping'!!!

Living in the same city, it made a difference to me knowing Suma. What began with exchange of comments, then emails and now phone calls, we seem to share common interests. We've exchanged ideas on recipes, baking thoughts, sources for uncommon ingredients, knowing interests, family... etc, etc... We haven't met up yet, possibly some day.


When Suma approached me for a guest post on her blog I was delighted. I posted this recipe on her blog. However, I was in crossroads whether to post that recipe here or not. I settled to do so, with this dedication to Suma, my first first acquaintance in the food blog world. Thanks Suma :)

What I shared with Suma was this healthy breakfast recipe for Granola. This Granola is loaded with nuts and we love it that way. The honey roasted oats and nuts bring out some good flavors while the nuts add a great deal of crunchiness to this recipe.

There are no rules with Granola. Throw in ingredients of your choice, basically anything and everything that you like. Recipe is simple and can be stored fresh in air-tight container for weeks. Served with milk or yogurt, they are the best way to go for a healthy start to your hectic day.


Homemade Granola

INGREDIENTS

3 cups rolled oats
1 cup corn flakes
1/4 cup chopped almonds
1/4 cup walnuts
1/4 cup chopped dates
1/4 cup melon seeds
1/8 cup flax seeds
1/4 cup raisins
1 cup honey
1 tbsp butter
1/4 teaspoon salt

DIRECTIONS

Preheat oven to 250 degrees F. In a large bowl, combine all the dry ingredients, except raisins. In a separate bowl, combine honey, melted butter and salt. Pour this to dry ingredients, toss to mix well. Transfer to baking tray. Cook for 40 minutes, stirring every 10-15 minutes to achieve an even color. Keep a watch. Take care not to burn them brown. Remove from oven and transfer into a large bowl. Add raisins and mix until evenly distributed. Store them in air-tight containers.


What's good about Granola is that you can throw in ingredients of your choice, basically anything and everything that you like. I like to add in figs at times. Sometimes skip the butter and roast them dry. Or may be replace corn flakes with wheat flakes, they work very good too. Increase or decrease sweetness if this isn't apt to your taste. Combination of 1/4 cup dark brown sugar with 1/2 cup honey would also work fantastic. There are no hard and fast rules. You decide on what you want to throw in!

With loads of nuts in them, I also love to add in fresh chopped fruits while serving. My favorite top ups are pineapples, peaches, oranges, bananas and apples. Seasonal fruits like Mangoes go well too. Serve with warm or cold milk. Try soy milk or even almond milk would be great!"

And as Suma concludes, this is a delicious recipe, for a healthy breakfast which is deliciously luxurious too!!!


After a short break with cookies, I am back again to the cookie business ;) And this time it's different from the previous cookies I have posted. I have made these Almond Pistachio Cardamon n' Saffron Cookies a couple of times now and this one is one of our favorite ever, especially with my DH. He always asks for more of these. I have been itching to post the recipe for long now.

Nuts have always been a part of our diet and our favorites too. We love them in any form, as is or in desserts or even as toppings. I always have a few almonds and pistachios slivered for ease.


Another method in which I like to use these nuts is in Indian Styled Almond Milk (Badam Milk), which is quite common at our place. Roasted almonds, pound to powder and flavored with warm scented cardamoms are kept in well sealed air tight containers to help us with long shelf life. Just mix with milk to serve a cup of homemade almond milk in minutes. Recipe? Here it goes... The thought makes me want to grab a cup of it right away!


Making your own Almond Flour at home:

And if you are looking for a simple recipe to make almond flour at home, this is how you can make your own...

Place 1/2 cup whole, un-blanched almonds in a dry mixer. Pulse just until a fine textured meal forms. Don't over-grind or you will land up with almond butter!

The recipe for cookie is quite simple. Here's what we need.


Almond-Pistachio Cardamom n' Saffron Cookies

INGREDIENTS

1/2 cup almond milk powder (You can use store-bought badam milk powder as well)
1/2 cup plain flour
1/2 tsp baking soda
1/2 cup oil/butter
Handful of chopped pistachios

DIRECTIONS

The recipe is as simple as just putting all the ingredients together in a bowl and bringing them together with oil/butter till they bind together. Refrigerate for a couple of minutes to handle the dough well. Knead and roll to a flat surface and cut to shapes with a cookie cutter. Place it on baking tray and bake for 10-15 mins till the cookies brown.

In case you do not have almond milk powder at hand, use 1/2 cup each of almond flour and 1/4 cup of fine sugar and add in the pistachios and saffron to it.


I made these cookies using oil instead of butter and they came out very well. Butter will make these richer in taste. Since the recipe does not call for any butter, it's healthier. Use butter for a richer taste. My homemade almond powder has sugar, so there's no added sugar in these. A store bought almond milk powder would also work great. I have made these with them as well and they too produce equally good results. These cookies are fairly simple and can be put together in less than 10 mins.


Did you know what almonds can do to you? Eating almonds in moderation promotes lower cholesterol levels, thus preventing the risks of heart diseases and can help with weight loss. Almonds are a great source of the Vitamin E and Folic acid and excellent to stimulate brain cells for good memory. They are known to benefit beauty by preventing premature appearance of wrinkles, black heads, pimples and dry skin.

At parent's place we were put in practice of regularly eating 4-5 almonds everyday with milk before sleep. Even today they follow that practice religiously. However, I drifted away from that practice. I just pick a couple of these anytime of the day and pop it to kill the hunger pangs.

As an excuse to consume almonds regularly, I recently made a batch of almond milk powder. It's a modest change to the regular tea or soy milk that I consume every morning. Apart from being a refreshing beverage that I like to serve my guests, I have also made some cookies and been using them in many other dessert recipes. The options are unlimited. It is quick and easy and requires few ingredients to make a healthy and deliciously tasting almond milk.


Homemade Indian Styled Almond Milk Powder for Badam Milk

INGREDIENTS

1 cup Almonds
1/2 cup Sugar
6-8 Cardamoms
1 tsp Saffron strands
1/4 cup finely chopped pistachios

DIRECTIONS

Heat a pan on medium low flame. Toss almonds to roast lightly. Allow them to cool well. Roasting almonds helps in removing any moisture in them and this will assist in a longer shelf life and retain freshness in flavor.

Place the roasted almonds, sugar, saffron and cardamom seeds in a dry mixer. Pulse to a fine powder. Do not pulse beyond that as it will turn into almond butter! Cool and store in an airtight container.

To make almond milk, take a teaspoon heap of prepared almond powder and mix it well with warm milk and serve. If you like it cold, mix the almond powder in a little warm milk and then add in cold milk to it and serve!


I like to serve my almond milk for breakfast with homemade muesli and fruits. Again, as I said it's a subtle variation to the regular milk or soy milk. Filled with warm cardamom and saffron flavors, it's not just healthy, nutritious breakfast, but also filled with ample goodness derived from almonds and pistachios. My way to go for a healthy start!