Today, the November 14th is celebrated as Children's Day throughout India and I extend my hearty wishes to all the children a Happy Children's Day. May your childhood be filled with loads of fun, thrill and happiness and may you sail a smooth journey to a better bright future. After all childhood is all about innocence and playfulness, it's about joy and freedom to enjoy and have fun.

Coming to think of my childhood, I have had good share of fun in my childhood days. Thanks to my dad's job, we moved places and changed many schools. New place, new school, new friends, new uniforms, new teachers were common to us and we were quite open about accepting this change. In fact, in a way we were accustomed to this as our parents had tuned us to accept the fact that we would be loyal to a particular school only for sometime :) It was not until I reached my ninth grade that we decided to settle down and not change schools anymore as that would hamper our studies.


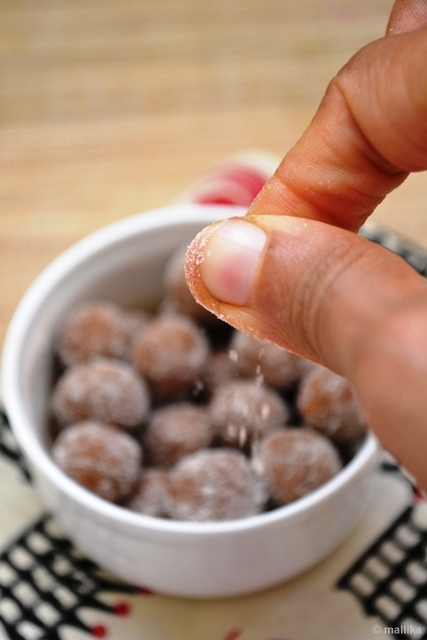
Like every other kid, I too have fond memories of my school. Infact there are so many that it would be hard to jot them all here. Children's day was always kind to us. The day meant no uniforms, no books, only loads of fun filled entertainment and games, all to compensate for the stress from competition we had taken from teachers, parents and society to prove ourselves better! Probably one of those days when going to school meant no burden to us. Our school would organize fun activities with teachers taking part actively to hold cultural performances followed by games, prizes and sweets that would make us kids a day to enjoy and remember. While through the year long we kids would carry bags that could easily be weighed in a couple of kilos, on Children's Day we were allowed to come hands free to have loads of fun. After all that celebration I probably looked forward to sweet distribution as my personal favorite part of the day. You'll know I was a foodie even as a kid :)

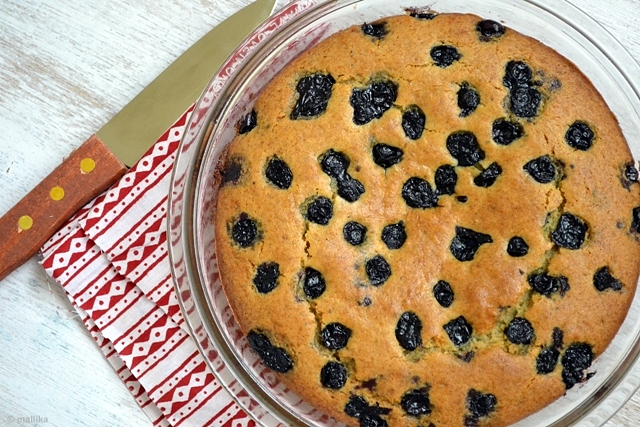
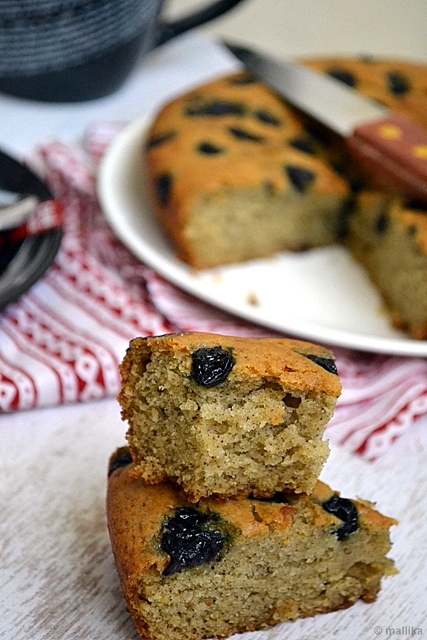
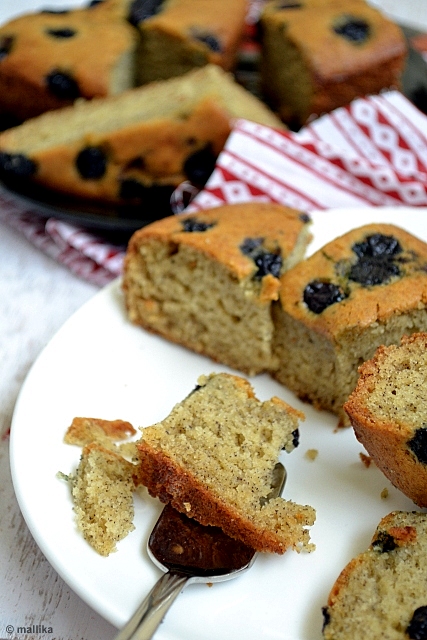
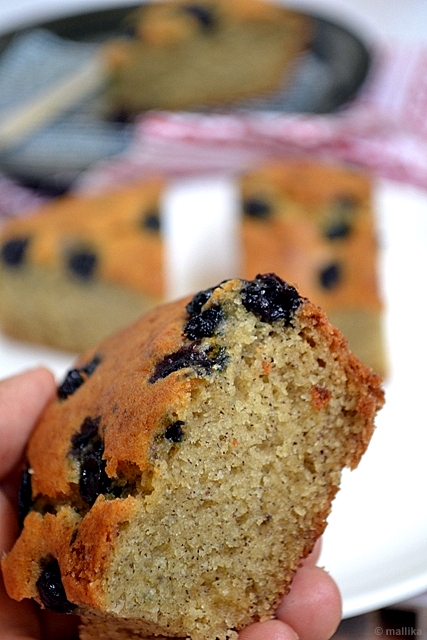
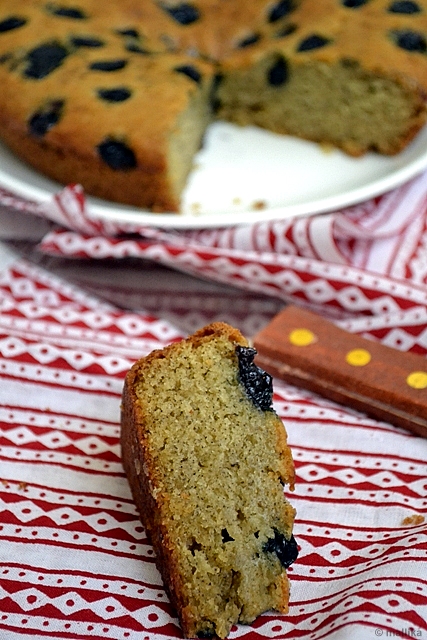
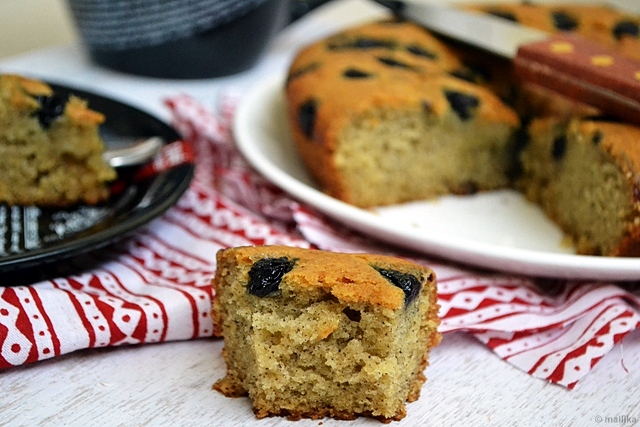
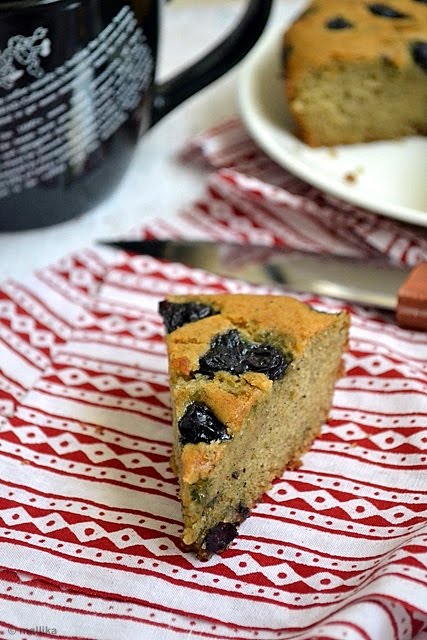
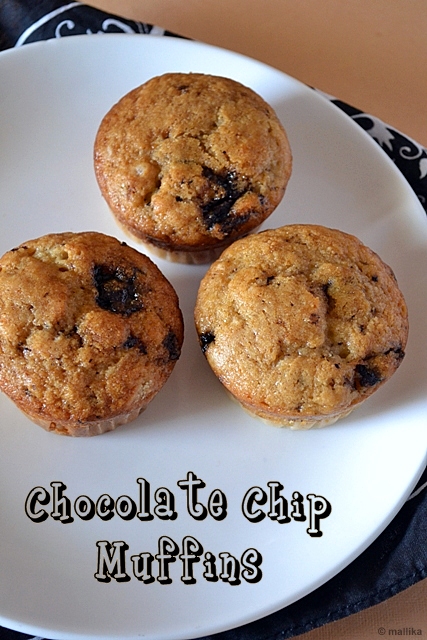
Nonetheless, how can an occasion be celebrated without any scrumptious food? Since it is a day for the kids, I made these easy and delicious muffins on this Children's Day to treat the kids. The recipe is egg-free and yet another adaptation from Nita Mehta's cookbook. Enjoy a scrumptious Children’s Day!


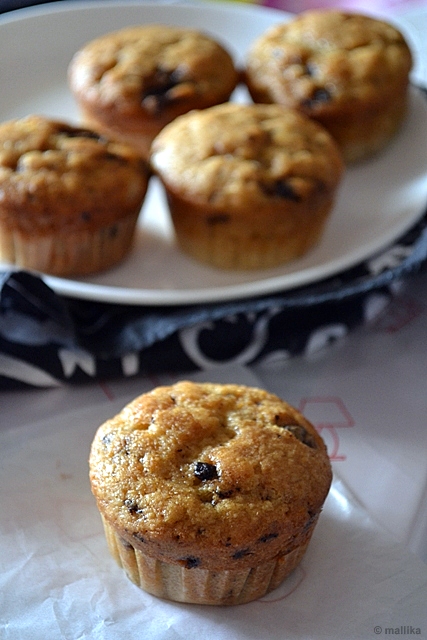
Chocolate Chip Muffins

INGREDIENTS

1 1/2 cups All purpose flour
1 cup Thick Curd/Yogurt
1 cup Sugar minus 1 tbsp
1/2 tsp Baking soda
1 1/4 tsp Baking powder
1/2 cup Butter
1 1/2 tsp Vanilla extract
A fist full of Chocolate Chips


DIRECTIONS

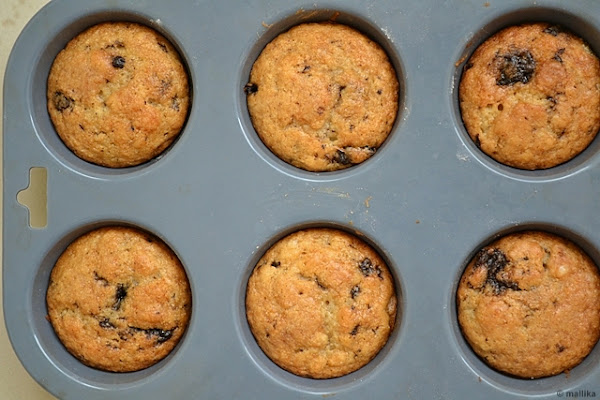
Preheat the oven to 200 deg C for 10 mins. Layer the muffin tin with muffin liners.

Sieve all purpose flour twice and keep aside. Cream the sugar and curd until sugar completely dissolves. Add baking powder, baking soda to the creamed mixture and mix well. Leave aside for 5 mins and till bubbles appear on the mixture. Now add in vanilla essence and softened butter and beat well. Next slowly add all purpose flour in portions at a time and blend with wet ingredients. Beat well with a till creamy and thick. Finally fold in the chocolate chips gently. Pour the batter to the prepared muffin liners and bake in the pre-heated oven for 15-20 mins (time depends on the oven you use). The top should be golden brown in color and centres cooked.


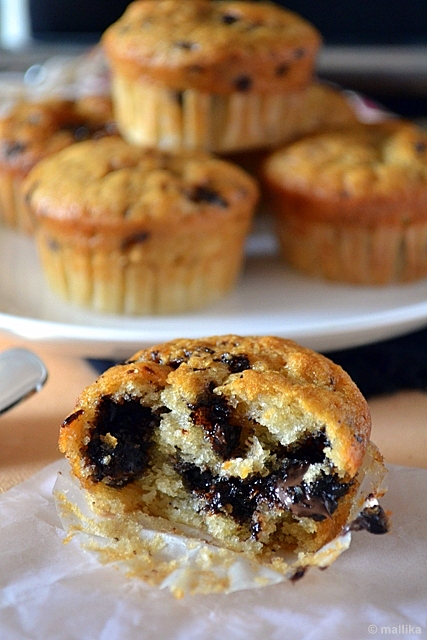
I used cooking dark chocolate chips in my cake batter which gave us gooey chocolate patches as we bite into the cake. You may also use chocolate chunks for the same effect. If you want firm chocolate bites, use regular chocolate chips (the ones we get in Nilgiris outlet, Bangalore) that don't melt easily. With addition of chocolate chips/chunks, this makes great tea-time goodies for the little ones. Every kid would love to sink his teeth into one and grab his second and third.


Festivities in the last week continued at my work place too and the ones who offered to work on these holidays were treated with food as a part of celebrations. To put it this way, I have been eating enough of store bought pizzas at my work place off late. The kind of pizzas offered aren't my best pick. Thick crusts of bread are not so fresh and all it feels is like biting into thick bread base with skeletal toppings. Eating pizzas and pastas at pizzerias with family and friends have diminished than ever before, more evidently since I have been making the base at home, albeit attempting their healthier counterparts. Seconding the reason that I have taken to liking thin crust pizzas than the deep pan ones.


If you've been through my previous posts on pizzas, you well know how much I love my pizzas loaded with toppings. Ironically, much against my liking, a vital element of a good pizza is not overloading the pie with toppings. Less is definitely more on pizza. And with thin, crisp crusts like this one, I can well assure that. :)

Pizza Margherita has been catching quite an attention from long. Every time I look up the pamphlet to place an order, Margherita calls out to me. But then, only tomato, basil loaded stuff doesn't appeal either, right? Is it just the name? I am not sure. I push the thoughts for a next time and go ahead for fancier toppings.


Something impelled me to make this classic pizza at home. First the recipe from the cookbook 'Vegetarian cookbook' said making this was a breeze and then Soma's blog compelled me further. I got down to making one of those classic recipes that's meant to stay the way it is. Did you know how Margherita Pizza got it's name? It is said that the Neapolitan chef, Raffaele Esposito created the Pizza Margherita, a pizza garnished with tomatoes, mozzarella cheese and basil, in honor of the Queen of Italy, Margherita of Savoy. It was created to represent the colors of the Italian flag. Now isn't that pretty interesting how a simple pizza, laden with tomatoes and cheese alone can get an exotic name?


Pizza Margherita with Thin crust Millet flour pizza base

INGREDIENTS:

Homemade Pizza dough

1 tsp dry yeast
1/4 cup warm water
A teaspoon of sugar
Salt to taste
1 cup flour mixture (Wheat Flour + Millet Flour in ratio of 3:1)
1 tsp Olive oil

Sauce/Toppings:

1 cup tomato puree
4-5 cloves of garlic, finely chopped
1 tbsp oregano flakes
1 tbsp fresh/dry basil leaves
1-2 tomatoes, chopped in rings (optional)
1/4 cup grated mozzarella cheese
Salt and Pepper to taste

DIRECTIONS

Prepare Thin crust Millet flour pizza base:

In a mixing bowl, blend yeast in lukewarm water along with a teaspoon of sugar. Allow this to rest for 10 mins. This should be frothy by now.

Heap the flour mixture into a large bowl and make a pit in the center. Pour the yeast mixture, salt and 1 tbsp of olive oil. Knead gently to form a smooth, soft, slightly sticky dough. Cover the dough with a kitchen towel and set aside in a warm place for an hour like an oven until almost double in size. About 20 minutes before baking, punch down, knead a minute or two and then form into a ball. Roll out thin crust pizza base.

Prepare the Sauce:

To prepare the sauce, heat a tablespoon of olive oil over medium heat. Sauté garlic and oregano for a few seconds. Do not let the garlic brown, they should only sweat. Add pureed tomatoes. Boil till the sauce is fairly thick. Adjust salt to taste.

Assemble the Pizza:

Spread sauce over thinly rolled out pizza crust, layer tomato rings (optional), sprinkle basil, good helpings of mozzarella cheese and finally a dash of olive oil. Finish with generous black pepper and a little salt. Bake in a pre-heated oven of 220 deg C for about 20-30 mins. Cut into wedges and serve hot.


The base follows a standard recipe with a substitution of millet flour instead of all purpose flour, making it a much healthier version. Count a few perks of home baking :) Millet flour is gluten-free, hence the dough would have less elasticity; don't expect it to behave the way all purpose flour would. I used a mix of whole wheat flour and millet flour in 3:1 ratio.

You can leave out the tomato rings, instead use roughly chopped tomatoes in the sauce. used dry basil leaves, however I suggest you use fresh basil if available. Basil and tomatoes marry well with each other and they are a combination made in heaven, making this pizza simple, yet bursting with fresh flavors.

What sounds like a tedious amount of work isn't actually any. It's wonderfully aromatic when you have the otherwise awful smelling yeast sitting in the oven converting a yeasty dough to a freshly baked crusty base topped with tangy cheesy tomato sauce and the entire house envelops with the charming smell of freshly baked rustic pizza. What an end to a Sunday evening!!!


Diwali celebrations just got over and we are still hanging on in festive mood. Lights put up for Diwali haven't come down yet, kandeels hanging up high in air are yet to be pulled down and diyas welcoming the door steps are to be removed. Flowers have lost their fragrance and Rangoli has faded into thin air and I am busy cleaning up the oil spill overs. Diwali may have been over, but it's spirit is still alive.

This Diwali was filled with loads of fun with lights, colors and lots of food on plate to eat. No crackers for me as the loud noise and pollution do not fascinate me much. But putting up lights and decorating home with diyas and kandeels is always on my to-do-lists. With all the festivities that went by and for the ones we have ahead, here I have a post festival treat to soothe your heavy tummies! And with sweet treats and spicy savories, what can be better if it is followed by some digestive candies to soothe your content tummies! I felt this post was apt for this season of festivities. :) So here's my version of digestive Tamarind Candies, aka Imli Heeng Goli.


The recipe comes from my dad where he uses minimalistic ingredients to make an extremely tasty, tongue tickling, lip smacking digestive candies, surely not something you can resist eating just one. I was craving for these some time ago and it brought back fond memories of my high school days when these candies were our favorite after meal treats to smack into. One of our school peons would sell these as tiny homemade candies wrapped cutely in thin transparent polythene sheets and sell them at a cheap price of 10 paisa. These candies will surely send your taste buds tingling.

Imli Heeng Goli

INGREDIENTS

1 tbsp tamarind
2 tbsp jaggery
1 tsp jeera powder/cumin seeds
1 tsp red chilli powder
1/4 tsp compounded asafeotida/hing
1 tsp salt
1 tbsp of castor sugar/powdered sugar for coating


DIRECTIONS

Dry roast cumin seeds till they darken lightly and turn aromatic. Pound the compounded asafeotida if in rock form. Add it to the roasted cumin. Add in the chilli powder and salt to taste. The spice mix is ready now.

Separate tamarind seeds, if any and discard them. Grate the jaggery and add it to the tamarind. Add the above spice mixture to this and start kneading it gently. Kneading it may call in a bit of your muscle effort as dry tamarind is stiff and working with it can be quite an ardent task. However, the tamarind, jaggery and spices will come together eventually to a dough like consistency. Taste and check for the spices. Increase jaggery according to taste. Your resultant dough should turn stiff and you can roll them just like a candy. Roll them to small logs or round candies using palms of your hands. Roll them in coarsely powdered sugar and store in clean air-tight containers free from moisture.


Just a handful of ingredients go into making this tongue tickling candy. It's hard to resist eating anything less than one. I made a good handful of these and before the end of day, they were all swiped clean. These candies stay for a month long since they have no moisture in them. Pack them in thin foodgrade plastic wraps and they make great travel companions too.

Rolling them in sugar helps these candies to prevent sticking to each other. There can be variations to this recipe. Add in pepper instead of red chilli powder. Omit asafeotida if that's not a flavor of your choice. If you love biting into those Hajmola candies, then this surely will tempt you to make your own at home. A melange of flavors, sweet and spice, salt and tangy, simple and easy, yet a winner recipe.


Here's wishing all my readers a very Happy Diwali. Sorry about being away from sometime. I am here, back again after a short hiatus. Work and personal life has been keeping me on my toes, to an extent blogging had to take a short backseat. I did intend to post something earlier, but time has been a bitter enemy! Now that Diwali is right here, I nudged myself to post this for my readers.

Indian sweets are comfort food for me, after all this is what I grew up eating all these years. Diwali or Deepawali is perhaps the most beautiful of Hindu festivals in India. Diwali signifies the victory of good over evil and is commonly celebrated across most states in India. Personally for me each festival brings hope, life, energy and happiness. This Diwali has been special to all of us, especially since it's our daughter's first one. Festivals for us are incomplete without sweets and delicious good food. It's true essence lies in enjoying the company of our loved ones and indulging in our favourite foods. Food that give us joy and comfort.


The store I hit often has been flooded with Diwali goodies. Supermarkets boast of Diwali festivity with neatly stacked gift boxes of dry fruits and sweet-meats beckoning every nook and corner. Ofcourse, then when you talk about Diwali, how can you not picture traditional Indian sweets? While traditional desserts may not be a part of daily Indian menu, they do feature on festivals making them an integral part of our festive celebrations.

I have been dreaming of making Kalakand since a long time now, ever since I saw the recipe in Nestle recipe book that came with Milkmaid. The book itself is named as Diwali special sweets with 9 traditional Indian recipes, all worth trying. I am glad I tried this out and was loved by all.


Kalakand

Recipe by Nestle's Milkmaid recipe booklet, also available on Nestle.com

INGREDIENTS

1 tin (400g) Sweetened Condensed Milk
2 heaped tbsps Milk powder
500 g Paneer (Cottage Cheese)
3-4 powdered Cardamom (Elaichi)

For Garnish

Silver leaf
Pistachio and Almond slivers

DIRECTIONS

Mash paneer coarsely and mix in milk powder and condensed milk. Heat the mixture in a thick bottom pan. Cook on medium heat with constant stirring till the mixture becomes thick and starts leaving the sides of the pan. Remove from the fire and spread onto a greased plate. Sprinkle elaichi powder & top with silver leaf or sprinkle kesar soaked in water & top with almond slivers. Cool and cut into squares.

Kalakand is expected to have a soft, crumbly texture with every bite. Don't be alarmed if you have some whey leaving from the edges while spreading the Kalakand. Good, soft Kalakand has some whey water seperating from it when it is spread on the tray. Most of it gets absorbed as the Kalakand cools. For this dessert in particular, I suggest it's best to make cottage cheese at home using fresh milk. However, if you are short on time, a store bought paneer works equally good. I have made this dessert a couple of times and it does feature on my favorites.


I used cardamom to flavor this dessert, but saffron flavored, Kesar Kalakand is definitely on my to-do list. Place each kalakand on paper cup and pack them to be shared with your family and friends. With subtle warm hints from cardamom, this dessert is rich and makes a great give away as gift.


I have never come to dislike anything as much as I did with blueberries off late. I think it was a thing of overdose. A good tin of canned blueberries were miserably used in every possible dessert to an extent that even the name of it would want me to shun it some time now. True that I had over worked with them, having used them in cakes, ice-creams, fro-yo, milkshakes. And if I had to say, even our breakfast with morning cereals were not spared.


Blueberries cost a bomb here and are not easily available in fresh. Before the tinned one was close to it's expiry I thought I should put them to best use. On the other hand, I could see my husband had too much of that flavor. He begged me not to use that last bit from that can, humbly requesting to discard even if it costed a lot. Had it not been for him, we would have probably ended up with some homemade blueberry jam for our breakfast.... very soon! He holds me culprit for this dislike.


Then, there was a time when Blueberry Muffins were my favorite take-aways from coffee shops and malls only because they were a rarity of kinds, but these days they no longer get a second glance from me, forget their purchase.


This cake is a twist in a tale. My husband isn't much of a sweet tooth. And if there's something he will ask for, then it has to be either a sinful chocolate cake or that rustic banana bread, both of which I can see him binge.

So when he refrained me from going on another blueberry spree, my only rescue was to pair it with bananas. He had been insisting on a banana bread for a long time and I decided he should be in a surprise this time :). Pleasant or not? It was for him to decide :D.


Blueberry Banana Tea Cakes

INGREDIENTS

1 cup all purpose flour
1/2 cup whole wheat flour
1/2 cup butter
3/4 cup sugar (increase if you prefer this cake sweeter)
2 ripe bananas (I chose yelakki bananas)
1/2 cup milk
1 tsp baking powder
1 tsp baking soda
A tsp of vanilla extract
Handful fresh/frozen blueberries

DIRECTIONS

Pre-heat the oven to 180 degrees C. Sieve together all purpose flour, wheat flour, baking powder and baking soda. Keep aside. Using a mixie, blend together the bananas with milk, sugar and vanilla extract. To this add melted butter. Finally toss the wet ingredients into the dry ingredients. Transfer the batter into a well greased cake tin or glass cake pan. Dot the top of the cake with fresh or frozen blueberries. I used tinned frozen blueberries here. Bake for 35-40 mins or till done. Test using a skewer or toothpick.


I generally use sweet Yelakki bananas in my cakes. That's the kind of banana we like for our regular helpings too. I am not particularly fond of Cavendish or the long bananas we get in markets. I balanced between the wheat flour and all purpose flour that gave my cake a nice nutty taste, yet did not steal away the flavors from it. The cake had a lovely texture with speckles from banana veins all over making it truly rustic.

I felt like a kid that day. Before I let the cake cool down, I enthusiastically cut my tea cakes in all sizes and shapes. I first cut them to triangles, then thought I needed them in squares, a few were cut into rectangles and few diamonds too ;) You can see I was a little too impatient for the cake to cool down. Surprisingly, blueberries and bananas made a great combo. Whatever shape it was cut into, it tasted great. They were absolute tea time treats.


My mom celebrated her birthday last month and I had every reason to bake a cake, especially when it's for her. I made plans, that too elaborate and I was determined it had to work well, secretly. Wanted to bake an Eggless Blueberry Gateau and chalked out timetable such that things would fall in place.

It wasn't probably the best day for me. Somethings just don't work right, that too when you are super excited to the pinnacle about it. Two days in advance to the D-day, I took time off in the evening to bake the cake. I chased my husband to buy some fresh cream and he was out on the hunt for what would sound a meaningless, clueless ingredient to him. Meanwhile, I baked an eggless sponge using the recipe for condensed milk. My baby sat in the pram silently looking at me as I shoved the cake to oven, let it bake there and skipped around setting up things for the frosting. The cake baked to perfection and it rose beautifully. I flattened the tops, sliced the center, moistened them with the syrup and let them sit on the stand to work artistically later. Things seemed positive till then.


I put myself back to relaxed mode, turned on the music, sipping tea and waiting patiently for my husband to be back with my dedicated ingredient. Clock ticked away and three hours later, he was back. I eagerly looked into the bag, hoping a liter pack would pop out. 'No fresh cream anywhere in town' he announced! The impulsive me almost blurted out the cry. "Yeah! I hunted the entire town. It's nowhere. There's a vendor issue they say." he confronted. I was broken. To him, it was more simpler to order an eggless cake from our dedicated Chef Bakers outlet. He comforted wondering why I should go through all this trouble of making a cake when we get the same fancy stuff outside. It may have sounded the simplest solution to anyone then :) The cake I baked was pretty massive. I had sliced it across, moistened it well, even spread the blueberry compote. I felt a sudden gush through my spine as my plans went topsy-turvy. I felt totally at loss.

The recipe I bring today is nowhere related to the cake I wished to prepare. But it's surprising how things do not work at times despite planning. A well prepared me had least thought that it was just not my day that evening, while this honey ice cream made out of no fore thought turned out to be one of the best flavors, something I least expected considering I was making it only to wipe off the last few spoons from the bottle!


Honey Ice-cream

INGREDIENTS

5 tbsp honey
200 ml low fat milk cream
100 ml milk
1 tbsp cornflour

DIRECTIONS

Prepare a thick custard by heating a mixture of 100 ml milk and a tablespoon of cornflour. Heat it till the mix thickens and coats well on the back of a spoon. Refrigerate till needed.

Whip cold cream along with honey and the prepared custard till it's all well combined. Taste your ice-cream at this stage. Add more honey if preferred. Transfer to a freezer proof bowl and freeze it for an hour till it just begins to set. Once it's almost set on the edges, remove and churn it briefly. Repeat a couple of times. This helps ice-cream to be creamy. After the final churn, freeze till it's completely set.


The ice-cream is simple to make and uses everyday ingredients available in every home. You can skip the cream and make a gelato too. My husband is not a honey lover, but the moment he tasted a spoon of this ice-cream, all he said was "Wow!". And it's the flavor from honey that makes it rich and delicious. Top it with nuts and they will only make it more decadent. Roasted almonds make the best pair for these and that reminds me of my favorite Baskin Robin's Honey and Roasted Almond ice-cream. Probably my next project, yeah?

Nippattu & Masala Shenga

Easy Nippattu Recipe | Easy Masala Shenga Recipe
I am very fond of Ganesha, the God of wisdom and prosperity and invoke him everyday. I believe in God, the strength prayers bring and the rituals performed for well being of our family and society. They bestow peace to my mind, an orientation in life which is of utmost importance for a healthy life.

This year Ganesha brought bounty happiness to our home and family. This Chaturthi had to be special for all of us. I fondly love to call my little one as Bal Ganesh and of course with due respect to my Lord, she has been named after him. She's prosperity for us, just as her name suggests. For the festival, our entire family came together for prayers and offerings, followed by a good spread of lunch and we felt pretty well soaked in the festive disposition.

A day before the festival, my mom and I came together to make both sweets and savories for the festival. While Modaka, Shankarpali and Tambittu were sweets made to offer our Ganesha, for savories we had Nippattus and Masala Shenga. Masala Shenga/Peanuts were not exactly for the offerings, but surely to serve the guests who came over to greet us.

Nippattu


Nippattu

INGREDIENTS

2 cups rice flour
1 cup maida (all purpose flour)
1/2 cup besan (chickpea flour)
1 tsp hing (asafoetida powder)
2 green chillies
3 strings chopped curry leaves
2 tbsp coarsely ground peanuts
2 tbsp hurigadale (roasted bengal gram)
2 tbsp chilli powder
2 tsp white sesame seeds
Salt to taste
2 tbsp cooking oil
Water to knead
Oil for deep frying

Nippattu & Masala Shenga_1


DIRECTIONS

Mix in all the flours, i.e. the rice flour, maida and besan. Add the hing, green chillies, finely chopped curry leaves, coarsely ground peanuts, roasted bengal gram, chilli powder, sesame seeds and salt to taste. Drizzle about 2 tbsp of oil. Using water little by little, knead gently into a soft dough.

Pinch lemon sized balls from the dough and roll out on an oiled surface. You can either use a granite stone or use a butter paper to pat the nippattu. An inverted and oiled steel plate will also do.

Heat oil in a fry pan. Gently drop the rolled nippattu and fry them on a medium low flame till they turn golden brown. Remove them and drain on a kitchen paper. Store them in air tight containers and they are good to go for a month long, well if you can resist not eating them so long!

Nippattu & Masala Shenga_2


Masala Shenga (Spiced Peanuts)

INGREDIENTS

For the Spice mix

1 cup gram flour (besan)
1/2 cup rice flour
1/2 tsp turmeric
1 tsp red chilli powder
Salt to taste

Other Ingredients:

3 cups roasted peanuts
Water as needed to bind the spices and flour
Oil to fry

DIRECTIONS

Mix all the spice mix ingredients mentioned above together in a large bowl. Add water in small quantities to the spices and flour. The quantity should be sufficient to ensure the spices coat the peanuts uniformly.

Heat the oil in a kadhai or fry pan on medium heat. Oil your hands a little as it will help in dropping the peanuts into the oil. Drop the peanuts in batches ensuring they are separated while frying. Fry the peanuts till they cook evenly and turn golden brown in color. Drain the peanuts on a kitchen paper to absorb the extra oil. Spread them out and allow them to cool down to room temperature.

Nippattu & Masala Shenga_3


Store the Masala Peanuts in an air-tight container and these are good for a month long. Again, these go very well as tea-time snack. Pack it up for travel treats or picnic munch-ons.

Both these spicy treats make great travel accompaniments and are excellent tea time snacks. Nipattu is another traditional dish from Karnataka cuisine and is commonly served as a snack in many Karnataka households. So the next time you have guests at home, greet them with these spicy Nippattus and Masala peanuts. Be promised, these spicy treats are sure to let their taste-buds lingering with it's spices.

Shankarpali and Tambittu

How to make Shankarpali | Tambittu Recipe
Wishing all my readers a very Happy Ganesh Chaturthi. Even before I have recovered from the heavy feasting we had on Krishna Janmasthami, we already have Ganesh Chaturthi here. More festivals to follow and I am looking forward to them eagerly. Festive season is here again and with good things happening in our life this year, I am all the more determined to celebrate our festivals with grandeur.

Ganesh Chaturthi is the festival I never miss to celebrate. The festival marks the birth of Lord Ganesha. Just like many, Ganesha happens to be my favorite God too. Our childhood did revolve around listening to mythological stories woven beautifully by my paternal grandma during our bed-time.

Larger than life-like clay models of Lord Ganesha have been making rounds in market, weeks before the festival. That's good enough an hint that the festival is just round the corner. Public celebrations of the festival, tableau and processions are hugely popular with streets laced with rice bulbs, music and heavily decorated pandals that host the God for 10 odd days.

Lord Ganesh is often associated with food and is known for his fondness for sweets like modaks, laddus, karjikai and savories like chakklis, kadabu and kodbale. Every Chaturthi, we have a ritual at home of waking up early for the bath, followed by puja. An array of dishes, both sweet and savory made at home by my mom a day before the festival are offered to Lord Ganesha on this day. The celebration goes on for 11 days, hence the sweets and savories are made in large quantities so that can last long. Like every year, Modaks will be made to offer the Lord this year too. Apart from this, we have Shankarpali, Nippattu, Huri Shenga, Tambittu and Panchakajjaya to offer our Ganesha this year. Fortunately, I have my mom close by, so it's been a combined effort. I shall share the recipes for Shankarpali and Tambittu today. Nippattu shall be on another post.

Shankarpali and Tambittu


Shankarpali

INGREDIENTS

3 cups all-purpose flour
1 cup sugar
1/2 cup milk
1/4 cup ghee
Pinch of salt
Oil or Ghee for deep-frying

DIRECTIONS

Mix the milk, sugar and ghee in a kadhai and heat to a boil. When it is warm enough to touch add the salt followed by flour and stir well. Add the flour till it comes to a kneading consistency, good enough to form a soft dough.

Using a rolling pin, roll out the dough flat to a centimeter thick. Using a pizza-cutter cut into diamond shapes. Deep fry them in hot oil/ghee till they turn golden brown. Fry on medium low heat. High heat will result in dark brown crust on the outsides and under cooked beneath. Remove and drain on a kitchen paper.

Shankarpali and Tambittu


The amount of sugar mentioned above is the right amount of sweetness we like. If you prefer it more sweeter, you may increase the amount of sugar as per your taste. The amount of flour mentioned above is an approximate number. While preparing the Shankarpalis, add in flour till it comes together to form a soft dough.

Spicy version of Shankarpali can also be made by replacing sugar with 2-3 teaspoons of chilli powder and omitting the cardamom powder. Shankarpali is a popular sweet all across the country. It's called Shakkarpare in the north while it's Shankarpali in the south. The names may differ, but the recipe is almost similar. It's pretty popular in Maharashtra and Karnataka and is often made on festivals in large quantities to offer the Lord and distribute among family and friends.

Tambittu

INGREDIENTS

1 cup rice flour
1/4 cup hurigadale hittu (roasted bengal gram powder)
1/4 cup coarsely ground roasted peanuts
1 1/2 cup grated dry coconut
1 cup grated jaggery
1/4 cup ghee (clarified butter)
2 tsp sesame seeds

Shankarpali and Tambittu


DIRECTIONS

Dry roast rice in a hot pan till it turns golden. Allow it cool. Grind it with roasted chickpeas to a fine powder.

Dry roast the grated dry coconut and sesame seeds till brown and set aside.

Take ghee in a fry pan/kadai and heat it till it's hot (not smoking). Dissolve the grated jaggery in hot ghee and stir well till the jaggery melts completely and the liquid just comes to a boil.

Mix together the coarsely powdered peanuts, sesame seeds and grated coconut. Add this to the boiling jaggery ghee mixture. Add the rice and roasted chickpea powder and keep stirring till the mixture becomes like a dough to make balls. Mix well to prevent the formation of lumps. Switch off the stove. Close and keep till it cools down. Grease your hands and roll balls to make tambittu.

Shankarpali and Tambittu


A little tedious it may sound, but isn't that effort required to impress your God? Tambittu is a traditional sweet dish commonly made in Karnataka household, often made to offer God during festivals. Again, these laddus stay well for a couple of weeks, so store them well in air-tight containers and they are good to go for your evening chai. You can see above we made a big batch to go for a few days.

As everyone celebrates Ganesh Chaturthi today with religious fervor, here's me wishing our Ganapati a very Happy Birthday. May Lord Ganesha shower you with success in all your endeavours. Hope this Ganesh Chaturthi brings home all the happiness, prosperity & fortune.

Jai Shri Siddhi Vinayaka

Shankarpali and Tambittu