In the small town where I grew up majorly, life was simple, time had a hold and things were slow. I had a blissful childhood in safe shelter of love, care and freedom. It was indeed the small town charm that made life simple and modest in a community replete of love and affection from all in the neighbourhood. Life there had an advantage and as kids, we enjoyed the proximity of our school to home, which brought us the perks of walking down home during the lunch time. As the clock stuck 12:30 PM, the school bells would ring for lunch break that spanned over an hour, which meant we had ample time to walk home, relish hot, home cooked meal, watch our favourite comedy series that we were hooked to (oh yes, we were hooked to Hum Paanch back then, to an extent that I could have given exams on it and topped them!) and get back to school on time for the noon classes.
Every afternoon as the school bell rang for lunch hour, we would walk back home midst the humid summer heat, soaking sweat in the navy blue pinafores that we wore for our uniform. Plonking ourselves under the comfort of fans and beating the blazing heat with tall glasses of chilled water, mum in all ears would serve us steaming hot rice, topped with either tove, saaru or huli and dollops of ghee on some days or tamblis with stir fried vegetables on other days. Happalas (paapads) and salivating homemade uppinakais (pickles) were a ritualistic part of our menu and always stayed on the table. I cannot ignore the joy of biting into crisp, fried, spicy sandiges served on days when tamblis showed up on the table. Mum was a strict believer in healthy, nutritious food and she ensured that the food she cooked with love balanced in taste, health and nutrition very well.
Our meals always ended with fruits for desserts. She would coax us to eat lots of vegetables and fruits as she does even today. She had a reasoning for what was cooked and she believed in them firmly. Like when greens were cooked, she would top them with freshly squeezed lime, because the vitamin C in lime aids in the digestion of iron in greens. Similarly, if a gravy was cooked with red chillies for the heat, the stir fry would then be cooked with green chillies, or vice versa to kill the monotony of flavours. Fresh vegetables and greens were a part of our daily diet, either in form of stir fries, or in huli, else in tamblis. And her love for organic food ran in her genes. Rustic vegetables like banana stems and flowers, drumsticks, raw jackfruits, gujje, basale soppu and doddapatre (brahmi) leaves that grow abundantly in wild during monsoons, produces that do not require intensive care, manure or added pesticides made up her favourites. On several other days, she broke the regime of traditional South Indian cooking with her delightful North Indian delicacies. On odd occasions, dessert during mid-week was in treat for us too. I was fortunate to have enjoyed the liberty of coming home to relish fresh home cooked meals for my lunches. It meant a lot – fresh, healthy, clean and nutritious. That was probably why I enjoyed food thoroughly even as a child, because it was simple, fresh and tasty.
With time as I grew up to being a mother myself, I realized that care and affection towards healthy food comes by instinct for your family. It means nurturing the tradition of cooking healthy, wholesome meals that can balance in taste and nutrition. Someone reading this blog may probably think that the recipes, mainly desserts shared here are all what we eat. But truth to be told, we do not eat banana breads every day, nor do we have tea cakes every evening. There’s a lot more healthier we eat than I can share here. But I don’t feature them here, least I dread this space would become tad boring.
Like I said, we grew up eating huli, that is quite traditional to our cuisine. I don’t make huli often because I never attempted to make a good one that tastes like what my mum or grandmom make. While in my teens, my mum would often chuckle saying “A good Havyaka bride is known by the Huli she makes!” If I had to go by that saying, I would never fit that bill! One of the reasons why I featured this recipe here is because the version I share today is much simpler, the cheat kinds as taught by my mum.
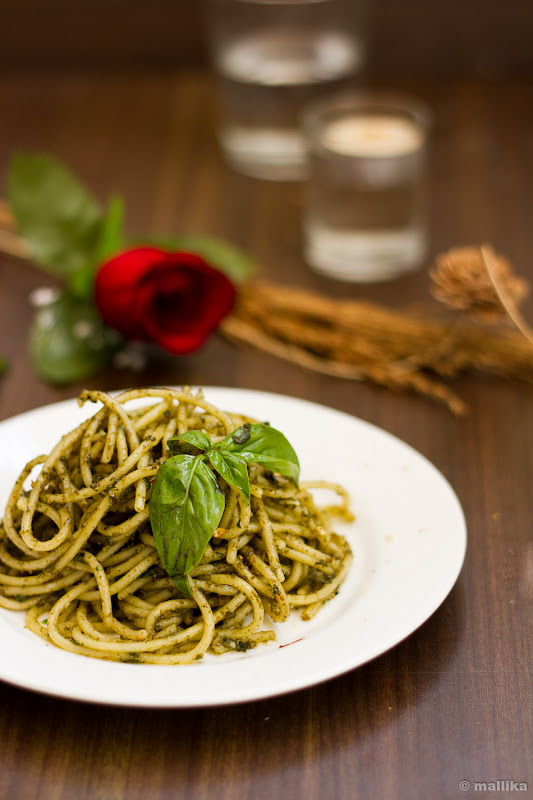
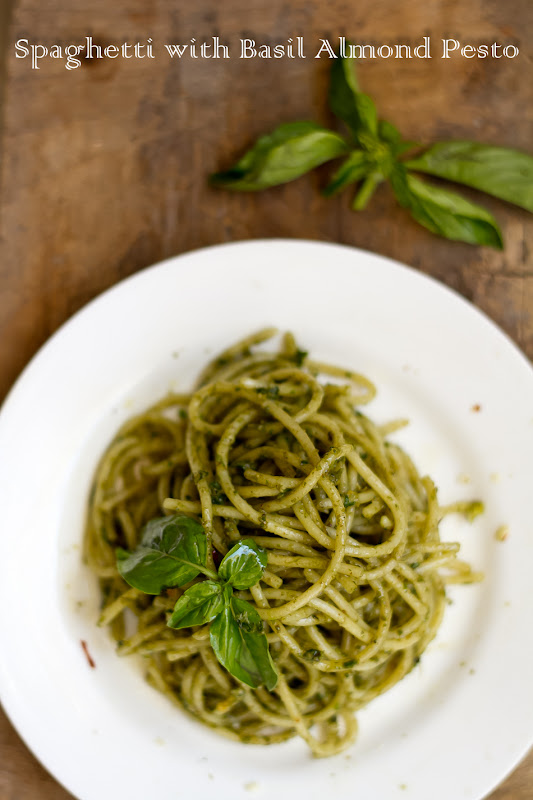
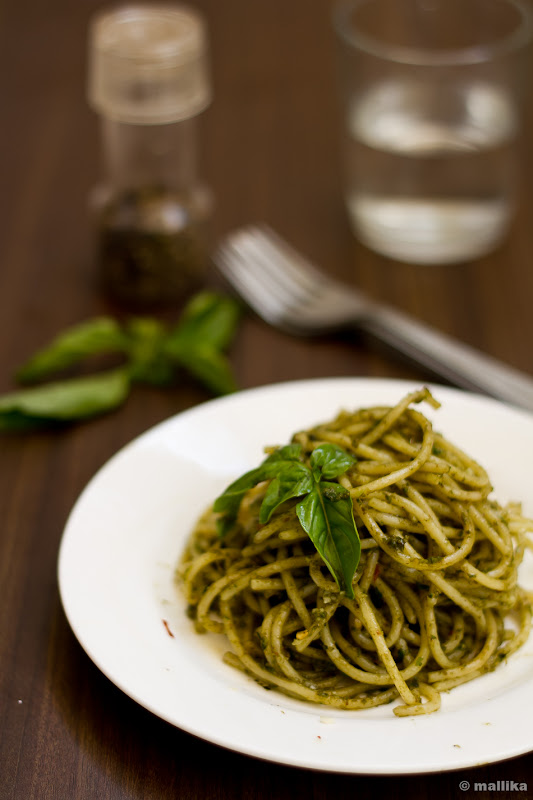
Huli is a traditional Havyaka dish from the famed Mangalore-Udupi region, made from lentils, cooked often with vegetables, roasted spices and ground liberally with coconut and tamarind, balancing off the tang with a hint of jaggery. It’s the balance of spices, coconut and tamarind that make up a good huli, an art that takes years to master. While there are several names (also called Kodhel) and different versions of it, this particular version of huli tastes so close to the traditional one I've grown up eating, that my dad, an avid huli lover and a good cook by himself, believed that I went through the laborious task of roasting and grinding all the spices, while mum and I chuckle on sheepishly. Devoid of all that hassle, hence quicker and easier too, it’s flavoursome and delicious served fresh with steaming hot rice.
Every afternoon as the school bell rang for lunch hour, we would walk back home midst the humid summer heat, soaking sweat in the navy blue pinafores that we wore for our uniform. Plonking ourselves under the comfort of fans and beating the blazing heat with tall glasses of chilled water, mum in all ears would serve us steaming hot rice, topped with either tove, saaru or huli and dollops of ghee on some days or tamblis with stir fried vegetables on other days. Happalas (paapads) and salivating homemade uppinakais (pickles) were a ritualistic part of our menu and always stayed on the table. I cannot ignore the joy of biting into crisp, fried, spicy sandiges served on days when tamblis showed up on the table. Mum was a strict believer in healthy, nutritious food and she ensured that the food she cooked with love balanced in taste, health and nutrition very well.

Our meals always ended with fruits for desserts. She would coax us to eat lots of vegetables and fruits as she does even today. She had a reasoning for what was cooked and she believed in them firmly. Like when greens were cooked, she would top them with freshly squeezed lime, because the vitamin C in lime aids in the digestion of iron in greens. Similarly, if a gravy was cooked with red chillies for the heat, the stir fry would then be cooked with green chillies, or vice versa to kill the monotony of flavours. Fresh vegetables and greens were a part of our daily diet, either in form of stir fries, or in huli, else in tamblis. And her love for organic food ran in her genes. Rustic vegetables like banana stems and flowers, drumsticks, raw jackfruits, gujje, basale soppu and doddapatre (brahmi) leaves that grow abundantly in wild during monsoons, produces that do not require intensive care, manure or added pesticides made up her favourites. On several other days, she broke the regime of traditional South Indian cooking with her delightful North Indian delicacies. On odd occasions, dessert during mid-week was in treat for us too. I was fortunate to have enjoyed the liberty of coming home to relish fresh home cooked meals for my lunches. It meant a lot – fresh, healthy, clean and nutritious. That was probably why I enjoyed food thoroughly even as a child, because it was simple, fresh and tasty.

With time as I grew up to being a mother myself, I realized that care and affection towards healthy food comes by instinct for your family. It means nurturing the tradition of cooking healthy, wholesome meals that can balance in taste and nutrition. Someone reading this blog may probably think that the recipes, mainly desserts shared here are all what we eat. But truth to be told, we do not eat banana breads every day, nor do we have tea cakes every evening. There’s a lot more healthier we eat than I can share here. But I don’t feature them here, least I dread this space would become tad boring.
Like I said, we grew up eating huli, that is quite traditional to our cuisine. I don’t make huli often because I never attempted to make a good one that tastes like what my mum or grandmom make. While in my teens, my mum would often chuckle saying “A good Havyaka bride is known by the Huli she makes!” If I had to go by that saying, I would never fit that bill! One of the reasons why I featured this recipe here is because the version I share today is much simpler, the cheat kinds as taught by my mum.
Huli is a traditional Havyaka dish from the famed Mangalore-Udupi region, made from lentils, cooked often with vegetables, roasted spices and ground liberally with coconut and tamarind, balancing off the tang with a hint of jaggery. It’s the balance of spices, coconut and tamarind that make up a good huli, an art that takes years to master. While there are several names (also called Kodhel) and different versions of it, this particular version of huli tastes so close to the traditional one I've grown up eating, that my dad, an avid huli lover and a good cook by himself, believed that I went through the laborious task of roasting and grinding all the spices, while mum and I chuckle on sheepishly. Devoid of all that hassle, hence quicker and easier too, it’s flavoursome and delicious served fresh with steaming hot rice.

Mum’s Cheat Vegetable Huli
Recipe adapted by mum
INGREDIENTS
1 cup mixed vegetables (raw bananas, brinjals, pumpkin, mangalore cucumber)
½ cup split pigeon peas / tuvar dal ( togari bele as in kannada)
1 tsp. turmeric powder
Salt to taste
For the Huli arpa, grind to paste:
½ cup grated fresh coconut
½ cup tamarind pulp / lime sized tamarind ball
3 tbsp. sāmbhar powder (preferably Karnataka styled)
1 tbsp. jaggery
To temper:
1 tsp. mustard seeds
2-3 whole red chillies
1 tsp. asafoetida
1 sprig of curry leaves
1 tsp. coconut oil
DIRECTIONS
Wash thoroughly and pressure cook the split pigeon peas / togari bele along with turmeric and 2 cups of water on 4-5 whistles. For 1 measure of the dal I use approximately 3 measures of water. In a separate pan, cook the vegetables with 1 cup of water and salt to taste till they are cooked and just tender. While the vegetables are getting cooked and the pressure cooker is cooling down, prepare the masala paste (called as huli arpa in kannada) by grinding fresh grated coconut with tamarind pulp (lime sized tamarind kernel cleaned and soaked in ½ cup warm water for 10-15 minutes), sāmbhar powder and jaggery, adding water little by little, if required, till its smooth and comes to chutney consistency.
Using a wooden ladle, mash the cooked split pigeon peas / togari bele to a paste. To this add the ground masala paste / huli arpa along with vegetables, and their broth and bring it to a rolling boil. Add sufficient water to bring it to a consistency of your preference. Adjust salt to taste.
Temper by heating some oil in a small wok. As it heats up, add mustard seeds, followed by whole red chillies, torn curry leaves and asafoetida / hing. Fry for a minute, turn off the flame and quickly add it to the prepare huli while hot. Serve hot with steamed rice.
Notes:
Tempering with coconut oil is optional, but highly recommended as it gives an authentic and traditional taste to this dish. You may use vegetable oil instead of coconut oil. Alternatively, use clarified butter / ghee for a richer taste.
I’ve used mixed vegetables here. However you may use these vegetables individually. Traditionally, for weddings and festive meals, Mangalore cucumber is the most common vegetable used in this kind of kai huli.
Vegetables that go well with huli are raw bananas, brinjals, pumpkin, mangalore cucumber, yam, bottle gourd.
The color of this dish hugely depends on the kind of chillies being used in the sāmbhar powder. Typically, byaadgi chillies will give you deep reddish brown hints while guntur chillies render more spice and less colour.
While we call this as huli in Havyaka cuisine, it is also popular by the name of kodhel in some of the sects/communities of coastal Karnataka, especially among the Tulu speaking Brahmins.