Showing posts with label Breakfast. Show all posts


Sunday morning we made a picnic to the nearby animal farm. The little one had been excited about it all through the Saturday as she played and constantly babbled the names of the animals she was supposed to pay visit to. Frisking through her set of animal toys, she managed to identify most of them by names, and we bribed her to take her out for that feat.


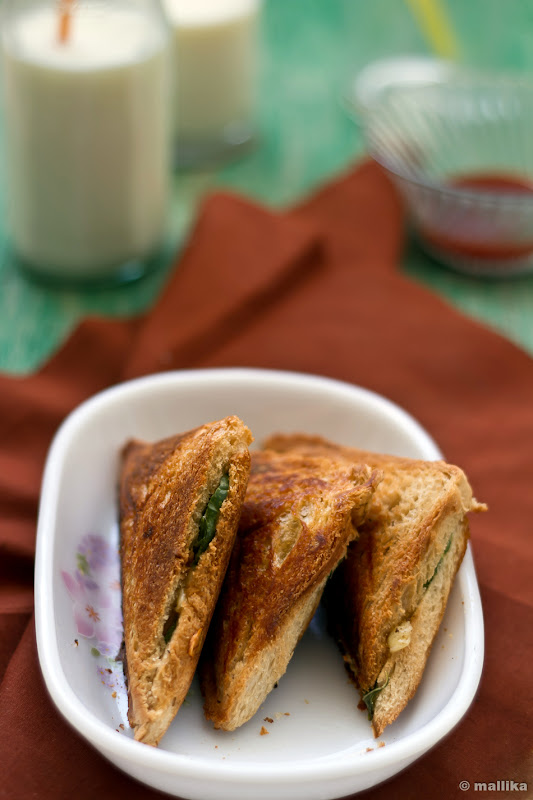
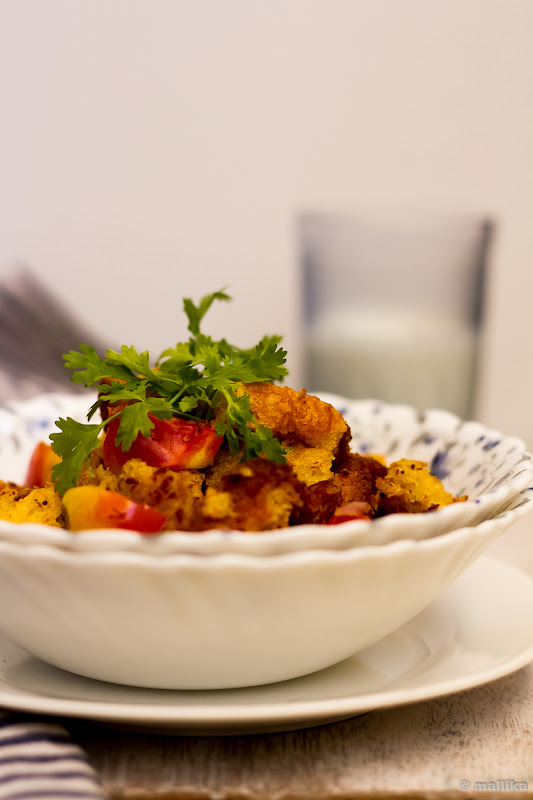
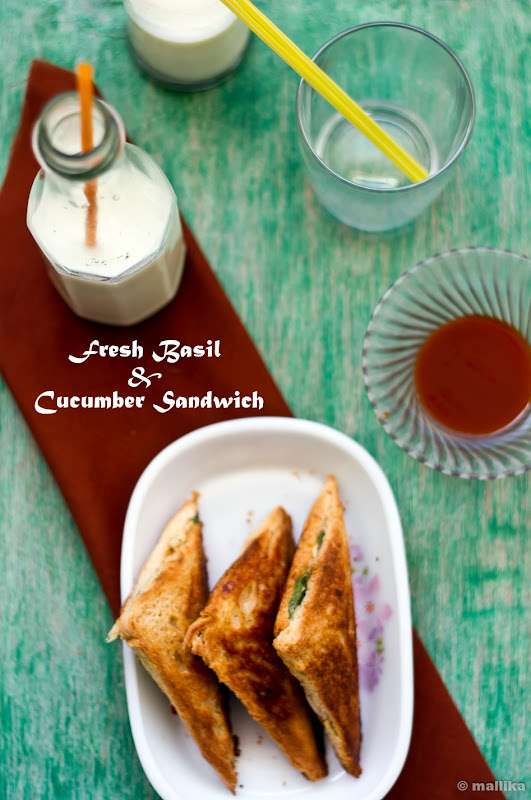
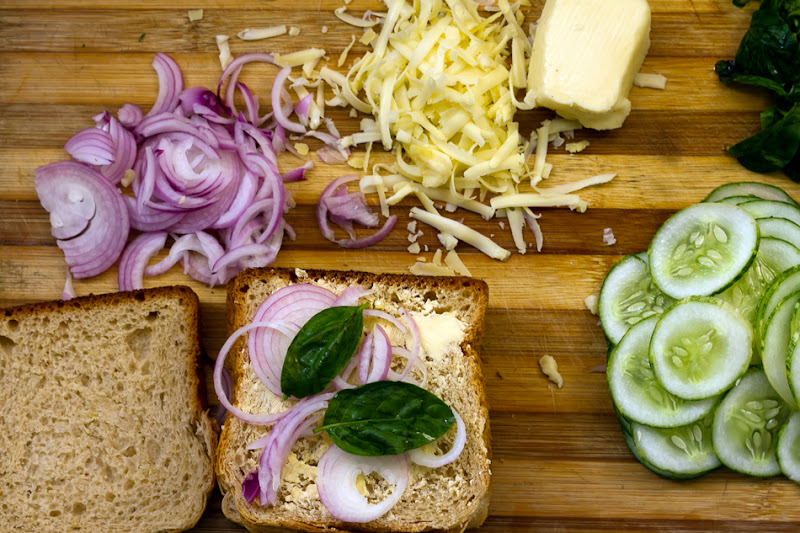
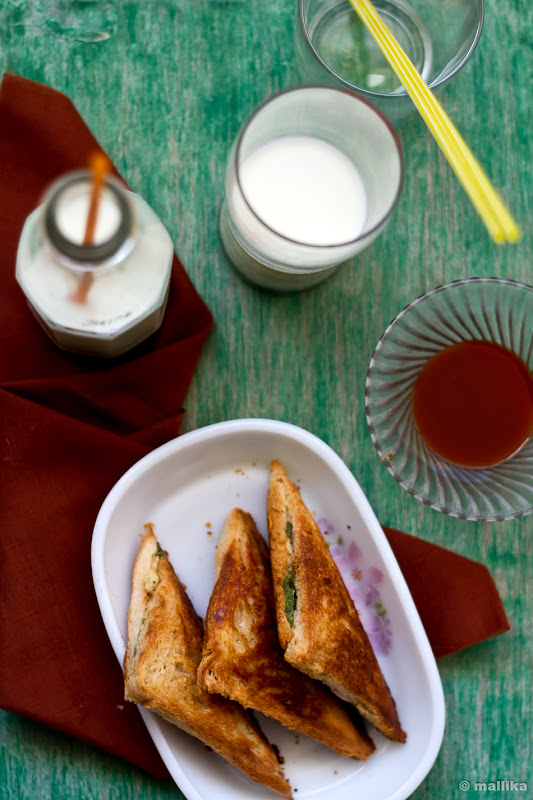
We left early on Sunday. The morning I woke up and quickly toasted these sandwiches for the munch. A slather of butter for the richness, few onions and cucumber slices for the base, some fresh basil that I plucked off from the budding plant for flavour, some grated cheese to top it and some herbs paired with fresh crackled pepper to finish, as simple and quick it can be. Shouldn't that how a picnic be? Quick and stress free.

We shoved the picnic basket with these sandwiches and fruits, the rug, paper plates, sauce sachets, napkins and water bottles into the back-seat of the car, put on our sunglasses and drove off to the farm.


It was fun as we saw her enjoy the company of turkeys, rabbits, donkeys, horse, goats and hens. She fed the goats some fresh peas and beans and loved the company of emus. As we munched on these fresh basil and cucumber sandwiches, she fed and shared her little bites to the rabbits too. I’m sure they loved it. In turn she devoured these happily, animating the little bunnies and teaching them how to eat. By the end, she made several babbling conversations and had almost made best friends with them.

Incidentally, on our drive back home, she managed to identify a faded white plastic rabbit thrash bin along a road side and she screamed in joy pronouncing “mama, labbit, labbit!”. Almost like she was united with her long lost friend! A day worthy that was ought to be.


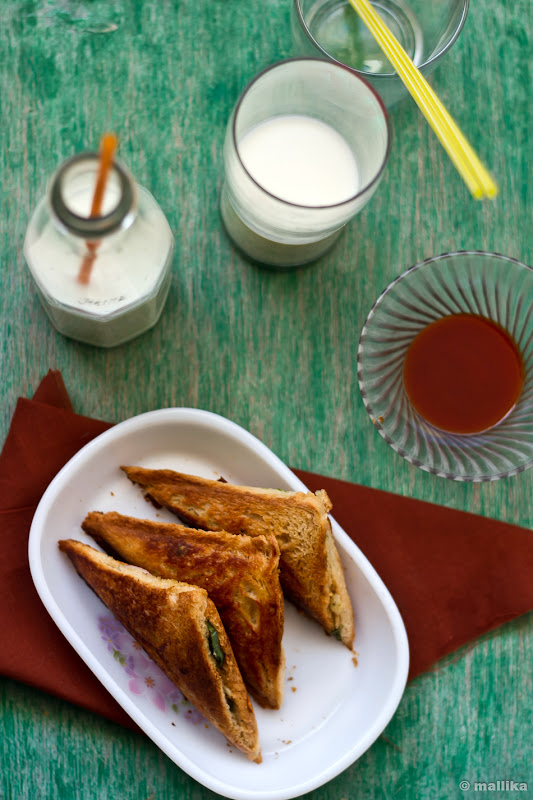
Fresh Basil and Cucumber Sandwich

INGREDIENTS

Couple of slices of whole wheat bread
Butter, to slather over
Couple of leaves of fresh basil, torn
Thin slices of cucumber
Thin rings of onions
Grated cheddar cheese
Fresh crackled pepper
A dash of Italian dried herbs

DIRECTIONS

Pre-heat the toaster / grill / sandwich maker for 5 minutes.

Meanwhile, place 2 slices of bread on a chopping board. Trim the edges and slather butter generously on either sides of these slices. On one of the bread slice, place couple of onion rings, followed by torn basil leaves. Top them with 2-3 cucumber slices, placing them side by side. Top them with more torn basil leaves, some freshly grated cheddar cheese and freshly crackled pepper. Sprinkle a dash of Italian dried herbs. Top it with the second slice. Press down gently and place it in the toaster / sandwich maker. Prepare the following sandwiches the similar way. Toast till they are golden brown and serve hot with tomato ketchup or chutney of your choice.


Four years up with blogging on Veg Bowl and it almost feels unreal. Why? Because I admit I never thought I would take up blogging seriously. I began blogging more than five years ago. Before writing on Veg bowl, I blogged privately on a personal space which was limited to few of my family and friends. The huge inspiration came when I accidently stepped on a couple of family blogs and took hours to read through them. I was awestruck, and almost felt one with them. I thought it was a great idea to maintain a diary of memories that could be cherished later in life. I jotted down reminiscences of our travel, our family gatherings, weekly happenings, musings, and a bit more. But my blogging on it was quite temperamental. I spent a year on that, though not so passionately and unfolded Veg Bowl in parallel to jot down recipes I created eagerly in my little kitchen, penning down the recipes that were appreciated by my family and friends and posting pictures of dishes that came out of my kitchen.


Much before I got into mainstream blogging on Veg Bowl, I hadn’t explored my skills in food photography. I realized where my passions lay as I gained more readers and many friends through VB, and that was even before I existed on Facebook. My blogging on Veg bowl got more consistent than my personal blog and I lost interest in the other space with time. Somehow I wondered if VB would see the same fate soon, but it didn’t. There was a joy to learn, to connect with like-minded bloggers, to explore and do a lot in cooking and photography. Somewhere I believe that my interest in this blog was linked to this urge to learn photography.


Down the lane 4 years now, I still feel there’s a scope to learn and explore. I still enjoy the art of blogging that’s so creative and therapeutic. I have grown older and matured to better from where I started. On the flip side, I am not a social networking bee yet, and that explains why I am never so active on Facebook. But I love your emails and genuinely go through your comments. I am not on twitter yet, neither on instagram or googleplus or any other networking sites and pardon me on that. After a lot of persuasion, I finally have a VB like page on FB, but I’m not serious about it. Clichéd I know, but I don’t fit well into the whole concept of social networking well. Somehow it leads me to believe that social networking has become a wide spread web syndrome, with most of us hooking our precious time into the web mesh. We are so busy socializing and connecting on FB that we will miss out on living those beautiful moments of our life that can be cherished later. There are times I feel guilty while I’m busy blogging, because I should probably use that time to cater to my daughter and not miss watching her grow.


Yet with all that said, I do not intend to give up blogging in the near future. Because this space has given me a lot more than I expected. Like it keeps me active and thinking all the time. What began with just a food and photography site has grown to share a lot on my personal front apart from just recipes. VB was not meant to be a commercial blog, that’s why I choose to keep it clutter free, clean and minimal as possible. I vent out here, I speak a lot of my mind, share fond memories close to my heart, unleash the joy of cooking and creativity, and I love to part away with my most loved recipes and photographs with you all. That means a lot to me since it keeps me going, and connects with you all.

For the joy of completing 4 successful years of blogging and for more to come, I am celebrating this day with this Whole Wheat Banana Bran Loaf. Coincidently, it’s my daughter’s birthday today. What can be a greater joy than this? As I see her geared up to celebrate her big day this evening, I baked this easy and delicious, yet an all healthy loaf last evening so that we could wake up to treat her with a quick bite of this loaf and wish her good luck, the best of health and bounty happiness in life she deserves. Time is fleeting by unbelievably fast. From a new born baby to infancy and now a swift intelligent toddler that she is, she turned two today. Happy Birthday to both my sweethearts! Life cannot be better without you!


Whole Wheat Banana Bran Loaf

INGREDIENTS

1 ½ cup whole wheat flour (150 gm.)
1 tbsp. wheat bran
1/3rd cup vegetable oil (35 gm.)
2 very ripe bananas (60 gm.)
½ cup milk (40 ml.) {replace with vegan milk of your choice for a vegan version}
2/3rd cup organic dark jaggery (60 gm.)
1 tsp. baking soda
1 tsp. cardamom powder

DIRECTIONS

Prepare a 8 inch pan by greasing and lining it with baking paper. Pre-heat the oven at 180 degrees C.

Pulse the bananas along with milk and jaggery in a food processor. Next add in the vegetable oil and blitz again. In a separate clean bowl, sift the whole wheat flour twice. Add baking soda, wheat bran and cardamom powder to this. Make a well and pour in the wet ingredients. Stir well till combined. The batter will be thicker than regular cake batter, but not stiff. At this stage you may add in nuts if preferred. Finally pour the batter into a greased loaf pan and bake in a pre-heated oven at 180 degrees C.


Notes:

* Jaggery has a typical rustic and earthy sweet flavour that’s customary to South Indian cooking. Hence pairing it with bananas and cardamom powder brings out a traditional aroma to this cake.
* I’ve used high quality organic jaggery here. The local jaggery available generally contains high amounts of impurities. Hence to remove the sediments, soak the jaggery in milk, dissolve it and strain it through. Alternatively, use brown sugar if jaggery is not available.
* To make a vegan version, replace milk with any vegan milk of your choice.
* Wheat flour and wheat bran bring out a nutty flavor to this cake, although you may replace them with plain flour altogether.


Couple of years ago I got an Aloe sapling handed over to me by my mom so that I could plant them in a lone pot that sat empty for a while in my backyard. My Aloe grew beautifully even with unattended attention. She stood strong in the worst of weather, rains, dust, pollution and draught, grew stout by days and bred couple of more saplings till the pot could hold it no longer. Later when we moved into our own little nest, one of the first things I had on my mind was to do a bit of kitchen gardening. For a long while I attempted to do some kitchen gardening, but all in vain. I hardly attended the Aloe, yet even today she adorns that pot I planted years ago. My kitchen gardening went for a toss as my coriander and fenugreek seeds never sprouted, the mint saplings I planted never took off, the leaves withered, the brahmi, sambharballi, amruthaballi and insulin plants went fungal till they broke down to die. It pained me as I saw their end. Every time I went to a nursery, I asked for tips and they would hand over some fertilizers that promised to help my plants grow, but they didn’t. Something went terribly wrong. I blamed the pot, the soil, the seeds, the vaastu and gave up on home gardening.


Things on gardening seemed brighter last month. The changes of water I use to wash the rice, the dal, the greens and other vegetables in are used efficiently to water my aloe and other pots. In quest to save water and not let go into drains, I drain them down to the aloe plants and the extra ones to the empty pots too so that they evaporate to the nature. A month ago though I was taken by surprise. A sapling that I thought to be weed sprout through my pot. I let it grow naturally till it shot up to 2 feet tall and flowered tiny white buds. I was elated but had less known it would fruit too. Last week, couple of the white flowers withered and beneath them shot tiny buds of green chillies. Somewhere in the process of draining the washed water into the pots, the green chilli seeds must have made their way and sprouted. Sometime ago, I had a tomato plant sprout the same way. It bore 3 cherry tomatoes that I used in my cooking, but later wilted away. This triggered my love for gardening all over again.


Last Sunday, we drove down to the nursery. I got a pot of basil and couple of seeds too. I almost went crazy and could have picked up the whole nursery, but I settled with basil, spinach, fenugreek, dill and parsley. I potted the fenugreek seeds again in a hope that they will sprout. I speak to them daily. I care for them just like my baby. I try to bond and hope they will reciprocate. I’m keeping my fingers crossed and hope they will shoot soon.

Meanwhile the budding green chilies have been making me happy. I watch them for hours. I tender them affectionately. Today morning, I couldn’t resist and plucked the longest one for this South Indian breakfast delicacy, Tomato Kharabath, which my husband loves for its tang and spices. The chilies rendered a fresh, bold and spicy taste to this dish. Beyond all, they were organically grown in my own garden. That’s the beauty.


Tomato Kharabath

INGREDIENTS

1 cup pre-roasted semolina / rava
1 onion, chopped
2 green chillies, finely chopped
2 large tomatoes, chopped
3 tbsp. ghee / clarified butter (use regular vegetable oil for a vegan version)
½ tsp. mustard seeds
½ tsp. cumin seeds
½ tsp. turmeric powder
1 tsp. sambhar powder
A sprig of curry leaves
Salt to taste
A dash of lime juice
Fresh coriander leaves to garnish

DIRECTIONS

Heat oil / ghee in a thick bottom pan. Add mustard seeds and allow them to splutter. As they splutter, add the curry leaves, chopped onions. Fry them till they golden brown. Next add the green chillies, the chopped tomatoes, turmeric powder, sambhar powder and salt and fry them for another 2-3 minutes. Now add the roasted semolina / rava and fry for few minutes. Pour 3 cups of hot water into the mixture and bring it to rolling boil on low heat for couple of minutes. The water should be absorbed by the semolina / rava and cooked. Turn off the heat and add a dash of lime juice. Garnish with coriander leaves. Serve hot.

Notes:

* Clarified butter / ghee makes this dish rich and delicious. However avoid it and replace with vegetable oil if you want a vegan option
* I've used only a tsp. of sambhar powder for a hint of added flavour. You may skip it altogether.


Rava Idli with Vegetable Sagu

How to make Rava Idli with Vegetable Sagu | Vegetable Sagu Recipe
Traversing through my old posts recently, which in a way I don’t do too often, strangely it felt odd for me to read of what I had written. Some made me laugh, some made me travel down the memory lane, some errors I fixed, some I felt proud of, I suppose it’s an anomalous sensation to read your own stuff. Some photographs made me think I should change, like the Marshmallows and S’mores, especially the ones I shot at night. Then as I dug deeper to my old, unheeded posts of 2009s, I thought they needed a makeover. Maybe sometime in future, when I recreate the same recipe and shoot again, I shall update them here. Or probably I’ll leave them that way and they’ll remind me how much I have evolved over the years in blogging.

You know I should hold on to penning down too much. Over the past couple of weeks, my posts, the write ups, have been spanning too long. I promise it’s not intentional. I like to write, to put my thoughts in words and do hope you enjoy reading them as much I love sharing my thoughts on food and memories with you.

Rava Idli


Having said that, I promise to keep this one short and savoury. Basically a spiced, savoury, breakfast semolina cake. This Rava Idli, is a common Karnataka breakfast dish and most loved by all of us at home. It repeats itself almost every week. Not the kinds we get at a restaurant, that’s dense, heavy and feels stodgy with one slice, but instant, light and the kinds you want to indulge in more than just one. Pair it with chutney or serve this with vegetable sagu like it’s done traditionally, this one will send you taste buds whirring for more. Whoosh, you can’t help but love it!


Rava Idli

1 cup regular yogurt (not thick, Greek yogurt kinds)
1 cup semolina (sooji rava)
2 tbsp. oil
1 tsp. mustard seeds
1-2 green chillies
1 sprig curry leaves
1 tsp. Channa dal
1 tbsp. broken cashew nuts
1 tsp. baking soda (or an unflavoured fruit salt, like Eno)
Salt to taste

Mix a cup of semolina in cup yogurt and set aside for 10 minutes. If using thick store-bought yogurt, then thin it down by adding water. I've used regular skimmed milk homemade yogurt here. While the batter is resting, prepare the tadka. Heat the oil in a small frying pan. Add in the mustard seeds, channa dal, cashew nuts, curry leaves and heat till the mustard seeds begin to splutter. Turn off the flame and add this to the semolina, yogurt mixture. Whisk well. Add chopped green chillies and salt to taste. Finally add in the baking soda (or a sachet of fruit salt, if using), give the entire batter a quick, good whisk. The batter should be thick, similar to idli or cake batter. Transfer the batter to an oiled cake tin. If you have idli moulds, its best to use them. However you don’t own idli moulds, use regular cake tin for this purpose.

Heat a steamer / rice cooker. Place these moulds in the steamer and cook for 15-20 mins. Alternatively you can microwave it on high power for 4-5 minutes, till skewer inserted comes out clean. Slice and serve hot with any chutney of your choice or with vegetable sagu as available commonly in restaurants.


Mixed Vegetable Sagu

Mixed vegetable sagu is a popular Karnataka dish, typically served in Bangalore restaurants. It’s spicy and goes well with puris, dosas, aappam, and even rice. For best results, ensure that the vegetables are cooked just right – they should neither be crunchy nor too mushy, just the right bite.

INGREDIENTS

For The Masala Paste

2 to 3 green chillies, roughly chopped
4-5 peppercorns
2 tsp. coriander powder
1/2 tsp. cumin seeds
1/2” stick cinnamon
2 cloves
3-4 garlic cloves (optional)
4 tbsp. freshly grated coconut
1 handful of cilantro

Other Ingredients

1 tbsp. oil
1 tsp. mustard seeds
A pinch of asafoetida
A sprig of curry leaves
1 large onions, finely chopped
2 cups chopped mixed vegetables (potato, carrots, beans, capsicum, cauliflower green peas)
Salt to taste

DIRECTIONS

To make the masala paste, grind all the ingredients mentioned under masala, adding little water to a thick, fine paste. Keep aside.

Next, heat oil in a wide mouthed frying pan and add the mustard seeds. When the seeds begin to splutter, add asafoetida and torn curry leaves, and sauté well on a medium flame. Add the onions and sauté on a medium flame, while stirring continuously till they turn translucent. Add the mixed vegetables, salt and 1¼ cups of water, mix well and cover and cook on a medium flame for 12 to 15 minutes till the vegetables are tender, stirring in between. Add the prepared masala paste, mix gently and simmer for another 5 minutes. Serve hot with Rava Idli.


I eat bread with not much favor to it. It's something I like to reserve as a last option. It wasn't until I began baking some at home did I really take much liking to it. Even as a kid I did not enjoy it much. At home, Sundays meant the day to relax and unwind and that meant some time off from cooking for mom too and that's when bread for our breakfast was a usual affair. We had many Sundays with bread sandwich for our breakfast. Saying that I do not rule out that homemade bread is indeed fresh and tasty.


Although one of the ways I did enjoy bread was in form of this Masala Bread Upma that was spiced well and tasted delicious. I often frowned at the sight of bread loaves served with butter or jam, but the moment it was converted to this upma, I would relish bowls full of these and go for the second and third helpings too. The base of the kadhai had crumbs of crusty bread stuck to it and that tasted heavenly. I have memories of scraping it off, not sparing the spatula too, relishing every bit of the last spiced crumb! Well, I still do it till date. :) Hope you too love this recipe as much as I do.


Masala Bread Upma

INGREDIENTS

6 Bread slices
1 tbsp. vegetable oil
1 tsp. mustard seeds
1 tsp. red chilli powder
1 tsp. turmeric powder
1 onion, finely chopped
1 large tomato, diced
1 green chilli
2 tsp. peanuts
1 sprig of curry leaves
Coriander leaves to garnish, optional
Salt and lime to taste

DIRECTIONS

Stack the bread pieces on top of each other and dice them through using a knife. Tear them into 1 inch cubes. Else tear them roughly using your fingers, crumbling them through into uneven pieces.

Heat oil in a pan and fry the mustard seeds. Once they splutter, add in the curry leaves, the chopped onions and peanuts. Fry them on medium high flame till the onions turn slightly brown in colour. Add the chopped green chillies, turmeric powder, chilli powder and fry further for a minute. Add the diced bread pieces and stir them well gently. Fry for a couple of more minutes stirring till all the masala has coated the bread pieces well. Finally add in the diced tomatoes and season with salt to taste. Fry further more for 2 minutes. Remove from flame and add a dash of freshly squeezed lime juice to taste. Serve hot.


So what do you think is life like for a toddler mom food blogger? Fun, thrilling, stressful, exciting, uncertain, adventurous, tough, entertaining, or may be all of these??? Interesting! Let me give you a glimpse of me as a food blogger.

Just about 2 days ago I decided Sankranthi, the festival for harvest is here and I need to have a post signifying it for the 14th. I rustle up my calculations and cross upon Huggi, a traditional Havyaka household dish, and an apt one that can make it right for the day and the festival. Perfect, I think.

So to be able to post it a day in advance that will benefit my readers, I decide I will cook the recipe a day before, photograph them and publish here. I almost put things together, when I simply get a feeling that I am cheating. Would that justify me celebrating the festival? It made more sense to cook them the first thing in the morning of the festival while my family is around, finish the pooja, offer God and relish them fresh. So I push the entire thought of cooking Huggi for the day of Sankranthi, in a hope I will be able to quickly grab some clicks and post them here, hopefully the same morning. Hopelessly, that rarely happens!


The morning of Sankranthi dawns and the baths are over. I head over to the kitchen to make both versions of Huggi, the sweet and the spicy one, both equally delicious and my favourites too. My cooking is done on time, pooja is over, little one is to be fed and I am to decide if the oggarne/tadka needs to be added then or saved for the photographs. A tic-tac-toe and I add a part of the oggarne/tadka, saving some of it for the grace. I almost finish feeding my hungry toddler, put her to play in my kitchen and keep a keen check on her from the corner of my eye. Often she hangs around me for my attention, so a huge effort goes into distracting her with piles of kitchen utensils and cutleries to amuse her. By now my kitchen is in a huge mess with utensils, dolls and toys lying on the floor and on counters too. Adding to this, hazaar utensils lay around to be cleared and washed. I clear a part of these to make some space for the props to be fitted into the existing clutter, as obvious to make my dish look a little appealing. By now my little toddler begins to get anxious, seeking my consideration to play with her, so she's up on the kitchen counter, least I can keep her busy with my constant talks and her plays. I begin to place up my props, lay the dishes, top the garnishes, neat my background, foot the tripod and almost begin to shoot when a tiny hand hovers over to dish, pulling the props, the background and at times the camera lens too! Again, in an attempt to distract, I hand over unforeseen kitchen items for her to play. Her hands go deep into the jar of my precious ghee, the onion and garlics are off their peels, things helter-skelter and a glass or two ends up cracking on the floor. Though by now she is bored and there comes the shrill cry, more mess and my woe! Then there are agony moments when my garnish ends up in a mess, spoons are thrown into the dish, splattering on to the table cloth and I throw up my hands in anguish! Did I say life of a blogger mom was stressful? Phew!


I come back to square one of laying things on the dining table instead, let her on her foot to play, hand over a spoon and bag of chickpeas for her to fiddle with, foot the tripod and almost begin to shoot a photograph or two when my little one spills over all the chickpeas, gives up on them instantly and hovers over to tripod, attempts a climb, almost tumbling over it. I tip toe over the scattered chickpeas, just managing to balance the falling camera on a single foot and my toddler on another! Again, I give up, shove aside the tripod and shoot by hand with a few shaky shots and some good angles. Did I say life of a blogger mom was adventurous? True!

Okay, so by now I somehow manage a few shots here and there and then sit down to processing the files, generally when my baby is off to her sleep. And today she decides not to sleep. I sit her till the noon, simply hoping I can make through this post today! She's off to sleep and I sit to blog about it, my thoughts are totally empty. Heck! Where do I start? Every blogger's foe, that blogger's block! I try to start, then just let it go. Instead I manage to do my processing and editing. Of the hazaar photos I click randomly I short-list to the chosen few. By then my little one is awake. Here I go off again, almost being sure this will have to wait another day, may be next year too...??? Yeah, I did say life of a blogger mom was uncertain.

With all that said and done, I finally have my post here, though not exactly on time as I would have preferred it earlier in the day. I sat at a stretch, almost 3 hours and managed to crack a good long write up too! And as it gets published, its fun and exciting. As the comments pour in, it gets entertaining too :) That's life being a food blogger and toddler's mom too!


Sihi Huggi

INGREDIENTS

1/2 cup moong daal
1 cup rice
3 cups milk
1 cup water
2 tbsp. clarified butter / ghee
1 1/2 - 2 cups sugar or jaggery (adjust as per taste)
1-2 cardamom pods, crushed
A handful cashew nuts & raisins
A pinch of saffron

DIRECTIONS

Wash and clean the moong daal and rice and keep it aside for about 10 minutes. In a pressure cooker, add the moong daal, the washed rice. Cook them in 2 cups of milk and 1 cup of water to 3 whistles. If you do not have a pressure cooker at hand, use a regular cooking pan and cook the daal and rice till they turn soft and mushy. Once cooled, lightly mash them using the back of the ladle once cooked. Add the sugar to taste and adjust the thickness of the huggi by adding remaining milk, if necessary. Add in the saffron and stir well. Heat it till it comes to a boil. I've used sugar here since I ran out of jaggery, but I suggest you try the jaggery version as it tastes great too!

Next, heat three tbsp. of ghee in a wide mouthed pan. Add cashews and fry till they turn golden brown. Switch of the flame and quickly toss in the raisins and cardamoms. Allow them to plump in the heat. Garnish the prepared sihi huggi with the fried cashews and raisins and serve hot.


Khara Huggi

INGREDIENTS

1/2 cup moong daal
1 cup rice
2 tbsp. clarified butter / ghee
1 tsp. turmeric powder
1 tsp. cumin seeds
1 tsp. chopped ginger
2 chopped green chillies
1 tsp. whole & broken peppercorns
A sprig of curry leaves
Salt to taste
A handful cashew nuts

DIRECTIONS

Wash and clean the moong daal and rice and keep it aside for about 10 minutes. In a pressure cooker, add the moong daal, the washed rice along with chopped ginger and green chillies. Cook them in sufficient water (about twice to three times the quantity of rice and dal) to 3 whistles. If you do not have a pressure cooker at hand, use a regular cooking pan and cook the daal and rice till they turn soft and mushy. Once cooled, lightly mash them using the back of the ladle once cooked. Add turmeric and salt to taste. Adjust water to your desired thickness as necessary.

Next, for the oggarne, heat three tbsp. of ghee in a kadai. Add the cumin seeds. When the cumin seeds turn fragrant, add torn curry leaves, the whole and broken pepper and cashew in the ghee till the cashews turn golden brown. Garnish the prepared huggi with this oggarne and top with more roasted cashews before serving.

Wishing you all a Happy Sankranthi this season!


In zeal of year end celebrations, it’s the piquancy of winter season that makes the last leg of the year very commemorative. We live in a country that swears by warm, sunny weather through most part the year, so when December welcomes you with gusty cold winds you yearn for, you can’t ask for something better! Apt for the season, it’s cold these days and the days are shorter. A bit of lethargy sneaks in as we snuggle deeper into the comfort of our quilt, unwilling to wake up to the bite of cold. As the alarm clock ticks itself to the wakeup call, I indolently push it to snooze only to catch up with couple of more minutes of my siesta. Not that my deep slumber holds on to me, but my head is dizzy to wake and I am half woken by the clock’s ring. On the fore, if sleep hovers itself, in the background, my mind is at unrest fighting away fears of waking up late and missing my office bus. Sleepy mind at unrest, that’s what cold winters can do to you.

Pulling off myself on the 2nd or 3rd ring of alarm, the floor is pitch cold as I hastily search for my slippers in the muffled rays of dawn that penetrates my room. Outside its cold and dark and as the first rays of amber sunshine begin to warm the sky, I drag my feet to the main door in sleepy eyes to reach out to the pack of milk that is door delivered by the milk man, as early as 4 in the morning. A splash of cold water on my face freshens me out of my slumber like a refreshing mint in a foul mouth. Before my man and my baby wake up, the milk is boiled, tea is made, while priorities race through my mind as I gear to organize for the day ahead. A quick round of discussion over a cup of tea with my hubby helps clear my thought process. But then that’s a daily facet.


There are some things other than the mundane that perk up our lives. If cold rainy winters can be dull and gloomy, I like to see the blessed part of it too. December brings about several comforting thoughts to my mind, about winter, the nip in air, waking up to be caressed by misty chill mornings, vibrancy of bounty fresh produce our markets will boast of, Christmas holiday baking, New year partying, which gives me good enough reasons to feel peppy about. Like the sight of first seasonal peas in the market or the Christmas tree in its glittery décor that has been put up in the nearby mall, year-end sales catching up at fast pace, obvious that we are chasing the last lap of the year that will soon be gone.

True to December, our markets are flooding with fresh produce of green leafy vegetables, cauliflowers, assortment of apples, juicy Nagpur oranges and bright pink strawberries. We are seeing first signs of fresh peas in the pod and I’m eagerly looking forward for more of litchis and figs. We are bringing apples, melons and pears in bulk. With Christmas which is hardly couple of weeks to go, I am pinning hopes to make use of all that bulk my refrigerator is currently stocked with, make time for some bakes that will keep my kitchen warm and cosy, roiling out dishes from the freshest of produce my markets have to offer. Food can be emotive in many ways!

I have already made a start with these breakfast muffins that make it perfect for the season. Healthy, flavoursome and quite festive too. Packed with health from fresh fruits, goodness from wheat, bran and cornmeal, crunch from nuts and eggless to boast, these will make a perfect beginning to my year end baking marathon.


Breakfast Muffins

INGREDIENTS

3/4 cup all purpose flour
1/4 cup wheat flour
2 tbsp. cornmeal
1 tbsp. rolled oats, powdered
1 tsbp. coconut flakes (I've used frozen one here)
1 tbsp. wheat bran
3/4 cup dark brown sugar, packed
1/2 cup oil
2 tsp. baking powder
2 bananas (I've used yelakki bananas here)
1/2 cup milk
1/4 cup apple, cored and finely chopped
1/4 cup pears, peeled and finely chopped
1 tsp. cinnamon powder
1 tsp. vanilla extract
1 tbsp. chopped cashews
1 tbsp. raisins

DIRECTIONS

Pre-heat the oven to 180 deg C. Line the muffin tins with paper cups and set aside.

Blend the bananas along with milk, vanilla and dark brown sugar. Add the oil and vanilla extract and pulse again. Transfer to a bowl and set this aside. This becomes the base of our wet ingredients.

In a separate mixing bowl, mix all the dry flours, like all purpose flour, wheat flour, cornmeal, rolled oats, coconut flakes, wheat bran together along with baking powder and cinnamon powder. Add in the chopped fresh fruits, cashews and the raisins and toss well. Make a well briefly and add in the wet ingredients to these dry ingredients. Fold the dry ingredients just until incorporated. Spoon into muffin tins, almost to the tops of the rims.

Bake for 35 to 45 minutes or until light golden brown. Cool in pans for 10 minutes then remove to wire rack to cool completely.


Note:

The cup measurements mentioned here are standard Indian tea cups.

Cornmeal does have quite a distinctive flavour which may not be in favour of everyone's palate. So skip it, instead substitute with equal amount of wheat flour or all purpose flour. The batter will be slightly thicker than the regular cake batter.


Hope you had a fabulous Diwali! We did and continue to do so over a couple of days. We came together, lit up the evening, met up family and friends, shared wishes, had fun the eco-friendly way, celebrated minus the crackers, snacked well (of course should I even mention that???) and had a great evening in all. Food becomes an integral part of our celebrations and is rooted to our traditions, so this Diwali wasn't any different for us in terms of feasting.

You do remember I spoke about making sweets and savouries like, Kala Jamuns and Boondi on my previous post for this Diwali? Oh I forgot to mention using boondi in Chiwda and frying up some delicious crisp, thin Jalebis to make our evening warm and memorable.


Making Jalebis have always been on my mind. I had my inhibitions, probably the process of making sugar syrup and frying them made me nervous. However, with my little one around and in an attempt to satisfy her food cravings, I am tempted these days to experiment with dishes that I hesitated in the past. My tiny tot is an average eater, but she enjoys a good deal of variety on her plate. She takes me to surprise with her food habits and likings, her uniqueness with tastes, which can get quite unpredictable!

I pulled my sleeves up well with the art of making jalebis which aren't as difficult as they sound or seem like. The video by Manjula's kitchen did boost my confidence quite a bit and I set out to fry a small batch (measured half the quantity of tea cups), yet they seemed like a lot. Easily made up close to 20 odd jalebis. I chose an instant recipe using yeast, trust me it works beautifully. My grandma is an expert in making these the traditional way by soaking flours in curd and leaving them to ferment overnight. Every Diwali, way back in her kitchen, she would slave for hours, to carefully break open the eye of an empty coconut shell to pipe out perfectly round jalebi batter over a large wok filled with oil, fry them gently and dunk them into delicately flavoured sugar syrup, an appealing dessert that could easily serve a huge crowd and satisfy many taste buds. She was quite surprised knowing the fact that I hardly slaved over these. I replaced the besan to equal amount of rice flour as per my grandma's suggestion and the resulting jalebis were very crisp and sinful.

To be honest, I wasn't sure if the photographs here were good enough to post. So I apologize since the eve was hectic and with all that I had at hand I shot them in a hurry. But then its Diwali season and jalebis should be here hence.


Crisp Jalebis

INGREDIENTS

Batter:

1/2 cup All Purpose flour
1 teaspoon rice flour
1/2 teaspoon yeast
1/2 teaspoon oil
1/2 teaspoon sugar
A pinch of turmeric for color (optional)
About 1/3 cup of lukewarm water (as needed)

Oil to fry

Syrup:

1 cup sugar
1/2 cup water
Pinch of cardamom powder
Few strands of saffron
1 teaspoon of lemon juice

DIRECTIONS

Dissolve the yeast in warm water and allow it to sit for about five minutes. Mix the flour, rice flour, turmeric, oil and sugar together. Add the yeast solution and mix well, making sure that there are no lumps and the batter is smooth. Set the batter aside and let it sit in a warm place for one hour. Make sure the batter is fermented. After fermenting batter will rise high and look frothy like the above picture.

Boil the sugar and water together. Add the lemon juice and saffron and close the heat.

Heat the oil in a kadhai or a frying pan. Check if the oil is ready by dropping dots of batter in the oil. If batter sizzles and comes up without changing color its ready. Fill the Jalebi batter into a piping bag with a plain round nozzle. Squeeze the Jalebi batter out in the hot oil in a pretzel shapes and fry them until golden-brown on both sides. Transfer into the warm syrup. Let jalebi soak in the hot syrup for a few seconds and take out. Serve hot.

Note: Having the oil at right temperature is the key to good jalebis. Fry jalebis on a low flame till they are golden in colour. I got a hang of this after my first 2 jalebis turned brown. Switch off the flame if the oil is too hot and the jalebi burn.

Last week I almost felt like the awesomeness of December winter was in the air. That’s when the bizarre North East cyclonic storms gave us an iconic threat with gusts of wind blowing hard and our toes went curling numb. It had been long time since Bangalore saw such rains, winds and chillness, a much desired respite from battling water problems in our city. Rain Gods heard our prayers, loud and clear. Misty Bangalore sky cried all day long and so through the night, bringing along with it biting cold, good drizzle and much shower we needed earnestly. We rushed home from work drenched in rain to stay indoors, sipped on piping hot adrakwali chai, snacked on spicy corn nuggets, enjoyed the melody of raindrops dripping onto our balcony shades, relished simple warm dinner and enveloped ourselves in the coziness of duvets pouncing on us, doing all that pleases one’s senses to stay cosy on a lovely rainy day like this one.


The splendid weather reminded me how much I love rains and winters. Though these rains really irk the hell out of me and have never done much good to my health or my sinuses, inhaling the aroma of the wet soil and indulging in some sizzling, spicy food can ignite happy mood and evoke nice feelings. It’s a perfect time you sit on the porch observing dark gloomy skies, while relishing some fresh hot pakodas, or sip hot, spicy masala chai and enjoy the showers outside in disposition to elevate the blissful moments.

But then to break the traditional monotony of snacking on pakodas and bajjis, to keep it healthy in lure of my health and to deem it ideal for my little toddler too, I whipped up these quick guLiappams, flavoured them with grated sweet corn, freshly chopped mint and seasoned them with green chillies. GuLiappams are traditionally South Indian breakfast dish made using fermented lentil batter, often spiced mildly, authentically made in cast iron appam mould (a slotted pan where the batter is filled) and cooked on a gas top. The ones I made are quick, instant and spicy too, making them ideal for breakfast. I paired them with some spicy peanut chutney powder I made in the day and they made up for an excellent evening snack we craved for the rainy day.


Corn and Mint Appams

INGREDIENTS

1/2 cup semolina (sooji rava)
1/2 cup rice flour
1 sweet corn, grated
Couple of mint leaves, chopped
1/2 cup regular yogurt or more (not the Greek/thick yogurt kinds)
1-2 green chillies, chopped to fine pieces
1 tsp. baking soda
Salt to taste

DIRECTIONS

Grate the sweet corn and mix in semolina and rice flour to it. Add in regular yogurt little by little till it comes to thick batter consistency. Sweet corn as some water content in it, so judge the amount of yogurt required to make a batter as thick as cake batter or dropping consistency. Add the chopped mint leaves and green chillies and adjust salt to taste. Whisk well. Finally add in the baking soda, give the entire batter a quick, good whisk.

Oil the appam pan well and bring it to heat. Using a spoon, scoop out the batter and drop into each appam mould. Fill all the moulds with the batter and allow to cook on medium low heat. Carefully flip the appams upside down and allow them to crisp well on both the sides. Serve hot with some fresh coconut chutney or chutney powder like I did.


Pick up one, take a bite, its savoury, spicy and bold. The Peanut chutney powder I made earlier in the day added further to the spice, making it delightfully right for that evening. I shall share the recipe for Peanut chutney powder in my forthcoming posts. Till then, make merry, enjoy life and celebrate Diwali in full fun and masti!


I love October for being a fantastic season in all aspects. Its that time of the year when weather is pleasantly nice and the festivities add an alluring charm to wrap the year in good spirits. The rains have washed down all the dust away and the trees allay us with their new blanket in all shades of soothing green. Nip in the air may have to wait a little longer as misty mornings and chill evenings aren't here yet, yet the changing season reminds me that December is nearing and winter is close to beckoning, something we so much look forward to. Between these changing seasons, October beautifully envelops itself with festivities that makes it the best time for bonding with our family and friends. Indian festivals like Chaturthi, Dusshera, Diwali remind you that it's time you push aside all your worries, bury down your pressures, wrap up your tensions and move ahead to celebrate life with your loved ones, the time when festivals bring in joy and celebration and contentment to our lives.


And with all those festivals gone by and the ones we look forward to, I've have been on my toes all this month. I've been living out of my suitcase with lots of travel packed over weekends, spilling over festivals and the celebrations that have kept me busy through and through. A weekend getaway to Mysore, then to Hyderabad for work related meet, then to Mangalore for Dusshera, it's been one hell of a calender blocked month with me cruising places.

With all this up, my kitchen hasn't been the busiest place for me, unlike most of my weekends. I do hope I can throw my hands at cooking some sweet and savouries for this Diwali, while I have been fairly depending on my mom for her delectable festive goodies. With no elaborate cooking done by me this Dusshera , some Besan Laddu and the quick snacks I made for our Ganesha this Chaturthi, I hope I'll be get some time out to meddle in my kitchen this Diwali.


Yet, I can't seem to stay long away from my beloved oven. So I hopped over to bake another banana cake in quick desperation to baking, something which I did not intend posting here. If you take a peep into my drafts you'll be a little amazed to see the number of banana breads/cakes I have lined up, that I've had to forgo some. Infact, I've been planning to do a step-by-step for sometime now, yet haven't been able make time for that. The increasing number of requests for step-by-step have been pouring in. Keeping in mind it's eggless I am sure many would love to re-create them at home. Hope you like this one with big bites into nice chunks of chocolate chips. Delicious!

Banana Chocolate Chunk Squares