Showing posts with label Gluten-free. Show all posts

Vegan Banana Berry Smoothie


Its three years past since the time our daughter came into our lives as a bundle of immense joy, love and responsibility. There she was, my little tiny tot whom I held close to my heart; so close that our breaths and heart beats felt one when I first cocooned her in my arms. That every laughter or wail of hers was instinctively a signaling feat only I could decipher. She moved out of her infancy far quicker than I had realized. I could carry her around like a doll, cuddle her fondly, swirl around with her in dance and soar her high so she would drop soundly into my arms. My playmate in every sense. I could plant a kiss on her baby cheeks at my will and dress the way I own her. She was my perfect baby doll.

By the time she turned two, she had popped out of my cuddling arms, and learnt to balance herself on foot. Her bunny jumps on our black-brown sofa has a deep dent on it. We've left it behind without mend as a hint of her mischief. She could chuckle by now, mimic her grandpa snoring and babble a rhyme or two. She could feed herself by a cup, but by no means was a neat or willing eater. She loved tender hugs and basked in the joy of being pampered. And she always needed me for her company through nights.

Her regular watch at height and weight tells us she’s tad below the normal range. But then she’s been that way since her birth. She’s now a hyper active kid of age three, in an age ripe for a child to be schooled they say. We pulled it this long home-schooling her elementary basics, avoiding so far any methodical training that would culminate her freedom to enjoy learning or push her to any orderly duress. As a quick learner she’s been way ahead of her peers. She can be friend with you quickly, can walk you through a dozen of nursery rhymes with ease, sing A-Z in phonic rhythms confidently and catch your misreckoning for your count on 1 to 10, pretty much putting many to surprise.

Vegan Banana Berry Smoothie 2


She needs a bit of seasoning though. She loves adults for her company and at times behaves like one. In company of other children, she is timid and demure. For long, she has been around with big folks, growing up in lack of company of children belonging to her age group. She speaks a ton that could tire anyone. Her mind is constantly bustling with dozens of questions every minute; the why-s, where’s, what’s, in constant need to be answered. She gets bored and cranky at the busyness of house and its people. She loves having someone around her every minute to play and keep her busy. As demanding as she sounds, she is a very happy child in company.

Last week, after much forethought, we placed her admissions with a nearby school. So she could wean away from comforts of being winged under parents and grandparents all the time; and find new friends for herself. To make friends with kids of her age group and discover joy in childhood and friendship. So that her curious mind would be busy with fun filled activities and play, instead of grown-up conversations. It’s a charming little place amid the bustling traffic ridden cross roads of Bangalore. With an artificial turf, bracing landscape, couple of outdoor and indoor games for play, and responsive teachers around, there’s enough there to keep her safe, busy and creative.

Vegan Banana Berry Smoothie 3


I was a bundle of nerves on the first day of her school. Worried as I was, several frantic calls went to my parents to know if she was doing ok or if the school had summoned them to pick her before time. In my mind I had expected her to cry her throat out, more in the company of thorough strangers and alien classmates whom she had never known. She came back home dancing happy feet instead. Certainly a joyous news for me. On day two, I accompanied her to drop at school; walking hand in hand, she, ideating about her dress and the matching shoes, and waving a cheerful bye-bye to me. A majority of her schoolmates were seen wailing, as their parents, grandparents, and aayas came to see them off. I expected she would cry for me. Instead she was still a happy child like the day before. It was a big proud moment, a revelation that my little one was adaptable and loved her time at school. Over the past two weeks, she has walked through her nestling period with no tears shed or anxious moments to deal with, making good progress at school. She is slowing getting accustomed to the company of other children, but has certainly got into good books of her teachers, gaining their confidence of being a good child. Soon someday she will wean away from tête-à-tête approach and come back to us with stories, games, learning and activities from her friends at school. She will soon grow up with an aura of her own. An individual with an independent mind who may not require her mommy or grandparents around for her being. A girl with definite thoughts, empathy and strong opinions of her own. I hope this is what good schooling will instil in her.

Vegan Banana Berry Smoothie 4


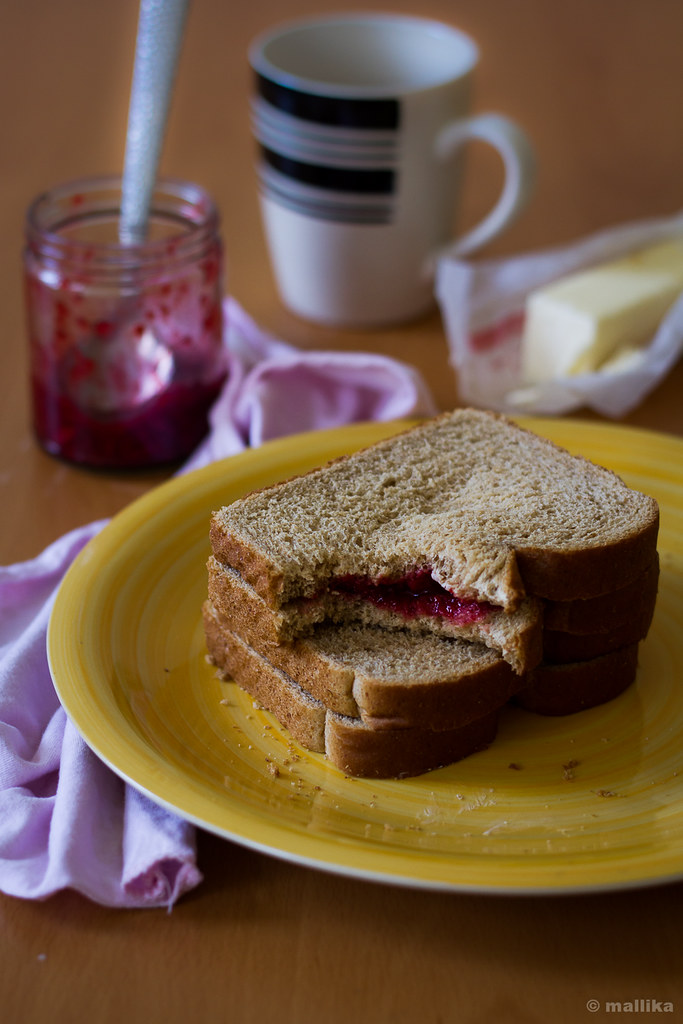
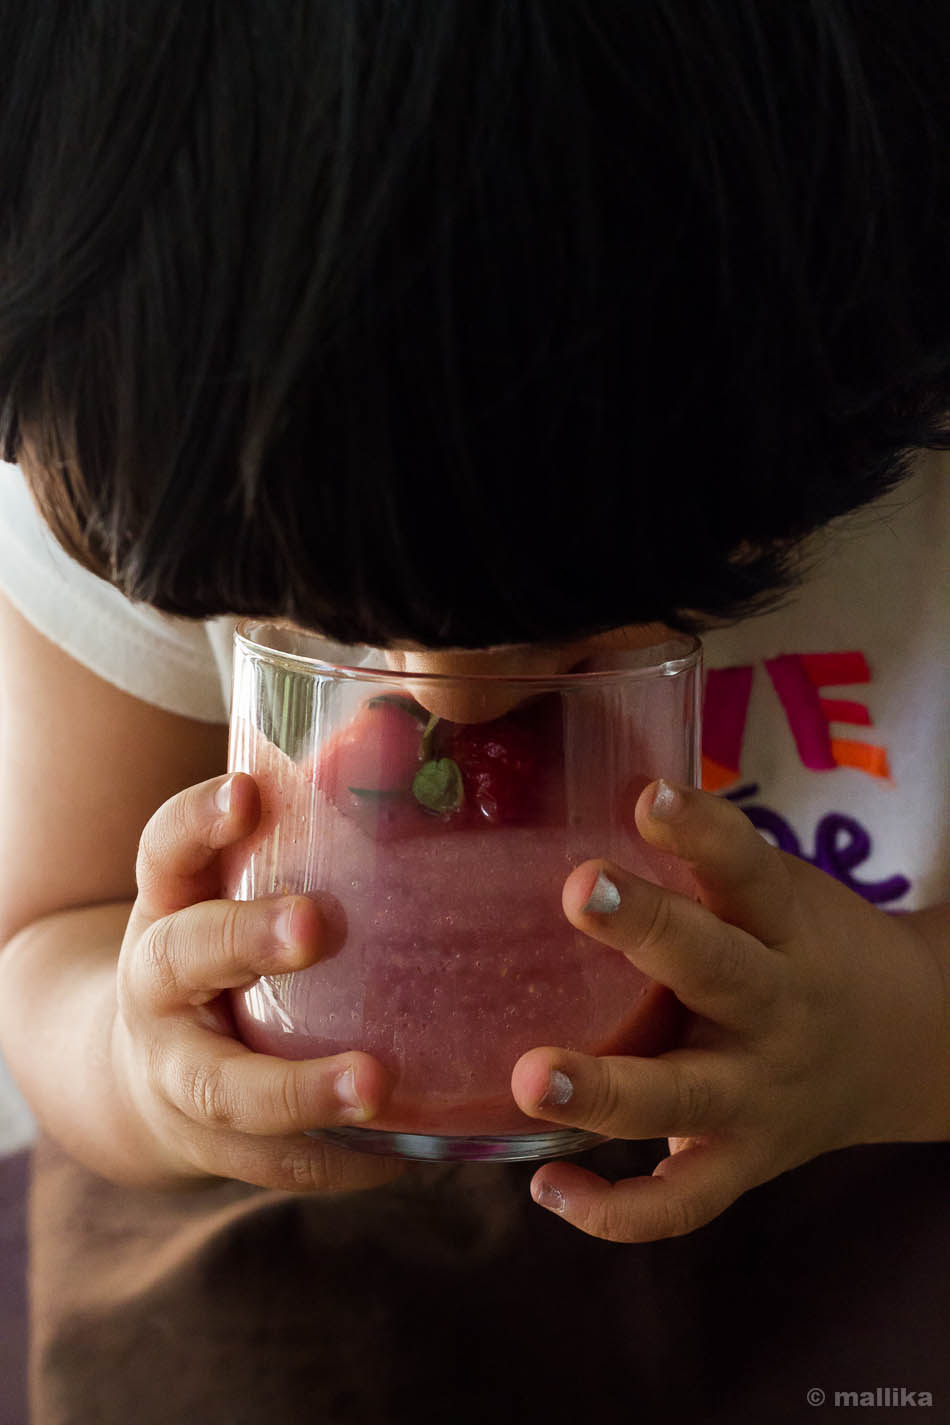
My little girl now carries a mid-morning snack for her school breaks. Her snack box that has healthy titbits like cut fruits, a piece of sandwich, bites of khakra or paratha wedges excites her, and each day she looks forward to what's being packed in her dabba. Mid-morning snacking was customary to her even during the time we were vacationing in US. That was the time, my little girl and I spent most of our mid-mornings together in the kitchen either chopping vegetables for lunch, baking a quick snack or whipping up berry smoothies to quench our thirsts. She would sit perched on the kitchen counter, while I stayed on my foot near the blender. She would peel bananas and I would slice them for her. The tall blender jar could nearly consume a quarter her height. Yet, she would unyielding adjust them neatly between her tiny legs and throw in ingredients by the order I said, all in for a game when it came to identifying colors and fruits.

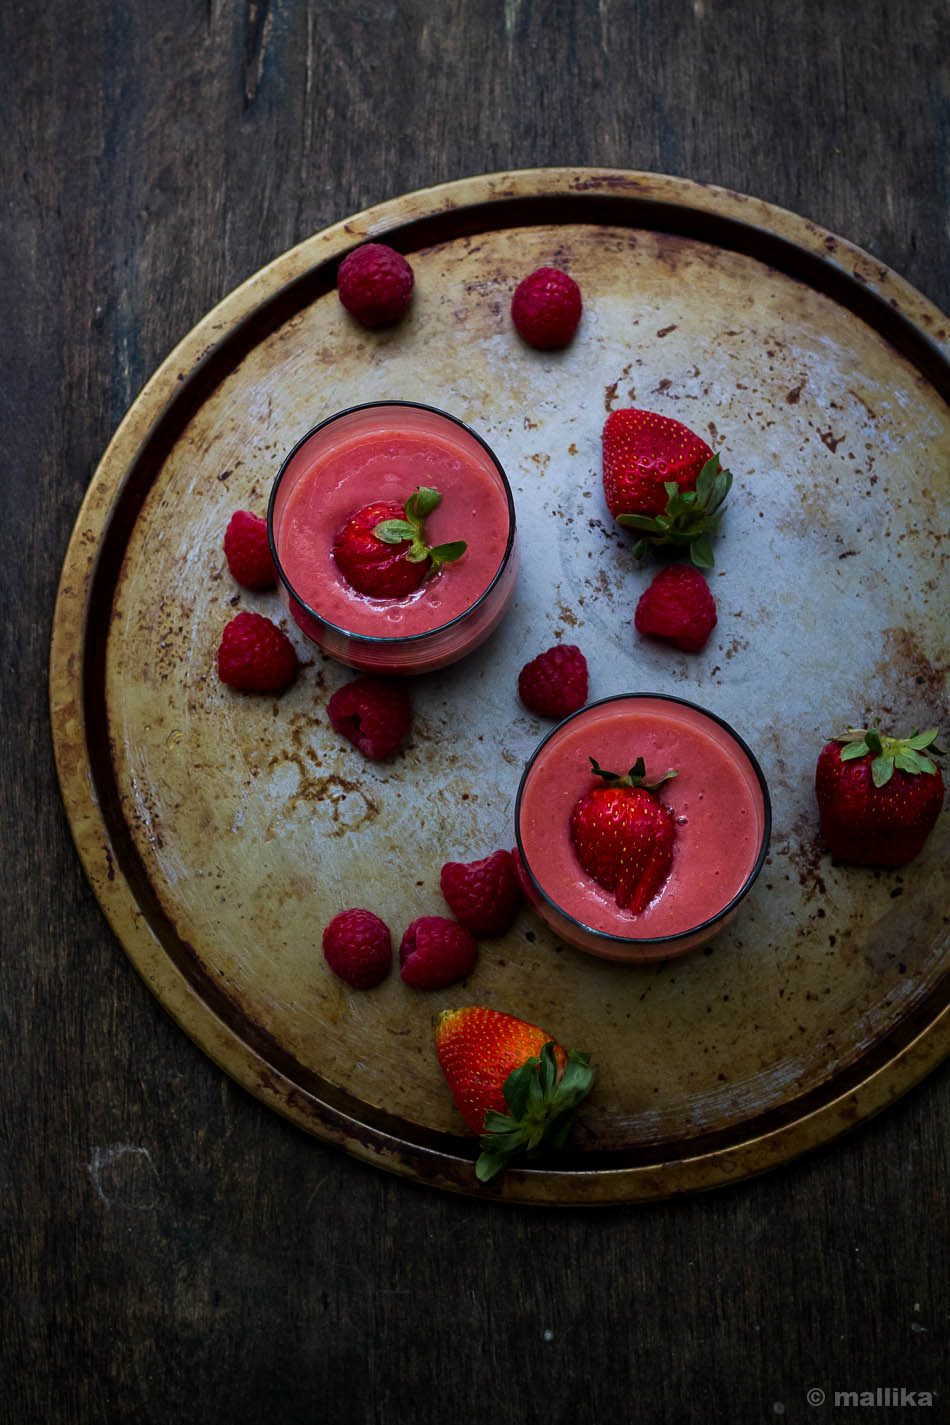
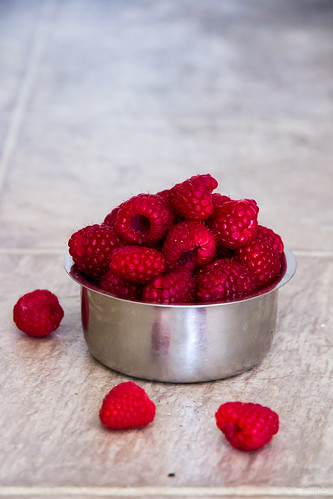
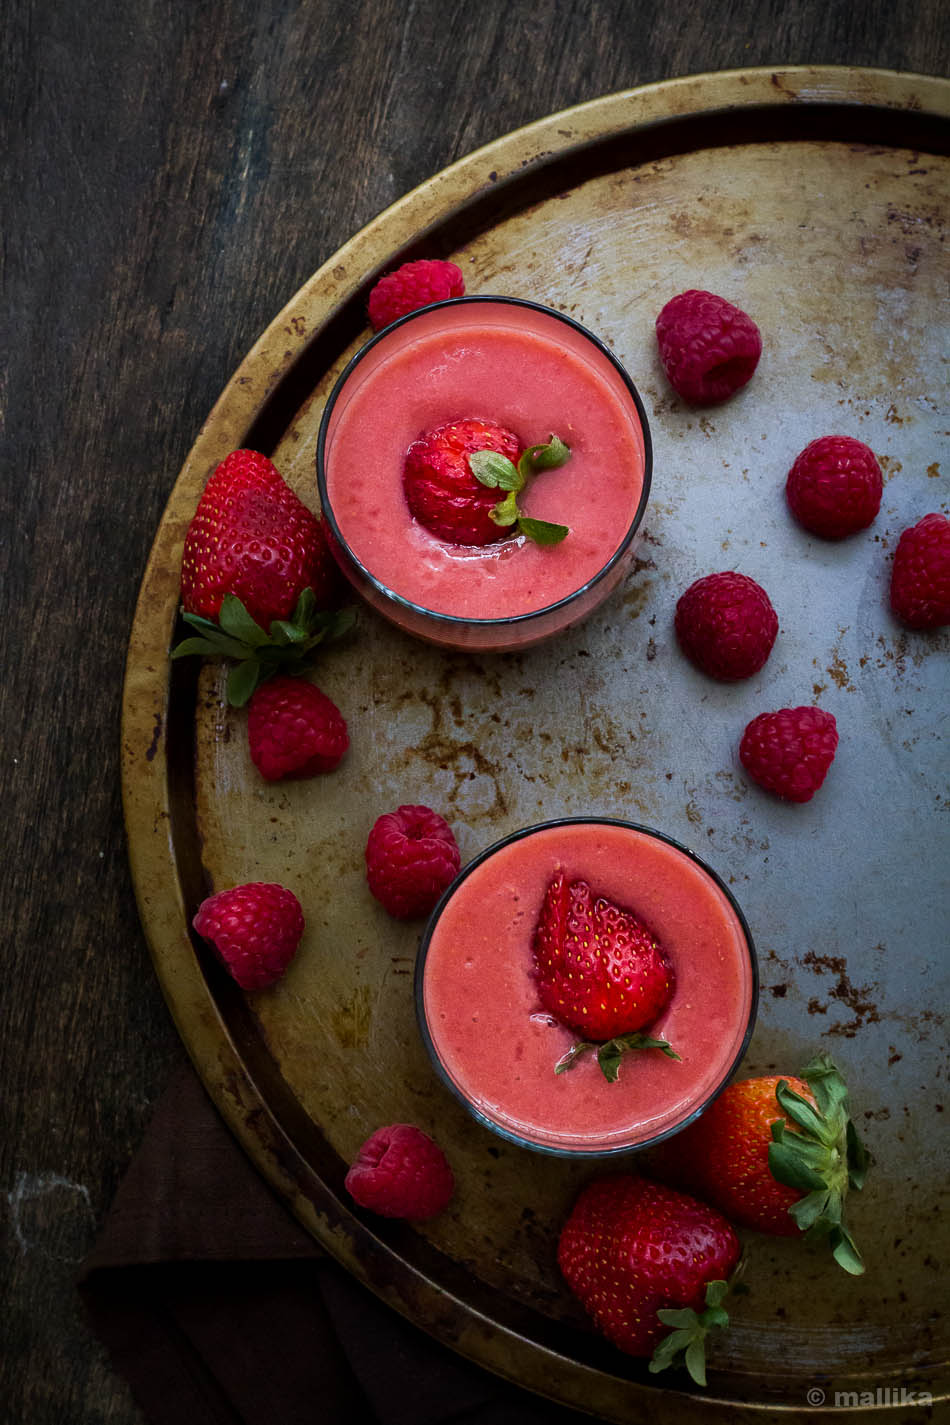
This Banana Berry Smoothie was our all time favorite mid morning drink. I could say more deary hers. She has a penchant for bananas. We would gulp tall glasses of it in a single go, sometimes go for seconds. Add in some oats while blitzing and it makes up for a breakfast too. Thick and luscious. Sincerely healthy. And vegan to boot.

Vegan Banana Berry Smoothie 5


Vegan Banana Berry Smoothie

INGREDIENTS

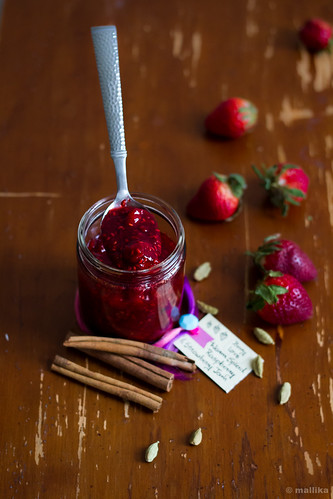
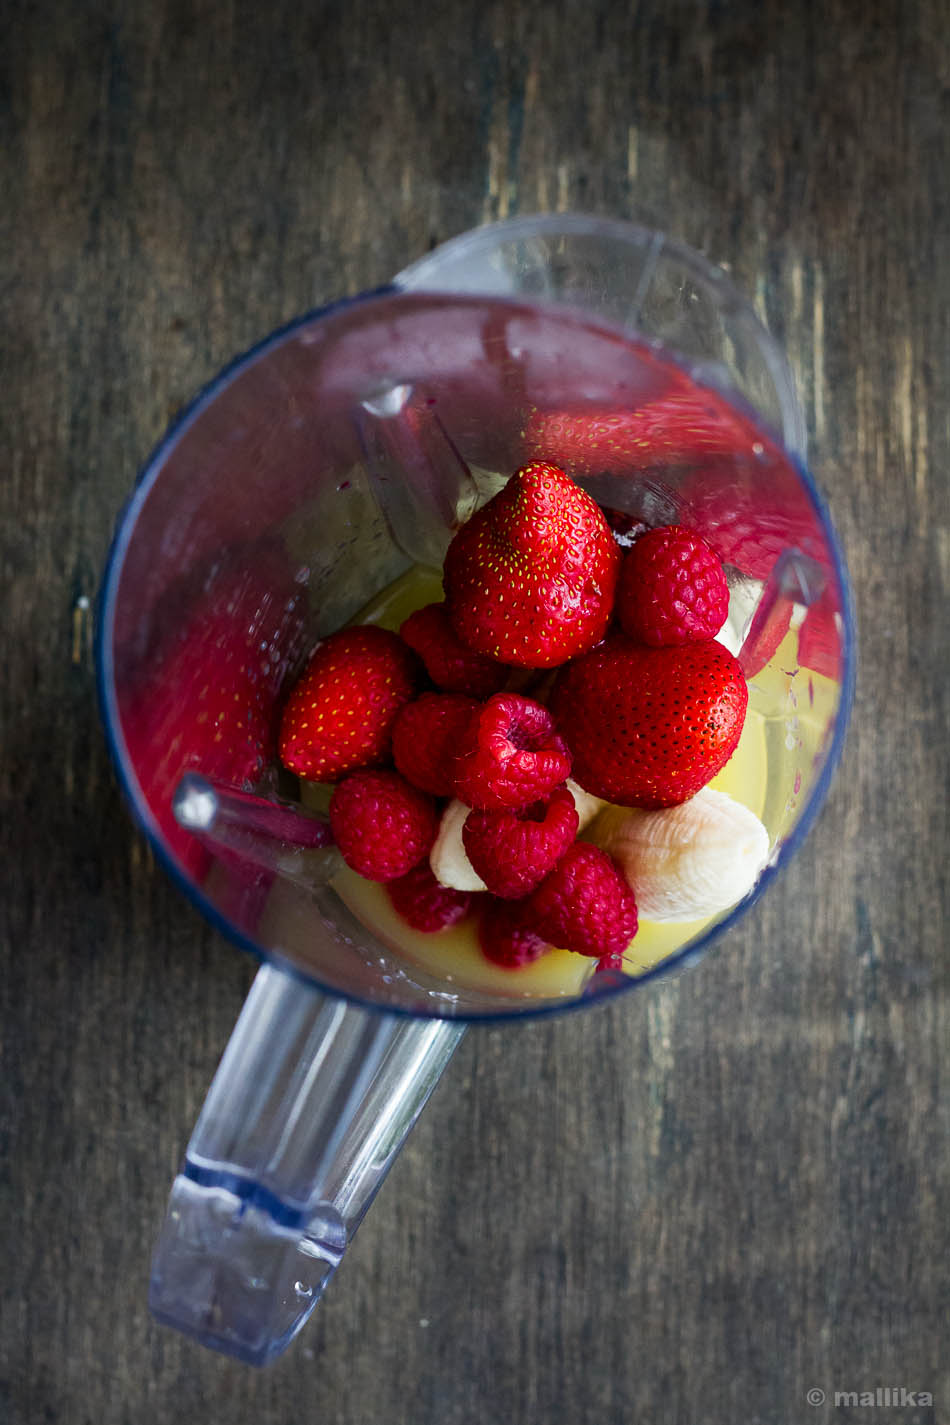
1 cup orange juice, cold
1 big banana
3 strawberries
12 raspberries
A dash of honey / maple syrup, optional

DIRECTIONS

Wash and clean all the berries thoroughly. Peel and chop the banana to rounds. Blitz them together along with orange juice and a dash of honey or maple syrup. Serve in tall glasses.

Note: You may use frozen berries for a cold drink. Frozen bananas work well too. I used chilled orange juice here since the drink was served for a child and was about the right temperature for a toddler.
Lemon Chilli Pickle_1
How to make Lemon Chilli Pickle | North Indian Nimbu Mirch ka Achaar
Two little sparrows visit us everyday. Just a customary visit, but we've become friends with them. I wonder why they did not visit us today. May be they have migrated to another place. Or retreated elsewhere. Or they just sniffed a sixth sense.

The sky turned dark and stodgy this morning. They stayed that way all day long; dull and gloomy. They could put any happy soul into depression. A stark contrast to the burnished blue and buoyant clouds of yesterday. The peppy hues of blues faded to somber shades of greys, blurring the horizon. As the clouds collided, they tore the skies up to a dreary downpour, like it was meant to mourn.

The wildflowers we tucked into the vase last evening sighted a battered slop. They wilted from crisp yellows to dregs of pale browns. Quite unusual, as they last nothing less than three days before the next change. This morning they too weren't in a mood. It seemed so. They had paled so much, they were beyond caring.

Lemon Chilli Pickle_2

We crept last night under the duvet hoping for a night longer than ever. For a day, we did not wish to come of. To witness an evening crammed with anxiety and emotions. We wished the day would never come, an evening we would never want to be in. Just the way we had wished about six months ago when D left from India to the US. I barely slept counting hours by minutes.

I woke up this morning with a heavy heart that felt like being weighed in tonnes, outweighing my body. With a pounding head, of a hangover from the deprived sleep and shorter breaths of anxiety. The water would barely go down the throat. It choked and felt wretched at every thought of this evening.

The day raced by quite quickly, much sooner than any other day. There was more silence in words and more action with bag packing. An unbalanced state of affection and emotions floating through the length of it. Our suitcases were packed and so were our tickets. Evening, we left home to airport. To fly back from this home and to be in another. Back to India - to a home we built together lovingly six years ago. Like birds migrating continents, my daughter and I are heading back to India after being here in US for three worthy months with D, every bit of it thrilling and memorable. D will stay back in US and continue his stint.

No tears though. We promised ourselves, we would not cry and make a scene. We've been taught that crying is a sign of melancholy and weakness. And we will live up to it. We will swallow the lumps in our throat. We are not the ones to depart with a twinge of guilt or pain. But positively and hopefully. We will bid a happy bye, give tight hugs and smile our way through as we depart. We will remind ourselves, once again - this distance is just a stretch of space that will get shorter with time. And soon we will be together again.

Lemon Chilli Pickle_3

As you read this, we may be standing in our queues going through security checks or soaring high up in the skies flying through continents. D will head back home in an empty car and the toddler's seat for his company. Our home will welcome him with our sounds resonating from the stuffs we've left behind. The sounds, that will echo from small joys we sought together while we were around.

From beneath the carpet floor that creaked each time we trod on, or the little one bunny hopped on it, reminding of how we taught ourselves to be gentle on it.

From the clitter-clatter of the vessels from the once-busy-kitchen. Now it's just his space.

From the photographs of us, the naughty three hanging on the wall, grinning ear to ear.

From the carton of half a dozen mangoes, of which only two are left behind - our mandatory family time of sitting around it every night; me peeling and chopping, the papa and daughter forking through it over tons of laughter, play and endless frolicking.

From the doll that the little one has left behind for her papa. She didn't want her papa to be all alone. Her doll, as she says, will now give him company.

From the jars of this lemon pickle I made for D last week. Homemade, just as he loves them alongside with his dinner. A taste that will bring him back to our home in Bangalore.

They will all speak to him, in silence; our essence lingering around in tits and bits, here and there. Almost in everything and everywhere. Ditto the way we felt about six months ago. Distance is terrible, it can be a crippling thing. But we remind ourselves, its just a matter of time; a stretch of space that will get shorter with time. And soon we will be together again.

Lemon Chilli Pickle_4

Lemon Chilli Pickle | Nimbu Mirch ka Achaar

INGREDIENTS

10 Lemons
5 green chillies
1/2 cup salt
2 tbsp. split yellow mustard seeds
1 cup mustard oil
2 tbsp. of red chilli powder
1 tbsp. dry roasted fenugreek seeds, ground
1 tsp. of asafoetida
2 tbsp. lemon juice

DIRECTIONS

Wash the lemons and green chillies. Pat them dry with clean kitchen napkin. Slit each lemon into 6-8 wedges. Similarly chop the green chillies to 3-4 rounds each. Rub them with salt and keep aside for few minutes for them to absorb salt.

Heat the mustard oil till its smoky. Add the split yellow mustard seeds and stir in. Add the chilli powder and asafoetida powder and mix well. Then add the salted lemons and green chillies and stir them well.

Place the vessel back on heat and cook on low flame until the lemon tenders slightly. Stir in the dry roasted and ground fenugreek seeds, and cook for 5 more minutes.

Remove the pickle from fire and add lemon juice. Allow to cool completely uncovered at room temperature. Transfer into clean, dry glass jars or ceramic barni. Use only dry spoon to serve the pickle.

Lemon Chilli Pickle_5

TonDekayi HuLi_1


I had a craving last noon. It was a serious one to say. A craving that cracked me crazy. In a long time I reminded myself and yearned for a morsel of it. Just a morsel that would satisfy me and feel at peace. May be it was the dreary weather or miss of my daily dose of conversation over phone with amma-appa, ever since they whisked far away to explore the greener pastures of Europe for their annual holiday. But it kicked me hard in my stomach. So hard, that I reached out to my husband on a frantic phone call to make a trip down to Indian stores that very evening, in every sense of urgency. 'Twenty-eight miles just for a coconut? Can it not wait? Wasn't it two days ago we had been there?', he zapped in midst of Monday morning chaos at work, composing his thoughts over matters more important than a mere coconut. Damn! Who knew I would hanker so much for a simple bowl of huli! For a craving that has least sense of timing or inventory (could I just not do with the leftover sweetened coconut I used here?), but had to be appeased.

TonDekayi HuLi_prep1 TonDekayi HuLi_prep2 TonDekayi HuLi_prep3


Truth to be told, the past three months never saw a day with fresh coconut. We never bought one here. The Indian store we shop at barely stocks one or two sad looking coconuts, often sleeping on the verge of their expiry bed. The packaged grated coconut is a bigger risk to buy. What if it tuned out to be rancid? After all, with no packaging date on it whatsoever, I wonder for how long it has been sitting there. The brand new blender I bought, advertised it could churn blocks of ice to granita in seconds. It broke out within days with a nasty burnt smell while attempting a simple fruit-date smoothie. That, enough was a hint for me. It could not stand the heavy duty grinding of Indian spices and coconut.

TonDekayi HuLi_2


Coconut chutney, tambli, gojju, paladhya, menskai did not feature in our menus. Otherwise the usual course of tip-toeing and balancing myself between Northern and Southern cooking, here I was, survived mostly by chopping copious batches of onions, brewing gallons of tomatoes to broth, throwing mounts of red chillies and garam masalas in almost every fare I made, cooking basic Northern dishes much to my husband's delight and satisfaction. I did make occasional saar that didn't call for coconuts, served dosas with coconut-less-chutneys and palyas that went without the mellowed sweetness from the much-desired-generous-garnish of fresh coconut. The pre-packed coconut I had bought long ago assuming would be good for curries was so sweetened, that it was consumed in desserts and occasionally bitter-gourd stews.

The little Southerner in me craved for the real deal.

So it had to be. A day I called for huli. Made the way my mother makes it, smashing whole tondekayi (known as tindora in hindi / ivy gourd in English) and tossing them in a delicate coconut based curry infused with garlic tempering. Little toiling and more satisfaction of finally accomplishing it - done, served and relished. In feeling of worth and delirious joy like none other. Of clinching rice between fingers, mashing them through huli and drawing morsel by morsel of it with fingers to satisfy the insatiable desire of being home. Of savoring comfort food that reminds me of my mother. Of swaddling in spices that brings aromas of her kitchen into mine. Deep satisfaction. Simple joys.

TonDekayi HuLi


TonDekayi MeNasina HuLi | Ivy Gourd in Spiced Coconut Curry

INGREDIENTS

20-24 ivy gourds( also known as tondekayi/ tindla/ tindora)
1/2 tsp. turmeric powder
Salt to taste

Grind to Paste:

1 cup grated fresh coconut
1 tbsp. thick tamarind pulp
5-6 red chillies
1 tsp. jaggery

For Tempering:

2 tsp. coconut oil
1 tsp. mustard seeds
3-4 garlic pods, smashed
A twig of curry leaves

DIRECTIONS

Wash the ivy gourds in running water and clean them on a kitchen towel. Snip off the tips at both the ends (as shown in the pic above). Using the wide bladed knife, smash the ivy gourd down against the blade, putting just enough pressure using the palms of your hand to smash it. We generally use a pestle to do this. A heavy rolling pin works fine too. What you get is a rough smash of ivy gourds that is still in tact and not broken apart. Transfer the smashed ivy gourds into a pressure cooker along with turmeric powder and salt and just enough water to cover the vegetable. Pressure cook it for 2-3 whistles. Meanwhile, while ivy gourds are being cooked, proceed to making the coconut curry.

Grind to paste the grated fresh coconut along with tamarind pulp, red chillies, jaggery. Add little water to enable smooth grinding. Set aside.

Release the pressure off the cooker and transfer the cooked ivy gourds along with the water into a steel vessel. Add the ground coconut paste, stir well and bring to a rolling boil. Adjust salt and more water depending on your preferred consistency. Simmer and let it boil for 5-7 mins for the spices to be absorbed.

Prepare the tempering by heating coconut oil in a small kadhai / wok. Add mustard seeds to it. As it begins to splutter, add smashed garlic and curry leaves. Fry them till the garlic turns golden brown. Add this to the prepared huLi. Serve hot with steamed rice.

TonDekayi HuLi

Moth ki Dal

Easy Moth Dal Recipe | How to make Moth ki Dal | Matki Dal
Two weeks ago there were signs of winter slowly slipping away giving their way to spring time. The snow shrank and shriveled away long ago, but the temperatures are still pitching low and below to call it the ideal spring time. Each time I look out of my window for that ray of warmth and sunshine playing its peek-a-boo, the sky is gloomy and dull, and warns of rains. More than a month ago we were hoping to welcome spring. Yet the weather is cold, wet and chilling.

Moth ki Dal 1


Spring may have been slower than expected this season, but after those dreary winters that had pretty much confined me indoors, watching the sun raise up in the morning and gleam till dusk, even though it may be quite occasional, gives me some hope that this month will be bright and cheerful with spring in its full bloom. The patches of dry twigs and fallen leaves have given way to fresh grass sprouts and tender new leaves. The black and white canvas has transformed to vibrant shades of green and blooming colors of spring. All I wish to do right now is shed my winter wears away and make way for lighter clothing, which seems to be distant at the moment. The weather Gods have been quite temperamental and the mercury still shows in single digits. With infrequent sunshine interspersed with drizzles, showers and windy chills, I think we may have to wait for that sunshine and warmth a little longer.

As the drizzles trickle down my window panes, there's nothing much I can do, but to wait and watch till the pours go away. Instead I sip this moth ki dal with steaming hot rice. I love the spice that makes it perfect for the cold weather. It's just so comforting.

Moth bean that's the heart of this dal is also popularly called as Matki. Though it's traditionally consumed for breakfast, after being sprouted and cooked, I use this dal often to accompany our main course meals, pairing them well with rice, rotis or puris. They have a taste and texture quite similar to that of moong, but they cook faster making it my preferred choice. It's spicy and soupy. This dal is a comforting dish for any winter or rainy day.

Mathki Dal


Moth ki Dal

INGREDIENTS

1 cup moth beans
1/2 tsp. turmeric powder
3 tbsp. vegetable oil
1 tsp. cumin seeds
2-3 small pods garlic, finely chopped
2 tsp. grated ginger
1 large onion, finely chopped
3 medium sized tomatoes, pureed (finely chopped also works great for more chunky textured gravy)
1 green chilli, finely sliced
2 tsp. coriander powder
1 tsp. cumin powder
1 tsp. red chilli powder
1 tsp. sugar
1 tsp. garam masala
Salt to taste
Chopped coriander leaves, for garnish

DIRECTIONS

Wash and soak the moth beans overnight or atleast 6-8 hours. Drain the water from soaked beans. You may either proceed with the recipe or choose to sprout them further for a day or two. To prepare the dal, pressure cook the soaked moth bean in 3 cups of water along with 1/2 tsp each of turmeric and salt for 3-4 whistles. Allow the press34e cooker to cool down completely. Meanwhile prepare the gravy for the dal. Heat oil in a thick bottomed pan. Add cumin seeds and allow them to splutter briefly. Next add in garlic and ginger and fry them for another 30 seconds on medium high heat. Then add the chopped onions and fry till they turn golden brown. Add the chopped green chilly and fry another few seconds. Next add the tomato puree (or chopped tomatoes, in case using) and fry till the oil oozes from the edges. Now add in the spice powders, the coriander powder, cumin powder, red chilli powder, garam masala and a dash of sugar. Stir well and fry for 2-3 minutes. Add the cooked moth along with a cup of water*. Bring the dal to a rolling boil and adjust the salt to taste. Remove from heat and garnish with chopped fresh coriander leaves. Serve hot with rice / phulkas / puris.

Moth ki Dal 3


Notes:

* Water can be increased or decreased depending on the consistency of the gravy you prefer.
* Sugar is optional, but I prefer adding a dash of it as it neutralizes the salt, the spices and tang.
* I like to add either lemon juice or amchur (mango powder) at times when there isn't enough sourness from tomatoes. This is just optional.
* I generally use vegetable oil for cooking our day to day recipes, however a dash of ghee / clarified butter enhances the taste of this dal. Skip if you choose to keep it vegan.

_MG_7640


A week ago, last Monday we got a glimpse of the last snowfall for the season. It was mesmerizing and the first time ever for me. Over the past one month, I mainly spent all my time indoors doing all that would keep us warm and cozy. I come from a region with tropical climate, where warmth and sun are in abundance throughout the year. Experiencing the sub-zero degree temperatures, watching the world around enveloped in sheets of fresh white snow, the flaky drizzle has all been thrilling. Never have I draped myself in so many layers of clothes, yet each time I stepped out, my fingers went tangling numb beneath the gloves that were meant to hold the warmth of my palms, my legs and thighs felt bare and exposed, my feet felt cold and impassive as if they did not belong to me, my eyes watered and my nose went numb with each blow of windchill. Layers of thermals and winter jackets seemed insufficient for me to withstand these cold snarls. This is a kind of winter that I have never witnessed in the past.

_MG_7655


For a month long of freezing cold weather and home confinement, I was silently hoping to witness spring soon and I am glad its here. Its not because I don't love winters, it's because I would love to venture out and explore this place more. Its because I have very little time to spend here and lots I would love to travel, sightsee and explore over the next two months. I wish to carve some beautiful memories and take them back home with me. And this probably is not possible if I stay indoors concealed in blankets to shelter from the cold.

There is an innate silence in this part of the world. Its far from the hustle bustle of city life that I am so accustomed to. I don't wake up to stressful mornings of chasing my daughter to wake up, brush and get her and myself ready to leave home early. Instead, I gleam in joy as I watch her sleep till late mornings. It's the sleep she deserves for her childhood. As I draw the blinds on the windows, bare trees stand tall and far till my sight can see. There is peace and serenity that's soothing to my mind and body. Its got me health and time to appreciate nature that I had been long awaiting for. Over the past week after the last snowfall, the sun emerged out of its hiding. It spread its warmth slowly and casually, bidding farewell to the last few patches of snow melting away steadily, giving way for the dry leaves and twigs from the fall to emerge from beneath. Spring is here and soon the trees will bloom new leaves for the season. And hopefully, it will stay on till I am here.

_MG_7615 _MG_7660


These winters made their way to some amazing recipes I managed to cook in my new home. Blessed with gas burners and a big oven, I used it fairly to cook and bake many dishes and wile away my time while indoors. Some pizzas and many pastas, some warm and comforting soups with grilled vegetables, perfecting some sinful chocolate chip cookies, trialing some delicious muffins and cupcakes, some that failed and I learnt, many I succeeded and won. Many of these I would love to share here with you all, as in case with this jam here. It's simple and easy to make and just under 3-4 ingredients. A bit of slaving over the stove many be intended, but its worth every effort.

For several years, Raspberry remained a fantasy fruit to me. Its not something we had seen or heard of in our part of the world. I had read them in books and novels as a kid where they appeared twined in stories - Noddy's love for raspberry and cream, the Famous Fives adventurous trips with their raspberry pops and tarts; often leaving me wonder if these were fancy meals that were made up for fantasy novels. I had little known then that Raspberries did exist in the real world and they indeed look dreamlike, beautifully pink and plump. Unfortunately, they don't store long. They mold easily and are subject to rot if not consumed soon. Instead, these jams make it up to trap their flavors and enjoy them over several meals. Addition of strawberries may be skipped totally and substituted to raspberries alone, but strawberries add deep pink hues and volume to the otherwise seedy raspberry jam.

_MG_7651


Warm Spiced Raspberry & Strawberry Jam

INGREDIENTS

1 1/2 cup fresh raspberries
1/2 cup strawberries, quartered
1 cup sugar
1 tsp. of all spices mix (a blend of cinnamon, cardamom, cloves and nutmeg)

DIRECTIONS

Wash and clean the berries thoroughly. Combine the raspberries and chopped strawberries in a heavy bottomed pan and heat till they begin to release their juices. Next add the sugar and cook over low heat, until the sugar is dissolved. Add the spice mix and continue to cook over low heat for 20 minutes, until the berries become soft and mushy. Allow the mixture to boil slowly stirring very often. Cook and reduce until a small amount of the jam gels on a cold plate and you are able to draw a line across it with your finger. The jam will thicken further as it cools. Allow to cool partially and pour carefully into glass jars. Cool completely and then close the lid. Use immediately or store refrigerated.

_MG_7686


Its cliché that I call myself a diehard foodie, because there are many encounters I make from time to time when I tell myself “oh! I dislike that” or “it tastes gross…. this is yuck!”. I hated papaya always but ate them with no favour because my parents reminded me how much good they would do. I could never stand the sight of jalebis and jahangiris from the time I can remember. I dislike the smell of flax and eggs in my bakes. The smell of strong coffee nauseates me even today. Breads, doughnuts and croissants were never my favourites. Several years now, I still despise samosas. My tummy aches each time I relish the street-side Indian chat. Bread Puddings at restaurants always taste gross. I could go on with this list.


Those exceptions apart, I still assert that I am a foodie at heart. As a kid, my parents did not face problems feeding me with whatever was made in our kitchen. My mom quotes often that even as a toddler I relished bitter gourd juice with as much penchant I did with any other fruit juice. I loved vegetables and fruits with far little exceptions. I was known to sneak peek into the kitchen in mom’s absence at odd hours and do furtive tasting of what was cooked for lunch and dinners. Frivolous memories of digging spoons into the prepared palya, skimming off the spiced watery part that floated on top of the huli saaru, sipping tumbler full of tamblis much ahead of lunch time, and flicking the roasted cashews and raisins that dotted the prepared halwas, till mom worried where they had disappeared still stay fresh and warm.

There were some dishes that could not be made ahead of time. They were meant to be made instantly and served immediately. One that attests my love for our cuisine is this paper-thin beaten rice spiced with green chillies and coconut. It’s really simplicity at its best and revokes fond memories of my school days when mom would whip this up in minutes to forage our hunger with such easy evening snacks. So dead simple and tastes great!


Hasi MeNasina Kayi Avalakki

INGREDIENTS

1 cup beaten rice (paper-thin variety)
1 tsp. coconut oil
1 tsp. mustard seeds
4-5 green chillies, finely crushed
1/4 cup fresh grated coconut
1 sprig curry leaves (optional)
1 tbsp. sugar
Salt to taste

DIRECTIONS

Crush the green chillies in a mortar and pestle or by hand. It's a common tradition to crush the chillies by hand, however to avoid the heat getting to your fingers, you may use mortar and pestle for the same. Crush these chillies into the fresh grated coconut so that they release all their flavors.

In a small kadai / wok, heat the coconut oil. Add mustard seeds and allow it to splutter. Add the curry leaves if using. Switch off the gas and allow it to cool. Add the crushed chillies and coconut along with the tempered oil into the beaten rice, followed by salt and sugar to taste. Toss everything well so that the beaten rice takes in the flavour and spices. Serve immediately. Accompanies well with upma for breakfast or evening snack with tea.

Ragi Biscuits


There has been a long silence on my blog. But that's with a reason. There has been a lot going on in the past few days. Remember I told you how I was caught between making productive decisions, weighing out their pros and cons and hoping for the best. A lot got sorted and matters did get clearer with time. I feel a lot better. There was a lucrative offer that I turned down unwillingly for a good reason. Instead, the daughter and I planned an overseas travel to join my husband for a holiday. It seemed dicey initially, but all fell in right place, the right time and we did travel as intended. So there was packing and unpacking, unsettling and re-setting, the jet-lag and weather change, an adaptation to a new country, a new home and new kitchen.

Ragi Cookies


It's taken time to get into grooves of routine in a new place where I am vacationing for 3 long months. For these months, I am on a sabbatical from work, devoting my time wholly to the family; my husband and daughter. I had been looking forward to this personal time and space for a long time, particularly to spend some quality time with my growing daughter, hence this break was thoughtful one and a big welcome. Three months may be a too short period to justify the time spent, yet I wish to make every use of this and enjoy her company.

My recipe post for today and, may be, for next couple of weeks comes from my kitchen in India. In a bid to wrap up the pantry staples and close the kitchen before we moved out, I consumed the last batch of Ragi (Finger Millet Flour) to bake these biscuits. These Ragi biscuits (as they are commonly referred to in Indian bakeries) are gluten-free and delicious. If you are not gluten intolerant you may consider using equal qualities of millet and all purpose flour for easier handling. They are simple to make and easy to put together. I hope you enjoy them as much as I do.

Ragi Biscuits_1


Ragi Biscuits

2 cups finger millet flour (ragi flour)
1 cup powdered sugar
1 cup clarified butter (desi ghee)
1/2 tsp. cardamom powder
1 tsp. baking powder

DIRECTIONS

Preheat the oven at 180 C.

Roast ragi flour in a thick bottomed pan / kadai on a medium low heat, for about 5-10 mins till the raw smell goes away. Take off the heat and add the powdered sugar, melted ghee, baking powder and cardamom powder to it. Mix well.

Make small balls of the dough and keep it on a greased or (lined with parchment paper) baking tray. Poke an almond each into the biscuit dough. Bake at 180 C for 12 minutes. Allow them to cool completely. Store in a cool dry place.

Ragi Biscuits_1


Notes:

* Roasting Ragi is very essential, else you will end up with muddy tasting, flavourless biscuits.
* Instead of cardamom powder, you may flavor them with vanilla seed powder.
* These biscuits are quite delicate since ragi flour does not have gluten in them. If you are not particular about being gluten free, you can substitute half of the ragi flour with whole wheat flour and bake as suggested.
* These biscuits are quite nutrition and can be fed to kids as a snack box item.


I kind of cheated here. Some leftover delicious pesto was stuffed into the yeasted dough, then let it rise and baked it for our breakfast. That made up these delightful bread rolls paired with a cheesy mayo dip. When breakfast gets so simple and easy, there can never be a complain!

As I write, my freezer is loaded with walnuts right now. So do expect to see some walnut recipes back to back, which I hope you will love.


A while ago I was crazy to have an organic kitchen garden of my own. The kinds that could supply me few tomatoes, chillies, spinach, mint, curry leaves, and some greens. But I have given up on my tiny kitchen gardening now. Over these months I made frantic attempts to get my plants all the nutrition they needed in behest of keeping them organic. I aerated the mud, replenished them and fed them field fetched dungs. They grew well, but only for a part of the time. Then my life got so busy that pursuing the weekly routine of caring for them seized. Just watering did not help as they needed extra effort and care when gardened in pots. While many other plants failed to grow as much I would have loved them, it was the mint that surprised me the most. She spread wild and nice, her leaves bursting in depth of greens, the stalks emanating the peppery aromas of mint, making it such a delight to watch her each time I nutured her. I basked in the happiness of watching her bloom and contemplated on how much beauty she would bring to my dishes. Sauces, chutneys, desserts, and this pesto. Such small joys give bounty happiness.


So one evening this pesto was made; mint, some leftover dill and coriander stalks ground with walnuts and garlic, seasoned with salt and pepper and liberally flavored with a dash of grated cheese. I've used the leftover dill and coriander stalks in making this pesto, but I recommend, you skip dill and only use coriander since both mint and dill have a unique strong flavour. Nevertheless, it's a comfort food that goes well with Garlic Spaghetti or into making these bread rolls for our breakfast.


Walnut Mint Pesto Bread Rolls

INGREDIENTS

For the dough:

2 cups all-purpose flour
1/2 cup warm milk (maybe a little more or less)
2 tsp. active dry yeast (I used Baker’s here)
1/4th cup melted salted butter
1/4th cup powdered sugar

For the Pesto filling:

1 garlic clove
1 cup fresh mint leaves
1/2 cup mix of dill leaves and coriander stalks
1 tbsp. extra-virgin olive oil
1/4 cup walnut halves, lightly toasted
Salt and freshly ground black pepper to taste
1/4 cup finely grated cheddar

DIRECTIONS

Dissolve 2 tsp. of active dry yeast in half a cup of warm water and a teaspoon of sugar. Keep it aside for 10 minutes till the yeast is active and frothy. If the yeast fails to froth, discard and start again.

After 10-15 minutes, in a separate glass bowl, combine all the ingredients for the dough; the frothy yeast, sugar, butter and flour, pouring just as much milk in small additions so as to form a sticky soft dough. The dough will initially be sticky, but later will begin to leave itself from the sides of the bowl. Knead into a smooth elastic dough with as little flour as possible. Stickier the dough, lighter will be the bread. Knead the dough for atleast 5-7 minutes so as to release its gluten which helps in a nice, light bread.Place the dough in a bowl, cover it and allow the dough rise until it has doubled in size (should take about 90 minutes in warm condition).

Meanwhile to prepare the pesto filling, grind all the ingredients except the cheese mentioned under pesto above. I like some bits of walnuts coming through, hence I used a mortar and pestle for this purpose. Set aside.

After about 45 min the dough should have risen. Give it a punch and knead it further for 5 more minutes. Using a rolling pin, roll the dough out on a lightly floured surface to form a rough rectangular shape with uniform thickness. Spread the pesto filling all over the dough. Sprinke over the grated cheese. Beginning with the long edge closest to you, roll the dough into a tight roll. Slice the roll into 9 even pieces. Gently poke some more grated cheese into the rolls. Place them on the baking tray and keep them in a warm place for at least 1 hour, until they've roughly doubled in size. Bake them at 180 deg C for 30 to 35 minutes.


Gifting or exchanging gifts during festivals per se was never a part of our culture. The only form of festive gifts were probably the homemade sweets and savories we shared with our family, friends and neighbours. However life changes to an extent after marriage, where embracing new culture, their lifestyle and values become essential to maintain the social associates. Exchanging gifts, termed as Shagun is an integral part of my husband’s side of family. Be it an occasion, a festival or just a casual greeting, it is inevitable to exchange gifts as a gesture of love and respect. For someone like me who had never seen this in my part of the world earlier, this seemed a bit prodigal and odd initially. Over years though I have learnt to accept and appreciate this culture and own it as well.


Festive gifting, particularly around this time of the year seems to be gaining a lot of popularity in India too. As known for a fact, Christmas was always associated with sharing of gifts by Santa Claus. As a kid I have lived by my share of dreams and fantasies, hanging stockings by the bedside and window sill around Christmas time, secretly hoping that some Santa would come by riding on his reindeer on this big night and drop a surprise gift that I had been longing to own as mine. I must say assertively that over the many years I hung my stockings by the window sill never did a Santa come by or drop goodies into my stockings. I realized eventually there existed no Santa, nor would my stockings be ever replenished with gifts, so I gave up on them. I wonder though why my parents never bothered to drop any goodies in there. Least I think, as a bribe that idea would have been fab.

With Christmas just around the corner and keeping in mind that these can make great give away gifts to your family and friends this season, I have 2 recipes for you today. The Home-made Christmas Mincemeat is purely vegetarian, much unlike of what it's name suggests. The inspiration to make these came from Nigella Lawson's 'How to be a Domestic Goddess', however the recipe for the same is tweaked and adapted from David Lebovitz's Quick & no-cook Mincemeat recipe I came across here; while the Candied Orange Peels are such delicious bitter-sweet treats that you will love to munch them as is or use in various recipes.


Home-made Christmas Mincemeat

INGREDIENTS

175 g raisins
100 g sultanas / black currants
100 g dried cranberries
100 g candied peel, finely chopped
175 g soft dark brown sugar
Zest of 1 orange
Juice and zest of 1 lemon
1 tsp. all spice mix (a freshly ground with cinnamon, cloves, cardamom and nutmeg)
5 tbsp. brandy

DIRECTIONS

Mix all the ingredients together and stir well. Spoon this into clean and sterilised jars. I sterilise my jars by placing them in warm oven for couple of mins. Allow the flavours to mature for at least 2 weeks. This works great for pies, tarts, Christmas cakes and puddings.


Home-made Candied Orange Peels

INGREDIENTS

2 large thick skinned oranges
2 cups sugar, divided
1 cup water

DIRECTIONS

Neatly score the oranges into quarters. Remove all the flesh neatly and retain the peels. Carefully scrape off the white pith as much possible so that the zesty orange peel can be used. The white pith will render bitterness to the oranges, hence its essential to remove all of it for best flavours. Chop the peels into 1/4-inch-wide strips as shown above in the 2nd picture.

Drop these peels into cold water. Bring this pot of water to a rolling boil. Drain off the water and repeat this twice with a new batch of water. This will soften the orange peels and mellow down the bitterness.

Next, in a thick bottomed pan heat 2 cups of sugar with 1 cup of water. Bring to a simmer and cook till it reaches one thread consistency. Add the peels and cook further till most of the sugar coats the peels and the peels get translucent. Remove from the flame and drain off any excess sugar. Place them on a tray and allow to dry further if you wish to store them. You may also roll them in castor sugar if preferred. However, I used them on the following day in recipes for Homemade Mincemeat (recipe above) and Christmas fruit cake.

BasaLe Soppu HuLi

How to make BasaLe Soppu HuLi| BasaLe Soppu Kodhel | BasaLe Soppu Sambhar
Homely, rustic and vastly organic. This is the kind of comfort food we grew up eating, often made from easily available farm grown wilds and greens fetched from aunt's estate, grandma's gardens and at times home-grown. I made this dish to bring back fond memories of a part of my childhood spent in the serene small town where convenience to such wild greens was in sheer abundance and was often subjected to lack of appreciation. And so much more to apologize myself for hating this dish through my growing up years. I remember disliking these greens in particular, eating them with puckered brows every time they made an appearance on the table, because my mom never spared cooking even those thick stalks of these creepers every time she lay her hands on them. I have seen dad relish them with relentless penchant. They were probably their favourites, rest assured they were not mine.

But now, it seems like ages since I had a chance to taste BasaLe Soppu or commonly called Malabar Spinach. The Malabar Spinach, also known as Red Vine Spinach grows abundantly in humid weather conditions. It has wide heart shaped leaves with soft-stems that grow into creepers. Despite my dislike for them through my growing up years, I missed them ever since I moved to Bangalore. I have never seen them around here where we live. If someone offered me this dish now, I would probably tag them 'exotic'. As kids, we were told these are healthy and have a great source of nutrition. But it's only now that I have learnt to appreciate those thick stalk-y chews of these wild creepers.

Homegrown BasaLe Soppu

(Pictured above, a lone creeper of Kempu BasaLe Soppu in midst of home-grown mint leaves)

A while ago, I grabbed a budding Malabar Spinach plant from a nursery on our trip back home. A handful of budding leaves on a stalk is all it stood with. Before I could let them grow and spread their wings, my impatience to revive my childhood memories with this dish took control over me and I went on a chopping spree. What remains now is a single barren short stalk that is making its way to climbing, twining, and creeping along another stem. As I patiently watch it grow to nurture new leaves, which will probably take a couple of months, I have a strong sense of excitement of using these home grown leaves in this home styled traditional recipe today. I hope you enjoy them as much as we did.

BasaLe Soppu Kodhel_1


Basale HuLi

INGREDIENTS:

1/2 cup Basale soppu (Malabar spinach / Red Vine Spinach)
1/2 cup togaribeLe / tuvar dal (pigeon peas)
1/2 tsp. turmeric powder
3 tbsp. kottambari beeja (coriander seeds)
10 + 2 Byadagi red chillies
1 tsp. hing (asafoetida)
1 tsp. jeerige (cumin seeds)
1 tbsp. kadale bele (split bengal gram)
1/2 tsp. menthya (fenugreek seeds)
1/2 cup grated raw coconut
Lemon sized tamarind
1 tsp. coconut oil
1 tsp. jaggery
1 tsp. mustard seeds
A sprig of curry leaves
Salt to taste

DIRECTIONS:

Wash and cook the togaribeLe/pigeon peas in pressure cooker along with turmeric till they are soft and mushy.

In a thick bottomed pan, dry-roast the coriander seeds, cumin seeds, methi seeds, split bengal gram, hing with about 7-10 red chillies till they are fragrant. Remove from heat and allow them to cool. Grind them to a fine paste with a handful of grated fresh coconut and tamarind. Set aside.

Wash the Basale leaves, along with their tender stalks. Chop them into small pieces. In a wide mouthed pan, cook the leaves and stalk in some water. As the leaves wilt and the stalks are cooked, add the cooked dal to this along with the freshly ground paste, a cup of water and bring to a rolling boil. Add a tsp. of grated jaggery along with salt to taste. Adjust the consistency of this huLi by adding more water to your taste and preference.

For the seasoning, heat a tsp of coconut oil in a wok. Fry the mustard seeds till they splutter. Add in torn curry leaves, hing and 2 broken red chillies. Fry for 30 sec and turn off the flame. Add this seasoning to the prepared huLi. Serve hot with steaming hot rice.

BasaLe Soppu HuLi_1

HuLi Avalakki

Gojju Avalakki recipe, HuLi Avalakki recipe, Havyaka recipes
I have been busy lately. We’ve had lot of travel on our cards this month and have been really enjoying all of it. Earlier this month, we were off to Goa to celebrate our anniversary. Then we headed to Lucknow last week for my brother-in-law’s wedding. Next week, we'll be off travelling to Chennai to celebrate Diwali with the newly-weds. We are just back from the wedding, beginning to unpack and trying to settle our life into normalcy. After all those pre-nuptial sacraments and wedding ceremonies, the late night partying, lot of gluttony gourmandizing, home coming feels good and we are craving simplicity. Weddings like these bring about gastronomical feast and when it spans over a couple of days, over several meals, you know you’ve had excess of it. Here’s when we are in need of a serious post-holiday diet detox. To settle into something homely and comforting like this one.

Gojju Avalakki


As much as I wish, not on all days do I have the luxury of making a full-fledged breakfast at home. Most weekdays, we hugely depend on office cafeteria for our breakfast due to lack of time to make one, much unlike of what I have grown up being to. Infact back home at my parents place, breakfast was a 3 course affair and it still continues to be. Being the most enjoyable meal of the day, this is when the family comes together seated at the table and grows over healthy conversations. Starting with a coveted cup of morning tea, seldom a biscuit or rusk to accompany, it’s followed by a main course of either idli, dosa, upma, poha, roti subzi or anything solid and nutritious to fill the stomach, and always ends with a variety of fresh cut fruits to wrap the meal. It’s a norm to have homemade pickles, chutney powders, jams, honey, ghee, jaggery syrup within hands reach on the table to accompany our breakfast dish. Between my hectic routine, I may have gone away from those traditions of enjoying daily breakfast leisurely, but on weekends and days where mornings are at my luxury, I ascertain to make a breakfast that is filling and wholesome and boasts of my family traditions.

HuLi Avalakki


Gojju Avalakki, also commonly known as Huli Avalakki is a delicious Karnataka breakfast delicacy made from beaten rice (called as poha / avalakki). I wonder what took me so long to make this breakfast dish at home considering how much I love this dish. This is yet another dish that comes from the realms of our traditional kitchens. A dish that I have grown up eating and evokes strong memories and wonderful nostalgias. My mother made this effortlessly, particularly on special occasions like Shivrathri, Navarathi and Ganesh Chaturthi, where use of onion and garlic are forbidden. It often makes a prominent presence during festivities such as weddings, poojas and Hindu festivals. With a delectable combination of spicy, sour and sweet, this dish is so traditional that you would hardly find them in hotels and restaurants anywhere.

HuLi Avalakki


Gojju Avalakki / HuLi Avalakki

INGREDIENTS

1 cup Beaten rice (called as flattened rice / avalakki / poha – thick variety)
1 tbsp. Thick tamarind pulp
2 tsp. Sambhar powder
1 tbsp. Grated Jaggery
1 tsp. Turmeric Powder
½ cup Grated Coconut
Salt to taste
1 tbsp. Coconut Oil (highly recommended)
1 tsp. Mustard seeds
2 Broken Dry red chillies
1 tbsp. Groundnuts
A Sprig of Curry leaves
A pinch Asafoetida / Hing

DIRECTIONS

Wash the beaten rice / avalakki in a couple of washes of water. Drain off the water and allow the beaten rice to absorb little water retained during washing. It should swell and soften in 15 minutes, yet maintain it's shape and texture. Once softened, add a tsp. of coconut oil (optional, but helps in keeping the avalakki separate), salt to taste and a pinch of turmeric.

As the rice soaks, prepare the gojju / huLi masala for the avalakki. In a small chutney grinder, finely pulse the fresh grated coconut along with thick tamarind pulp, sambhar powder and grated jaggery. Do not add any additional water while grinding. Set aside.

For seasoning, heat a tbsp. of coconut oil in a thick bottomed pan and add mustard seeds. As they begin to crackle add the peanuts. Fry them for few minutes till the peanuts change their color. Add the red chillies, asafoetida / hing powder and fresh curry leaves. Fry further for few seconds. Next add the avalakki to this and mix well. Add in the prepared gojju / huLi masala to the avalakki and gently stir the entire mixture further for a few minutes. You may cover and cook also. However, I like to cook open to ensure there is no excess water trapped that may make the avalakki soggy. When cooked, turn off the fire and serve hot. Gojju Avalakki goes well with yoghurt/curd, chutney powder or plain jaggery.

HuLi Avalakki