I love Indian festivals not just for the traditional, fun moments we have with family and friends, but for the great food each festival has to offer. As kids, we looked forward to those moments of feasting at home. A wide spread platter of food ranging from feisty meals to dessert treats awaited each festival.

Ganesh Chaturthi meant Modaks (kadabu) made by amma just once a year. Yeah, just once and that too on this day alone. Imagine the torture and desperation that makes us wait a year long! Then, Diwali had treats like Karjikai, Shankarpoli, Payasa, etc... Tulsi Pooja made us wait long for the Panchakajjaya. The Til laddu was the most awaited for Sankranti. While at my paternal grandma's place, festival like Navratri mean huge feasting for 9 long days with 20 odd dishes for each day followed very religiously as a mark of respect, tradition and offerings to Goddess.


This tradition is now slowing drifting away from my hands and I am unable to live up to what my parents and grandparents followed, though I try my best to follow when ever I possibly can. It's my hectic work schedules that seizes away at least 10-11 hours of my time at work, the rest for home chores, while I am drained and left with little sleep for the day. It's no excuse, I know. But with posts like these, I am trying to compensate on what I have lost.

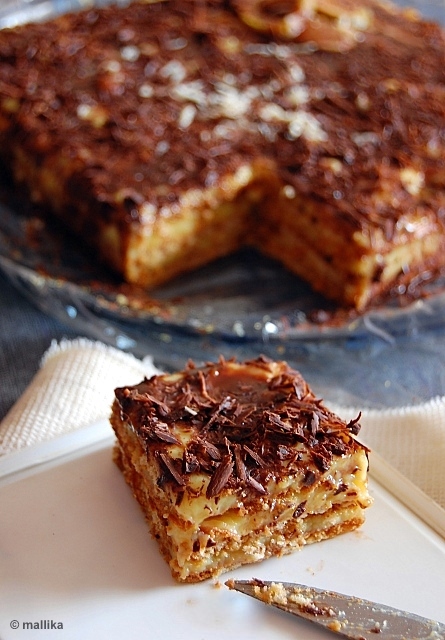
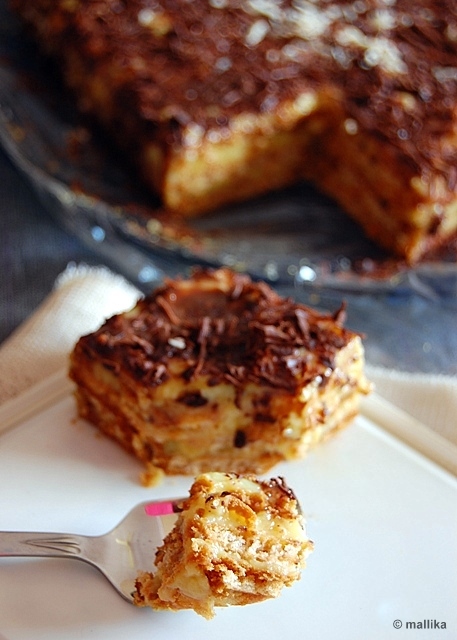
Til laddu is a common traditional recipe for Sankranti, a festival that marks the beginning of Spring or the harvest season. The recipe remains the same, irrespective of the laddus or chikkis. I opted to make these chikkis as they were quicker and easier. Time saving factor, again for ease??? With Ugadi that went by more than 2 months ago or Sankranti about 4 months ago, I do not mind making these again to review those festive spirits again and again. I am here with these simple and traditional Til chikki.


Til Chikki/Sesame Bars

INGREDIENTS

1 cups white sesame (til) seeds
3/4 cup brown sugar
1 tsp cardamom powder
1/2 tsp butter

DIRECTIONS

Roast sesame seeds in a saucepan till they become light brown. Keep them aside.

Grease an inverted stainless steel plate (flat side) and knife.

Heat 1/2 cup brown sugar and butter so that it melts to a syrupy consistency. Allow it to heat up till it comes to a boil. Remove from flame. Add in the white sesame seeds to the syrup and mix.

Immediately transfer this mixture to the greased plate. Using a rolling pin spread the mixture across uniformly. This needs to be done very quickly, else the sugar will start setting up making it difficult later. While it's hot, run a greased knife across it to serrate it into squares or rectangles as preferred.


Traditionally these are made with jaggery. But getting the right consistency is not an easy task, especially if you are a beginner. It needs a little practice to master. My mom and grand-mom mastered that art well. I have a long way to go till I reach that stage! I opted brown sugar which was the closest I could get with jaggery. They still tasted exactly similar. You may use normal white sugar instead of traditional jaggery or brown sugar, which will work excellent. These caramelized nutty bars with delicate flavors of sesame and cardamom will stay for long when stored in air-tight containers.


Have you ever had a never fail recipe? I do! One of my embarrassing moments dates back to days when D invited one of his close friend home for dinner whom I was being introduced for the first time. Cooking was done to the best, Phulkas, Pulao, Palak Paneer, Lauki Kofta, Salads, etc. I did not leave any stone upturned for compliments, as if I was prepared for it!

His friend hailing from Andhra, loved spices to the core. D hadn't briefed me on this prior! I, on the other hand reduced spices (chillies) in my food considerably not knowing his taste. I have personally experienced moments where spicy food has led me to tears, but on being obliged have been compelled to eat! Considering such sympathetic moments with food ;) I decided to cook with lower spice in food that day.


Imagine my dismay as I served the food, this guy struggled to eat :( Being so accustomed to extreme spices, we could literally see him pushing food down this throat! Having put in so much effort in food with care and concern, I was baffled :( Later, my husband did have to take tantrums on not briefing me his tastes! He admits it ;)

To compensate the spice, I quickly whipped up a Potato Raita laden with green chillies (which surely had me in tears!), but was adored by him. I shall share that recipe some other day. As the dinner ended, I gently brought out this Coffee n' Biscuit Pudding Cake, served it with some gooey, warm chocolate over vanilla ice-cream. Pudding Cake was a HIT! Definitely a flattering moment to see them being eaten to hearts content, sought after for more helpings!

I have always had winning moments with these. Promise! It will not let you down. I have made these on infinite number of occasions, never been let down. It is such a simple, easy, no-bake recipe, quick to put together, melt in the mouth feel, great dessert to serve for any kind of a gathering, even for the worst taste-buds!!!


Coffee n' Biscuit Pudding Cake

INGREDIENTS

Prepare the custard:

1 packet vanilla flavored custard
1/2 litre milk
1/2 cup sugar

Layering the cake:

1 pack sweet-salt biscuits (I love to use Krack-Jack always)
1 tbsp coffee liquor or coffee decoction (see the note below)
Dried fruits & Nuts (Raisins, walnuts, cashews, almonds, pistachios)

Topping the cake:

Chocolate sauce
Chocolate shavings

DIRECTIONS

Prepare the vanilla custard following the instructions from the custard pack. Dissolve the custard powder in a little warm milk. Heat rest of the milk to a boil. Add sugar. Add the custard milk. Heat it on low flame till it thickens and is cooked. Stir constantly to prevent from burning. Consistency of the custard should be thick enough to coat the back of a spoon and be able to draw a line. Turn off the flame and allow to cool to just warm.

Line a square cake tin with a layer of cling film with the sides hanging outside the cake tin. Avoid it if you plan to serve the cake directly from the tin in pieces. First, dip the sweet-salt biscuit in warm coffee liquor or decoction for a few seconds. Do not dip the biscuits for long as we don't want the biscuits too soggy. They should retain a light crunch from within. Layer the base of a tin with sweet-salt biscuits dipped in coffee liquor. Avoid liquor if it's not your taste. I avoid liquor and use coffee decoction instead if I am to make this for a gathering. Coffee liquor does make a little difference though. The biscuits will absorbs it. Next, spread a good helping of the prepared custard over this layer.


Repeat with another layer of biscuits dipped in coffee liquor, topped with another layer of vanilla custard. Build about 3-4 layers, not beyond that, as it will not hold shape while serving. Place it in the fridge for few hours (about 4-5 hrs). If you plan to serve it for lunch, prepare it the overnight and let if refrigerate. Remove from the fridge about 5-10 minutes before serving.

Note: If you don't prefer using coffee liquor in your desserts, use coffee decoction instead. To prepare the coffee decoction, bring a cup of water to boil and turn off the flame. Then add a sachet of instant coffee powder to it. Allow it to sit for 5 mins and it's ready to use!

If you or your guest love chocolate, top it with warm chocolate sauce or chocolate shavings, as I did. I used Hershey's chocolate sauce here. Garnish with dry fruits and nuts before serving.


And to complete the story above, the Pudding cake did all the justice to the efforts taken in tedious cooking that day!


I am falling back humbly on a recipe that is close to my roots. I am going back to my basics with this post. After a couple of posts with multi-cuisines, desserts, cookies and cakes, I feel obliged to come back to simple everyday cooking.

I am feeling nostalgic as I write this post today. I have spent a fair part my life in my native where summer heats are clammy and pose the biggest challenge. While different parts of world celebrate various seasons with summers, autumns, spring and monsoons, I crib, it's only this part of the world that has seen only 2 seasons. The oppressive humid summers that last 8 long months and the terrific rains lasting meager 4 months. Unfair. It's no joke. And it's for these summers, tamblis would bring respite in form of food. I wouldn't be doing justice if I do not post this recipe here.

I can't stop smirking when I think of how I would often sneak into kitchen even in the brief absence of my mom to quench my coveted thirst for various delicious tamblis prepared by amma for those sultry afternoon meals. I am no better even today!


Tambli is a much loved, uncooked, coconut blended curry revered in the coastal belts of Karnataka. It's a pleasure to serve this with a helping of steaming hot rice and a drizzle of this cool and soothing yogurt based curry. With simple and very basic few ingredients, this does all the justice for the hot summer days.

Menthe Tambli

INGREDIENTS

1 tsp fenugreek seeds
1 tsp cumin seeds
1 tsp oil
1 tbsp fresh/frozen coconut
1 cup yogurt
3 red chillies
Salt to taste

Seasoning:
1 tsp oil
1/2 tsp mustard seeds
A sprig of curry leaves


DIRECTIONS

Lightly fry the fenugreek seeds, cumin seeds and red chillies till you get the roasted aroma from them. Don't let them brown a lot as they will turn bitter and lose the taste. It takes about a min or two. Cool and grind them with coconut. Lightly beat the yogurt and this paste to it. Tamblis are usually thin and a little runny in consistency. So adjust by adding extra water if required to bring it to thinner consistency. Add salt to taste.

Temper the Tambli by seasoning it well. Heat a tsp of oil in a kadai. Add mustard seeds. As they begin to pop, add in the curry leaves. Let the curry leaves fry for half a minute or less. Pour this seasoning over the Tambli. Serve it cold over steaming hot rice.


My mom adds a tad bit of jaggery to this for that hint of bitter-sweetness. I like to leave that out. Apart from being are excellent coolants in summers, they are good for patients suffering from fever as they are simple and easily digestible. Enjoy this traditional meal with some palya, uppinkai and happala!

I vouch this for one of those ancient recipes that have been passed on from generation to generation, from grandmas to mothers, from mothers to daughters and probably their daughters in future ;). It's one of those kinds which has been preserved, seeing little or no changes.


I must have crossed this place so many times earlier, but never been able to purchase something 'fruitful' really. All owing to the exorbitant costs of imported fruits, I would only glare, probably give a second glance and walk past by it! I recently had a trip again to this place... it's a simple shack-like fruit shop on Brigades that I am referring to.

I am left mused on many of my visits here. More often have I seen a wide variety of fruits arranged in an orderly manner, all tempting to be purchased in a lot. Colored grapes and berries, deep red gleaming apples, bright citrus-y fruits, earthy melons, figs, rosy strawberries, not to forget the kiwis too... it's a pure pleasure to see an assortment of inviting fruits, many of which I may have probably not seen or known. I love to see how these fruits adorn this stall! This time too I was mused. And I had a reason. I picked up some of these. I was all ecstatic to see a box of berries sitting at my favorite counter in this fruit shop.


I picked two packs of it (at a good price of course!) and was curious to know where it came from. Inquisitively, I put the question across to him if they were blackberries. And he nodded saying yes. As I inquired more, I learnt that these were Indian produce and not imported ones. Glad! I would have probably paid double otherwise. I was hunting for some blueberries, but instead got some blackberries :). These were not imported berries, but our own Indian yields from Mahabaleshwar.


As I walked back I knew what to make of it. I was glad I could get hold of these berries which had been grabbing my attention for long now. A little disappointed though, as I have been on lookout for blueberries and haven't been able to get hold of them yet :(. No complaints :). These berries were small, ripe and easily squishy, probably from wild produce. They seemed to rot easily, had I not used them at the earliest. I managed to whip up my longing recipe for Blueberry muffins... ooops, Blackberry muffins ;) Finally! Sigh! I breath relief!!!

I did a frantic search on good recipes for blackberries. On few such searches, I learnt that blackberries are deceptively similar to mulberries. As I did more searches, I discovered what I had at hand was mulberries and not blackberries. I felt a little cheated too. :( Mulberries are commonly grown in Mahabaleshwar along with other produces like strawberries, litchis, apples, etc. I am feeling more confident about making various egg-free versions these days as I have been fairly successful in my recent expeditions with them :D So I have made this recipe egg-free.


Mulberry Muffins

INGREDIENTS

1 cup all-purpose flour (100 gm + 25 gm)
1/3 cup sugar (approx. 45 gm)
1/2 cup fresh mulberries
1/2 tsp baking powder
1/2 tsp baking soda
1/4 cup vegetable oil (35 ml)
3/4 cup low fat milk (90 ml)
1 tbsp dry milk powder (20 gm)
1/2 tsp vanilla extract
A pinch of salt

I prefer cup recommendations any day as to me it is much easier than gram measurements. I like to eyeball my ingredients than actual measurements. That's what makes it 'my' characteristic recipe.

Substitute vegetable oil to butter for a richer tasting muffins. Nothing can beat the richness butter imparts to these baked goods. Butter enhances flavors, unless you want to go low on them for health reasons.


DIRECTIONS

Preheat oven to 180 deg C. Line muffin pan with paper liners.

Sift together flour, sugar, baking powder, soda and salt. Make a well in the center and keep it aside.

Mix a tablespoonful of milk powder to a cup of warm milk. Dissolve well. Add 1 tbsp of plain flour (taken from the cup measurement of flour) to it. Heat it through till it thickens. This is the egg-replacer being used and it worked fantastic in this recipe!

Next mix in the oil and vanilla extract to it. Pour into the dry mixture and mix till just combined. Gently fold in the mulberries. I squished a few for flavors and color. Using a spoon, divide the batter equally into the muffin cups. Bake for 20 to 25 minutes or until a tooth pick inserted comes out clean.


Lightly dust the muffins with some icing sugar and top each muffin with a fresh mulberry fruit. Serve warm!

I am so glad the way these muffins turned out. My dad is a staunch vegetarian and consuming eggs is a big NO-NO for him. The muffins were not too sweet, so my family loved these moist and delicious treats. I got thumbs up from all. Dad relished it the most and that made me happy! I regret, I made very few. I got about 6 large muffins from 1 cup measuring approximately 125 gm. I'm not a big fan of frosting on cupcakes and muffins. I somehow enjoy them as is, especially warm and fresh out of the oven. They're practically bursting with flavors, mild yet significant.


I have confessed this in past how hooked I am to Nigella shows! And that confession is bound to come with a couple of recipes that I picked from hers'. This Rocky Road Bar is one of my favorite pick.

These Rocky Road Bars take me back to our adventurous trip to Goa earlier this year. Late evening in Goa, we headed to the 'Night Market' near Anjuna beach. It left us amazed as we were surprised to see so many foreigners flaunt that place. Almost gave us a feeling that we were in a different country all together. Foreigners selling and buying various stuffs, ranging from art to sculptures, gowns to bikinis, cowboy hats to shoes, handicraft bags to pouches... and many other stuffs.

Food here had cuisines from almost all over the world (disappointed to see mostly non-veg, but I guess the food catered mostly to their needs!). Indian, Mediterranean, Chinese, Japanese, Lebanese, Italian, French, etc, etc, etc. It was here that we first got to enjoy the true chocolatey seduction of Belgium hot chocolate! Our chocolate affair continued with Rocky Road Bars and it was served with scoops of some melted warm Belgium dark chocolate. It was heck of an evening that we had and we would love to go back to this place again.


These Rocky Road Bars had been lingering in my thoughts since long, especially after I last tasted them in Goa. I haven't been able to get good quality marshmallows in Bangalore. So I generally get my pick on trips to hill stations like Ooty, Munnar, Kodaikanal. Our recent trip to Kodaikanal helped me pick up a good batch of homemade marshmallows in a couple of flavors. I got them with an intention of using in a few recipes. But, they were fresh and so good that we almost finished them and there was hardly any left for few recipes, but just 'one lucky' recipe :) And that was saved for these Rocky Road Bars.


Rocky Road Bars

INGREDIENTS

1 1/2 cups best-quality dark chocolate (160g)
1/4 cup + 1 tbsp soft unsalted butter (60g)
1 cup rich tea biscuits (100g)
1/4 cup + 1 tbsp mini marshmallows (60g)
1 tsp icing sugar, to dust

DIRECTIONS

Break the chocolate into pieces for ease in melting. Heat the butter and chocolate in a saucepan over a gentle heat till the chocolate begins to melt. Remove from the heat and stir the melted chocolate well. Scoop out a big dollop (approximately 60 ml) of the melted mixture and set aside in a bowl.

Place the biscuits into a zip lock bag and crush them with a rolling pin until we have some have biscuit crumbs and some bite sized pieces. If you don't manage to get mini marshmallows, then tear the bigger ones to smaller chunks like I did.

Fold the biscuit pieces and crumbs into the melted chocolate mixture in the saucepan, then add the marshmallows.

Transfer the mixture into a square baking tin. Smooth the top with a spatula. Pour over the reserved melted chocolate and smooth the top again. Refrigerate for about two hours or overnight. To serve, cut into square or rectangular fingers and dust with icing sugar.


The original recipe calls for the use of golden syrup, but I skipped it. This recipe itself was too sweet and adding more sweetness would have ruined it's taste. I did not use warm chocolate for topping, but it's a great addition for a party dessert. We thoroughly enjoyed the crisp biscuits dunked in fudgy chocolate, highlighted by the pillow soft marshmallows. Heavenly!

Believe me, these were so good that as chocolatey aromas wafted through, I completely ran out of patience to photograph them. So all you see here is a little left over bit, which is not my way otherwise! This recipe is a keeper for sure and I'll be making more of this in future, least I have the next batch of marshmallows at hand!


Nithu Bala of Nithu's Kitchen tagged me with a "Tag Award". Thanks Nithu. This award comes with set of rules... The rules are,

1. I should pass it on to 7 friends (This is the toughest job for me! Looking out for new bloggers to be felicitated is a challenge for me!!!)
2. I should post a favorite picture/pictures.

I'm passing this award to 7 of my blogger friends,

1. Suma
2. Sarah Naveen
3. Panchpakwan
4. Madhuri
5. SS
6. Pari
7. Tina

I would also like to share 2 of my favorite photographs.


From my collection, I've posted my favorite picture from our trip to Innovative Film City, Bidadi. This is one amazing place where you can spend an entire day with family and friends.


And another one here... Have you ever been with a tiger so close? This was shot at the Tavarekoppa sanctuary, a few kms away from Shimoga, Karnataka. The place plays a host to few tigers, lions, deers and few other animals. We got to see the Tigers and Lions so closely that it was stunning! I have never been this close to a wild animal (Gosh! I am scared to the love of my life!), that we captured every movement of the tigers on our camera.


A traditional Punjabi food would definitely comprise of Parathas without which their menu would remain incomplete. In a week, this would be a compulsive part of the breakfast, lunch or dinner menu. Travel north and you are bound to be greeted with Thelewalas selling hot Parathas on street side. Loaded with ghee and butter, spiced up well, they are a sure to leave your taste buds lingering for more. Yum indeed! The thought itself leaves me tempting and wants me to grab for some right away! Since wheat is primarily grown in Northern part of India, it forms a staple part of their dietary intake.

Mooli Paratha is one of my personal favorites and I love it for the simple mélange of spicy flavors that it creates with each bite. Almost every weekend, we indulge in various types of Parathas. They are always either on our breakfast or lunch menu and sometimes dinner as well. When ever I have dull, weary looking radish lying in the fridge, I make it a point to use them this way. They never go waste this way. Parathas are very filling and a complete meal by themselves. Although the best and the most tastiest parathas are made when they are cooked with lots of oil (may be almost fried!) and then loaded with butter on top before serving, I try to cut down on oil content as much as possible for heath reasons.

I posted this recipe of Mooli paratha last year, but when I made this a couple of days ago, I thought it would be a good idea to share the step-by-step recipe with photos for the same. This is just an attempt here...

Mooli Paratha

Prepare the dough first:

For the dough:
2 cups Wheat flour
Salt To taste
1 cup Water approximately

Add water to the wheat flour and salt and knead to a pliable dough. A trick that makes it easier to knead the dough is by using a fork instead of digging your hand into it. Swirl the dough in the water using the fork till the entire mass comes together roughly. Drizzle a tsp of oil on the dough and your hand. Remove the fork and knead the dough softly using the heal of your hand till it turns to a soft pliable dough. This prevents a lot of the mess while making dough. This has always worked for me and I hope it helps you too. Cover and keep aside for sometime.


For the Paratha stuffing, here's what we need:

3 Mooli (Radish)
1/2 tsp Red chilli powder
1/2 tsp Cumin seeds
1/2 tsp Coriander powder
2 Green chillies, chopped finely
2 tbsp Coriander leaves
1/2 tsp grated ginger
A hint of Amchoor powder (Mango powder)
Salt To Taste

Wash, peel and grate the radish. Add salt to it and leave it aside for 15 minutes. Squeeze and drain all the water. Use this water to knead the dough as it contains the nutrients. Add cumin seeds, coriander powder, red chilli powder, green chillies, ginger, mango powder and coriander leaves and mix well. Add more salt (if needed).


Roll some dough (about 2 lemon sized) into small flat disk using a roller pin. Place 2 tsp of stuffing at the centre, pull the edges up and cover it from all the sides. Flatten it a little and then roll again into a thick, round flat paratha.

Heat a tava/iron griddle and transfer the rolled dough it it. Cook partially on one side and turn it over. Cook partially on the other side now and flip over the paratha. Now drizzle some oil over the paratha and fry the mooli paratha on both sides till it's cooked well and is crispy brown. Serve the mooli paratha hot with pickle and curd.


It's a boon we have channels like Travel and Living and NDTV Good Times. With programs like these aired, the world has become a much smaller place. I have been hooked to these television shows for long now. These shows have showcased vivid cultures, lifestyles, cuisines and food habits from different parts of the world and it's been interesting to learn and pick at least few aspects, if not many.

With programs from Nigella Lawson and Rachael Allan, I long desire to create delectable recipes like they do, with such an ease. In fact, at a point I was so obsessed with Nigella Lawson's decadent cooking that I had the entire cookery series downloaded to my computer. I would always go back to her series just to learn the know-hows of dessert recipes. It's due credit to Nigella shows that instigated me to fantasy making desserts and cakes in my kitchen. Though I wouldn't dare to cook or bake them often, fearing they would choke my arteries way too soon... and I don't intend to die that way! ;)


As a gesture, I ought to share a recipe of her's that I had jotted down in my recipe book not long ago. I saw an episode of Nigella Feasts where she made figs with a lovely yogurt dressing that looked fabulous. I was lucky to have some red wine at hand that we picked on our trip to Goa earlier this year. Even ingredients like figs are not so common in my regular cooking. So this recipe was apt as I saw the show.


I did try looking for the recipe source on Nigella's website, but despite thorough search, couldn't find it. Instead, I found it the recipe on Food Network.

The recipe is fairly simple, yet flavorsome. This is what I term a 'healthy low-cal dessert'.


Figs in Citrus Yogurt Dressing

INGREDIENTS

1 tbsp red wine
1 orange, zested
1 tbsp honey
3/4 cup low-fat yogurt
Pinch of ground cinnamon
2 to 3 ripe figs
2 tsp slivered pistachios, to garnish


DIRECTIONS

Put the red wine, orange zest and honey into a bowl. Whisk in the yogurt and ground cinnamon.

Quarter the figs and divide them between 2 bowls. Pour the yogurt mixture around the figs in each of the bowls and sprinkle with the pistachios to decorate.

The recipe is simple and fuss-free. It can be served as a dip or a healthy dessert or even as an accompaniment with pastas. I loved the tang of wine yogurt against the simple sweetness of figs. Very satisfying.


Have you ever felt elated about bargaining and then ending up purchasing, possibly a few bucks lesser than the tagged price, with a feeling of euphoria while walking out of the shop about having won a battle (huh, with the shopkeeper)??? Admit! I do!!! Even that ephemeral satisfaction is such a joyous feeling, despite being just a transient moment!

I love the Wednesday sales in the nearby stores. I await. I rush. I grab. I bill! Any savings? Again I'm elated! A few lady-like traits that I carry at times ;) One such moment was a week ago when the nearby FoodWorld had their Wednesday sale. A bunch each of Spinach, Mint, Coriander leaves all costing as low as Rs 1. Can I ask for anything better than this? I rushed to the spot to find farm fresh aromatic green leaves piled in stacks on their vegetable counters. I picked few bunches of each and they lasted well over few meals, including breakfast.

One such breakfast affair saw this mildly spiced Mint (Pudina in Hindi) paratha. Simple, healthy and flavorsome, it's a satisfying breakfast for any morning. You may use the same recipe to make Puris too.


Pudina Paratha

INGREDIENTS:

1 bunch Pudina (mint leaves)
1 green chilli
1 tsp salt (or to taste)
2.5 cups wheat flour
1/4 - 1/2 cup water
Wheat flour for dusting
Salt (if you prefer)
1 tsp ghee/clarified butter (if you prefer)

DIRECTIONS:

Wash and clean the mint leaves. Pulse them along with a green chilli to puree in a food processor. Prepare the dough with wheat flour, mint puree, salt, adding little water, till everything comes together to form a soft dough. Knead well and set aside for 30 mins.

Keep some wheat flour aside for dusting the dough while rolling it out. Using the rolling pin, take a large lemon sized dough and roll it out in a circle of about 6 inches. Dust the dough if it sticks to the rolling pin. Once rolled out, place it on the hot iron skillet. Turn it over the moment you see small bubbles forming. Wait another 30 secs to a minute till the other side is partially cooked. Now turn it over again. At this point, drizzle a little butter or clarified butter (ghee) or oil around the sides of the paratha. Flip again and cook the other side too. Remove from the skillet. Brush the roti with ghee or butter for enhanced taste.


P.S. These photographs may not be the best and won't probably do sufficient justice to these parathas, but don't go by looks of it. I had the least patience to capture them on my camera as they were for my breakfast and I am particular about eating them hot!


I wasn't ever a fan of chocolates till I first tasted some sinfully good Lindt Dark chocolates given by my brother-in-law. Prior to this, I hardly purchased chocolates on my own. Of course, a few indulgences in the gifted ones were always sought after. Ever since I tasted the bittersweet dark chocolate, I have been a fan of them. And what I really like about them is the bitter-sweetness, apt for my taste. The real boost for loving these dark beauties came when I started using them in bakes like that of brownies, cakes and their kinds.

Even as I have loved these, I have not been able to adapt well to the tastes of white chocolates. For the uninitiated, white chocolates are not supposedly chocolates, but are of made up of cocoa butter and milk solids with added sugar. White chocolates lack the cocoa flavor, emitting mostly flavors derived from milk solids and cocoa butter. To me, it tastes almost like thick emulsion of milk powder mixed in butter. I love milk, but this kind of chocolate is not my taste.

One of our trips to Brigades saw us picking a 500g bar of white chocolate from Nilgiris, just to make the sibling of these Brownies, called Blondies. My DH has not shown particular inclination in picking any baking ingredients as that bit of shopping is usually left to me. I am not sure what triggered him that day as he asked me to pick a bar of these. It probably reminded him of the fabulous Brownies that he is fond of. Or probably remembered me referring to Blondies in the past while serving him Brownies. Back home, I had to work on these.

I posted this on my blog a few days ago, but withdrew it immediately and it went back to drafts. It was time for Yogurt Panna Cotta then, but I am posting it again today.


Vegan Blondies

INGREDIENTS

200 gm white chocolate
100 gm unsalted butter (use non dairy margarine for vegan option)
100 gm silken tofu
50 gm sugar
50 gm all purpose flour
A pinch of salt
½ tsp vanilla extract
½ tsp baking soda

DIRECTIONS

Melt chocolate with butter in a double boiler over barely simmering water until the white chocolate melts and dissolves with butter. Stir frequently till it is smooth. Set aside for it to cool a little.

Pulse the silken tofu in a food processor, till it's extremely fine and smooth. Add in the rest of the ingredients, like the white chocolate, butter, vanilla extract, the flour and pulse again till the batter is fine and smooth. White chocolate that I had at hand were already sweet, so care for the sugar you use if you are using sweetened white chocolates.

Finally add in the baking soda. I was skeptical if the blondies would get any rise with tofu, so I have used baking soda here. Feel free to skip if you like. Bake for about 30 to 40 minutes at 350 degrees. Test with a toothpick. The top would look like a cake, center may be moist. That's how we want it to be. Do not over-bake the brownies. Remove and cool completely. Cut into squares or rectangles. Serve warm as is.


The blondies turned out great! I admit it's not 100% vegan as I was unable to get vegan white chocolate. Using silken tofu often is not the best feasible option as I still haven't been able to procure local ingredient and I rely on the imported ones. My guess for a good alternative to tofu would be homemade cottage cheese. These warm white chocolate brownies or blondies were surely fudgy and good as our evening snack.


The city is getting hotter and sweltering under heatwave for the past couple of weeks. Mid-days are bad with temperatures soaring as high as 34 deg C. I have considerably reduced on spice in food to relive the heat. Ceiling fan switches have been turned on after a long time and as we are reeling under the heat, we look forward to eating simple meals with low spices and masala. Kitchen affairs are more of salads, simple curries, vegetable stir-fries, soups, yogurt based meals and many of their likes. Though, I seldom make soups, but whenever I do, it's eaten steaming hot, spooned right off from the stove to the mouth! So I have never been able to capture them on my camera.

After a few doses of cookies and desserts, I am introducing soups on my blog for the first time. Bingo! Good way to go. This soup was my choice for the day from an array of soups, salads and desserts, picked from a cookery book by Radha Rao's 'Soups, Salads and Desserts', that don my bookshelf from past few weeks. A Grape Gazpacho. For the uninitiated, Gazpacho are cold soups commonly made with ingredients of bread, olive oil, water and garlic. Tomato Gazpacho are the most commonly known ones, but this one is a Grape Almond Gazpacho. I was curious! Not quite sure how this combination would work out. With grapes, almonds, garlic, olive oil, I was skeptical if it would really come well together!

Since grapes are in season, I thought it was a great idea to give it a try. Sit back and relish a cold soup, the best way to soothe the high temperatures and beat the heat.


Grape Almond Gazpacho

INGREDIENTS

1 cup green seedless grapes
1 cup diced bread pieces
4 large garlic cloves
1/2 cup blanched whole almonds
1 cup water
1 tbsp extra virgin olive oil
1 tbsp vinegar/lime juice
Salt & pepper to taste

DIRECTIONS

Soak whole almonds in warm water for 15 minutes.

Wash and clean the green seedless grapes. Puree them in a blender till they are fine. Collect the pulp and the juice. Place the torn bread pieces in a bowl and pour the grape pulp and juice over it so that it absorbs it.

Combine blanched softened almonds (along with water) and garlic in a food processor. Pulse until nuts are finely ground. Add the bread along with grape juice and blitz again until bread is completely incorporated. Add the vinegar or lemon juice and olive oil and pulse until all is evenly incorporated. Add salt and pepper. Taste and adjust seasoning as preferred.

Transfer the soup to a container and chill for an hour or more. Gazpacho is best served when cold. Pour into soup bowls and garnish with parsley/coriander and pepper. Serve cold.


Even as I was pouring the soups to their respective soup bowls, I sipped and enjoyed quite a lot of it directly from the jug! It was good enough not to last long! The soup has higher tones of garlic which I thoroughly loved. But, reduce a few garlic cloves if that's not your liking. I served these with bread croutons to complete the soup.

It's a simple aromatic soup made of juicy sweet grapes and nutty almonds, spiced with hints of garlic and pepper. Cool and soothing for a nice sunny day.


I am sending this over to Nithubala's event "Think Beyond the Usual - Fruits".