Pesto, need I say what it means to me? Having been a lover for Italian food, I'm sure there should be no second thought that I love pesto. But strangely that wasn't how it started a few years ago when we first tasted it. Well, it was a love hate relationship that we started with. We did not really give into liking it till recently we acquired a taste for the famed pesto.


For a while we despised pesto or even the word of it. Probably, because I never made it the authentic way. My experiments with dill, coriander and other greens, except basil were not received well. I gave up for a while, feeling incredibly guilty about not tackling it and getting such a simple straight forward recipe right. So I stuck by other pasta recipes that were appealing our palate. Then recently we had it at our coveted Italian restaurant, Toscano and that's really when we took liking to it. The pesto sauce served with an assortment of breads had us a convert. It's chunky texture, mild flavour, fresh and oh-so-delicious when we smeared it on bread and even paired them with spaghetti had us love it thoroughly.


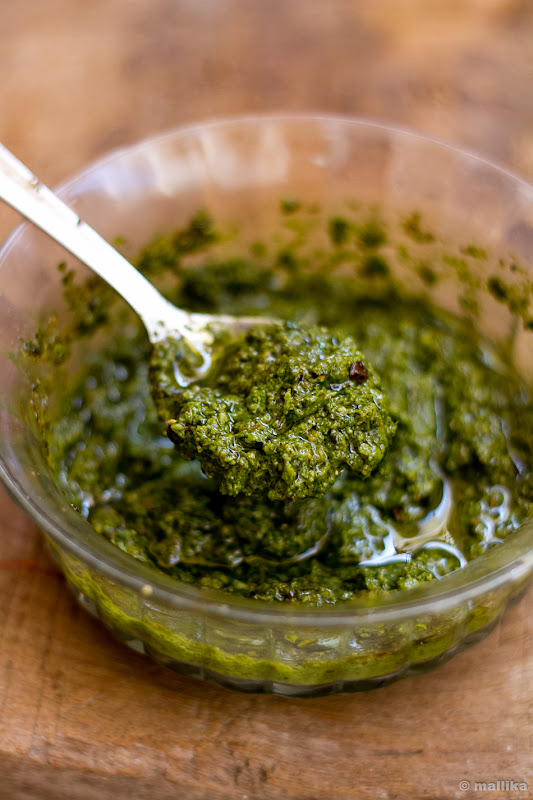
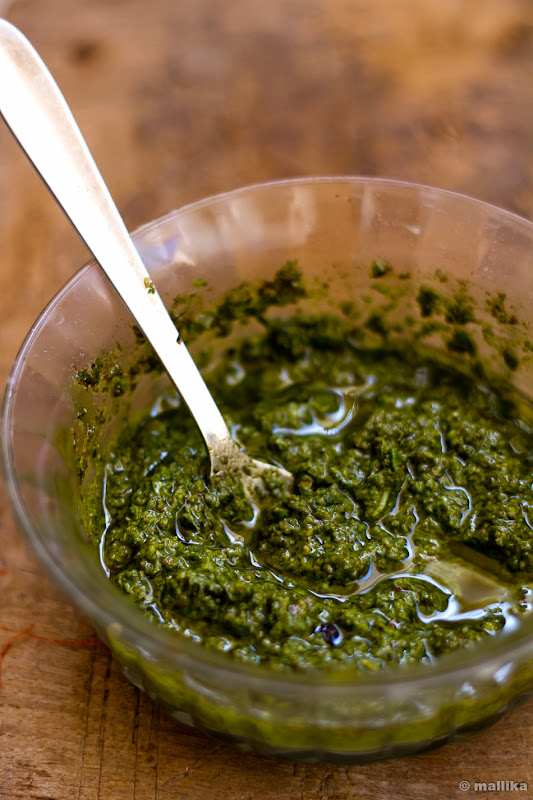
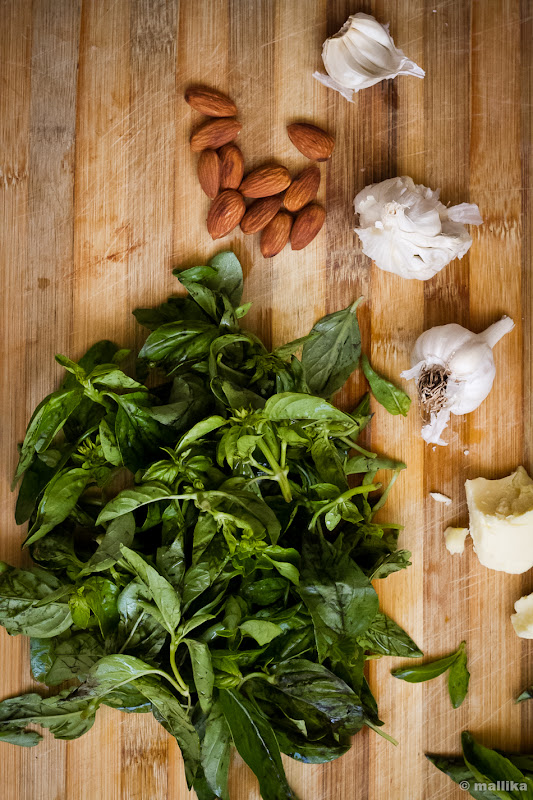
The core ingredients that make up a good pesto sauce are basil, pine nuts, garlic and olive oil. These days, getting basil in a supermarket here is not a worry, but then they are not always fresh. Hence the basil I used here are home grown in a pot, so that makes this recipe fresh and all the more appealing. Pine nuts are something I have never seen or tasted. A quick google search said walnuts or almonds make an equally good substitute. Far from fetching pine nuts here, I settled for almonds as an alternative, something that I always have a stock of. So, these were made, we relished it with simple garlic spaghetti and they tasted close to the original stuff we had the week earlier.


Basil Almond Pesto

Inspired by BBC GoodFood Magazine

INGREDIENTS

50g roasted almonds
A large bunch of basil
50g Parmesan (I used mozarella instead)
150 ml olive oil, plus extra if storing
2 garlic cloves

METHOD

Put all the above mentioned ingredients into a food processor and process until slightly chunky. Season liberally with salt and pepper. Pour the pesto into a jar and cover with a little extra oil, then seal and store in the fridge. It's known that the pesto will keep well in fridge for up to two weeks, although I recommend using them fresh.


Vegan version:

To make the recipe vegan, use vegan cheese or skip cheese altogether.


2nd February 2013: It was quite a relaxed Sunday. I plonked myself on my deep brown and black shaded sofa, threw my legs up on the aged teak coffee table that adorns my living and sat there gazing at a bunch of my favourite magazine collection from BBC GoodFood. The past one year has seen me as an ardent lover of their series and my subscription was due for closure. In the morning the courier guy had just hand delivered my last copy and I kept pondering if I should renew them or stick on to the 12 magazines I had at hand. They lay there in absolute desire to be flipped over again and again and as I made myself comfortable with a cup of coffee, I couldn't hold my fondness for them any longer and I flipped them all over again. I was lost and in love again.


And like it often happens, as I read through them, admire the photographs and get critical, flipping recipes over, I do not realize how I have lost on time. Admit, I spend a lot of my time, often quite futile over these cookbooks. Because it happens frequently that I take more than hours to pin down a recipe that I actually wish to recreate in my kitchen. Again I'm lost. I simply don’t feel guilty either.

So this Sunday wasn't any different. I dreamt of making a savoury, flipped over a couple of recipes and couple of magazines too. Pulao was done, the vegetable stew busy brewing up on the stove, so cooking was almost over. How about a salad I think. I flip over pages. I scan my pantry for those cheeses and herbs. I realize soon I need to stock them. I hunt for desserts instead to make my Sunday worthy. I flip over to the last page and there the beautiful raspberry brownies hold my utmost attention. I know what I have been looking for. Finally! I rush to my kitchen, pull my kitchen scales out, do a quick melt of butter in the microwave and stir all things good to bake these dark beauties.


So these brownies were made, ditto the way the magazine said, measuring out ingredients carefully by their weight, replacing the raspberries for some dried cranberries. I suggest you make them and you’ll know yourself how good they are. They are deep, fudgy and chocolatey with beautiful fruity bites from cranberries. A bit of cheating in your diet is all okay. So forget your fears, pick up a slice and devour them happily to your hearts content.


Cranberry Dark Chocolate Brownies

Inspired by Best-ever Chocolate & Raspberry Brownies from BBC GoodFood magazine

150 gm dark chocolate broken into chunks
125 gm salted butter
200 gm soft brown sugar
2 large eggs
70 gm plain flour
25 gm cocoa powder
100 gm cranberries (I’ve used Ocean Spray here)

Heat the oven to 180 deg C. Line a baking dish with baking paper. Put the chocolate, sugar and butter in a pan and gently melt, stirring well with a wooden spoon. Remove from the heat.

Stir in the eggs one by one, into the chocolate mixture. Sieve the flour and the cocoa and stir in. add in half the cranberries and scape the batter into the tray. Then scatter the remaining cranberries over the top of the batter. Bake for 30 minutes or 5 more minutes if you prefer a firmer texture. Cool before slicing and store in air tight containers for up to 3 days.


Tucked into our mom’s saree pallu, our little hands twirled into hers, carrying jute bags that we could fit ourselves in, we would often accompany our mom to do the weekly grocery shopping. Tip toeing into the busy streets of the weekly vegetable market, the lookout was always for the freshest of the produce they had to offer. The street side vendors, some on carts and others lining the pavements would sit with heaps of greens, fruits, vegetables and other kitchen staples, often calling us out loudly in the best of their voices, inviting the passing buyers with their heaps of sale. Quite a chaotic scene if I had to recall, where the street vendors would literally pull us into bargaining till we gave in, and even as one got busy perusing the vegetables and fruits, the neighbouring vegetable vendor would try to drag the buyer into his attention. Negotiating for a handful of free curry leaves or a bunch of coriander leaves was a common affair and that brought profound happiness to our hearts. And in odd occasions where the vendor refused to be considerate, mom would grump on her way back, complaining she would never go back to him again.


Those memories of market hopping and raasta shopping will stay with us for long. Shopping was quite a stimulating affair we loved. Yet it came with its rules of pros and cons. Bargaining was the tool and while it brought some joy, somewhere it would leave us dissatisfied with a sinking feeling that probably the vendor down the street sold better produce at lower prices than we bought. Then there were ploys with the traditional weighing scales, with the vegetables often weighing lesser than they should. While most of the fruits and vegetables were picked from the weekly vegetable market, we would heavily depend on the nearby kiraana shops for other kitchen staples, which meant another trip to the kiraana store.

For long now, since the supermarket culture and online shopping trends kicked in, I moved out to a more comfortable zone of shopping in a supermarket where I get my entire pantry staples at a single place. For the modern day working woman like me, it saves me time, energy and more importantly the hassle of weighing and bargaining. I ensure I pick my vegetables and pantry staples, but at times get the luxury of home deliveries too and that’s a bonus. I get to know their manufacturing date, their expiries and the ingredients. More importantly I like to return the product if I am dissatisfied.


Some time ago, I got hooked to online shopping. My first camera was bought online more than 10 years ago. Ever since then I bought several things online and got hooked to it. I browse online shopping websites very often, sometimes out of seriousness to buy, at times out of curiosity, or even to kill boredom. My husband and net savvy dad too appreciate this culture. They’ve bought electronics, tees, books, gifts, sports gears and many other stuffs online. I like the fact you save on time and effort when you need things on demand and its home delivered for free. Then there are sites like Cuponation that give crazy discounts on the products you would buy in market at higher rates and that’s really a bargain.


I wonder how many of you know, but I thought this would interest many. Cuponation has a broad collection of coupon codes with deals and offers from top online retailers like Flipkart, eBay.in, FabFurnish, Future bazaar, Jabong, Naaptol, Myntra, Home shop 18, Pepperfry and many more. I have bought several items from these retailers in the past, however ever since I got to know of Cuponation, I like using their coupons to get those added discounts on my purchases. I am eyeing at some kitchen cutleries and bakewares and these discount coupons will just be perfect. I am excited and hope you’ll too!


For times while you spend surfing the net, buying online or just couching in front of the television, these ginger lime pops will give you a perfect company. Tart, tangy, a spicy gingery twist with hint of cardamom, does that ring bells to you? Yes, its our very own nimbu sherbet in pops.

Ginger Lime Pops

INGREDIENTS

2 large limes
3 cups of water
1/2 cup sugar
1 tsp. cardamom powder
1 tsp. ginger paste

DIRECTIONS

Squeeze lime juice out of the 2 limes. Snip off the lime zest for some intense lemony flavor.

Stir the sugar in water till completely dissolved. Extract juice from ginger. Alternatively, you may also use ginger powder. Add in ginger, cardamom powder, lime zest along with the freshly squeezed lime
juice to the prepared sugary water and stir well.

Pour into pop moulds and freeze overnight or for at least 5-6 hours till set. Enjoy!

Note:

Check for sugar and adjust according to your taste. You may replace with honey if you like. These lime pops are a little tart, so reduce if you like a milder taste.


I studied much in an all girls’ high school, so I don’t remember knowing Valentine’s day then. There was no excitement but life as usual like any other day. College life although had a different story to say. Valentine day was about the excitement to dress smart, an anxiety to get sneaky looks from boys, may be a couple of roses, candies and teddies too. Red was a too bold colour to wear, so it stayed away for the day. All were dressed their best for the day, yet they made it look modest, atleast not to be dragged into peppy conversations by friends. There were hopes for those red roses, seeking male attention, for chits of proposals that came through those less known common friends, an ice-breaker conversation, probably a plea to join for a coffee in a coffee shop, and like I said it was an odd anxiety and hushed excitement. Those were the days in college.

Later, life at workplace was a much serious affair. There was a spirit to celebrate the love day, but in a festive way. The fun committee organized entertaining events to promote healthy relationship among peers. There were red roses on every bay, floating balloon hearts across cubicles and team building activities to build rapport. We were encouraged to dress in red, but essentially it did not really mean about love or being in love. It was about anyone whom you cared for and could be your Valentine. I loved that spirit. I respected it and enjoyed it through.


My husband and I hardly got time to celebrate the Valentine’s day ever. We never went out for candle lit dinners, throw parties or the big bashes. We dream about it, but then we are working couples with little time at hand. We exchange no gifts, just hugs and kisses. Instead we sit down and enjoy a home cooked meal together. He cares for me, so he lets me to dig into my favourite dessert for the dinner just that evening, and we relish it together. Over the years, my meaning for love and lust has changed by leaps. Today, it’s about trust and support, of care and affection, of expressing less by words and more in actions, of being faithful and sympathetic. My considerations have changed, because it’s about being selfless and sensitive. It’s a beautiful feeling, and is meaningful by nature. Love is magical. The greatest joy comes from our little daughter, who is a gift of God given to us by the virtue of that bonding and togetherness. She brings life into us, she paints it vivid, makes it worthy to live, and she ties our bonds for a lifetime. Life is short, I like to live it sweet. So why waste even a day that’s dedicated for a purpose?


My menu is sketched. I’ll have some Ginger Lime Pops for my daughter to bite into, that will keep her busy. These Pan Roasted Fiery Balsamic Carrots will make it quick and perfect for the weekday dinner table. And I’ll serve them with some fresh spaghettis and some homemade pesto. I am still dreaming of what dessert I can make. But certainly I would love to pair it with a dollop of Classic Vanilla Ice cream. I think this will make it perfect.

Lay your table, set your glasses, pour the wine, don your apron and get set to whirl up your kitchen this Valentine day. Have a fabulous day with your loved ones and don’t forget to express that you care for them.


Pan Roasted Fiery Balsamic Carrots

INGREDIENTS

3 Carrots, medium sized
1 tsp. Olive oil
2-3 cloves Garlic chopped
2 tbsp. Balsamic Vinegar
1 tsp. Brown Sugar
1 tsp. Red chilli flakes
Salt to taste

DIRECTIONS

Wash the carrots thoroughly and chop them to ½ inch fingers. Blanch them in boiling hot water for 2 minutes. Remove them and shock them in cold water.

Heat oil in a pan and sauté the chopped garlic till they sweat. Next add in the balsamic vinegar and sauté till it reduces to half. Add the blanched carrots, followed by the brown sugar and red chilli flakes. Stir fry for a couple of minutes on medium high flame till the balsamic sauce glazes all the carrots well. I like to smoke the carrots a bit by tilting the pan close to the fire and letting them burn tad bit. They almost taste like grilled. Finally season with salt and herbs, if preferred.

I hold high esteem for the old school thought of sun-drying vegetables and fruits for prolonged life. I do consider its fabulous, no doubts. After all we Indians aren't novice to this technique. We've done it for ages. Our grandmas did it and our moms took over. The art of making crisp happalas (papads) and sandiges came down to us through traditions and we've enjoyed them endlessly on several occasions, meals and dinners. But, heck this technology is luring. Like, I've never thought of making sun-dried tomatoes at home, and if you ask, I would probably never give it a try. Slaving over them for weeks, what if that only means keeping a keen check on the tomatoes as they slowly get kissed by the sun to age into crisp-crimson-red tart, all that seems enticing, but is quite an effort I like to rule out for now.

So, I headed over for the alternatives. The oven called out to me. Replicating the same stuff in my oven resonated my thoughts. But again, that meant couple of hours of drying in the oven too. Back while in college, my semester project work had seen me working on ‘Drying Characteristics of Garlic’ where I did a study on ‘Industrial analysis of Tray Drying and Microwave Drying methods’ using some scientific laws, exponential terms and thermodynamics, none of which I can recall now. That study however told us that up to 88-90% energy, power and time could be saved with microwave drying and that was interesting. Back then too, beyond all those calculations, I enjoyed peeling the cloves, chopping and inhaling the pungent aromas of the drying cloves, their analysis, textures and tastes. See, how I had a foodie blood running in me, that had me food associated with my project work too! As an engineering student, I was no way associated to home science, yet I managed to fit that in! :)

On the same lines, I went ahead and made a really small batch with just 3 tomatoes, just for trial, least I may not have to discard the whole lot in fits of a disaster. Glad I gave this a try. They may not be the best, not exactly the sun-kissed kinds, but pretty much close. You dunk them in the goodness of garlicky olive oil, herbs and spices and they just resonate the original stuff.

One of the mistakes I did probably was to chop them to fine rounds. They seeped out a lot of water and once dehydrated they thinned down a lot and got glued to the plate. Instead, I suggest you chop to halves and place them on the chopped side down. Microwave them one side for couple of minutes and then turn them around and microwave further till dehydrated. That way they will remain firm pieces, unlike mine that ended in strands. Nevertheless, for a trial they were good. These tart beauties are instant and can add that concentrated sweet sour flavor to your salads, pizza, dips or even breads and last long.

Homemade Sun-Dried Tomatoes (Off the Sun, in a microwave)

INGREDIENTS

3 large tomatoes
A few pinches salt & pepper
Couple of pinches of oregano seasoning
1 clove garlic, crushed (optional)
1/2 cup olive oil (optional)

DIRECTIONS

Wash and clean the tomatoes and chop them into halves. Scoop out the flesh using a slotted spoon and place them in a microwave proof flat dish, cut side down. Brush each cut piece with some olive oil and microwave on high for about 3-4 on one side. Flip the tomatoes over and microwave again for another 3-4 minutes. The tomatoes will leave out a lot of water. Take care and keep a keen eye so that they do not burn. Continue to microwave each side till the tomatoes wilt and become dry.

In a small pan, heat some olive oil and fry the garlic till they leave out flavors to the oil. Once they are brown, remove them from the oil and discard. Add in the oregano seasoning, salt and pepper to taste. In a bowl, place the dried tomato flakes and pour the garlicky olive oil. Season further if required. Use in dips, sauces, salads and pizzas as preferred.

Rava Idli with Vegetable Sagu

How to make Rava Idli with Vegetable Sagu | Vegetable Sagu Recipe
Traversing through my old posts recently, which in a way I don’t do too often, strangely it felt odd for me to read of what I had written. Some made me laugh, some made me travel down the memory lane, some errors I fixed, some I felt proud of, I suppose it’s an anomalous sensation to read your own stuff. Some photographs made me think I should change, like the Marshmallows and S’mores, especially the ones I shot at night. Then as I dug deeper to my old, unheeded posts of 2009s, I thought they needed a makeover. Maybe sometime in future, when I recreate the same recipe and shoot again, I shall update them here. Or probably I’ll leave them that way and they’ll remind me how much I have evolved over the years in blogging.

You know I should hold on to penning down too much. Over the past couple of weeks, my posts, the write ups, have been spanning too long. I promise it’s not intentional. I like to write, to put my thoughts in words and do hope you enjoy reading them as much I love sharing my thoughts on food and memories with you.

Rava Idli


Having said that, I promise to keep this one short and savoury. Basically a spiced, savoury, breakfast semolina cake. This Rava Idli, is a common Karnataka breakfast dish and most loved by all of us at home. It repeats itself almost every week. Not the kinds we get at a restaurant, that’s dense, heavy and feels stodgy with one slice, but instant, light and the kinds you want to indulge in more than just one. Pair it with chutney or serve this with vegetable sagu like it’s done traditionally, this one will send you taste buds whirring for more. Whoosh, you can’t help but love it!


Rava Idli

1 cup regular yogurt (not thick, Greek yogurt kinds)
1 cup semolina (sooji rava)
2 tbsp. oil
1 tsp. mustard seeds
1-2 green chillies
1 sprig curry leaves
1 tsp. Channa dal
1 tbsp. broken cashew nuts
1 tsp. baking soda (or an unflavoured fruit salt, like Eno)
Salt to taste

Mix a cup of semolina in cup yogurt and set aside for 10 minutes. If using thick store-bought yogurt, then thin it down by adding water. I've used regular skimmed milk homemade yogurt here. While the batter is resting, prepare the tadka. Heat the oil in a small frying pan. Add in the mustard seeds, channa dal, cashew nuts, curry leaves and heat till the mustard seeds begin to splutter. Turn off the flame and add this to the semolina, yogurt mixture. Whisk well. Add chopped green chillies and salt to taste. Finally add in the baking soda (or a sachet of fruit salt, if using), give the entire batter a quick, good whisk. The batter should be thick, similar to idli or cake batter. Transfer the batter to an oiled cake tin. If you have idli moulds, its best to use them. However you don’t own idli moulds, use regular cake tin for this purpose.

Heat a steamer / rice cooker. Place these moulds in the steamer and cook for 15-20 mins. Alternatively you can microwave it on high power for 4-5 minutes, till skewer inserted comes out clean. Slice and serve hot with any chutney of your choice or with vegetable sagu as available commonly in restaurants.


Mixed Vegetable Sagu

Mixed vegetable sagu is a popular Karnataka dish, typically served in Bangalore restaurants. It’s spicy and goes well with puris, dosas, aappam, and even rice. For best results, ensure that the vegetables are cooked just right – they should neither be crunchy nor too mushy, just the right bite.

INGREDIENTS

For The Masala Paste

2 to 3 green chillies, roughly chopped
4-5 peppercorns
2 tsp. coriander powder
1/2 tsp. cumin seeds
1/2” stick cinnamon
2 cloves
3-4 garlic cloves (optional)
4 tbsp. freshly grated coconut
1 handful of cilantro

Other Ingredients

1 tbsp. oil
1 tsp. mustard seeds
A pinch of asafoetida
A sprig of curry leaves
1 large onions, finely chopped
2 cups chopped mixed vegetables (potato, carrots, beans, capsicum, cauliflower green peas)
Salt to taste

DIRECTIONS

To make the masala paste, grind all the ingredients mentioned under masala, adding little water to a thick, fine paste. Keep aside.

Next, heat oil in a wide mouthed frying pan and add the mustard seeds. When the seeds begin to splutter, add asafoetida and torn curry leaves, and sauté well on a medium flame. Add the onions and sauté on a medium flame, while stirring continuously till they turn translucent. Add the mixed vegetables, salt and 1¼ cups of water, mix well and cover and cook on a medium flame for 12 to 15 minutes till the vegetables are tender, stirring in between. Add the prepared masala paste, mix gently and simmer for another 5 minutes. Serve hot with Rava Idli.


I eat bread with not much favor to it. It's something I like to reserve as a last option. It wasn't until I began baking some at home did I really take much liking to it. Even as a kid I did not enjoy it much. At home, Sundays meant the day to relax and unwind and that meant some time off from cooking for mom too and that's when bread for our breakfast was a usual affair. We had many Sundays with bread sandwich for our breakfast. Saying that I do not rule out that homemade bread is indeed fresh and tasty.


Although one of the ways I did enjoy bread was in form of this Masala Bread Upma that was spiced well and tasted delicious. I often frowned at the sight of bread loaves served with butter or jam, but the moment it was converted to this upma, I would relish bowls full of these and go for the second and third helpings too. The base of the kadhai had crumbs of crusty bread stuck to it and that tasted heavenly. I have memories of scraping it off, not sparing the spatula too, relishing every bit of the last spiced crumb! Well, I still do it till date. :) Hope you too love this recipe as much as I do.


Masala Bread Upma

INGREDIENTS

6 Bread slices
1 tbsp. vegetable oil
1 tsp. mustard seeds
1 tsp. red chilli powder
1 tsp. turmeric powder
1 onion, finely chopped
1 large tomato, diced
1 green chilli
2 tsp. peanuts
1 sprig of curry leaves
Coriander leaves to garnish, optional
Salt and lime to taste

DIRECTIONS

Stack the bread pieces on top of each other and dice them through using a knife. Tear them into 1 inch cubes. Else tear them roughly using your fingers, crumbling them through into uneven pieces.

Heat oil in a pan and fry the mustard seeds. Once they splutter, add in the curry leaves, the chopped onions and peanuts. Fry them on medium high flame till the onions turn slightly brown in colour. Add the chopped green chillies, turmeric powder, chilli powder and fry further for a minute. Add the diced bread pieces and stir them well gently. Fry for a couple of more minutes stirring till all the masala has coated the bread pieces well. Finally add in the diced tomatoes and season with salt to taste. Fry further more for 2 minutes. Remove from flame and add a dash of freshly squeezed lime juice to taste. Serve hot.


I made this quite a while ago but I don't know why I had been procrastinating on this one. It just sat in the corner of my drafts and though every time I thought of posting it other recipes caught my attention. I finally decided to put this recipe here, least I forget and it goes into hiding.

A while ago I had posted the recipe for a quick instant evening snack, Corn & Mint GuLiappa along with which I served this lip smacking peanut chutney powder. I promised then that I would share this recipe with you in the following post, but that didn't happen. So here it comes. This recipe is quite simple and comes from my mom and hope you too love it the way we do. It goes well with dosas, idlis and other breakfast dishes, as well pairs well with steaming hot rice and dollop of ghee.


Peanut Chutney Powder

INGREDIENTS

1 cup peanuts
2 tsp. red chilli powder
3-4 cloves of garlic
1 tiny piece of tamarind
Salt to taste

DIRECTIONS

Dry roast the peanuts along with cloves of garlic on a medium low flame till the skin turns to a darker color and the garlic is dry (has no moisture left). Let it to cool for a few minutes. Using the palms of your hand or placing peanuts between two towels, rub them to remove the skin. Grind the roasted peanuts, the roasted garlic along with chilli powder, tamarind and salt to taste till its powdered. You can leave tiny flecks of peanuts in there if you want a slight crunch. I prefer to grind it to a fine powder and serve it with a dollop of fresh ghee. Use as is or serve with ghee or dahi.


Just as I mentioned on my previous post on how life is like being a toddler's mom, I received an email from Sagarika, Madisons asking if I was open to do product reviews. Last year I was unable to be a part of some blogger events and give justice to product reviews that came into my mailbox since other priorities took up that space. However, this year began on a good note with a product review for newly launched Gone Mad – Choco Sticks that hit the market stands recently.

I received a pack of 24 Gone Mad Choco Sticks in a neatly wrapped card case promising the goodness of fudgy chocolate filling beneath a layer of thin wafer. The reason I took up to this review was because this wasn't the first time I had tasted Gone Mad Choco Sticks. My previous trip to my local supermarket saw me picking up this Cigar shaped choco stick, indeed to dress up a dessert and I loved it instantly. There are several brands and kinds of Choco sticks and wafer chocolates in the market, but this is one had me smitten. I do say that it's indeed the best I have had in recent times and if I had to really describe, it's sort of a crisp bite into a thin wafer that envelops a nice chocolatey-fudgy-brownie-kinda tasting filling. And that's delicious and addictive.


Garuda PolyFlex Foods Pvt Ltd has made a recent entrant into the wafer category with its Gone Mad Choco Sticks, and with the kind of catchy, chocolatey wrapping, a delicious piece of chocolate stick tagged at a decent price of Rs.5/- per piece it is sure to steal the show in chocolate segment of the market and make it popular especially among the kids. I handed a couple of these to my family and my friends and they surely enjoyed these bars.

On a flip side, I certainly think Garuda foods may need to work a bit on their individual packaging. These Choco Sticks are great no doubt, but if you go for their singles priced at Rs. 5/-, they crumble a lot and that too quite easily. The singles are quite fragile. If you buy the package of 24 sticks then you are saved, but if you go for their singles, you'll find most of the wafers crumbling and off the chocolate filling, mainly due to human touch and feel of the product before the purchase. And I saw that as problem even with the packaged ones.

Yet saying this I don't mean to demean these choco sticks. I do think the entire box of choco sticks can make up for a good picnic munching with your friends or a travel companion to beat those hunger pangs. They can be great birthday party treats or even a part of return gifts that most kids would love munching into. They can be used to dress a dessert which is quite what I did here. I made a quick Chunky Monkey Supreme Ice cream and topped it with Gone Mad Choco Sticks instead of chocolate chunks. They are delicious. There will be couple of more recipes that I intend to use these little addictive bars, but till then I do hope you enjoy these bars in this healthy, simple and delicious Quick Gone Mad Chunky Monkey Ice cream, a recreation of my Chunky Monkey Ice cream I made in the past.


Gone Mad Chunky Monkey Supreme

INGREDIENTS

2 bananas, peeled, chopped and frozen (I used yelakki bananas here)
1 Go Mad Choco Stick, crumbled
A tablespoon of honey (optional)
1 tsp. milk masala powder (make one at home with roughly powdered almonds, pistachios, saffron and cardamom)
Roasted and chopped nuts (almonds and pistachios)
1 Go Mad Choco Stick, broken to half, to garnish

DIRECTIONS

Place frozen bananas in your food processor. A tablespoon of honey is optional, you can add it if you like your ice cream sweet. Pulse until its mashed well and comes to consistency of ice cream. If you have difficulty while churning the frozen bananas, or if banana isn't binding, try adding 1-2 tbsp. non-dairy milk or wait for a minute or so to defrost slightly and then churn. Scoop out a ball of soft serve into a serving bowl. In a martini glass, crumble the go made choco sticks, top it with the banana ice cream and then spread generous pinches of milk masala powder, roasted and chopped nuts and garnish with more Go Mad Choco Sticks. Serve immediately.


So what do you think is life like for a toddler mom food blogger? Fun, thrilling, stressful, exciting, uncertain, adventurous, tough, entertaining, or may be all of these??? Interesting! Let me give you a glimpse of me as a food blogger.

Just about 2 days ago I decided Sankranthi, the festival for harvest is here and I need to have a post signifying it for the 14th. I rustle up my calculations and cross upon Huggi, a traditional Havyaka household dish, and an apt one that can make it right for the day and the festival. Perfect, I think.

So to be able to post it a day in advance that will benefit my readers, I decide I will cook the recipe a day before, photograph them and publish here. I almost put things together, when I simply get a feeling that I am cheating. Would that justify me celebrating the festival? It made more sense to cook them the first thing in the morning of the festival while my family is around, finish the pooja, offer God and relish them fresh. So I push the entire thought of cooking Huggi for the day of Sankranthi, in a hope I will be able to quickly grab some clicks and post them here, hopefully the same morning. Hopelessly, that rarely happens!


The morning of Sankranthi dawns and the baths are over. I head over to the kitchen to make both versions of Huggi, the sweet and the spicy one, both equally delicious and my favourites too. My cooking is done on time, pooja is over, little one is to be fed and I am to decide if the oggarne/tadka needs to be added then or saved for the photographs. A tic-tac-toe and I add a part of the oggarne/tadka, saving some of it for the grace. I almost finish feeding my hungry toddler, put her to play in my kitchen and keep a keen check on her from the corner of my eye. Often she hangs around me for my attention, so a huge effort goes into distracting her with piles of kitchen utensils and cutleries to amuse her. By now my kitchen is in a huge mess with utensils, dolls and toys lying on the floor and on counters too. Adding to this, hazaar utensils lay around to be cleared and washed. I clear a part of these to make some space for the props to be fitted into the existing clutter, as obvious to make my dish look a little appealing. By now my little toddler begins to get anxious, seeking my consideration to play with her, so she's up on the kitchen counter, least I can keep her busy with my constant talks and her plays. I begin to place up my props, lay the dishes, top the garnishes, neat my background, foot the tripod and almost begin to shoot when a tiny hand hovers over to dish, pulling the props, the background and at times the camera lens too! Again, in an attempt to distract, I hand over unforeseen kitchen items for her to play. Her hands go deep into the jar of my precious ghee, the onion and garlics are off their peels, things helter-skelter and a glass or two ends up cracking on the floor. Though by now she is bored and there comes the shrill cry, more mess and my woe! Then there are agony moments when my garnish ends up in a mess, spoons are thrown into the dish, splattering on to the table cloth and I throw up my hands in anguish! Did I say life of a blogger mom was stressful? Phew!


I come back to square one of laying things on the dining table instead, let her on her foot to play, hand over a spoon and bag of chickpeas for her to fiddle with, foot the tripod and almost begin to shoot a photograph or two when my little one spills over all the chickpeas, gives up on them instantly and hovers over to tripod, attempts a climb, almost tumbling over it. I tip toe over the scattered chickpeas, just managing to balance the falling camera on a single foot and my toddler on another! Again, I give up, shove aside the tripod and shoot by hand with a few shaky shots and some good angles. Did I say life of a blogger mom was adventurous? True!

Okay, so by now I somehow manage a few shots here and there and then sit down to processing the files, generally when my baby is off to her sleep. And today she decides not to sleep. I sit her till the noon, simply hoping I can make through this post today! She's off to sleep and I sit to blog about it, my thoughts are totally empty. Heck! Where do I start? Every blogger's foe, that blogger's block! I try to start, then just let it go. Instead I manage to do my processing and editing. Of the hazaar photos I click randomly I short-list to the chosen few. By then my little one is awake. Here I go off again, almost being sure this will have to wait another day, may be next year too...??? Yeah, I did say life of a blogger mom was uncertain.

With all that said and done, I finally have my post here, though not exactly on time as I would have preferred it earlier in the day. I sat at a stretch, almost 3 hours and managed to crack a good long write up too! And as it gets published, its fun and exciting. As the comments pour in, it gets entertaining too :) That's life being a food blogger and toddler's mom too!


Sihi Huggi

INGREDIENTS

1/2 cup moong daal
1 cup rice
3 cups milk
1 cup water
2 tbsp. clarified butter / ghee
1 1/2 - 2 cups sugar or jaggery (adjust as per taste)
1-2 cardamom pods, crushed
A handful cashew nuts & raisins
A pinch of saffron

DIRECTIONS

Wash and clean the moong daal and rice and keep it aside for about 10 minutes. In a pressure cooker, add the moong daal, the washed rice. Cook them in 2 cups of milk and 1 cup of water to 3 whistles. If you do not have a pressure cooker at hand, use a regular cooking pan and cook the daal and rice till they turn soft and mushy. Once cooled, lightly mash them using the back of the ladle once cooked. Add the sugar to taste and adjust the thickness of the huggi by adding remaining milk, if necessary. Add in the saffron and stir well. Heat it till it comes to a boil. I've used sugar here since I ran out of jaggery, but I suggest you try the jaggery version as it tastes great too!

Next, heat three tbsp. of ghee in a wide mouthed pan. Add cashews and fry till they turn golden brown. Switch of the flame and quickly toss in the raisins and cardamoms. Allow them to plump in the heat. Garnish the prepared sihi huggi with the fried cashews and raisins and serve hot.


Khara Huggi

INGREDIENTS

1/2 cup moong daal
1 cup rice
2 tbsp. clarified butter / ghee
1 tsp. turmeric powder
1 tsp. cumin seeds
1 tsp. chopped ginger
2 chopped green chillies
1 tsp. whole & broken peppercorns
A sprig of curry leaves
Salt to taste
A handful cashew nuts

DIRECTIONS

Wash and clean the moong daal and rice and keep it aside for about 10 minutes. In a pressure cooker, add the moong daal, the washed rice along with chopped ginger and green chillies. Cook them in sufficient water (about twice to three times the quantity of rice and dal) to 3 whistles. If you do not have a pressure cooker at hand, use a regular cooking pan and cook the daal and rice till they turn soft and mushy. Once cooled, lightly mash them using the back of the ladle once cooked. Add turmeric and salt to taste. Adjust water to your desired thickness as necessary.

Next, for the oggarne, heat three tbsp. of ghee in a kadai. Add the cumin seeds. When the cumin seeds turn fragrant, add torn curry leaves, the whole and broken pepper and cashew in the ghee till the cashews turn golden brown. Garnish the prepared huggi with this oggarne and top with more roasted cashews before serving.

Wishing you all a Happy Sankranthi this season!