My sweet tooth never lets me live in peace. It let's me down way too often. I hate to admit that I love anything and everything that is sweet and has sugar. I know the fact that it is not so nice on the body. Despite all possible attempts at keeping me at bay from sweet meats by my near and dear ones, I sneak way too often with no resistance to my temptation to grab few on almost daily basis. Honestly, I go through a guilt feel. But my weakness wins over most of the times. All my attempts at trying to stay away from them have gone in vain. I have been trying real hard, cautiously, but no go.

Every time, I enter the kitchen with a thought to make a dessert, I have a mind that strongly disagrees to it, but a heart that never approves. This is how the conversation goes...

Heart: Shall I... ?
Mind: No, that's not for you...
Heart: Please!!!
Mind: You know it's not good for you...
Heart: I know... hmm... but it's not for me... it's for him (my hubby)...
Mind: It's always for him... but you eat them most...
Heart: I know, that was last time... not this time I swear!
Mind: Hmm... ok, go ahead
Heart: Yippie!!!

And the heart wins always...


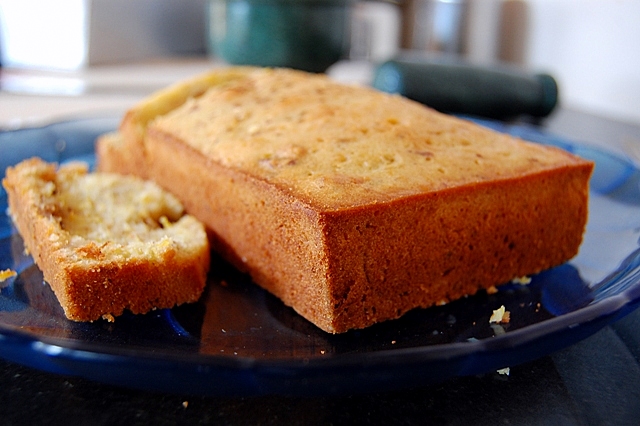
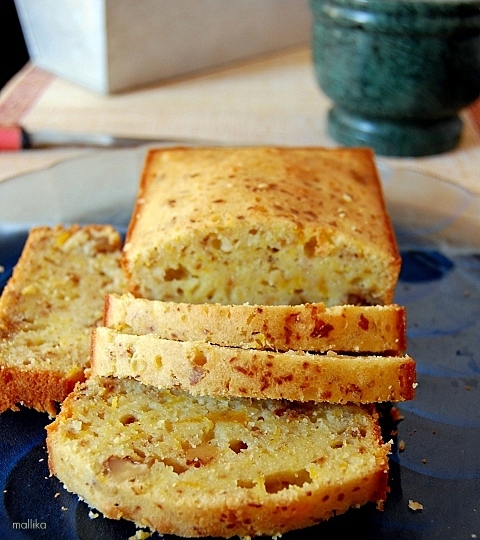
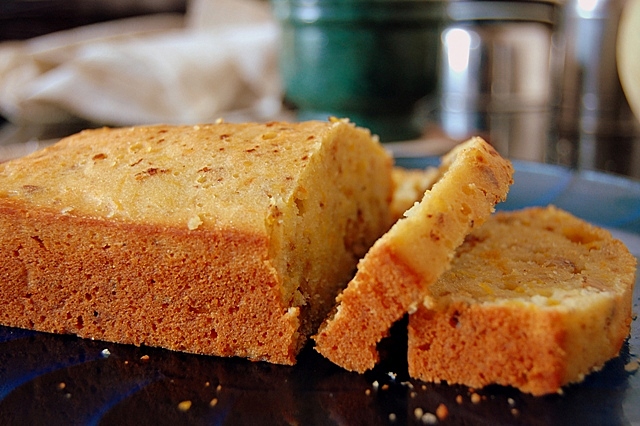
I was recently in the same situation. My hubby was out on a trip and I had some free time at hand. I had Chiroti on my mind for long. In fact, I wanted to make these for Diwali, but somehow couldn't make them then. I made these recently in his absence. They were really good. I probably would require more mastery in making these, but for the first attempt they came out really well.


Chiroti

INGREDIENTS

2 tbsp semolina/chiroti rava
2 cups all purpose flour/maida
1 cup water
1/4 tsp salt
1 tsp cardamom powder/elaichi

1 tbsp all purpose flour/maida
Ghee for greasing

Oil/Ghee for frying
1 cup finely powdered sugar


DIRECTIONS

Make a dough by mixing semolina, flour, cardamom powder, salt and water. Add more flour if it's too soft. Make it pliable. Leave it to rest for 10 minutes.

Meanwhile keep the icing sugar (finely powdered sugar) ready.

Roll out the dough flat using a rolling pin, similar to a nice long roti. Grease this with ghee/butter all over evenly. Next spread all purpose flour on this. Now, starting from one end, gently roll this (like cinnamon rolls) till the other ends meet. Using a knife, cut into 1/2 inch rolls. Dust some flour and roll these to small disks. These will help us in forming a nice multi-layered dough almost similar to a pastry dough.

Now, heat ghee/oil in a frying pan. Let it heat up well. Drop each chiroti to the oil at a time. Fry them on low flame gently till they turn golden brown. When done, remove from oil on to a kitchen towel. Then lay them on a plate and gently spread a generous dose of icing sugar so that they coat them well.

Another option is to drop these fried chirotis to thick sugar syrup. However, they need to be consumed soon and may not last as long as the one coated with powdered sugar. They also taste equally heavenly. These treats are often seen as desserts in our marriages and we relish them a lot. Bite into one of these and you will notice multi-layered thin crispies which you are sure to relish with each bite. Bet you, you can't stop at one!


I am not an ardent lover of pumpkins, but I do enjoy them once in a while. I have mostly relished them only in form of Indian curries. Coming to think of pumpkins in bread or desserts was beyond my imagination. This is primarily because of me thinking of pumpkins only as another vegetable.

As I peeped into my fridge yesterday, I saw half a pumpkin lying pale and dreary, as if it was almost nearing it's end of life. I sympathized with them. So I had to be quick to decide how I could use them effectively. I knew that these would make no justice if I were to use them in a curry. Probably a soup, but no, I was not in a mood.

My mum has often suggested me to try Banana Walnut bread/cake, but honestly I couldn't get a chance. So when I brought out this pumpkin from the fridge, the first thing that crossed my mind was to make a bread or cake out of it. The recipe for Pumpkin Walnut bread was not any different. Just that the eggs were added in for the texture and rise. This also has mild spices which mellow well with the gently sweetness of the pumpkins while the walnuts add the required nuttiness to the cake.

As the bread was baking, it filled the entire house with the aroma. We could see our neighbors' poke their noses out just to smell the fresh bake... just kidding ;) ! As my parents visited us that day, the moment they stepped in, they were too tempted to have this even while it was baking. That's the power of baking!

When the warm bread came out of the oven, I handed a slice of it to my hubby for taste. His expressions spoke a thousand words. "Wow! wow! wow! is what he had to say! Soon the other pieces were also grabbed and these disappeared real soon. They were really good indeed.


Pumpkin Walnut Bread

Dry Ingredients:

1 cup grated pumpkin
2 cups all purpose flour
1/2 tsp salt
1/2 tsp cinnamon
1/4 nutmeg
1/4 tsp ginger powder
1/4 tsp baking powder
1/2 cup brown sugar
1/2 cup sugar

Wet Ingredients:

1/2 cup buttermilk
1 teaspoon vanilla extract
2 eggs
1/4 cup vegetable oil/butter


Preheat the oven to 350 degrees. Lightly coat a loaf pan with melted butter. In a large mixing bowl, whisk together the flour, salt, cinnamon, ginger, nutmeg powders and baking soda. Keep this dry mixture aside.

In another bowl, whisk together the eggs and sugars till they turn pale yellow. Add the buttermilk and then the grated pumpkin. Next, add the vegetable oil and vanilla extract. Blend these well.

Add the wet ingredients to the dry ingredients. Blend them gently. Stir in the walnuts. Transfer the prepared batter into a greased loaf pan and even the top. Bake for about 55 to 60 mins till a knife inserted into the center comes out clean. Remove and set it on the rack to cool. Slice the bread as required.


Mine tasted great, it was perfect. The sweet and spice complimented each other very well. The ginger hinted an earthy flavor, not overpowering at all. The vanilla was at it's best as it blended well with all the spices and gave out really well. I would definitely go back to making this one again and again in future. This one turned a bit moist. But the next time, I would probably increase the quantity of flour a little to make this a little denser. I want to be sure it's slightly dry and crumbly in texture than moist.

Good for breakfast, amazing as desserts and fabulous as tea time snack too. This is sure to be a crowd pleaser!


Sometimes, some of the best things in life are just to relax and pamper the self at home. Plunge into the couch, grab a cushion, read a book with a soothing good music playing in the background... they can give so much happiness than anything else. It can transform a low spirit to a happy heart. And along with this, a good partner to chit chat with and enjoy a nice lemonade or a slush or even a hot cup of tea! Wow! Why can't I do this everyday? I wish I could! Our hectic lifestyle leaves us with little time to spend moments like these, but this is something which I thoroughly enjoy and would love to do whenever possible.

This is exactly what I did this weekend. Relax and revive! Adding to this, it was fun as I got back to my artistic skills of painting after a long time. My skills had almost scraped away and got rusted as I hadn't got to sketching or painting for a very long time. Now after a year or more, and after constant push by my hubby, I thought I had to revive my passion again and that's exactly what I did.


On the food side, I made a Smoothie from Cantaloupe or what we commonly call as Musk Melon in India. This round melon with a netted, often ridged rind and aromatic orange flesh is an excellent coolant and will surpass any other smoothie drink on a bright sunny day. Strangely, I am not really fond of this as a fruit by itself. But I thoroughly enjoy it in fruit salads, milkshakes, as an ice cream, or simply mashed with a little honey or sugar. The brilliant flavors of cardamom add to the distinctive taste.


Cantaloupe/Musk Melon Smoothie

INGREDIENTS

1 Cantaloupe/Musk Melon, cut to pieces
A little ice cold milk/cream
1 tbsp sugar or to taste
1 pod cardamom, freshly ground

DIRECTIONS

Wash and remove the skin of the melon fruit. Scoop the seeds out and cut into pieces. Blend the cut melon pieces with little chilled milk/cream and sugar till it's well pureed. Musk Melon has a mild and melt in mouth taste. When blended it becomes smooth.

Add a little freshly ground cardamom powder and serve in glasses. Add a little more cardamom powder for garnishing. Enjoy this refreshing drink.


For the summer fast approaching, the days getting hotter. With the onset of summer here, I am sending this coolant drink to Madhuri of Cook-Curry Nook who is hosting an event, Summer Soothers I: ‘Juices, Shakes, Smoothies' for this month.


I have been fairly successful in my attempts at making bread. They taste equally as good as the bakery bought ones, so I am happy. I also don't find a too tedious task making them at home. However, baking them for as long as 50 mins to an hour is a real test to my patience.

It has been fun baking bread at home, but honestly, I don't often make them. I find Indian breads more quicker as they need no fermentation time. However, when I do find time, I enjoy making them. I wish I could make them more often. I had a small batch of homemade dried herbs which I had prepared a few weeks ago. I use them often in Italian seasoning and salads. They go very well on toasted garlic bread. So I decided to use them on my bread. These were primarily dried Rosemary. I made these over the weekend and they were really good. These tasted fresh and heavenly when warm. The next day, we toasted leftovers with garlic butter and relished it with strawberry compote. They were good enough to make my day!


Sesame Rosemary Bread

To prepare the bread:

5-10 gm dry yeast
1 tsp of Sugar
1 cup warm water
1 cup wheat flour
1 cup all purpose flour
1 tbsp Olive oil
Salt to taste

Dissolve dry yeast in warm water with sugar. Leave for 5-10 mins to dissolve and become frothy. Next mix the wheat flour and all purpose flour with salt to taste. Add in the yeast, water and oil till a soft pliable dough is formed. Cover with a warm towel or cling film and leave it to rest overnight in a warm place.

Prepare the dressing:

1 tsp Olive oil
1 tsp dried herbs or Rosemary leaves finely chopped
1 tsp Sesame seeds

Heat some olive oil in a pan. As it gets hot, add in the rosemary leaves and sesame seeds and take it off the flame immediately. Allow to rest overnight so that the flavors infuse well.


Next morning, the dough would have risen and doubled in size. Grease and dust the bread tin. Transfer the dough gently to the baking dish. Gently dimple the bread with Sesame Rosemary oil and allow to rest there for about an hour.

Pre-heat the oven to 180 degrees C. Bake the bread for 50 mins to an hour till the top looks crusty and brown. Remove from the oven and allow to cool on the rack for sometime. Slice them as preferred. This compliments well with steaming hot soup and can go great on a rainy or cold day.


I dislike my fridge being loaded with tit-bits of this and that and when I do often find them mortifying in some corner of the fridge it brings agony to my face. You see, I cook food sufficient to be consumed and finished in maximum of two meals. I dislike eating the same the third time. This leaves me with more work, more of chopping, cooking and cleaning, but at the end the meal is more satisfying. Atleast, I know I enjoy every bit and bite of it :) Considering that I do often have leftovers of many raw vegetables in my fridge often. My best way to use common vegetables like carrot, beans, capsicum, peas, etc is by pairing them with sweet corn cobs. They couple very well with these veggies and add subtle sweetness to this dish. And to go a bit off track with the regular garnish of coriander leaves, I opted for dill leaves which doubly enhanced the flavors.


Mixed Vegetable Curry

INGREDIENTS

1 medium carrot
10 beans
1 medium capsicum
150 gm sweet corn kernels
1 onion
1 potato
1 tsp grated ginger
1 tomato
1 tsp oil
1 tsp cumin
1 tsp red chilli powder
Salt to taste


DIRECTIONS

Wash and chop all the vegetables to medium to small bite sized pieces. Heat oil in a pan. Let the cumin splutter. Add onion and grated ginger. Fry till the onions are translucent. Add potatoes and fry next. Once they are partially cooked, add tomatoes and stir for sometime. Next add carrots and beans. Allow to cook for 2-3 mins on medium heat. Then the capsicum and sweet corn kernels. Add the salt and chilli powder and cover with lid and allow to cook for a few mins. Check for the vegetables to be just cooked. Once done add in finely chopped dill leaves and remove from the stove. Transfer to the serving dish and garnish with dill leaves. Serve hot with phulkas or rice.

Wasn't that simple and an easy!


As kids, I remember we often hosted dinner parties at home. It would either be dinner parties hosted at home or get-together at a company club house. Parties would be hosted by dad's bosses or colleagues or by us. These parties were quite common at our home.

They meant bouts of excitement and preparations, from discussions over menu to preparations and stocking of ingredients, from bringing out the best crockery sets to laying the table cloth, from circulating the drinks and snacks to arranging the buffet table, from serving food to ending with desserts, every bit of it would incite us. It meant chirpy laughs, giggles over talks, hearty jokes over home cooked food posed to liven up the evening.

This brings back my memories on how amma's food would be loved and appreciated in these gatherings for the care she took in cooking, dressing and decorating them and finally coax to eat beyond they could! One of her mastery was over Koftas and they were always a hit among all. I tried recreating that magic in my kitchen recently. They were simply too good! My hubby dislikes lauki and when I served him these koftas, he wasn't aware of what went into it's main ingredients ;) As he was indulging in these, he quaintly asked me what it was made of. When I replied that lauki went into it, he was zapped! He never expected that lauki could taste this good! I think I managed to change his resentment towards bottle-gourd since then.


Lauki ka kofta

INGREDIENTS

1 medium sized lauki/bottle-gourd
1/4 cup besan/chickpea flour
2 medium sized onions
2 tomatoes pureed
1 tsp ginger garlic paste
1 tbsp oil
2 tsp Kashmiri mirchi powder
2 tsp dhaniya/coriander powder
2 tsp jeera/cumin powder
1 tsp garam masala
2 elaichi/cardamoms
2 laung/cloves
1 dalchini/cinnamon stick
2 green chillies
2 tsp of malai/cream
Salt to taste
Few almonds and cashews soaked in warm water for 15 mins
Coriander leaves to garnish


DIRECTIONS

Prepare the kofta:

Wash and clean the lauki/bottle-gourd. Grate it. Squeeze as much water as possible out of lauki. Save it aside as it can be added later in the gravy. Add the chickpea flour, little ginger garlic paste, 1/2 tsp red chilli powder, 1 tsp of coriander cumin powder and salt. Mix well and shape into lemon sized balls. Flatten them if you like. Deep fry the koftas to golden brown over medium high flame. Keep the koftas aside so that it can be added to the gravy as required at the time of serving.

For the gravy:

Pulse the green chillies, onions, cloves, cinnamon, cardamoms, almonds and cashews in a mixer to a fine paste. In a pan, heat the oil. Add the ground paste and fry for few mins. Next add the tomato puree and fry for some more time till the oil floats. Add the dry masalas like the cumin coriander powder, garam masala, red chilli powder and fry for some more time. Add a cup of water and adjust the thickness of the gravy depending on you taste. Once the gravy comes to a boil, simmer it for about 5 mins and allow the flavors to blend well. Finally add in the fresh cream. At the time of serving, arrange the koftas in a serving dish and dress it with the prepared gravy on top of these koftas. Garnish with fresh coriander leaves and serve it hot.


I served mine with hot parathas.


Another dessert to satisfy my sweet tooth! During our recent trip to Munnar, we picked up a good batch of homemade dark chocolates. We have almost finished most of it, but before it could get completely over, I wanted to save some for my favorites brownies. I recently picked up a pack of good walnut kernels from the nearby store and they were crisp, crunchy and absolutely fantastic. I have always loved dried fruits and nuts and they have been on my list of 'must-have' in kitchen. They add flavors to the dish and make it really rich.

My previous attempt at making Best cocoa brownies were a good success. They were gooey, fudgy and loved by all. However, they were made using cocoa and not dark chocolates. This time since I had dark chocolates at hand, I didn't want to miss an opportunity to make walnut brownies. I must admit that these brownies were more rich in flavors, fugdy and deep chocolatey. Walnut added a great crunch and complimented the chocolatey fudge very well. My only regret, I wish I had made a larger batch of these as they disappeared the day they came out of the oven! They went perfectly well with our evening tea.


Chocolate Walnut Brownies

INGREDIENTS

200 gm bittersweet dark chocolate
100 gm unsalted butter
225 gm cup sugar
A pinch of salt
2 large eggs
150g plain flour
½ tsp vanilla extract
A handful of chopped walnuts


DIRECTIONS

Melt chocolate with butter in a double boiler over barely simmering water until the chocolate melts and dissolves with butter. Stir frequently till it is smooth. Set aside for it to cool a little.

In a glass mixing bowl, add the eggs and sugar. Beat well till it turns pale yellow. Add the vanilla and a pinch of salt. Fold again. Next, stir in the chocolate butter mixture. The batter will look thick and shiny now. Then add the flour and blend everything well. Add in the nuts finally. Line the baking tin with parchment paper or aluminum foil. Spread evenly on a baking tin.

Bake for about 30 to 40 minutes at 350 degrees. Test with a toothpick. The top would look like a cake, center may be moist. That's how we want it to be. Do not over-bake the brownie. Remove and cool completely. Cut into squares or rectangles. Serve warm as is or as brownie fudge with hot chocolate sauce and ice-cream.


Firstly, let me wish all a Happy Diwali and a prosperous new year. May this Diwali brings loads of love and happiness in every home. Welcome Diwali and it is time for all Hindus to buy new clothes, gold, vehicles, etc. Diwali preparations begin a month ahead of the festival and the joy in doing things together binds most families with love and happiness that they share during this festival season.

Most of the shops are filled with people flocking to buy stuffs for Diwali. Streets are lined with people selling diyas, flowers and crackers for the festival. Homes are cleaned, diyas and kandeels brought out, are cleaned and hung, sweets and savories are stocked for guests who visit, crackers are collected for the day, sms messages and phone calls with wishes are sent to everyone. Evenings are spent in lighting diyas and busting crackers. No doubts from kids to adults, from old to young this is one festival which all look forward to.

I love making Diwali a special occasion every year... after all it comes just once a year! This year I had plans to make Chiroti, but I just couldn't make it due to time constraint. However, I did make Sabudana Kheer or Sabakki Payasa as we call in Kannada. It was the first time I tried this one and I admit I was skeptical about it turning out right. Sago needs to be handled with care else it will turn out mushy and can ruin the entire dish. Luckily for me it came out just right.


Sabudana Kheer/Sago Pudding

INGREDIENTS

1 cup sago, washed and soaked for 15 mins
2 cups water
1/2 lt milk (approx 2 cups)
1 cup sugar
A pinch of cardamom powder
1/4 cup chopped nuts (cashews/almonds/raisins)
A pinch of saffron


DIRECTIONS

Wash and soak sago in minimal water for 15 mins. Bring 2 cups of water to boil and add the sago to it. Boil till the sago just begins to swell. Switch off the flame. It should be partially cooked so that we can cook it further in milk. Bring milk to a boil and add sugar. Adjust sugar according to taste. Then add the par cooked sago to it. Cook further for 10 minutes. It may look thick, don't worry. You can adjust with milk later.

Rub a few strands of saffron in warm milk. Saffron gives a nice flavor to the dessert. Add them to the kheer. Add cardamom powder and chopped nuts and serve warm.

Enjoy this kheer with your family and friends. Once again, wishing you all a Happy and a safe Diwali!


I am just back from a short holiday and it was so much relaxing to take this leave as we desperately needed a break from work. We needed this break badly as it's been a year since we hadn't taken any. I am back to work in high spirits!

As a continuation to my previous post for Khaman Dhokla, I am posting the recipe for Khatti Meethi Chutney with tamarind and dates. Amma makes this often at home and I am inspired to learn from her. This is one of the simplest and the easiest methods to make and can be used in many other savories, like chats and dips. It calls for no fuss, no cook recipe and can be done in minutes.

I prefer the use of dates due to it's natural sweetness instead of sugar. Dates have a great taste and sweetness that can be easily substituted for sugar. Apart from that, it's also to derive the health benefits from it as it is rich in iron content. This fruit is affluent in natural fibers, sugar, proteins as well as many essential vitamins. So here it goes.

Khatti Meethi Chutney

INGREDIENTS

1/2 cup of dates
1/4 cup thick tamarind pulp
1/2 tsp garam masala
1 tsp chilly powder
Salt to taste
A little water


For tempering:

1 tsp oil
1 tsp mustard seeds
1 tsp cumin seeds
Few broken red chillies
A sprig of curry leaves

DIRECTIONS

Just put all the ingredients to a mixer and pulse them till they become a thick paste. Add water to adjust the consistency. It's good enough to consume this way, but tempering would enhance the flavors further. So heat some oil in a pan, add mustard, cumin seeds, broken red chillies and curry leaves. Fry them for a min and then add to the prepared chutney/dip. It's ready to serve!

The ones that are commonly used in chats or in street foods are made by heating tamarind pulp with sugar and spices till it comes to a slightly thick consistency. It stays for a longer duration. However, as I mentioned this is a quicker and healthier version, this one has a shorter life span and needs to be consumed in a day or two. It will also require refrigeration if it is not consumed in a day.


I am inspired a lot by my amma's cooking. I think most of us are. Somehow or the other our cooking is influenced by the way our mums' cook. The tastes, the ingredients, particularly the spices, all in a way do have an effect. I think we are all brought up in a significant manner and lifestyle which varies from one household to the other. Our food and taste buds are accustomed to particular spices.

Back home, amma is a little low on spices. She makes sure that the food is tasty, healthy, appealing to taste buds, not overly hot or spicy and happily eaten by all... from kids to elders. It is always a mélange of spices, sweet, salt and tang. After marriage, I was greeted into a family who loved spice and oil. I think my mother in law consumes a litre of oil in one week, which would otherwise last a month at amma's place! Though I love spice, I take pleasure in indulging in it once a while, but despise eating everyday. I like it light and easy on the tummy.

My cooking is a mix of both cultures. These days, my husband understands the health benefits of medium spice and appreciates it well. I make sure it's just rightly spiced and low in oil, so that it can cater to health benefits.

Over this weekend, I made this Khaman Dhokla. I have made this one couple of times earlier and was loved by my hubby and his parents as well. It is mildly sweet which caters to my nibbles, has enough spices that caters to their likings well. Khaman Dhokla dressed well with tadka and served with accompaniments like Khatti Meethi Chutney and Pudina Chutney can leave your mouth tangling and craving for some more.


Khaman Dhokla

INGREDIENTS

For Dhokla:

1 cup Besan / Chickpea flour
2 tbsp Rava/ Semolina
1 sachet Eno fruit salt
1 tsp Sugar
Salt to taste
A pinch of Hing/Asafeotida
A pinch of turmeric
1 tbsp oil
1/2 cup water / buttermilk

DIRECTIONS

Make a dry mix of all the ingredients in the list from 1 to 7. Finally add in the oil and the buttermilk and mix well to avoid the lumps. Next transfer to a clean greased plate (1 1/2 inch in height) and place it in cooker. Ensure enough space is let in the vessel for the dhokla to rise in height during the cooking process. Cook without weights on medium-low for 15-20 mins till done. Insert a fork to test. It should come out clean, else cook for some more time. Once done, allow to cool a little so that the dhokla can be removed easily.


Next give a good tadka to the prepared Dhokla. For the Tadka here's what we need:

1 tsp oil
1 tsp mustard seeds
A sprig of curry leaves
2 chopped chillies in rounds
1 tbsp water
1 tsp sugar
1 tsp lime juice

For the tadka, heat the oil in a tempering pan. As the oil heats, add mustard. Next add curry leaves and green chillies. As they splutted add sugar and water. Finally add lime juice and turn off the gas immediately. Allow the dhokla to cool a little. Then add this tadka on top of the dhokla. Dhoklas are soft and fluffy and will absorb the water. This gives a nice moistness to it. Cut into sqaures and serve. Serve this with Khatti Meethi Chutney and Pudina Chutney. This also serves a great snack at a high tea!